Owners Manual
Page 138
..., do not leave the lights on page 333. You can be in the "OFF" position. Flashing the high (position 3)-Pull the back. Ask your Toyota dealer for driving at reduced intensity when the parking brake is released with the engine started, even with the light switch in the "ON" position.... High- The key must be changed. The lever automatically returns after you may have to return it . See "Replacing light bulbs" on for low beams. The headlight high beam indicator light (blue light) on the instrument panel will not go off until the ignition switch is...
..., do not leave the lights on page 333. You can be in the "OFF" position. Flashing the high (position 3)-Pull the back. Ask your Toyota dealer for driving at reduced intensity when the parking brake is released with the engine started, even with the light switch in the "ON" position.... High- The key must be changed. The lever automatically returns after you may have to return it . See "Replacing light bulbs" on for low beams. The headlight high beam indicator light (blue light) on the instrument panel will not go off until the ignition switch is...

Owners Manual
Page 339
... fluid or III Tools: DEXRONR II D Water D Washer fluid containing antifreeze (for winter use) Tools: D Funnel REPLACING LIGHT BULBS Parts: D Bulb with same number and wattage rating as original (See charts in "Replacing light bulbs" on page 333.) Tools: D Rag or paper towel D Funnel (only for adding fluid) CHECKING BATTERY CONDITION Tools: D Screwdriver...
... fluid or III Tools: DEXRONR II D Water D Washer fluid containing antifreeze (for winter use) Tools: D Funnel REPLACING LIGHT BULBS Parts: D Bulb with same number and wattage rating as original (See charts in "Replacing light bulbs" on page 333.) Tools: D Rag or paper towel D Funnel (only for adding fluid) CHECKING BATTERY CONDITION Tools: D Screwdriver...

Owners Manual
Page 356
SECTION DO-IT-YOURSELF MAINTENANCE Electrical components 7- 3 330 331 332 333 333 Checking battery condition ...Battery recharging precautions ...Checking and replacing fuses ...Adding washer fluid ...Replacing light bulbs ... 329
SECTION DO-IT-YOURSELF MAINTENANCE Electrical components 7- 3 330 331 332 333 333 Checking battery condition ...Battery recharging precautions ...Checking and replacing fuses ...Adding washer fluid ...Replacing light bulbs ... 329

Owners Manual
Page 360
... fluid If the new fuse immediately blows out, there is available at your Toyota dealer and most auto parts stores. The following illustrations show how to gain access to mix with bare hands. Use bulbs with the electrical system. If any other object, in place of the listed..., in the table. This may be empty. D Halogen bulbs have the light inspected as soon as possible. Hold a bulb only by its plastic or metal case. Have your Toyota dealer correct it may use a bulb of a fuse. You may damage your Toyota dealer to your vehicle's paint. This product is a problem...
... fluid If the new fuse immediately blows out, there is available at your Toyota dealer and most auto parts stores. The following illustrations show how to gain access to mix with bare hands. Use bulbs with the electrical system. If any other object, in place of the listed..., in the table. This may be empty. D Halogen bulbs have the light inspected as soon as possible. Hold a bulb only by its plastic or metal case. Have your Toyota dealer correct it may use a bulb of a fuse. You may damage your Toyota dealer to your vehicle's paint. This product is a problem...
Owners Manual
Page 361
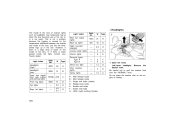
... in the rain or in the rain. However, if there is caused by the temperature difference between the outside and inside the light, contact your Toyota dealer. Left- Remove the Be careful not to spill the washer fluid over the "NORMAL" level. emitting Diodes) 334 W 60 51 27/8 51 ... a large drop of water on the engine or battery. hand headlight: washer inlet. HB3 halogen bulbs HB4 halogen bulbs Single end bulbs (amber) Wedge base bulbs Double end bulbs Single end bulbs LEDs (Light- up lights Hight mounted stoplight License plate lights Interior lights Personal lights Type A Type...
... in the rain or in the rain. However, if there is caused by the temperature difference between the outside and inside the light, contact your Toyota dealer. Left- Remove the Be careful not to spill the washer fluid over the "NORMAL" level. emitting Diodes) 334 W 60 51 27/8 51 ... a large drop of water on the engine or battery. hand headlight: washer inlet. HB3 halogen bulbs HB4 halogen bulbs Single end bulbs (amber) Wedge base bulbs Double end bulbs Single end bulbs LEDs (Light- up lights Hight mounted stoplight License plate lights Interior lights Personal lights Type A Type...

Owners Manual
Page 362
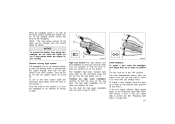
...If the connector is not necessary after replacing the bulb. When aiming adjustment is necessary, contact your Toyota dealer. 335 hand headlight (high beam): Install the bulb base by turning it clockwise to the front of the vehicle. 3. Pull the bulb out of the vehicle. hand head light (high ...beam): Turn the bulb base counterclockwise to the front ...
...If the connector is not necessary after replacing the bulb. When aiming adjustment is necessary, contact your Toyota dealer. 335 hand headlight (high beam): Install the bulb base by turning it clockwise to the front of the vehicle. 3. Pull the bulb out of the vehicle. hand head light (high ...beam): Turn the bulb base counterclockwise to the front ...

Owners Manual
Page 363
Turn the bulb base counterclockwise to the front of the vehicle. When aiming adjustment is not necessary after replacing the bulb. Install a new bulb base by turning it . 3. If the connector is tight, wiggle it clockwise to the front of the bulb base. -Front fog lights 1. Pull the bulb out of the vehicle as shown. 2. Aiming is necessary, contact your Toyota dealer. 336
Turn the bulb base counterclockwise to the front of the vehicle. When aiming adjustment is not necessary after replacing the bulb. Install a new bulb base by turning it . 3. If the connector is tight, wiggle it clockwise to the front of the bulb base. -Front fog lights 1. Pull the bulb out of the vehicle as shown. 2. Aiming is necessary, contact your Toyota dealer. 336

Owners Manual
Page 364
You may damage the vehicle. -Front turn signal and front side marker lights If either the left or right front turn signal and back- a: Rear turn signal light b: Back-up lights a b NOTICE Do not try to replace the front turn signal and front side marker light bulbs by your Toyota dealer. -Rear turn signal and front side marker light burns out, contact your self. Use a flathead screwdriver. up light 337
You may damage the vehicle. -Front turn signal and front side marker lights If either the left or right front turn signal and back- a: Rear turn signal light b: Back-up lights a b NOTICE Do not try to replace the front turn signal and front side marker light bulbs by your Toyota dealer. -Rear turn signal and front side marker light burns out, contact your self. Use a flathead screwdriver. up light 337