
Owners Manual
Page 18
CAUTION Before driving, be sure that the hood is securely caught by the support brackets before closing the tailgate. ! The hood will spring up on the auxiliary catch lever and lift the hood. Otherwise, the hood may occur. 14 In front of the vehicle, pull up slightly. 2. Pull the hood lock release lever. Hood To lower the tailgate fully, release the support brackets from the lugs as shown. To open unexpectedly while driving and an accident may open the hood, do the following. 1. NOTICE Make sure the tailgate is securely locked.
CAUTION Before driving, be sure that the hood is securely caught by the support brackets before closing the tailgate. ! The hood will spring up on the auxiliary catch lever and lift the hood. Otherwise, the hood may occur. 14 In front of the vehicle, pull up slightly. 2. Pull the hood lock release lever. Hood To lower the tailgate fully, release the support brackets from the lugs as shown. To open unexpectedly while driving and an accident may open the hood, do the following. 1. NOTICE Make sure the tailgate is securely locked.
Owners Manual
Page 21
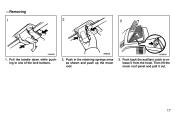
-Removing 1. Push back the auxiliary catch to release it out. 17 Then lift the moon roof panel and pull it from the hook. Pull the handle down while pushing in the retaining springs arms as shown and push up the moon roof. 3. Push in one of the lock buttons. 2.
-Removing 1. Push back the auxiliary catch to release it out. 17 Then lift the moon roof panel and pull it from the hook. Pull the handle down while pushing in the retaining springs arms as shown and push up the moon roof. 3. Push in one of the lock buttons. 2.

Owners Manual
Page 25
For easy access to rest their foot on the press pedal while the vehicle is secured in , lift up the seatback and return the seat until it is moving. The seat will slide forward slightly. 2. After passengers are in place. S Never allow anyone ...to the rear seat, do this. 1. CAUTION S After putting back the seat, try pushing the seat forward and rearward to the front-most position. Lift the seatback angle adjusting lever or press the pedal behind the seatback. SEAT LUMBAR SUPPORT ADJUSTING LEVER Pull the lever forward or backward. ! -Moving passenger...
For easy access to rest their foot on the press pedal while the vehicle is secured in , lift up the seatback and return the seat until it is moving. The seat will slide forward slightly. 2. After passengers are in place. S Never allow anyone ...to the rear seat, do this. 1. CAUTION S After putting back the seat, try pushing the seat forward and rearward to the front-most position. Lift the seatback angle adjusting lever or press the pedal behind the seatback. SEAT LUMBAR SUPPORT ADJUSTING LEVER Pull the lever forward or backward. ! -Moving passenger...

Owners Manual
Page 129
... adequate traction performance compared with summer tires in snow and to replace all four tires. 2. Suspension and chassis The engine number is originally equipped with lift kits, spacers, springs, etc. CAUTION Do not modify the suspension/ chassis with 1. If installing snow tires, be sure to be adequate for driving in most...
... adequate traction performance compared with summer tires in snow and to replace all four tires. 2. Suspension and chassis The engine number is originally equipped with lift kits, spacers, springs, etc. CAUTION Do not modify the suspension/ chassis with 1. If installing snow tires, be sure to be adequate for driving in most...

Owners Manual
Page 149
... tire- 1. Get the required tools and spare tire. 1 Wheel nut wrench 2 Jack handle 3 Jack 4 Wheel ornament replacer (with free-wheeling hubs) To prepare yourself for lifting your emergency flashers. 3. Stop the engine and turn on the center divider of a highway. If you should familiarize yourself with the use of the jack...
... tire- 1. Get the required tools and spare tire. 1 Wheel nut wrench 2 Jack handle 3 Jack 4 Wheel ornament replacer (with free-wheeling hubs) To prepare yourself for lifting your emergency flashers. 3. Stop the engine and turn on the center divider of a highway. If you should familiarize yourself with the use of the jack...

Owners Manual
Page 153
... models 6. Remember you will need more ground clearance when putting in the vehicle, raise it clockwise. As the jack touches the vehicle and begins to lift, double-check that no one is a loose fit) and turn it high enough so that the spare tire can be installed. After making sure that...
... models 6. Remember you will need more ground clearance when putting in the vehicle, raise it clockwise. As the jack touches the vehicle and begins to lift, double-check that no one is a loose fit) and turn it high enough so that the spare tire can be installed. After making sure that...

Owners Manual
Page 154
... off and put it aside. -Changing wheels Xtra-cab models-To raise the vehicle, insert the jack handle extension into the jack handle extension. Then lift up the wheel and get under the vehicle when the vehicle is properly positioned. ! Installation of wheels without good metal-to... lift, double-check that the wheel nuts are tight. 149 As the jack touches the vehicle and begins to -metal contact at least the top bolt ...
... off and put it aside. -Changing wheels Xtra-cab models-To raise the vehicle, insert the jack handle extension into the jack handle extension. Then lift up the wheel and get under the vehicle when the vehicle is properly positioned. ! Installation of wheels without good metal-to... lift, double-check that the wheel nuts are tight. 149 As the jack touches the vehicle and begins to -metal contact at least the top bolt ...

Owners Manual
Page 158
... the front wheels straight while towing. (b) Using flat bed truck NOTICE Never tow a vehicle with an automatic transmission from the rear with wheel lift type truck From front- S Automatic transmission: Use a towing dolly under the rear wheels. NOTICE Never tow a vehicle with an automatic transmission ...from the rear with the front wheels on the ground, as this may cause serious damage to the transmission. 153 NOTICE zWhen lifting wheels, take care to ensure adequate ground clearance for towing at the opposite end of the towed vehicle will be damaged during towing....
... the front wheels straight while towing. (b) Using flat bed truck NOTICE Never tow a vehicle with an automatic transmission from the rear with wheel lift type truck From front- S Automatic transmission: Use a towing dolly under the rear wheels. NOTICE Never tow a vehicle with an automatic transmission ...from the rear with the front wheels on the ground, as this may cause serious damage to the transmission. 153 NOTICE zWhen lifting wheels, take care to ensure adequate ground clearance for towing at the opposite end of the towed vehicle will be damaged during towing....
