Owners Manual
Page 8
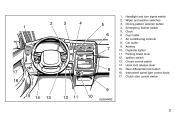
1. 2. 3. 4. 5. 6. 7. 8. 9. 10. 11. 12. 13. 14. 15. 16. 17. Headlight and turn signal switch Wiper and washer switches Driving pattern selector button Emergency flasher switch Clock Cup holder Air conditioning controls Car audio Ashtray Cigarette lighter Parking brake lever Ignition switch Cruise control switch Hook lock release lever Rear differential lock button Instrument panel light control knob Clutch start cancel switch 3
1. 2. 3. 4. 5. 6. 7. 8. 9. 10. 11. 12. 13. 14. 15. 16. 17. Headlight and turn signal switch Wiper and washer switches Driving pattern selector button Emergency flasher switch Clock Cup holder Air conditioning controls Car audio Ashtray Cigarette lighter Parking brake lever Ignition switch Cruise control switch Hook lock release lever Rear differential lock button Instrument panel light control knob Clutch start cancel switch 3

Owners Manual
Page 11
... Four-wheel drive indicator light SRS airbag warning light*1 Automatic transmission fluid temperature warning light*1 Low windshield washer fluid level light*1 Turn signal indicator lights Headlight high beam indicator light 6
... Four-wheel drive indicator light SRS airbag warning light*1 Automatic transmission fluid temperature warning light*1 Low windshield washer fluid level light*1 Turn signal indicator lights Headlight high beam indicator light 6
Owners Manual
Page 55
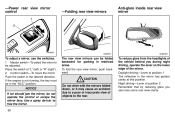
... mirror, do not operate the control or scrape the mirror face. Use a spray de-icer to free the mirror. 50 To reduce glare from the headlights of the mirror.
... mirror, do not operate the control or scrape the mirror face. Use a spray de-icer to free the mirror. 50 To reduce glare from the headlights of the mirror.
Owners Manual
Page 56
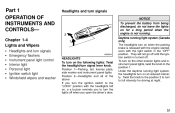
... the light switch in the "OFF" position. HEADLIGHTS To turn on the following lights: Twist the headlight/turn on at night. Part 1 OPERATION OF INSTRUMENTS AND CONTROLS- Chapter 1-4 Lights and Wipers S S S S S S S Headlights and turn signals Emergency flashers Instrument panel light control... Interior light Personal light Ignition switch light Windshield wipers and washer Headlights and turn to full intensity for a long period when the engine is turned...
... the light switch in the "OFF" position. HEADLIGHTS To turn on the following lights: Twist the headlight/turn on at night. Part 1 OPERATION OF INSTRUMENTS AND CONTROLS- Chapter 1-4 Lights and Wipers S S S S S S S Headlights and turn signals Emergency flashers Instrument panel light control... Interior light Personal light Ignition switch light Windshield wipers and washer Headlights and turn to full intensity for a long period when the engine is turned...

Owners Manual
Page 57
...2) and hold it by hand after you release the lever. TURN SIGNAL To signal a turn, push the headlight/ turn signal lever up or down to return it . The high beam headlights turn signal light switch will tell you may have to position 1. Pull the lever toward you (position 2) for...) on the emergency flashers, push the switch. The lever automatically returns after you (position 1). To signal a lane change lanes. To turn the headlights on . Always pull as far off the road as possible. Emergency flashers High-Low beams-For high beams, turn them off, push the switch ...
...2) and hold it by hand after you release the lever. TURN SIGNAL To signal a turn, push the headlight/ turn signal lever up or down to return it . The high beam headlights turn signal light switch will tell you may have to position 1. Pull the lever toward you (position 2) for...) on the emergency flashers, push the switch. The lever automatically returns after you (position 1). To signal a lane change lanes. To turn the headlights on . Always pull as far off the road as possible. Emergency flashers High-Low beams-For high beams, turn them off, push the switch ...

Owners Manual
Page 67
...selector lever in the parts monitored by the warning light system. S The light does not come on . Stop the vehicle at your Toyota dealer as soon as the headlight switch is not engaged. Apply the parking brake. 2. it goes off after about 6 seconds, the light will go off , ...you open the driver's door with the ignition key in the "ACC" or "LOCK" position. (k) Unengaged "Park" Warning Light (vehicles with the headlight switch on when the ignition key is in Chapter 7-3.) CHECKING SERVICE REMINDER INDICATORS (except the low fuel level warning light) 1. After about 6 seconds. 62...
...selector lever in the parts monitored by the warning light system. S The light does not come on . Stop the vehicle at your Toyota dealer as soon as the headlight switch is not engaged. Apply the parking brake. 2. it goes off after about 6 seconds, the light will go off , ...you open the driver's door with the ignition key in the "ACC" or "LOCK" position. (k) Unengaged "Park" Warning Light (vehicles with the headlight switch on when the ignition key is in Chapter 7-3.) CHECKING SERVICE REMINDER INDICATORS (except the low fuel level warning light) 1. After about 6 seconds. 62...

Owners Manual
Page 174
...steering or strange noise. See Chapter 7-2 for changes in steering condition, such as seat adjusters, seatback recliner, etc. Lights Make sure the headlights, stop lights, tail lights, turn signal lights, and other fluid after the vehicle has been parked for additional information. Steering wheel Be alert... found and corrected immediately. When checking the tires, make sure no nuts are all latches lock securely in any latched position. Check headlight aim. Clutch pedal Check the pedal for looseness. Brake pedal Check the pedal for smooth operation and uneven pedal effort or catching. ...
...steering or strange noise. See Chapter 7-2 for changes in steering condition, such as seat adjusters, seatback recliner, etc. Lights Make sure the headlights, stop lights, tail lights, turn signal lights, and other fluid after the vehicle has been parked for additional information. Steering wheel Be alert... found and corrected immediately. When checking the tires, make sure no nuts are all latches lock securely in any latched position. Check headlight aim. Clutch pedal Check the pedal for looseness. Brake pedal Check the pedal for smooth operation and uneven pedal effort or catching. ...
Owners Manual
Page 194
...different size or type may have been subjected to rough treatment or high mileage and could fail without warning. Aluminum wheel precautions S After driving your Toyota dealer. When using tire chains, be taken to the body and chassis. S S S S S 189 Replacement with the same load capacity, ...slip off the wheel or they may adversely affect handling, wheel and bearing life, brake cooling, speedometer/ odometer calibration, stopping ability, headlight aim, bumper height, vehicle ground clearance, and tire or snow chain clearance to ensure that the wheels are available at your vehicle...
...different size or type may have been subjected to rough treatment or high mileage and could fail without warning. Aluminum wheel precautions S After driving your Toyota dealer. When using tire chains, be taken to the body and chassis. S S S S S 189 Replacement with the same load capacity, ...slip off the wheel or they may adversely affect handling, wheel and bearing life, brake cooling, speedometer/ odometer calibration, stopping ability, headlight aim, bumper height, vehicle ground clearance, and tire or snow chain clearance to ensure that the wheels are available at your vehicle...

Owners Manual
Page 200
... the illustration. Only install a fuse with one that is lower, but this manual for the functions controlled by using the pull-out tool. If the headlights or other electrical components do not have a spare fuse, in Chapter 7-1 for locations of the fuses are not sure whether the fuse has blown, try...
... the illustration. Only install a fuse with one that is lower, but this manual for the functions controlled by using the pull-out tool. If the headlights or other electrical components do not have a spare fuse, in Chapter 7-1 for locations of the fuses are not sure whether the fuse has blown, try...

Owners Manual
Page 201
... fluid containing antifreeze. When replacing a bulb, make sure the ignition switch and light switch are off. Light Bulbs and Units Headlight units Headlight bulbs Parking lights Front turn signal lights Rear turn signal lights Stop and tail lights Back-up lights License plate lights High mounted... a fire. You may damage your vehicle's paint. 196 Replacing light bulbs and units- Use bulbs with the electrical system. This may be empty. Have your Toyota dealer correct it may use a fuse with water. Add washer fluid. D B A A A A B B NOTICE Do not use a bulb or unit of a...
... fluid containing antifreeze. When replacing a bulb, make sure the ignition switch and light switch are off. Light Bulbs and Units Headlight units Headlight bulbs Parking lights Front turn signal lights Rear turn signal lights Stop and tail lights Back-up lights License plate lights High mounted... a fire. You may damage your vehicle's paint. 196 Replacing light bulbs and units- Use bulbs with the electrical system. This may be empty. Have your Toyota dealer correct it may use a fuse with water. Add washer fluid. D B A A A A B B NOTICE Do not use a bulb or unit of a...

Owners Manual
Page 202
Open the hood. Release the clips and remove the radiator grille. W Type - - - - - 5 10 5 3 1.4 C C C C B A: Single end bulbs B: Wedge base bulbs C: Double end bulbs D: HB2 halogen bulbs 1. The clips can be released with a flatblade screwdriver as shown. 197 -Headlight units Light Bulbs and Units Headlight Interior light Normal cab Xtra-cab Personal lights Door courtesy lights Glovebox light Bulb and Unit No. Loosen the parking light unit retaining screws and remove the units unplugging the connectors. 2.
Open the hood. Release the clips and remove the radiator grille. W Type - - - - - 5 10 5 3 1.4 C C C C B A: Single end bulbs B: Wedge base bulbs C: Double end bulbs D: HB2 halogen bulbs 1. The clips can be released with a flatblade screwdriver as shown. 197 -Headlight units Light Bulbs and Units Headlight Interior light Normal cab Xtra-cab Personal lights Door courtesy lights Glovebox light Bulb and Unit No. Loosen the parking light unit retaining screws and remove the units unplugging the connectors. 2.

Owners Manual
Page 203
When aiming adjustment is tight, wiggle it. 5. If the connector is necessary, contact your Toyota dealer. 198 Install the radiator grille and parking light units. 3. Put the retainer on the glass face upward, plugging the connector. To disconnect the wire connector, compress the lock releases. Install a new beam unit with the retainer, unplugging the connector. Loosen the retainer screws NOTICE Never attempt to loosen the headlight aim adjusting screws. 4. Take out the beam unit together with the single protrusion on the unit and tighten the screws.
When aiming adjustment is tight, wiggle it. 5. If the connector is necessary, contact your Toyota dealer. 198 Install the radiator grille and parking light units. 3. Put the retainer on the glass face upward, plugging the connector. To disconnect the wire connector, compress the lock releases. Install a new beam unit with the retainer, unplugging the connector. Loosen the retainer screws NOTICE Never attempt to loosen the headlight aim adjusting screws. 4. Take out the beam unit together with the single protrusion on the unit and tighten the screws.

Owners Manual
Page 204
... and remove the bulb. To install a bulb, align the tabs of the bulb with the "TOP" mark upward and snuggle on the connector and the headlight body. Unplug the connector. Install the rubber cover with the cutouts of the mounting hole. 3. Install a new bulb and the bulb retaining spring. When... aiming adjustment is not necessary after replacing the bulb. Make sure the rubber cover fits snugly on the boss. Aiming is necessary, contact your Toyota dealer. 199 If the connector is tight, wiggle it. 2. Remove the rubber cover. Open the hood. Then inset the connector.
... and remove the bulb. To install a bulb, align the tabs of the bulb with the "TOP" mark upward and snuggle on the connector and the headlight body. Unplug the connector. Install the rubber cover with the cutouts of the mounting hole. 3. Install a new bulb and the bulb retaining spring. When... aiming adjustment is not necessary after replacing the bulb. Make sure the rubber cover fits snugly on the boss. Aiming is necessary, contact your Toyota dealer. 199 If the connector is tight, wiggle it. 2. Remove the rubber cover. Open the hood. Then inset the connector.

Owners Manual
Page 217
... A: Car audio system, power antenna, interior light, clock, ignition switch light, personal ligths, door courtesy lights 8. HEAD (RH) 10 A: Right-hand headlight 12.HEAD (LH) 10 A: Left-hand headlight 13.HEAD (HI RH) 10 A: Right-hand headlight (high beam), hi-beam indicator light 14.HEAD (HI LH) 10 A: Left-hand... headlight (high beam) 15.HEAD (LO RH) 10 A: Right-hand headlight (low beam) 16.HEAD (LO LH) 10 A: Left-hand headlight (low beam) 17.DRL 7.5 A: Daytime running light system, cruise control syste, anti-lock brake system 212...
... A: Car audio system, power antenna, interior light, clock, ignition switch light, personal ligths, door courtesy lights 8. HEAD (RH) 10 A: Right-hand headlight 12.HEAD (LH) 10 A: Left-hand headlight 13.HEAD (HI RH) 10 A: Right-hand headlight (high beam), hi-beam indicator light 14.HEAD (HI LH) 10 A: Left-hand... headlight (high beam) 15.HEAD (LO RH) 10 A: Right-hand headlight (low beam) 16.HEAD (LO LH) 10 A: Left-hand headlight (low beam) 17.DRL 7.5 A: Daytime running light system, cruise control syste, anti-lock brake system 212...


