
Owner's Manual
Page 13
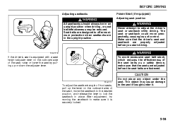
... unlatch switch (P.2-5) 12. Accessory Socket (P.5-80)/ Cigarette Lighter (if equipped) (P.5-81) 17. Front Seat Heater Switch (if equipped) (P.2-28) 7. Hazard Warning Switch (P.2-106) 8. Engine Hood Release Handle (P.5-75) 13. Instrument Cluster (P.2-68) 5. Lighting Control Lever (P.2-100)/ Turn Signal Control Lever (P.2-105) 3. Parking Sensor Switch (if equipped) (P.3-26) 10. 2WD/i-AWD (intelligent...
... unlatch switch (P.2-5) 12. Accessory Socket (P.5-80)/ Cigarette Lighter (if equipped) (P.5-81) 17. Front Seat Heater Switch (if equipped) (P.2-28) 7. Hazard Warning Switch (P.2-106) 8. Engine Hood Release Handle (P.5-75) 13. Instrument Cluster (P.2-68) 5. Lighting Control Lever (P.2-100)/ Turn Signal Control Lever (P.2-105) 3. Parking Sensor Switch (if equipped) (P.3-26) 10. 2WD/i-AWD (intelligent...
Owner's Manual
Page 25
...locked and cannot be found easily. Refer to the explanation in this section. (3) (4) 57L21061 57L21012 (3) UNLOCK (4) LOCK This switch is a release lever located inside the glove box. There is inside the trunk, on the door handle. This lever is pushed to unlock the lid. If...if a person, such as a child, gets trapped in the trunk. 2-6 BEFORE DRIVING Trunk Lid Lock Switch (if equipped) Internal Trunk Release EXAMPLE Keyless Start System Remote Controller Keyless Start System Remote Controller The remote controller enables the following operations: • You can lock or ...
...locked and cannot be found easily. Refer to the explanation in this section. (3) (4) 57L21061 57L21012 (3) UNLOCK (4) LOCK This switch is a release lever located inside the glove box. There is inside the trunk, on the door handle. This lever is pushed to unlock the lid. If...if a person, such as a child, gets trapped in the trunk. 2-6 BEFORE DRIVING Trunk Lid Lock Switch (if equipped) Internal Trunk Release EXAMPLE Keyless Start System Remote Controller Keyless Start System Remote Controller The remote controller enables the following operations: • You can lock or ...
Owner's Manual
Page 33
... expose it to the following : - The key - The lock lever on a door - The power door lock knob - The trunk lid unlatch switch - The engine hood release handle CAUTION The remote controller is armed, any attempt to open a door by pushing the request switch on the driver's or front passenger's door handle...
... expose it to the following : - The key - The lock lever on a door - The power door lock knob - The trunk lid unlatch switch - The engine hood release handle CAUTION The remote controller is armed, any attempt to open a door by pushing the request switch on the driver's or front passenger's door handle...
Owner's Manual
Page 37
...means the driver or passenger can open a window, push the top part of the switch and to operate the passenger's window. To restore normal operation, release the lock switch by operating any of the switch. When you push in the "Down" or "Up" position. BEFORE DRIVING Passenger's door, Rear doors .... 2-18 To stop the window before it reaches the full-down or full-up position, pull up the driver's or passenger's window switch completely and release it. Press down or lift up or push down " and "auto-up the top part of the switches (2), (3), (4) or (5). To open or close ...
...means the driver or passenger can open a window, push the top part of the switch and to operate the passenger's window. To restore normal operation, release the lock switch by operating any of the switch. When you push in the "Down" or "Up" position. BEFORE DRIVING Passenger's door, Rear doors .... 2-18 To stop the window before it reaches the full-down or full-up position, pull up the driver's or passenger's window switch completely and release it. Press down or lift up or push down " and "auto-up the top part of the switches (2), (3), (4) or (5). To open or close ...
Owner's Manual
Page 43
... damage to make sure that the driver's seat and seatback are fastened. The seat or seatback could move the seatback to the desired position, and release the lever to lock the seatback in place. After adjustment, try moving the seatback to the seat if caught under the seat. WARNING Never attempt...
... damage to make sure that the driver's seat and seatback are fastened. The seat or seatback could move the seatback to the desired position, and release the lever to lock the seatback in place. After adjustment, try moving the seatback to the seat if caught under the seat. WARNING Never attempt...

Owner's Manual
Page 46
... tall passengers, adjust the head restraint as high as possible. Each front seat is not possible for cleaning, replacement, etc.), push in the release knob and pull the head restraint all the way out. 57L21035 WARNING All occupants, including the driver, should not operate a vehicle or sit ...in a vehicle's seat until it clicks. NOTE: It may be reinstalled to remove the head restraint. 2-27 EXAMPLE (1) head restraint (2) bars (3) release knob To raise the head restraint, pull upward on the restraint while holding in the event of a crash. To lower the restraint, push down on...
... tall passengers, adjust the head restraint as high as possible. Each front seat is not possible for cleaning, replacement, etc.), push in the release knob and pull the head restraint all the way out. 57L21035 WARNING All occupants, including the driver, should not operate a vehicle or sit ...in a vehicle's seat until it clicks. NOTE: It may be reinstalled to remove the head restraint. 2-27 EXAMPLE (1) head restraint (2) bars (3) release knob To raise the head restraint, pull upward on the restraint while holding in the event of a crash. To lower the restraint, push down on...
Owner's Manual
Page 49
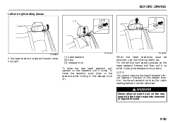
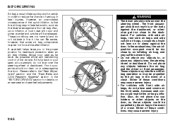
...following methods: For the left and right seating places, tip the head restraint forward and then pull it up while holding in the release knob (3). When the head restraints must be removed. WARNING Never allow anyone to sit on the restraint until it clicks. NOTE:... You cannot remove the head restraint without tipping it forward; To lower the restraint, push down on the restraint while holding the release knob pushed. BEFORE DRIVING Left and right seating places (1) (3) (2) 57L21040 57L30033 57L30058 If the head restraint is tipped forward, raise it upright....
...following methods: For the left and right seating places, tip the head restraint forward and then pull it up while holding in the release knob (3). When the head restraints must be removed. WARNING Never allow anyone to sit on the restraint until it clicks. NOTE:... You cannot remove the head restraint without tipping it forward; To lower the restraint, push down on the restraint while holding the release knob pushed. BEFORE DRIVING Left and right seating places (1) (3) (2) 57L21040 57L30033 57L30058 If the head restraint is tipped forward, raise it upright....
Owner's Manual
Page 50
... against you and passengers in the central seating place, push down the head restraint fully while holding the release knob pressed. Then tilt it locks. The height of the seat while holding the release knob (1) pressed. NOTE: It is firmly in position after installing it with the head restraint removed or in...
... against you and passengers in the central seating place, push down the head restraint fully while holding the release knob pressed. Then tilt it locks. The height of the seat while holding the release knob (1) pressed. NOTE: It is firmly in position after installing it with the head restraint removed or in...
Owner's Manual
Page 51
... head restraints for the right and left seats. 3) Detach the seat belts for the right and left seating place can be adjusted. 57L30038 4) Pull the release lever (1) on the top of each split seat, and fold the seatbacks forward. 57L30037 1) Stow the seatbelt for the left seats from being locked securely...
... head restraints for the right and left seats. 3) Detach the seat belts for the right and left seating place can be adjusted. 57L30038 4) Pull the release lever (1) on the top of each split seat, and fold the seatbacks forward. 57L30037 1) Stow the seatbelt for the left seats from being locked securely...

Owner's Manual
Page 52
... of the lock and prevent the seatback from being locked securely. WARNING Do not put your finger is not, a red sign will appear behind the release lever. 2-33 Never pile cargo higher than the seatbacks. CAUTION When returning the rear seatback to the inside of it may get caught and be...
... of the lock and prevent the seatback from being locked securely. WARNING Do not put your finger is not, a red sign will appear behind the release lever. 2-33 Never pile cargo higher than the seatbacks. CAUTION When returning the rear seatback to the inside of it may get caught and be...
Owner's Manual
Page 53
... a red sign is a much greater risk of injury for persons who are not riding in the event of an accident, there is visible behind the release lever, the seatback cannot be locked because it from your face and neck, but not falling off your shoulder. (Continued) WARNING An air bag supplements...
... a red sign is a much greater risk of injury for persons who are not riding in the event of an accident, there is visible behind the release lever, the seatback cannot be locked because it from your face and neck, but not falling off your shoulder. (Continued) WARNING An air bag supplements...
Owner's Manual
Page 74
...all passengers must be sure the battery is worn low across the pelvis, not across the waist. The pretensioners can be released. Have both systems inspected by your SUZUKI. When scrapping your risk of severe injury or death in the event of the pretensioners, be performed only by an ... the risk of severe injury or death in the event of a crash. Service on for at their seating position, to minimize your SUZUKI, ask an authorized SUZUKI dealer, body repair shop or scrap yard for the driver and right front passenger. To prevent damage or unintended activation of a collision....
...all passengers must be sure the battery is worn low across the pelvis, not across the waist. The pretensioners can be released. Have both systems inspected by your SUZUKI. When scrapping your risk of severe injury or death in the event of the pretensioners, be performed only by an ... the risk of severe injury or death in the event of a crash. Service on for at their seating position, to minimize your SUZUKI, ask an authorized SUZUKI dealer, body repair shop or scrap yard for the driver and right front passenger. To prevent damage or unintended activation of a collision....
Owner's Manual
Page 84
...; For vehicles with air bag operation or may suffer severe injury. • Do not attach any objects to an inflating air bag, and may be released. BEFORE DRIVING Air bags must inflate quickly and forcefully in the event of a crash. In these objects could restrict the air bag's inflation. Do not...
...; For vehicles with air bag operation or may suffer severe injury. • Do not attach any objects to an inflating air bag, and may be released. BEFORE DRIVING Air bags must inflate quickly and forcefully in the event of a crash. In these objects could restrict the air bag's inflation. Do not...

Owner's Manual
Page 89
.... Refer to "Tires" in the "INSPECTION AND MAINTENANCE" section for instructions on how to restore normal operation of the tire pressure monitoring system after fully releasing the parking brake, if the fluid level in the brake fluid reservoir is engaged and 2) when the fluid in all of your speed and avoid...
.... Refer to "Tires" in the "INSPECTION AND MAINTENANCE" section for instructions on how to restore normal operation of the tire pressure monitoring system after fully releasing the parking brake, if the fluid level in the brake fluid reservoir is engaged and 2) when the fluid in all of your speed and avoid...
Owner's Manual
Page 90
...to inspect the brake system. • If the brake system warning light does not go down farther than normal. 2) Test the brakes by an authorized SUZUKI dealer. 2-71 NOTE: Because the disc brake system is a registered trademark of the following conditions occur, you should have to the nearest dealer for ...repairs, or 4) Have the vehicle towed to push harder on the pedal, and the pedal may go out after the parking brake has been fully released. • If the brake system warning light does not come on briefly so you can check that it is working . If the ABS becomes inoperative...
...to inspect the brake system. • If the brake system warning light does not go down farther than normal. 2) Test the brakes by an authorized SUZUKI dealer. 2-71 NOTE: Because the disc brake system is a registered trademark of the following conditions occur, you should have to the nearest dealer for ...repairs, or 4) Have the vehicle towed to push harder on the pedal, and the pedal may go out after the parking brake has been fully released. • If the brake system warning light does not come on briefly so you can check that it is working . If the ABS becomes inoperative...

Owner's Manual
Page 95
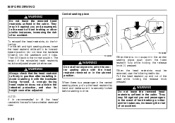
... the 2WD/i-AWD Switch" in this light stays on, there is any of these conditions occurs, have your vehicle inspected by an authorized SUZUKI dealer. • The light comes on while driving. • The light does not come on even when the ignition mode is working... the continuously variable transaxle (CVT). • The light should normally come on when the ignition mode is not sensing the remote controller. system is released. 3) The headlights are all met. i-AWD Warning Light (if equipped) 60B245 With the D.R.L. BEFORE DRIVING Intelligent All Wheel Drive (i-AWD) Indicator...
... the 2WD/i-AWD Switch" in this light stays on, there is any of these conditions occurs, have your vehicle inspected by an authorized SUZUKI dealer. • The light comes on while driving. • The light does not come on even when the ignition mode is working... the continuously variable transaxle (CVT). • The light should normally come on when the ignition mode is not sensing the remote controller. system is released. 3) The headlights are all met. i-AWD Warning Light (if equipped) 60B245 With the D.R.L. BEFORE DRIVING Intelligent All Wheel Drive (i-AWD) Indicator...
Owner's Manual
Page 119
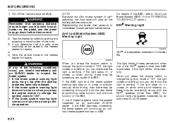
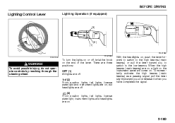
... beams) are off , twist the knob on . To momentarily activate the high beams (main beams) as a passing signal, pull the lever slightly toward you and release it when you to switch to the high beams (main beams) or pull the lever toward you have completed the signal. 2-100 There are three...
... beams) are off , twist the knob on . To momentarily activate the high beams (main beams) as a passing signal, pull the lever slightly toward you and release it when you to switch to the high beams (main beams) or pull the lever toward you have completed the signal. 2-100 There are three...
Owner's Manual
Page 122
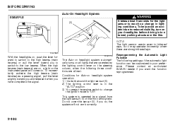
...rays. 57L21065 With the headlights on, push the lever forward to switch to the high beams (main beams) or pull the lever toward you and release it when you want the function reprogrammed. 2-103 This system is in the "AUTO" position. 3) You press the engine switch to change in... lighting conditions. Please contact an authorized SUZUKI dealer if you have completed the signal. 57L21118 The Auto-on headlight system automatically turns on all lights that are all met. Conditions for the...
...rays. 57L21065 With the headlights on, push the lever forward to switch to the high beams (main beams) or pull the lever toward you and release it when you want the function reprogrammed. 2-103 This system is in the "AUTO" position. 3) You press the engine switch to change in... lighting conditions. Please contact an authorized SUZUKI dealer if you have completed the signal. 57L21118 The Auto-on headlight system automatically turns on all lights that are all met. Conditions for the...
Owner's Manual
Page 123
... it is pre-set at the factory) • when the rain sensor senses light and heavy rainfall (in the instrument cluster while the buzzer is released. 3) The headlights are all met.
... it is pre-set at the factory) • when the rain sensor senses light and heavy rainfall (in the instrument cluster while the buzzer is released. 3) The headlights are all met.
Owner's Manual
Page 133
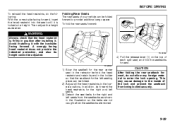
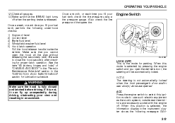
...each time you cannot open the deriver's door, the steering will be automatically locked. OPERATING YOUR VEHICLE 12)Check all the way without releasing the secondary latch. When this position is selected by pressing the engine switch and you fill your fuel tank, check the tire pressure ...-hood checks: 1) 2) 3) 4) 5) Engine oil level Coolant level Brake fluid level Windshield washer fluid level Hood latch operation Pull the hood release handle inside the vehicle. If it can fly up unexpectedly during driving, obstructing your fuel tank, perform the following message: IGNI- Make sure ...
...each time you cannot open the deriver's door, the steering will be automatically locked. OPERATING YOUR VEHICLE 12)Check all the way without releasing the secondary latch. When this position is selected by pressing the engine switch and you fill your fuel tank, check the tire pressure ...-hood checks: 1) 2) 3) 4) 5) Engine oil level Coolant level Brake fluid level Windshield washer fluid level Hood latch operation Pull the hood release handle inside the vehicle. If it can fly up unexpectedly during driving, obstructing your fuel tank, perform the following message: IGNI- Make sure ...