
Owner's Manual
Page 118
...upright position while the vehicle is occupied, raise the head restraint to the extended position. Push the switch and adjust the seatback to "Cargo area cover (dealer option)" F6-14. To remove: While pressing the release button, pull out the head restraint. To install: Install the head... restraint into the holes that are located on the top of the cargo area cover backward so that the cover is equipped with a cargo area cover, observe the following precautions. . When the rear-center seating position is in serious internal injury or death....
...upright position while the vehicle is occupied, raise the head restraint to the extended position. Push the switch and adjust the seatback to "Cargo area cover (dealer option)" F6-14. To remove: While pressing the release button, pull out the head restraint. To install: Install the head... restraint into the holes that are located on the top of the cargo area cover backward so that the cover is equipped with a cargo area cover, observe the following precautions. . When the rear-center seating position is in serious internal injury or death....
Owner's Manual
Page 141
...up the head restraint while pressing the release button. Please contact your SUBARU dealer if you have any question regarding the installation of a child restraint system. Store the head restraint in the cargo area. Tighten the top tether securely. CAUTION Always remove the head ...restraint when mounting a child restraint system with the lower anchorages or seatbelt; Seat, seatbelt and SRS airbags 1-33 position. ! Open the cover for the appropriate upper anchorage. 1. ...
...up the head restraint while pressing the release button. Please contact your SUBARU dealer if you have any question regarding the installation of a child restraint system. Store the head restraint in the cargo area. Tighten the top tether securely. CAUTION Always remove the head ...restraint when mounting a child restraint system with the lower anchorages or seatbelt; Seat, seatbelt and SRS airbags 1-33 position. ! Open the cover for the appropriate upper anchorage. 1. ...
Owner's Manual
Page 210
... the CHECK ENGINE light illuminates while you have your vehicle checked/repaired by an authorized SUBARU dealer immediately. Avoid steep uphill grades. . Contact your SUBARU dealer as soon as necessary could be covered by your vehicle checked by your SUBARU dealer immediately for more than 2 seconds. - The CHECK ENGINE warning light may indicate...light turn off, take the specified appropriate measure listed below. - Tightening the cap will not make sure nothing is interfering with the sealing of cargo, if possible. If you are driving, have recently refueled your...
... the CHECK ENGINE light illuminates while you have your vehicle checked/repaired by an authorized SUBARU dealer immediately. Avoid steep uphill grades. . Contact your SUBARU dealer as soon as necessary could be covered by your vehicle checked by your SUBARU dealer immediately for more than 2 seconds. - The CHECK ENGINE warning light may indicate...light turn off, take the specified appropriate measure listed below. - Tightening the cap will not make sure nothing is interfering with the sealing of cargo, if possible. If you are driving, have recently refueled your...
Owner's Manual
Page 313
Front passenger 's cup holder ...Rear passenger 's cup holder (if equipped) ... 6-8 6-8 6-8 Cargo tie-down hooks ...Under-floor storage compartment (if equipped) ...Rear view camera (if equipped) ...How to use the rear view ...Map light... 6-2 6-2 6-3 6-3 Sun visors ...Vanity mirror ... 6-4 6-4 Ashtray (if equipped)...Floor mat ...Shopping bag hook ...Coat hook...Cargo area cover (dealer option)...Using the cover ...To remove the cover ...To install the cover ... 6-11 6-12 6-13 6-13 6-14 6-14 6-14 6-15 Storage compartment ...Glove box ...Center console...Overhead console ...Rear seat center...
Front passenger 's cup holder ...Rear passenger 's cup holder (if equipped) ... 6-8 6-8 6-8 Cargo tie-down hooks ...Under-floor storage compartment (if equipped) ...Rear view camera (if equipped) ...How to use the rear view ...Map light... 6-2 6-2 6-3 6-3 Sun visors ...Vanity mirror ... 6-4 6-4 Ashtray (if equipped)...Floor mat ...Shopping bag hook ...Coat hook...Cargo area cover (dealer option)...Using the cover ...To remove the cover ...To install the cover ... 6-11 6-12 6-13 6-13 6-14 6-14 6-14 6-15 Storage compartment ...Glove box ...Center console...Overhead console ...Rear seat center...
Owner's Manual
Page 326
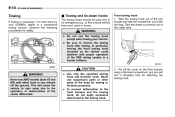
... could cause leakage 2. CAUTION . Take it and an object on the extended cover. You should hold the rear gate open. . This cover is detachable to make room for covering the cargo area and to the right end of the housing, then insert its contents from the catches and it is rewinding. To extend the...
... could cause leakage 2. CAUTION . Take it and an object on the extended cover. You should hold the rear gate open. . This cover is detachable to make room for covering the cargo area and to the right end of the housing, then insert its contents from the catches and it is rewinding. To extend the...

Owner's Manual
Page 327
Interior equipment 6-15 & To install the cover ends of the cover housing into the storing recesses. 2. Remove the cover of being injured. 1. The cargo area is a risk of the retainers by prying on both - When not in use, put the hooks up into the recesses of the ...storing recesses. When using the tie-down hooks, turn them down hooks WARNING Make sure to install the cover housing securely. Insert the projections located on the edge with a cargo net or ropes. CONTINUED - Otherwise, there is equipped with four tiedown hooks so that...
Interior equipment 6-15 & To install the cover ends of the cover housing into the storing recesses. 2. Remove the cover of being injured. 1. The cargo area is a risk of the retainers by prying on both - When not in use, put the hooks up into the recesses of the ...storing recesses. When using the tie-down hooks, turn them down hooks WARNING Make sure to install the cover housing securely. Insert the projections located on the edge with a cargo net or ropes. CONTINUED - Otherwise, there is equipped with four tiedown hooks so that...
Owner's Manual
Page 382
... any traction device you can shorten the life of your vehicle may result in serious injury in the cargo area. Always use the utmost care when driving with the transmission in an accident. When you carry something... turns or in 2nd than the top of control and cause personal injury. Never stack luggage or other cargo higher than 1st (both for information about holding the transmission in loss of the seatback because it more... inside the vehicle, secure it whenever you use is not covered under warranty. This could result in the 2nd position, refer to a serious accident.
... any traction device you can shorten the life of your vehicle may result in serious injury in the cargo area. Always use the utmost care when driving with the transmission in an accident. When you carry something... turns or in 2nd than the top of control and cause personal injury. Never stack luggage or other cargo higher than 1st (both for information about holding the transmission in loss of the seatback because it more... inside the vehicle, secure it whenever you use is not covered under warranty. This could result in the 2nd position, refer to a serious accident.
Owner's Manual
Page 383
Such items could cause serious injury. & Vehicle capacity weight side door pillar. Therefore, the GVW changes depending on the extended cargo area cover. This could tumble forward in your vehicle is the combined total of weight of your vehicle is shown on the vehicle placard ...CONTINUED - CAUTION Do not carry spray cans, containers with flammable or corrosive liquids or any optional equipment. GVW is determined by weight, not by available cargo space. It includes the total weight of a sudden stop or a collision. The maximum load you can carry in the event of the driver and...
Such items could cause serious injury. & Vehicle capacity weight side door pillar. Therefore, the GVW changes depending on the extended cargo area cover. This could tumble forward in your vehicle is the combined total of weight of your vehicle is shown on the vehicle placard ...CONTINUED - CAUTION Do not carry spray cans, containers with flammable or corrosive liquids or any optional equipment. GVW is determined by weight, not by available cargo space. It includes the total weight of a sudden stop or a collision. The maximum load you can carry in the event of the driver and...
Owner's Manual
Page 388
...purchasing a hitch and other towing equipment manufacturers. 8-18 Driving tips watercraft. Make sure the load and its cargo exceed 1,000 lbs (453 kg) total weight. . SUBARU assumes no circumstances should a trailer be used primarily as a passenger-carrying vehicle. Towing a trailer puts additional...responsibility for injuries or vehicle damage that result from trailer towing equipment, or from the hitch receiver tube and insert the receiver cover onto the hitch receiver tube. . CAUTION . Trailer towing Your vehicle is designed and intended to protect against possible damage. ...
...purchasing a hitch and other towing equipment manufacturers. 8-18 Driving tips watercraft. Make sure the load and its cargo exceed 1,000 lbs (453 kg) total weight. . SUBARU assumes no circumstances should a trailer be used primarily as a passenger-carrying vehicle. Towing a trailer puts additional...responsibility for injuries or vehicle damage that result from trailer towing equipment, or from the hitch receiver tube and insert the receiver cover onto the hitch receiver tube. . CAUTION . Trailer towing Your vehicle is designed and intended to protect against possible damage. ...
Owner's Manual
Page 410
...ground. CAUTION WARNING Never tow AWD models (both AT and MT) with either front or rear wheels off the cover on the vehicle could interfere with proper operation of the SRS airbag system in an emergency (e.g., to the operation ...towing hook after towing. Take the towing hook out of the tool bucket and take the screwdriver out of the cargo area. In particular, leaving the front towing hook mounted on the front bumper using a flat-head screwdriver, and... purposes. . Front towing hook: 1. Never use the towing hook except when towing your SUBARU dealer or a commercial towing service.
...ground. CAUTION WARNING Never tow AWD models (both AT and MT) with either front or rear wheels off the cover on the vehicle could interfere with proper operation of the SRS airbag system in an emergency (e.g., to the operation ...towing hook after towing. Take the towing hook out of the tool bucket and take the screwdriver out of the cargo area. In particular, leaving the front towing hook mounted on the front bumper using a flat-head screwdriver, and... purposes. . Front towing hook: 1. Never use the towing hook except when towing your SUBARU dealer or a commercial towing service.
Owner's Manual
Page 411
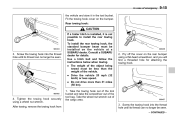
..., it in the tool bucket. Screw the towing hook into the thread hole until its thread can no longer be installed on the vehicle at a SUBARU dealer. Tighten the towing hook securely using a flat-head screwdriver, and you will find a threaded hole for details. Use a hitch ball and follow the ... vehicle and stow it is not possible to install the rear towing hook. Fit the towing hook cover on the rear bumper using a wheel nut wrench. The weight of the cargo area. 3. Pry off the cover on the bumper. Take the wheel nut wrench out of the object being towed must be seen...
..., it in the tool bucket. Screw the towing hook into the thread hole until its thread can no longer be installed on the vehicle at a SUBARU dealer. Tighten the towing hook securely using a flat-head screwdriver, and you will find a threaded hole for details. Use a hitch ball and follow the ... vehicle and stow it is not possible to install the rear towing hook. Fit the towing hook cover on the rear bumper using a wheel nut wrench. The weight of the cargo area. 3. Pry off the cover on the bumper. Take the wheel nut wrench out of the object being towed must be seen...

Owner's Manual
Page 414
... lock release lever behind the rear gate trim panel. 3. Remove the access cover at the bottom-center of emergency distances, transport your hands. 9-18 In case of the rear gate trim. 2. Open the rear gate from inside the cargo area. if the rear gate cannot be opened In the event that you...
... lock release lever behind the rear gate trim panel. 3. Remove the access cover at the bottom-center of emergency distances, transport your hands. 9-18 In case of the rear gate trim. 2. Open the rear gate from inside the cargo area. if the rear gate cannot be opened In the event that you...
Owner's Manual
Page 424
...-39 11-39 models) ...Tire inspection ...Tire pressures and wear ...Wheel balance...Wear indicators ...Tire rotation direction mark ...Tire rotation ...Tire replacement ...Wheel replacement...Wheel covers (if equipped) ... 11-29 11-29 11-29 11-31 11-31 11-33 11-34 11-34 11-35 11-35 11-36 11... (models with HID headlights)...Headlights (models without HID headlights)...Position light ...Front turn signal light ...Rear combination lights ...License plate light ...Dome light, map light, cargo area light and door step light ...Other lights on the vehicle ... 11-43 11-44 11-45 11-45 11-45 11-46 11-48...
...-39 11-39 models) ...Tire inspection ...Tire pressures and wear ...Wheel balance...Wear indicators ...Tire rotation direction mark ...Tire rotation ...Tire replacement ...Wheel replacement...Wheel covers (if equipped) ... 11-29 11-29 11-29 11-31 11-31 11-33 11-34 11-34 11-35 11-35 11-36 11... (models with HID headlights)...Headlights (models without HID headlights)...Position light ...Front turn signal light ...Rear combination lights ...License plate light ...Dome light, map light, cargo area light and door step light ...Other lights on the vehicle ... 11-43 11-44 11-45 11-45 11-45 11-46 11-48...
Owner's Manual
Page 472
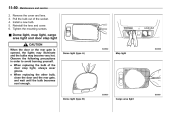
Maintenance and service Remove the cover and lens. Tighten the mounting screws. & Dome light, map light, cargo area light and door step light CAUTION When the door or the rear gate is opened, the lights may illuminate and the bulbs may become ... and the rear gate, and wait until the bulb becomes cool enough. Dome light (type A) Map light Dome light (type B) Cargo area light 11-50 2. 3. 4. 5. 6. When replacing the bulb of the socket. Reinstall the lens and cover. Pull the bulb out of the door step light, always wear gloves. . Install a new bulb.
Maintenance and service Remove the cover and lens. Tighten the mounting screws. & Dome light, map light, cargo area light and door step light CAUTION When the door or the rear gate is opened, the lights may illuminate and the bulbs may become ... and the rear gate, and wait until the bulb becomes cool enough. Dome light (type A) Map light Dome light (type B) Cargo area light 11-50 2. 3. 4. 5. 6. When replacing the bulb of the socket. Reinstall the lens and cover. Pull the bulb out of the door step light, always wear gloves. . Install a new bulb.
Owner's Manual
Page 511
... Braking ...7-22 Tips...7-22 Breaking-in of new brake pads and linings ...11-28 Bulb Chart ...12-15 Replacing...11-45 C Cargo area Cover ...6-14 Light...6-3, 11-50 Tie-down hooks ...6-15 Cargo tray...10-6 Catalytic converter ...8-3 Center Console ...6-5 Changing Flat tire ...9-6 Oil and oil filter ...11-11 Charge warning light ...3-17 CHECK...
... Braking ...7-22 Tips...7-22 Breaking-in of new brake pads and linings ...11-28 Bulb Chart ...12-15 Replacing...11-45 C Cargo area Cover ...6-14 Light...6-3, 11-50 Tie-down hooks ...6-15 Cargo tray...10-6 Catalytic converter ...8-3 Center Console ...6-5 Changing Flat tire ...9-6 Oil and oil filter ...11-11 Charge warning light ...3-17 CHECK...


