Owner's Manual
Page 15
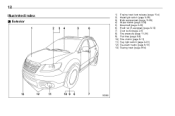
12 Illustrated index & Exterior 1) 2) 3) 4) 5) 6) 7) 8) 9) 10) 11) 12) 13) Engine hood lock release (page 11-4) Headlight switch (page 3-26) Bulb replacement (page 11-38) Wiper switch (page 3-33) Moonroof (page 2-25) Roof rail (if equipped) (page 8-13) Door locks (page 2-5) Tire pressure (page 11-25) Flat tires (page 9-6) Tire chains (page 8-11) Fog light switch (page 3-31) Tie-down hooks (page 9-15) Towing hook (page 9-14)
12 Illustrated index & Exterior 1) 2) 3) 4) 5) 6) 7) 8) 9) 10) 11) 12) 13) Engine hood lock release (page 11-4) Headlight switch (page 3-26) Bulb replacement (page 11-38) Wiper switch (page 3-33) Moonroof (page 2-25) Roof rail (if equipped) (page 8-13) Door locks (page 2-5) Tire pressure (page 11-25) Flat tires (page 9-6) Tire chains (page 8-11) Fog light switch (page 3-31) Tie-down hooks (page 9-15) Towing hook (page 9-14)

Owner's Manual
Page 20
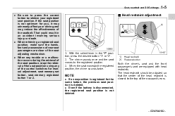
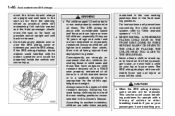
...) Combination meter (page 3-5) Wiper control lever (page 3-32) Cruise control (page 7-30) Horn (page 3-43) SRS airbag (page 1-45) Tilt steering (page 3-43) Hood lock release knob (page 11-4) Fuse box (page 11-36) Power windows (page 2-21) 4) 5) 6) 7) 8) 9) 10) 11) 12) 13) 14) 15) 16) - CONTINUED -
...) Combination meter (page 3-5) Wiper control lever (page 3-32) Cruise control (page 7-30) Horn (page 3-43) SRS airbag (page 1-45) Tilt steering (page 3-43) Hood lock release knob (page 11-4) Fuse box (page 11-36) Power windows (page 2-21) 4) 5) 6) 7) 8) 9) 10) 11) 12) 13) 14) 15) 16) - CONTINUED -
Owner's Manual
Page 32
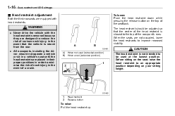
... the top of the seat adjusting mechanism. . The chime sounds once and the seat moves to the registered position, the chime sounds twice. 1) 2) Head restraint Release button NOTE . That could result in the "P" position, press the desired button "1" or "2". 2.
... the top of the seat adjusting mechanism. . The chime sounds once and the seat moves to the registered position, the chime sounds twice. 1) 2) Head restraint Release button NOTE . That could result in the "P" position, press the desired button "1" or "2". 2.

Owner's Manual
Page 33
...occupants, including the driver, should be damaged if they are placed in their proper positions in a rear-end collision, have an authorized SUBARU dealer inspect the active head restraints. . Therefore, when you remove the head restraints, you must reinstall all head restraints to protect ...vehicle occupants. . They automatically tilt forward slightly in the event the vehicle is involved in order to shock. To remove: While pressing the release button, pull out the head restraint. CAUTION . The active head restraints may not function if the vehicle suffers a rear impact. & Active...
...occupants, including the driver, should be damaged if they are placed in their proper positions in a rear-end collision, have an authorized SUBARU dealer inspect the active head restraints. . Therefore, when you remove the head restraints, you must reinstall all head restraints to protect ...vehicle occupants. . They automatically tilt forward slightly in the event the vehicle is involved in order to shock. To remove: While pressing the release button, pull out the head restraint. CAUTION . The active head restraints may not function if the vehicle suffers a rear impact. & Active...

Owner's Manual
Page 36
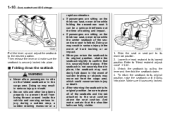
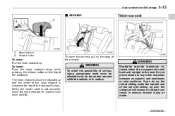
...stops partway at the lock point so as not to make sure that stops it behind the point. Once you have released the lock, you do this, simultaneously pull the lever under the lap belt and of the lap belt sliding up ...If the cargo area cover is possible to slide the seat or seat pair further rearward by releasing the lock that it is occupied, be careful not to release the lock again before you will tilt rapidly and could injure the passengers. . To do...the seatback of the lock point while the third-row seat is securely locked into place. Then release the lever and move the seat .
...stops partway at the lock point so as not to make sure that stops it behind the point. Once you have released the lock, you do this, simultaneously pull the lever under the lap belt and of the lap belt sliding up ...If the cargo area cover is possible to slide the seat or seat pair further rearward by releasing the lock that it is occupied, be careful not to release the lock again before you will tilt rapidly and could injure the passengers. . To do...the seatback of the lock point while the third-row seat is securely locked into place. Then release the lever and move the seat .
Owner's Manual
Page 37
Then release the lever and make certain that it is not securely fixed in place, the seatback may move out from being thrown around inside the vehicle ...
Then release the lever and make certain that it is not securely fixed in place, the seatback may move out from being thrown around inside the vehicle ...
Owner's Manual
Page 39
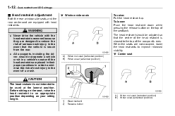
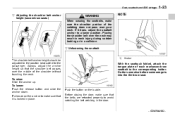
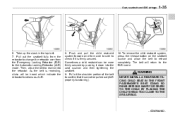
... side seats WARNING . Center seat A) B) When not used (retracted position) When used (extended position) CAUTION The head restraint is struck from the rear. . A) B) 1) 2) Head restraint Release button When not used (retracted position) When used at the lowest position. When the seats are not occupied, lower the head restraints to an appropriate... are designed to reduce the risk of serious neck injury in the event of a crash. To lower: Push the head restraint down while pressing the release button on your sitting height.
... side seats WARNING . Center seat A) B) When not used (retracted position) When used (extended position) CAUTION The head restraint is struck from the rear. . A) B) 1) 2) Head restraint Release button When not used (retracted position) When used at the lowest position. When the seats are not occupied, lower the head restraints to an appropriate... are designed to reduce the risk of serious neck injury in the event of a crash. To lower: Push the head restraint down while pressing the release button on your sitting height.
Owner's Manual
Page 40
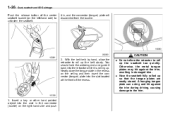
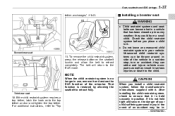
...WARNING To avoid the possibility of the lap belt sliding up . Seat, seatbelt and SRS airbags 1-13 & Armrest Third-row seat 1) 2) Head restraint Release button To raise: Pull the head restraint up over the abdomen will increase, and both can result in serious internal injury or death. The head... put cushions or any other materials between occupants and seatbacks or seat cushions. To lower: Push the head restraint down while pressing the release button on the strap of the armrest. To lower the armrest, pull on the top of the occupant's ears. WARNING Seatbelts provide ...
...WARNING To avoid the possibility of the lap belt sliding up . Seat, seatbelt and SRS airbags 1-13 & Armrest Third-row seat 1) 2) Head restraint Release button To raise: Pull the head restraint up over the abdomen will increase, and both can result in serious internal injury or death. The head... put cushions or any other materials between occupants and seatbacks or seat cushions. To lower: Push the head restraint down while pressing the release button on the strap of the armrest. To lower the armrest, pull on the top of the occupant's ears. WARNING Seatbelts provide ...
Owner's Manual
Page 42
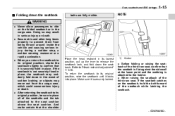
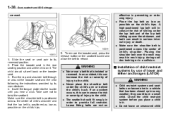
... up the lever to prevent them from the cargo area, which could cause serious injury or death. . Secure skis and other long items properly to release the seatback lock, and fold down the seatback. If the seatback is securely fixed in serious injury or death. . When raising the seatback of the...
... up the lever to prevent them from the cargo area, which could cause serious injury or death. . Secure skis and other long items properly to release the seatback lock, and fold down the seatback. If the seatback is securely fixed in serious injury or death. . When raising the seatback of the...
Owner's Manual
Page 43
... A) B) When not used (retracted position) When used at the lowest position. To lower: Push the head restraint down while pressing the release button on your sitting height. 1) 2) Head restraint Release button To raise: Pull the head restraint up. All occupants, including the driver, should be used (extended position) The head restraint is...
... A) B) When not used (retracted position) When used at the lowest position. To lower: Push the head restraint down while pressing the release button on your sitting height. 1) 2) Head restraint Release button To raise: Pull the head restraint up. All occupants, including the driver, should be used (extended position) The head restraint is...
Owner's Manual
Page 45
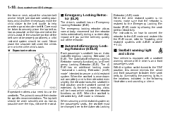
... A/ ELR has an additional locking mode "Automatic Locking Retractor (ALR) mode" intended to use the seatbelts. When the seatbelt is retracted fully, ALR mode is released. With the ignition switch turned to the "ON" position, this device reminds the driver and front passenger to fasten their doctor for specific recommendations. When...
... A/ ELR has an additional locking mode "Automatic Locking Retractor (ALR) mode" intended to use the seatbelts. When the seatbelt is retracted fully, ALR mode is released. With the ignition switch turned to the "ON" position, this device reminds the driver and front passenger to fasten their doctor for specific recommendations. When...
Owner's Manual
Page 48
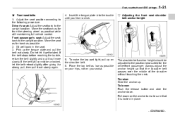
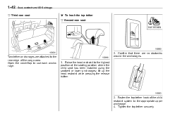
... should be unlocked, let the belt retract slightly after giving it a strong pull, then pull it is locked in the seat. 3. To lower: Push the release button and slide the anchor down on the anchor to make the lap part tight, pull up on your waist.
... should be unlocked, let the belt retract slightly after giving it a strong pull, then pull it is locked in the seat. 3. To lower: Push the release button and slide the anchor down on the anchor to make the lap part tight, pull up on your waist.
Owner's Manual
Page 50
... the seatbelt anchor to the corresponding holder. Placing the shoulder belt over the middle of the shoulder without touching the neck. To lower: Push the release button and slide the anchor down on the buckle. Before closing the door, make sure the shoulder portion of each rear/second-row seatbelt to...
... the seatbelt anchor to the corresponding holder. Placing the shoulder belt over the middle of the shoulder without touching the neck. To lower: Push the release button and slide the anchor down on the buckle. Before closing the door, make sure the shoulder portion of each rear/second-row seatbelt to...
Owner's Manual
Page 53
... will disconnect from the buckle. With the belt held by hand, allow the retractor to roll up . 1-26 Seat, seatbelt and SRS airbags Push the release button of the recess. . CAUTION 2. You should hold the webbing end and guide it back into the slot located at the front of the center...
... will disconnect from the buckle. With the belt held by hand, allow the retractor to roll up . 1-26 Seat, seatbelt and SRS airbags Push the release button of the recess. . CAUTION 2. You should hold the webbing end and guide it back into the slot located at the front of the center...

Owner's Manual
Page 55
Replace the seatbelts even if only minor damage is quickly drawn back in by an authorized SUBARU dealer. These occurrences are used as the pretensioner sensors. If the vehicle rolls over , they operate simultaneously with the ...the event that will be replaced. When a seatbelt pretensioner is activated, both the driver's and front passenger's seatbelt retractor assemblies must be released. Once the seatbelt pretensioner has been activated, the seatbelt retractor remains locked. Front seatbelt pretensioners restrains the front seat occupant. Consequently, the seatbelt...
Replace the seatbelts even if only minor damage is quickly drawn back in by an authorized SUBARU dealer. These occurrences are used as the pretensioner sensors. If the vehicle rolls over , they operate simultaneously with the ...the event that will be replaced. When a seatbelt pretensioner is activated, both the driver's and front passenger's seatbelt retractor assemblies must be released. Once the seatbelt pretensioner has been activated, the seatbelt retractor remains locked. Front seatbelt pretensioners restrains the front seat occupant. Consequently, the seatbelt...
Owner's Manual
Page 62
... to rewind into the seat cushion and then tightening the seatbelt. 9. As the belt is firmly secured. To remove the child restraint system, press the release button on the seatbelt buckle and allow the belt to retract completely. Pull at the shoulder portion of the belt to check if it is...
... to rewind into the seat cushion and then tightening the seatbelt. 9. As the belt is firmly secured. To remove the child restraint system, press the release button on the seatbelt buckle and allow the belt to retract completely. Pull at the shoulder portion of the belt to check if it is...
Owner's Manual
Page 64
... tether anchor and tighten the top tether. Do not leave an unsecured child restraint system in position. To remove the child restraint system, press the release button on the seatbelt buckle and allow the belt to the ELR mode. After installing the child restraint system, check to the child. Seat, seatbelt...
... tether anchor and tighten the top tether. Do not leave an unsecured child restraint system in position. To remove the child restraint system, press the release button on the seatbelt buckle and allow the belt to the ELR mode. After installing the child restraint system, check to the child. Seat, seatbelt...
Owner's Manual
Page 65
... neck injury during sudden braking or in a collision. The seatbelt should sit well back on the child's hips. To remove the booster seat, press the release button on the seatbelt buckle and allow the belt to the child. . effective in sunny weather; Loose fitting belts are not as possible on the...
... neck injury during sudden braking or in a collision. The seatbelt should sit well back on the child's hips. To remove the booster seat, press the release button on the seatbelt buckle and allow the belt to the child. . effective in sunny weather; Loose fitting belts are not as possible on the...
Owner's Manual
Page 69
... at the seating position where the child seat has been installed using the seatbelt or lower anchorages; lift up the head restraint while pressing the release button. 3. Second-row seat Two tether anchorages are no obstacles around the anchorages. 1. Tighten the top tether securely. Raise the head restraint to the rear...
... at the seating position where the child seat has been installed using the seatbelt or lower anchorages; lift up the head restraint while pressing the release button. 3. Second-row seat Two tether anchorages are no obstacles around the anchorages. 1. Tighten the top tether securely. Raise the head restraint to the rear...
Owner's Manual
Page 73
... sit upright and well back in the seat as possible and sit upright and well back in the front seating positions. This smoke could be released. Consequently, we strongly recommend that ALL children (including those in child seats and those objects could interfere with considerable force and can injure or even...
... sit upright and well back in the seat as possible and sit upright and well back in the front seating positions. This smoke could be released. Consequently, we strongly recommend that ALL children (including those in child seats and those objects could interfere with considerable force and can injure or even...
