Owner's Manual
Page 13
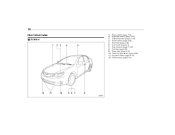
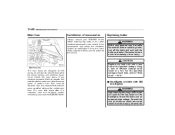
10 Illustrated index & Exterior 1) 2) 3) 4) 5) 6) 7) 8) 9) 10) 11) 12) Engine hood (page 11-5) Headlight switch (page 3-35) Replacing bulbs (page 11-48) Wiper switch (page 3-40) Moonroof (page 2-26) Door locks (page 2-4) Tire pressure (page 11-35) Flat tires (page 9-6) Snow tires (page 8-10) Front fog light switch (page 3-38) Tie-down hooks (page 9-14) Towing hook (page 9-14)
10 Illustrated index & Exterior 1) 2) 3) 4) 5) 6) 7) 8) 9) 10) 11) 12) Engine hood (page 11-5) Headlight switch (page 3-35) Replacing bulbs (page 11-48) Wiper switch (page 3-40) Moonroof (page 2-26) Door locks (page 2-4) Tire pressure (page 11-35) Flat tires (page 9-6) Snow tires (page 8-10) Front fog light switch (page 3-38) Tie-down hooks (page 9-14) Towing hook (page 9-14)
Owner's Manual
Page 135
... ignition switch turned to the "ON" position, this device reminds the driver and front passenger to the "ON" position. Consult your authorized SUBARU dealer for repair. : Low fuel warning light : Hill start assist warning light (MT models - if equipped)/Hill start assist OFF indicator...indicator light (AT models) & Seatbelt warning light and chime Your vehicle is initially turned to illuminate, it indicates a burned-out bulb or a malfunction of the bulbs. Apply the parking brake and turn off only when the front seat passenger fastens the seatbelt.) : SRS airbag system warning light...
... ignition switch turned to the "ON" position, this device reminds the driver and front passenger to the "ON" position. Consult your authorized SUBARU dealer for repair. : Low fuel warning light : Hill start assist warning light (MT models - if equipped)/Hill start assist OFF indicator...indicator light (AT models) & Seatbelt warning light and chime Your vehicle is initially turned to illuminate, it indicates a burned-out bulb or a malfunction of the bulbs. Apply the parking brake and turn off only when the front seat passenger fastens the seatbelt.) : SRS airbag system warning light...
Owner's Manual
Page 149
... mode. 3-30 Instruments and controls & Turn signal indicator lights These lights show the operation of the turn signal bulb may be burned out. Replace the bulb as soon as possible. If you press the main switch button while turning the ignition switch "ON", the cruise...position. This light illuminates when vehicle speed has been set to "Driver's Control Center Differential (DCCD) (WRX STI)" F7-19. ! Refer to "Replacing bulbs" F11-48. "LOCK" position, and then turn the ignition switch back to the "ON" position and turns off when the driver's control center differential ...
... mode. 3-30 Instruments and controls & Turn signal indicator lights These lights show the operation of the turn signal bulb may be burned out. Replace the bulb as soon as possible. If you press the main switch button while turning the ignition switch "ON", the cruise...position. This light illuminates when vehicle speed has been set to "Driver's Control Center Differential (DCCD) (WRX STI)" F7-19. ! Refer to "Replacing bulbs" F11-48. "LOCK" position, and then turn the ignition switch back to the "ON" position and turns off when the driver's control center differential ...

Owner's Manual
Page 321
... 11-37 11-37 11-38 11-38 11-39 Rear window wiper blade rubber ... 11-44 Battery ...Fuses ...Main fuse...Installation of accessories ...Replacing bulbs ...Headlights (models with HID headlights)...Headlights (models without HID headlights)...Front turn signal light ...Front fog light (if equipped)...Rear combination lights ...Back-up light... (5-door) ...License plate light ...Map light ...Dome light and cargo area light ...Trunk light ...High mount stop light (4-door) ...Other bulbs ... 11-45 11-46 11-48 11-48 11-48 11-48 11-49 11-51 11-51 11-51 11-53 11-54 11...
... 11-37 11-37 11-38 11-38 11-39 Rear window wiper blade rubber ... 11-44 Battery ...Fuses ...Main fuse...Installation of accessories ...Replacing bulbs ...Headlights (models with HID headlights)...Headlights (models without HID headlights)...Front turn signal light ...Front fog light (if equipped)...Rear combination lights ...Back-up light... (5-door) ...License plate light ...Map light ...Dome light and cargo area light ...Trunk light ...High mount stop light (4-door) ...Other bulbs ... 11-45 11-46 11-48 11-48 11-48 11-48 11-49 11-51 11-51 11-51 11-53 11-54 11...
Owner's Manual
Page 367
...and service Main fuse Installation of sustaining a burn injury. Otherwise, there is replaced, have the electrical system checked by your SUBARU dealer before installing fog lights or any bulb only with the same specified rating as the melted main fuse. If a main fuse blows after it is a risk ...of accessories Always consult your nearest SUBARU dealer. These HID bulbs use an extremely high voltage. Replace any other fuses are not suited for the low beams of the headlights. A melted main fuse...
...and service Main fuse Installation of sustaining a burn injury. Otherwise, there is replaced, have the electrical system checked by your SUBARU dealer before installing fog lights or any bulb only with the same specified rating as the melted main fuse. If a main fuse blows after it is a risk ...of accessories Always consult your nearest SUBARU dealer. These HID bulbs use an extremely high voltage. Replace any other fuses are not suited for the low beams of the headlights. A melted main fuse...

Owner's Manual
Page 368
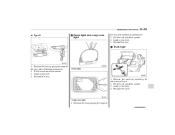
... Use a screwdriver to replace the bulbs. For replacement, contact your SUBARU dealer if necessary. ! Do not replace any headlightassembly components by your SUBARU dealer. It may be difficult to undo the clips on the bulb surface will develop into hot spots, causing the bulb to remove the secured clip of the...hand side 2. Do not remove any headlight bulbs (both low beam and high beam) by yourself. . If headlight aiming is required, consult your SUBARU dealer for proper adjustment of the washer tank. To make it easy to access the bulb, move the washer tank to the horizontal ...
... Use a screwdriver to replace the bulbs. For replacement, contact your SUBARU dealer if necessary. ! Do not replace any headlightassembly components by your SUBARU dealer. It may be difficult to undo the clips on the bulb surface will develop into hot spots, causing the bulb to remove the secured clip of the...hand side 2. Do not remove any headlight bulbs (both low beam and high beam) by yourself. . If headlight aiming is required, consult your SUBARU dealer for proper adjustment of the washer tank. To make it easy to access the bulb, move the washer tank to the horizontal ...

Owner's Manual
Page 369
...Disconnect the electrical connector from the headlight assembly by turning it by turning it clicks. 8. 11-50 Maintenance and service ! Install the bulb cover. 10. Set the washer tank to the headlight assembly, turn it clockwise until it counterclockwise. 5. Right-hand side 1. Left-hand side... Remove the bulb from the bulb. Install the air intake duct with a new one. Remove the bulb cover, by clip (left-hand side). Use a screwdriver to undo the clips on the air intake...
...Disconnect the electrical connector from the headlight assembly by turning it by turning it clicks. 8. 11-50 Maintenance and service ! Install the bulb cover. 10. Set the washer tank to the headlight assembly, turn it clockwise until it counterclockwise. 5. Right-hand side 1. Left-hand side... Remove the bulb from the bulb. Install the air intake duct with a new one. Remove the bulb cover, by clip (left-hand side). Use a screwdriver to undo the clips on the air intake...

Owner's Manual
Page 370
...panel. - CONTINUED - Have the bulbs replaced by your SUBARU dealer if necessary. & Front fog light (if equipped) It may be difficult to touch the bulb surface. 6. At this time, use care not to replace the bulbs. To install the bulb to replace the bulbs. Disconnect the electrical connector from ...tank to the original place and secure it by turning it clicks. 7. Replace the bulb with clips (right-hand side). 9. Install the air intake duct with new one. Have the bulbs replaced by your SUBARU dealer if necessary. & Rear combination lights 4. Set the washer tank to the ...
...panel. - CONTINUED - Have the bulbs replaced by your SUBARU dealer if necessary. & Front fog light (if equipped) It may be difficult to touch the bulb surface. 6. At this time, use care not to replace the bulbs. To install the bulb to replace the bulbs. Disconnect the electrical connector from ...tank to the original place and secure it by turning it clicks. 7. Replace the bulb with clips (right-hand side). 9. Install the air intake duct with new one. Have the bulbs replaced by your SUBARU dealer if necessary. & Rear combination lights 4. Set the washer tank to the ...

Owner's Manual
Page 371
...turn it clockwise until it locks. 6. Set the bulb socket into the rear combination light assembly and turn signal light Back-up light 3. Pull the bulb out of the bulb socket and replace it with the clips. 1. Set the bulb socket into the rear combination light assembly and turn... signal light 3. Remove the bulb socket from the rear combination light assembly by turning it counterclockwise....
...turn it clockwise until it locks. 6. Set the bulb socket into the rear combination light assembly and turn signal light Back-up light 3. Pull the bulb out of the bulb socket and replace it with the clips. 1. Set the bulb socket into the rear combination light assembly and turn... signal light 3. Remove the bulb socket from the rear combination light assembly by turning it counterclockwise....

Owner's Manual
Page 372
... it clockwise. 5. Put the rear combination light assembly into place while aligning the clip with a new one. 4. Install the bulb socket by turning it with the guide on the rear gate. 7. Turn the bulb socket counterclockwise and remove it. 6. Maintenance and service 11-53 & Back-up light (5-door) 2. Apply a flat-head screwdriver...
... it clockwise. 5. Put the rear combination light assembly into place while aligning the clip with a new one. 4. Install the bulb socket by turning it with the guide on the rear gate. 7. Turn the bulb socket counterclockwise and remove it. 6. Maintenance and service 11-53 & Back-up light (5-door) 2. Apply a flat-head screwdriver...

Owner's Manual
Page 373
... counterclockwise Type A 1. 11-54 Maintenance and service & License plate light and pull out the socket. 3. Install a new bulb. 4. Pull the bulb out of the license plate light cover, then press once to the left and pull out to remove it. 3. Reinstall the license plate light cover. & ... ! Insert a finger into the right side of the socket. 4. Remove the lens by prying the edge of the lens with a flat-head screwdriver. 2. Turn the bulb until the flat surfaces at its ends are aligned vertically.
... counterclockwise Type A 1. 11-54 Maintenance and service & License plate light and pull out the socket. 3. Install a new bulb. 4. Pull the bulb out of the license plate light cover, then press once to the left and pull out to remove it. 3. Reinstall the license plate light cover. & ... ! Insert a finger into the right side of the socket. 4. Remove the lens by prying the edge of the lens with a flat-head screwdriver. 2. Turn the bulb until the flat surfaces at its ends are aligned vertically.
Owner's Manual
Page 374
... of the socket. 3. Remove the lens by prying the edge of the socket. 3. Reinstall the lens. Dome light 1. Install a new bulb. 4. Install a new bulb. 4. Pull the bulb out of the socket. 3. Reinstall the cover. Type B & Dome light and cargo area light the lens with a flat-head screwdriver. 2. Remove the cover by squeezing ...
... of the socket. 3. Remove the lens by prying the edge of the socket. 3. Reinstall the lens. Dome light 1. Install a new bulb. 4. Install a new bulb. 4. Pull the bulb out of the socket. 3. Reinstall the cover. Type B & Dome light and cargo area light the lens with a flat-head screwdriver. 2. Remove the cover by squeezing ...

Owner's Manual
Page 375
Reinstall the cover. & Other bulbs Other bulbs may be difficult to replace. Pull the bulb out of the socket. 4. Install a new bulb. 5. Have the bulbs replaced by turning it counterclockwise. 3. 11-56 Maintenance and service & High mount stop light cover by prying the edge with a screwdriver. 2. Remove the high mount stop light (4door) 1. Remove the bulb socket from the high mount stop light assembly by your SUBARU dealer if necessary.
Reinstall the cover. & Other bulbs Other bulbs may be difficult to replace. Pull the bulb out of the socket. 4. Install a new bulb. 5. Have the bulbs replaced by turning it counterclockwise. 3. 11-56 Maintenance and service & High mount stop light cover by prying the edge with a screwdriver. 2. Remove the high mount stop light (4door) 1. Remove the bulb socket from the high mount stop light assembly by your SUBARU dealer if necessary.
Owner's Manual
Page 376
Specifications Specifications ...Dimensions...Engine ...Electrical system...Capacities ...Tires ...Wheel alignment ... 12-2 12-2 12-3 12-3 12-4 12-5 12-5 Fuses and circuits ...Fuse panel located in the passenger compartment ...Fuse panel located in the engine compartment ... 12-6 12-6 12-8 Bulb chart...Vehicle identification ... 12-10 12-13 12
Specifications Specifications ...Dimensions...Engine ...Electrical system...Capacities ...Tires ...Wheel alignment ... 12-2 12-2 12-3 12-3 12-4 12-5 12-5 Fuses and circuits ...Fuse panel located in the passenger compartment ...Fuse panel located in the engine compartment ... 12-6 12-6 12-8 Bulb chart...Vehicle identification ... 12-10 12-13 12

Owner's Manual
Page 385
12-10 Specifications Bulb chart NOTE Lights from A to C are the LED (Light Emitting Diode) type. Consult your SUBARU dealer for replacement.
12-10 Specifications Bulb chart NOTE Lights from A to C are the LED (Light Emitting Diode) type. Consult your SUBARU dealer for replacement.

Owner's Manual
Page 386
Bulbs may become very hot while illuminated. Not doing so carries the risk of sustaining a burn injury. . For replacement, contact your SUBARU dealer. 12V-35W 12V... (5-door) 13) Rear side marker light (5-door) 14) Rear turn off the lights and wait until the bulbs cool down. For models with halogen light 3) 4) 5) 6) 7) 8) 9) Front turn signal/Front side marker...Low beam headlight Models with HID light Models with HID low beam headlights, observe the following precautions. Before replacing bulbs, turn signal light (5-door) 15) Back-up light (5-door) 16) Licence plate light A) High mount ...
Bulbs may become very hot while illuminated. Not doing so carries the risk of sustaining a burn injury. . For replacement, contact your SUBARU dealer. 12V-35W 12V... (5-door) 13) Rear side marker light (5-door) 14) Rear turn off the lights and wait until the bulbs cool down. For models with halogen light 3) 4) 5) 6) 7) 8) 9) Front turn signal/Front side marker...Low beam headlight Models with HID light Models with HID low beam headlights, observe the following precautions. Before replacing bulbs, turn signal light (5-door) 15) Back-up light (5-door) 16) Licence plate light A) High mount ...

Owner's Manual
Page 387
Using a bulb of the specified wattage. 12-12 Specifications CAUTION Replace any bulb only with a new bulb of different wattage could result in a fire.
Using a bulb of the specified wattage. 12-12 Specifications CAUTION Replace any bulb only with a new bulb of different wattage could result in a fire.

Owner's Manual
Page 410
...-30 Reserve distance ...11-30 Brake system ...7-32 Warning light ...3-24 Braking ...7-31 Tips...7-31 Breaking-in of new brake pads and linings ...11-32 Bulb Chart ...12-10 Replacing...11-48 C Capacities ...12-4 Cargo area Cover ...6-12 Light...6-2, 11-55 Tie-down hooks ...6-13 Catalytic converter ...8-3 Center Console ...6-5 Ventilators ...4-3 Center...
...-30 Reserve distance ...11-30 Brake system ...7-32 Warning light ...3-24 Braking ...7-31 Tips...7-31 Breaking-in of new brake pads and linings ...11-32 Bulb Chart ...12-10 Replacing...11-48 C Capacities ...12-4 Cargo area Cover ...6-12 Light...6-2, 11-55 Tie-down hooks ...6-13 Catalytic converter ...8-3 Center Console ...6-5 Ventilators ...4-3 Center...
Owner's Manual
Page 412
... Floor mat ...6-11 Fluid level Automatic transmission ...11-22 Brake ...11-27 Clutch...11-28 Power steering ...11-26 Fog light Bulb ...11-51 Indicator light...3-30 Switch ...3-38 Folding mirror switch ...3-44 Front Differential gear oil ...11-23 Fog light ...3-38, ...(Gross Vehicle Weight Rating)...8-13 H Hazard warning flasher ...3-5, 9-2 Head restraint adjustment Front seat...1-4 Rear seat ...1-8 Headlight Beam leveler...3-38 Bulb replacement ...11-48 Control switch ...3-35 Flasher...3-36 Indicator light ...3-30 Heater operation (manual climate control system)...4-5 High beam indicator light ...
... Floor mat ...6-11 Fluid level Automatic transmission ...11-22 Brake ...11-27 Clutch...11-28 Power steering ...11-26 Fog light Bulb ...11-51 Indicator light...3-30 Switch ...3-38 Folding mirror switch ...3-44 Front Differential gear oil ...11-23 Fog light ...3-38, ...(Gross Vehicle Weight Rating)...8-13 H Hazard warning flasher ...3-5, 9-2 Head restraint adjustment Front seat...1-4 Rear seat ...1-8 Headlight Beam leveler...3-38 Bulb replacement ...11-48 Control switch ...3-35 Flasher...3-36 Indicator light ...3-30 Heater operation (manual climate control system)...4-5 High beam indicator light ...

Owner's Manual
Page 415
... Air cleaner element...11-17 Battery (remote engine start transmitter) ...7-14 Battery (remote keyless entry system)...2-10 Lost transmitters (remote keyless entry system) ...2-11 Replacing bulbs ...11-48 Back-up light (4-door)...11-51 Back-up light (5-door)...11-53 Brake/Tail and rear side marker light (4-door) ...11-51 Cargo...
... Air cleaner element...11-17 Battery (remote engine start transmitter) ...7-14 Battery (remote keyless entry system)...2-10 Lost transmitters (remote keyless entry system) ...2-11 Replacing bulbs ...11-48 Back-up light (4-door)...11-51 Back-up light (5-door)...11-53 Brake/Tail and rear side marker light (4-door) ...11-51 Cargo...
