
Owner's Manual
Page 62
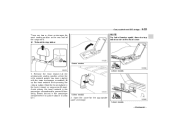
...; Avoid placing the head restraint in the passenger compartment to prevent it from being thrown around in the passenger compartment in the trunk (4-door) or cargo area (5-door). Store the head restraint in a sudden stop or a sharp turn. 5-door models 2. Seat, seatbelt and SRS airbags 1-35 There are two or ...three anchorages for the appropriate upper anchorage. 5-door models - CONTINUED - To hook the top tether NOTE For Latin America model, there is a top tether cover on the rear wall of the cargo area. ! lift up the head restraint while pressing the release button. Open the...
...; Avoid placing the head restraint in the passenger compartment to prevent it from being thrown around in the passenger compartment in the trunk (4-door) or cargo area (5-door). Store the head restraint in a sudden stop or a sharp turn. 5-door models 2. Seat, seatbelt and SRS airbags 1-35 There are two or ...three anchorages for the appropriate upper anchorage. 5-door models - CONTINUED - To hook the top tether NOTE For Latin America model, there is a top tether cover on the rear wall of the cargo area. ! lift up the head restraint while pressing the release button. Open the...
Owner's Manual
Page 207
... mirror ... 6-3 6-4 Storage compartment ...Glove box ...Center console...Coin tray (if equipped) ... 6-4 6-4 6-5 6-5 Floor mat (if equipped)...Shopping bag hook (5-door)...Cargo area cover (5-door - if equipped)...Using the cover ...To remove the cover ...To install the cover housing ... 6-11 6-11 6-11 6-11 6-12 6-12 Cup holders ...Front passenger's cup holder ...Rear passenger's cup holder (if equipped...
... mirror ... 6-3 6-4 Storage compartment ...Glove box ...Center console...Coin tray (if equipped) ... 6-4 6-4 6-5 6-5 Floor mat (if equipped)...Shopping bag hook (5-door)...Cargo area cover (5-door - if equipped)...Using the cover ...To remove the cover ...To install the cover housing ... 6-11 6-11 6-11 6-11 6-12 6-12 Cup holders ...Front passenger's cup holder ...Rear passenger's cup holder (if equipped...

Owner's Manual
Page 217
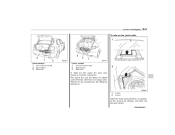
... floor mat is located on the driver's side floor. Cargo area cover (5-door - if equipped) The cargo area cover is attached to protect its contents from the catches and it could cause an accident. To extend the cover, pull the end of the cover out of the housing, then insert its retaining pins.... If the floor mat slips forward and interferes with the movement of the cargo area. You should hold on to make room for covering the cargo area and to each side of the pedals during driving, it will rewind automatically. Shopping bag hook (5-door)...
... floor mat is located on the driver's side floor. Cargo area cover (5-door - if equipped) The cargo area cover is attached to protect its contents from the catches and it could cause an accident. To extend the cover, pull the end of the cover out of the housing, then insert its retaining pins.... If the floor mat slips forward and interferes with the movement of the cargo area. You should hold on to make room for covering the cargo area and to each side of the pedals during driving, it will rewind automatically. Shopping bag hook (5-door)...

Owner's Manual
Page 285
... of a sudden stop or accident. Do not pile heavy loads on the rear shelf behind the rear seatback (for 4-door) or the extended cargo area cover (for 5-door). Also, overloading can to prevent it can change the way your vehicle. . Do not place anything on the roof. CAUTION... Do not carry spray cans, containers with flammable or corrosive liquids or any other cargo higher than the top of the seatback because it ...
... of a sudden stop or accident. Do not pile heavy loads on the rear shelf behind the rear seatback (for 4-door) or the extended cargo area cover (for 5-door). Also, overloading can to prevent it can change the way your vehicle. . Do not place anything on the roof. CAUTION... Do not carry spray cans, containers with flammable or corrosive liquids or any other cargo higher than the top of the seatback because it ...
Owner's Manual
Page 293
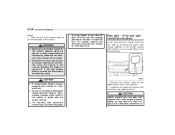
In case of emergency 9-5 To take out the jack handle. - CONTINUED - Take out the spare tire, jack, jack handle and wheel nut wrench. Take them out according to the following procedure. 1) 2) 4-door 5-door Open the floor cover of the trunk or cargo area. The spare tire and the tools are stored under the floor of the trunk (4-door) or the cargo area (5-door), and take out the jack handle: 4-door models 1) Jack and tool bucket 2) Jack handle 3) Spare tire 5-door models 1) Jack and tool bucket 2) Jack handle 3) Spare tire 5.
In case of emergency 9-5 To take out the jack handle. - CONTINUED - Take out the spare tire, jack, jack handle and wheel nut wrench. Take them out according to the following procedure. 1) 2) 4-door 5-door Open the floor cover of the trunk or cargo area. The spare tire and the tools are stored under the floor of the trunk (4-door) or the cargo area (5-door), and take out the jack handle: 4-door models 1) Jack and tool bucket 2) Jack handle 3) Spare tire 5-door models 1) Jack and tool bucket 2) Jack handle 3) Spare tire 5.

Owner's Manual
Page 302
Never use suspension parts or other parts of the body for attaching the towing hook. 4. Take the jack handle out of the cargo area. 3. Use only the specified towing hook and tie-down purposes. . To prevent deformation to the front bumper and the towing hook, do not apply ... bag. Front towing hook (except WRX STI): 1. Front towing hook (WRX STI): 1. Take the jack handle out of the trunk (4-door) or cargo area (5-door). 2. Pry off the cover on the front bumper using the jack handle. 9-14 In case of emergency & Towing and tie-down hooks The towing hooks should be...
Never use suspension parts or other parts of the body for attaching the towing hook. 4. Take the jack handle out of the cargo area. 3. Use only the specified towing hook and tie-down purposes. . To prevent deformation to the front bumper and the towing hook, do not apply ... bag. Front towing hook (except WRX STI): 1. Front towing hook (WRX STI): 1. Take the jack handle out of the trunk (4-door) or cargo area (5-door). 2. Pry off the cover on the front bumper using the jack handle. 9-14 In case of emergency & Towing and tie-down hooks The towing hooks should be...

Owner's Manual
Page 304
Take the jack handle out of the tool bag. Fit the towing hook cover on the rear bumper using the jack handle. Tighten the towing hook securely using a... 3. Take the towing hook out of the tool bucket and take the screwdriver out of the trunk (4-door) or cargo area (5-door). Front tie-down hooks are located between each of emergency Rear towing hook: 1. Screw the towing hook...longer be seen. 2. WARNING Do not use the towing hook except when towing your vehicle. Pry off the cover on the bumper. the vehicle and stow it in the tool bucket. 9-16 In case of the front tires and...
Take the jack handle out of the tool bag. Fit the towing hook cover on the rear bumper using the jack handle. Tighten the towing hook securely using a... 3. Take the towing hook out of the tool bucket and take the screwdriver out of the trunk (4-door) or cargo area (5-door). Front tie-down hooks are located between each of emergency Rear towing hook: 1. Screw the towing hook...longer be seen. 2. WARNING Do not use the towing hook except when towing your vehicle. Pry off the cover on the bumper. the vehicle and stow it in the tool bucket. 9-16 In case of the front tires and...
Owner's Manual
Page 306
...the direction of the wheels will take greater effort to the "LOCK" position while the vehicle is turned off, it from inside the cargo area. Locate the rear gate lock release lever behind the rear gate trim panel. Transmission damage could result if the vehicle is not ...running . . 9-18 In case of the rear gate trim. 2. Remove the access cover at the bottom-center of emergency towed. 4. Never turn the ignition switch to operate the brake pedal and steering wheel. For vehicles with ...
...the direction of the wheels will take greater effort to the "LOCK" position while the vehicle is turned off, it from inside the cargo area. Locate the rear gate lock release lever behind the rear gate trim panel. Transmission damage could result if the vehicle is not ...running . . 9-18 In case of the rear gate trim. 2. Remove the access cover at the bottom-center of emergency towed. 4. Never turn the ignition switch to operate the brake pedal and steering wheel. For vehicles with ...

Owner's Manual
Page 308
Have your vehicle checked and repaired by an authorized SUBARU dealer. Maintenance tools Your vehicle is equipped with the following maintenance tools: Jack Jack handle Screwdriver Towing hook (eye bolt) Wheel nut wrench Hex-head wrench (vehicle with moonroof) & Jack handle 1) 2) 4-door 5-door The jack handle is stored under the floor cover of emergency clockwise. 9-20 In case of the trunk (4-door) or the cargo area (5-door). To close the moonroof, turn the wrench counterclockwise.
Have your vehicle checked and repaired by an authorized SUBARU dealer. Maintenance tools Your vehicle is equipped with the following maintenance tools: Jack Jack handle Screwdriver Towing hook (eye bolt) Wheel nut wrench Hex-head wrench (vehicle with moonroof) & Jack handle 1) 2) 4-door 5-door The jack handle is stored under the floor cover of emergency clockwise. 9-20 In case of the trunk (4-door) or the cargo area (5-door). To close the moonroof, turn the wrench counterclockwise.

Owner's Manual
Page 371
Reinstall the lens. & High mount stop light assembly by your SUBARU dealer if necessary. 1. Remove the high mount stop light cover by prying the edge with a flat-head screwdriver. 2. Reinstall the cover. 1. Remove the bulb socket from the high mount stop light (4door) & Trunk light Dome light...out of the socket. 4. 11-56 Maintenance and service & Dome light and cargo area light the lens with a screwdriver. 2. Pull the bulb out of Install a new bulb. 5. Reinstall the cover. & Other bulbs Cargo area light Other bulbs may be difficult to replace. Remove the lens by squeezing...
Reinstall the lens. & High mount stop light assembly by your SUBARU dealer if necessary. 1. Remove the high mount stop light cover by prying the edge with a flat-head screwdriver. 2. Reinstall the cover. 1. Remove the bulb socket from the high mount stop light (4door) & Trunk light Dome light...out of the socket. 4. 11-56 Maintenance and service & Dome light and cargo area light the lens with a screwdriver. 2. Pull the bulb out of Install a new bulb. 5. Reinstall the cover. & Other bulbs Cargo area light Other bulbs may be difficult to replace. Remove the lens by squeezing...

Owner's Manual
Page 398
Index 14-3 C Capacities ...12-4 Cargo area Cover ...6-11 Light...6-2, 11-56 Tie-down hooks ...6-13 Catalytic converter ...8-3 Center Console ...6-5 Ventilators ...4-3 Center and side ventilators...4-3 Changing Flat tire ...9-4 Oil and oil filter ...11-...
Index 14-3 C Capacities ...12-4 Cargo area Cover ...6-11 Light...6-2, 11-56 Tie-down hooks ...6-13 Catalytic converter ...8-3 Center Console ...6-5 Ventilators ...4-3 Center and side ventilators...4-3 Changing Flat tire ...9-4 Oil and oil filter ...11-...
