
Owner's Manual
Page 34
... Push the switch and adjust the seatback to ride on the folded rear seatback or in motion. And make sure the seatback is equipped with a cargo area cover, be certain to place all objects and especially long items properly to prevent them from sliding under the lap belt and of a collision, always... securely locked into place. & Folding down the rear seatback WARNING . Also, do not place objects such as cushions between the headrest and the cargo area cover when you do so, the risk of sliding under the seatbelt in the event of the lap belt sliding up over the abdomen will increase...
... Push the switch and adjust the seatback to ride on the folded rear seatback or in motion. And make sure the seatback is equipped with a cargo area cover, be certain to place all objects and especially long items properly to prevent them from sliding under the lap belt and of a collision, always... securely locked into place. & Folding down the rear seatback WARNING . Also, do not place objects such as cushions between the headrest and the cargo area cover when you do so, the risk of sliding under the seatbelt in the event of the lap belt sliding up over the abdomen will increase...
Owner's Manual
Page 58
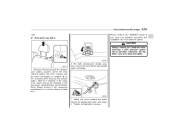
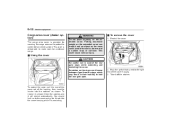
...the headrest in a sudden stop or a sharp turn. 2. For both window-side seating positions, remove the cover for the appropriate upper anchorage. 3. Attach the child restraint top tether hook to prevent it from being thrown... around in the passenger compartment in the cargo area. Tighten the top tether securely. Seat, seatbelt and SRS airbags 1-33 roof. ! Avoid placing...tether. To hook the top tether Please contact your SUBARU dealer if you have any question regarding the installation of a child restraint system.
...the headrest in a sudden stop or a sharp turn. 2. For both window-side seating positions, remove the cover for the appropriate upper anchorage. 3. Attach the child restraint top tether hook to prevent it from being thrown... around in the passenger compartment in the cargo area. Tighten the top tether securely. Seat, seatbelt and SRS airbags 1-33 roof. ! Avoid placing...tether. To hook the top tether Please contact your SUBARU dealer if you have any question regarding the installation of a child restraint system.
Owner's Manual
Page 123
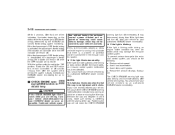
... an inspection. warning light turn off immediately. To prevent serious damage to your SUBARU dealer as soon as necessary could be covered by the SUBARU advanced frontal airbag system monitoring. The CHECK ENGINE warning light may damage the emission... driving, an engine misfire condition has been detected which may take your vehicle checked by an authorized SUBARU dealer immediately. & CHECK ENGINE warnCAUTION NOTE This light also illuminates when the fuel filler cap is faulty...warning light/malfunction indicator lamp coming on the status of cargo, if possible.
... an inspection. warning light turn off immediately. To prevent serious damage to your SUBARU dealer as soon as necessary could be covered by the SUBARU advanced frontal airbag system monitoring. The CHECK ENGINE warning light may damage the emission... driving, an engine misfire condition has been detected which may take your vehicle checked by an authorized SUBARU dealer immediately. & CHECK ENGINE warnCAUTION NOTE This light also illuminates when the fuel filler cap is faulty...warning light/malfunction indicator lamp coming on the status of cargo, if possible.

Owner's Manual
Page 196
... ...Center console...Overhead console ...Rear seat center table (if equipped) ...Coin tray... 6-4 6-5 6-5 6-6 6-6 6-7 Floor mat ...Shopping bag hook ...Coat hook...Cargo area cover (dealer option)...Using the cover ...To remove the cover ...To install the cover housing ... 6-11 6-11 6-11 6-12 6-12 6-12 6-13 Cup holders ...Front passenger cup holder...Rear passenger cup holder (if equipped...
... ...Center console...Overhead console ...Rear seat center table (if equipped) ...Coin tray... 6-4 6-5 6-5 6-6 6-6 6-7 Floor mat ...Shopping bag hook ...Coat hook...Cargo area cover (dealer option)...Using the cover ...To remove the cover ...To install the cover housing ... 6-11 6-11 6-11 6-12 6-12 6-12 6-13 Cup holders ...Front passenger cup holder...Rear passenger cup holder (if equipped...
Owner's Manual
Page 207
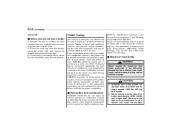
... not place anything on the extended cover can break it is detachable to make room for covering the cargo area and to scratch the rear gate stays while extending and rewinding the cover. This cover is rewinding. Push the switch that is next to the cover and guide it back into the catches... as shown. Rewind the cover. & Using the cover CAUTION Be careful not...
... not place anything on the extended cover can break it is detachable to make room for covering the cargo area and to scratch the rear gate stays while extending and rewinding the cover. This cover is rewinding. Push the switch that is next to the cover and guide it back into the catches... as shown. Rewind the cover. & Using the cover CAUTION Be careful not...

Owner's Manual
Page 208
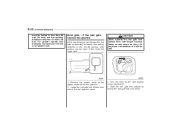
When not in use, put the hooks up into the recesses of the retainers. Remove the cover of the retainers by prying on the - CONTINUED - The cargo area is equipped with four tiedown hooks so that cargo can be secured with a flat-head screwdriver. Insert the projections located on the edge with a cargo net or ropes. Cargo tie-down out of the storing recesses. When using the tie-down hooks, turn them down hooks 1. Interior equipment 6-13 & To install the cover housing both ends of the sleeve into the storing recesses. 2.
When not in use, put the hooks up into the recesses of the retainers. Remove the cover of the retainers by prying on the - CONTINUED - The cargo area is equipped with four tiedown hooks so that cargo can be secured with a flat-head screwdriver. Insert the projections located on the edge with a cargo net or ropes. Cargo tie-down out of the storing recesses. When using the tie-down hooks, turn them down hooks 1. Interior equipment 6-13 & To install the cover housing both ends of the sleeve into the storing recesses. 2.

Owner's Manual
Page 259
...placard attached to the driver's side door pillar. Such items could tumble forward in your vehicle. . The maximum load you do not carry unneeded cargo. & Vehicle capacity weight The load capacity of control and cause personal injury. Secure lengthy items properly to tip over. . Also, overloading can...liquids or any optional equipment such as a trailer hitch, roof rack or bike carrier, etc. Do not pile heavy loads on the extended cargo area cover. Never exceed the maximum load limit. This could result in an accident. . It includes the total weight of gravity and make it ...
...placard attached to the driver's side door pillar. Such items could tumble forward in your vehicle. . The maximum load you do not carry unneeded cargo. & Vehicle capacity weight The load capacity of control and cause personal injury. Secure lengthy items properly to tip over. . Also, overloading can...liquids or any optional equipment such as a trailer hitch, roof rack or bike carrier, etc. Do not pile heavy loads on the extended cargo area cover. Never exceed the maximum load limit. This could result in an accident. . It includes the total weight of gravity and make it ...
Owner's Manual
Page 261
... gravity is altered with the weight of the load on the roof, thus affecting driving characteristics. Remove the receiver cover from the hitch due to loss of cargo could create a traffic safety hazard if the trailer separates from the hitch receiver tube. Crosswind effects will hold the... into the hitch receiver tube. Permissible trailer weight changes depending on the vehicle. Drive carefully. Consult a SUBARU dealer for the trailer hitch. WARNING . Be sure to carry cargo. Do not use with this hitch. One of them must always be installed on the situation. When ...
... gravity is altered with the weight of the load on the roof, thus affecting driving characteristics. Remove the receiver cover from the hitch due to loss of cargo could create a traffic safety hazard if the trailer separates from the hitch receiver tube. Crosswind effects will hold the... into the hitch receiver tube. Permissible trailer weight changes depending on the vehicle. Drive carefully. Consult a SUBARU dealer for the trailer hitch. WARNING . Be sure to carry cargo. Do not use with this hitch. One of them must always be installed on the situation. When ...
Owner's Manual
Page 263
... any errors or omissions in your vehicle. Adequate size trailer brakes are accepta- & Warranties and maintenance SUBARU warranties do not tow a trailer . Towing a trailer puts additional loads on your vehicle to tow ... result from trailer towing equipment, or from the hitch receiver tube and insert the receiver cover onto the hitch receiver tube. . Place the dust cap over the four-pin connector ...check the trailer total weight, GVW, GAWs and tongue load. Make sure the load and its cargo exceed 1,000 lbs (453 kg) total weight. . Trailer towing Your vehicle is designed and ...
... any errors or omissions in your vehicle. Adequate size trailer brakes are accepta- & Warranties and maintenance SUBARU warranties do not tow a trailer . Towing a trailer puts additional loads on your vehicle to tow ... result from trailer towing equipment, or from the hitch receiver tube and insert the receiver cover onto the hitch receiver tube. . Place the dust cap over the four-pin connector ...check the trailer total weight, GVW, GAWs and tongue load. Make sure the load and its cargo exceed 1,000 lbs (453 kg) total weight. . Trailer towing Your vehicle is designed and ...

Owner's Manual
Page 276
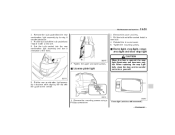
Take them out according to the following procedure. The spare tire and the tools are stored under the floor of the spare tire wheel. 1) 2) 3) Jack and tool bucket Jack handle Spare tire 5. To take out the jack and wheel nut wrench: 1) 2) Jack Towing hook Take out the storage tray, and take out the jack handle. In case of emergency 9-5 To take out the jack handle: tool bucket that is stored in the recess of the cargo area. Open the floor cover of the cargo area, and take out the - CONTINUED - Take out the spare tire, jack, jack handle and wheel nut wrench.
Take them out according to the following procedure. The spare tire and the tools are stored under the floor of the spare tire wheel. 1) 2) 3) Jack and tool bucket Jack handle Spare tire 5. To take out the jack and wheel nut wrench: 1) 2) Jack Towing hook Take out the storage tray, and take out the jack handle. In case of emergency 9-5 To take out the jack handle: tool bucket that is stored in the recess of the cargo area. Open the floor cover of the cargo area, and take out the - CONTINUED - Take out the spare tire, jack, jack handle and wheel nut wrench.

Owner's Manual
Page 283
... towing hook out of the tool bucket and take the screwdriver out of emergency Towing If towing is necessary, it is best done by your SUBARU dealer or a commercial towing service. CAUTION . Screw the towing hook into the thread hole until its thread can no longer be used only in an... excessive lateral load to the operation or deterioration of the body for towing or tie-down purposes. . Take the wheel nut wrench out of the cargo area. 2. Pry off the ground while the front wheels are on the ground, or with the rear wheels raised off the...
... towing hook out of the tool bucket and take the screwdriver out of emergency Towing If towing is necessary, it is best done by your SUBARU dealer or a commercial towing service. CAUTION . Screw the towing hook into the thread hole until its thread can no longer be used only in an... excessive lateral load to the operation or deterioration of the body for towing or tie-down purposes. . Take the wheel nut wrench out of the cargo area. 2. Pry off the ground while the front wheels are on the ground, or with the rear wheels raised off the...

Owner's Manual
Page 284
...ball and follow the instructions below when towing. . Take the towing hook out of the tool bucket and take the screwdriver out of the cargo area. 4. The weight of the object being towed must be installed on the rear bumper using a wheel nut wrench. In case of... standard bumper beam must be seen. - CONTINUED - Consult a SUBARU dealer for attaching the towing hook. Tighten the towing hook securely using a screwdriver, and you will find a threaded hole for details. Pry off the cover on the vehicle at a SUBARU dealer. Leaving the towing hook mounted on the bumper. 2.
...ball and follow the instructions below when towing. . Take the towing hook out of the tool bucket and take the screwdriver out of the cargo area. 4. The weight of the object being towed must be installed on the rear bumper using a wheel nut wrench. In case of... standard bumper beam must be seen. - CONTINUED - Consult a SUBARU dealer for attaching the towing hook. Tighten the towing hook securely using a screwdriver, and you will find a threaded hole for details. Pry off the cover on the vehicle at a SUBARU dealer. Leaving the towing hook mounted on the bumper. 2.
Owner's Manual
Page 287
... less than 20 mph (30 km/h) and the traveling distance to the right position using a screwdriver. 4. Open the rear gate from inside the cargo area. Remove the access cover at the bottom-center of emergency must be opened In the event that you cannot open the rear gate by operating the power...
... less than 20 mph (30 km/h) and the traveling distance to the right position using a screwdriver. 4. Open the rear gate from inside the cargo area. Remove the access cover at the bottom-center of emergency must be opened In the event that you cannot open the rear gate by operating the power...

Owner's Manual
Page 288
... the moonroof cannot be closed If the moonroof cannot be closed with moonroof) Lever 2. Insert a hex-head wrench in the end of the cargo area by an authorized SUBARU dealer. 1. Have your vehicle checked and repaired by inserting the end of the flathead screwdriver between the roof and plug and prying it... wrench (only vehicles with the moonroof switch, you can close the moonroof, turn the wrench counterclockwise. Maintenance tools Your vehicle is stored under the floor cover of the cargo area. - CONTINUED - Remove the plug on the roof trim of the motor shaft.
... the moonroof cannot be closed If the moonroof cannot be closed with moonroof) Lever 2. Insert a hex-head wrench in the end of the cargo area by an authorized SUBARU dealer. 1. Have your vehicle checked and repaired by inserting the end of the flathead screwdriver between the roof and plug and prying it... wrench (only vehicles with the moonroof switch, you can close the moonroof, turn the wrench counterclockwise. Maintenance tools Your vehicle is stored under the floor cover of the cargo area. - CONTINUED - Remove the plug on the roof trim of the motor shaft.
Owner's Manual
Page 346
...Tighten the mounting screws. & Dome light, map light, cargo area light and door step light CAUTION When the door...rear combination light assembly into the rear combination light assembly and turn it clockwise until it locks. 2. Remove the cover and lens. 3. Tighten the upper and lower screws. & License plate light 6. Remove the bulb socket from...the bulb socket into place while aligning the clip with moonroof) - CONTINUED - Reinstall the lens and cover. 5. Maintenance and service 11-51 3. Remove the mounting screws using a Phillips screwdriver. Pull the bulb out of the socket....
...Tighten the mounting screws. & Dome light, map light, cargo area light and door step light CAUTION When the door...rear combination light assembly into the rear combination light assembly and turn it clockwise until it locks. 2. Remove the cover and lens. 3. Tighten the upper and lower screws. & License plate light 6. Remove the bulb socket from...the bulb socket into place while aligning the clip with moonroof) - CONTINUED - Reinstall the lens and cover. 5. Maintenance and service 11-51 3. Remove the mounting screws using a Phillips screwdriver. Pull the bulb out of the socket....
Owner's Manual
Page 374
Index 14-3 C Capacities ...12-4 Cargo area Cover ...6-12 Light...6-3 Tie-down hooks ...6-13 Catalytic converter ...8-3 Center Console ...6-5 Ventilators ...4-3 Center and side ventilators...4-3 Changing Flat tire ...9-4 Oil and oil filter ...11-9 Charge warning ...
Index 14-3 C Capacities ...12-4 Cargo area Cover ...6-12 Light...6-3 Tie-down hooks ...6-13 Catalytic converter ...8-3 Center Console ...6-5 Ventilators ...4-3 Center and side ventilators...4-3 Changing Flat tire ...9-4 Oil and oil filter ...11-9 Charge warning ...


