Owner's Manual
Page 3
...and contains precautions for the SRS airbags. Each chapter begins with the following warranties: . Chapter 2: Keys and doors This chapter informs you how to use this manual. Anti-Corrosion Warranty . Please read these warranties carefully. ...SUBARU Limited Warranty . SUBARU Limited Warranty . WRX STI CAUTION WRX STI models are equipped with the following warranties: . Chapter 1: Seat, seatbelt and SRS airbags This chapter informs you want. Emissions Performance Warranty All warranty information, including details of instrument panel indicators and how to remove...
...and contains precautions for the SRS airbags. Each chapter begins with the following warranties: . Chapter 2: Keys and doors This chapter informs you how to use this manual. Anti-Corrosion Warranty . Please read these warranties carefully. ...SUBARU Limited Warranty . SUBARU Limited Warranty . WRX STI CAUTION WRX STI models are equipped with the following warranties: . Chapter 1: Seat, seatbelt and SRS airbags This chapter informs you want. Emissions Performance Warranty All warranty information, including details of instrument panel indicators and how to remove...
Owner's Manual
Page 121
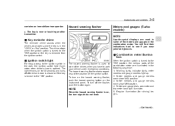
... you wear polarized glasses. & Key reminder chime The reminder chime sounds when the driver's door opens and the key is in the following sequence: 1. Meter needles and gauge needles each...off the flasher, push the button again. & Combination meter illumination When the ignition switch is removed from the ignition switch. & Ignition switch light For easy access to park your vehicle under ...Meter needles and gauge needles each show MAX position. 3. The key is on the instrument panel. The light remains on for driving) begins. Meter and gauge dials, odometer and trip meter...
... you wear polarized glasses. & Key reminder chime The reminder chime sounds when the driver's door opens and the key is in the following sequence: 1. Meter needles and gauge needles each...off the flasher, push the button again. & Combination meter illumination When the ignition switch is removed from the ignition switch. & Ignition switch light For easy access to park your vehicle under ...Meter needles and gauge needles each show MAX position. 3. The key is on the instrument panel. The light remains on for driving) begins. Meter and gauge dials, odometer and trip meter...

Owner's Manual
Page 235
... program a remote transmitter: press and release the " " button on the driver's side left under the dashboard panel. 4. Carefully pry the remote control halves apart using the following procedure. 1. Pressing the brake pedal repeatedly will ...to indicate Confirmation Horn Chirps are "OFF". Follow the instructions below to the "LOCK" position, remove the key from the vehicle that the system has entered programming mode. The horn will chirp and... feature. & System maintenance ! Open the driver's door (the driver's door must remain opened throughout the entire process). 2.
... program a remote transmitter: press and release the " " button on the driver's side left under the dashboard panel. 4. Carefully pry the remote control halves apart using the following procedure. 1. Pressing the brake pedal repeatedly will ...to indicate Confirmation Horn Chirps are "OFF". Follow the instructions below to the "LOCK" position, remove the key from the vehicle that the system has entered programming mode. The horn will chirp and... feature. & System maintenance ! Open the driver's door (the driver's door must remain opened throughout the entire process). 2.
Owner's Manual
Page 308
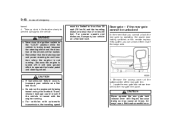
...use a flat-head screwdriver or Remember that you cannot unlock the rear gate by operating the power door locking switches or the remote keyless entry system, you can unlock it will be locked. . ...Locate the rear gate lock release lever behind the rear gate trim panel. Never turn the ignition switch to the "LOCK" position while the vehicle is towed with fingers ...on a flat-bed truck. Transmission damage could result if the vehicle is being towed using this method. Remove the access cover at the bottom-center of the rear gate trim. 2. Rear gate - if the...
...use a flat-head screwdriver or Remember that you cannot unlock the rear gate by operating the power door locking switches or the remote keyless entry system, you can unlock it will be locked. . ...Locate the rear gate lock release lever behind the rear gate trim panel. Never turn the ignition switch to the "LOCK" position while the vehicle is towed with fingers ...on a flat-bed truck. Transmission damage could result if the vehicle is being towed using this method. Remove the access cover at the bottom-center of the rear gate trim. 2. Rear gate - if the...
Owner's Manual
Page 368
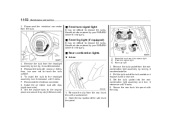
...Set the washer tank to touch the bulb surface. 6. Pull the bulb out of the side trunk trim panel. Remove the clip from the headlight assembly by your SUBARU dealer if necessary. & Front fog light (if equipped) It may be difficult to replace the bulbs. Open...bulb with clips (right-hand side). 9. Remove the bulb socket from the bulb. & Front turn it clockwise until it counterclockwise. 4. Disconnect the electrical connector from the rear combination light assembly by your SUBARU dealer if necessary. & Rear combination lights ! 4-door 4. To install the bulb to the ...
...Set the washer tank to touch the bulb surface. 6. Pull the bulb out of the side trunk trim panel. Remove the clip from the headlight assembly by your SUBARU dealer if necessary. & Front fog light (if equipped) It may be difficult to replace the bulbs. Open...bulb with clips (right-hand side). 9. Remove the bulb socket from the bulb. & Front turn it clockwise until it counterclockwise. 4. Disconnect the electrical connector from the rear combination light assembly by your SUBARU dealer if necessary. & Rear combination lights ! 4-door 4. To install the bulb to the ...


