Owner's Manual
Page 13
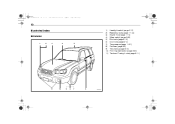
A8110BE.book 10 ページ 10 Illustrated index Exterior 1 2 3 4 5 1) 2) 3) 4) 5) 6) 7) 8) 9) 10) 11) Headlight switch (page 3-17) Replacing bulbs (page 11-44) Engine hood (page 11-4) Wiper switch (page 3-22) Roof rails (page 8-13) Door locks (page 2-4) Tire pressure (page 11-31) Flat tires (page 9-3) Tire chains (page 8-10) Front fog light button (page 3-20) Tie-down/Towing hooks (page 9-11) 11 10 9 8 7 6 000194
A8110BE.book 10 ページ 10 Illustrated index Exterior 1 2 3 4 5 1) 2) 3) 4) 5) 6) 7) 8) 9) 10) 11) Headlight switch (page 3-17) Replacing bulbs (page 11-44) Engine hood (page 11-4) Wiper switch (page 3-22) Roof rails (page 8-13) Door locks (page 2-4) Tire pressure (page 11-31) Flat tires (page 9-3) Tire chains (page 8-10) Front fog light button (page 3-20) Tie-down/Towing hooks (page 9-11) 11 10 9 8 7 6 000194
Owner's Manual
Page 226
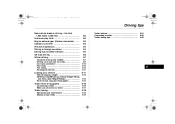
... a trailer ...Trailer towing tips ... 8-21 8-22 8-23 8 Loading your vehicle ...Vehicle capacity weight ...GVWR and GAWR (Gross Vehicle Weight Rating and Gross Axle Weight Rating) ...Roof rail and crossbar (if equipped) ... 8-11 8-12 8-12 8-13 Trailer hitch (if equipped) ...Connecting a trailer ...When you do not tow a trailer ... 8-16 8-16 8-17 Trailer towing...
... a trailer ...Trailer towing tips ... 8-21 8-22 8-23 8 Loading your vehicle ...Vehicle capacity weight ...GVWR and GAWR (Gross Vehicle Weight Rating and Gross Axle Weight Rating) ...Roof rail and crossbar (if equipped) ... 8-11 8-12 8-12 8-13 Trailer hitch (if equipped) ...Connecting a trailer ...When you do not tow a trailer ... 8-16 8-16 8-17 Trailer towing...
Owner's Manual
Page 238
...inside the vehicle. Cargo can be used alone to carry cargo. Roof rail and crossbar (if equipped) For cargo carrying purposes, the roof rail must never be carried after securing the roof crossbar kit to the roof rail and installing the appropriate carrying attachment. You should also be evenly...the crossbars. The maximum load limit of the - CONTINUED - When using the roof crossbar kit and a carrying attachment, never exceed the maximum load limit explained in the following. The roof rail is altered with a lower load range than the originals do not increase the ...
...inside the vehicle. Cargo can be used alone to carry cargo. Roof rail and crossbar (if equipped) For cargo carrying purposes, the roof rail must never be carried after securing the roof crossbar kit to the roof rail and installing the appropriate carrying attachment. You should also be evenly...the crossbars. The maximum load limit of the - CONTINUED - When using the roof crossbar kit and a carrying attachment, never exceed the maximum load limit explained in the following. The roof rail is altered with a lower load range than the originals do not increase the ...
Owner's Manual
Page 239
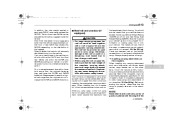
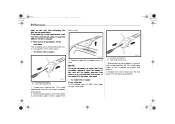
... the top of each side of the crossbar from To install the crossbar Front crossbar: Front crossbar has 150 LBS. To remove the crossbar 0 the roof rail. 1 2 800222 800223 1 3. Spread the inner clamp and the end support as far apart as possible. 2 1) Crossbar end support 2) T-30 torx® head screw ...1. Removal and installation of the roof rail for easier removal. Use care not to carry cargo. Move the end support and inner clamp to move the Front crossbar rearward, near the center...
... the top of each side of the crossbar from To install the crossbar Front crossbar: Front crossbar has 150 LBS. To remove the crossbar 0 the roof rail. 1 2 800222 800223 1 3. Spread the inner clamp and the end support as far apart as possible. 2 1) Crossbar end support 2) T-30 torx® head screw ...1. Removal and installation of the roof rail for easier removal. Use care not to carry cargo. Move the end support and inner clamp to move the Front crossbar rearward, near the center...

Owner's Manual
Page 240
...crossbars are removed. FRONT MAXIMUM LOAD 100 LBS. NOTE Before each end of the crossbar. Use care not to hook under the end of the roof rail on both sides and loosely assemble the T-30 torx® head screw with the torx® wrench provided). Move the end support and inner clamp...to start the inner clamp and end support at the center of the roof rail for easier installation, then move the crossbar forward. Luggage on the top of the roof rails approximately 6 inches (150 mm) rearward in the front radius of the roof rail. 4. With the front direction arrow label on the top right side ...
...crossbars are removed. FRONT MAXIMUM LOAD 100 LBS. NOTE Before each end of the crossbar. Use care not to hook under the end of the roof rail on both sides and loosely assemble the T-30 torx® head screw with the torx® wrench provided). Move the end support and inner clamp...to start the inner clamp and end support at the center of the roof rail for easier installation, then move the crossbar forward. Luggage on the top of the roof rails approximately 6 inches (150 mm) rearward in the front radius of the roof rail. 4. With the front direction arrow label on the top right side ...

Owner's Manual
Page 353
A8110BE.book 6 ページ 14-6 Index Replacing Air cleaner element ...11-15 Battery (remote keyless entry) ...2-8 Bulbs ...11-44 Transmitters ...2-9 Rocking the vehicle ...8-11 Roof rail and crossbar ...8-13 S Safety Precautions when driving ...4 Symbol ...2 Warnings ...2 Seat height adjustment (drivers seat) ...1-4 Seatbelt ...4 Extender ...1-20 Maintenance ...1-19 Pretensioners ...1-21 Safety tips ...1-10 Warning ...
A8110BE.book 6 ページ 14-6 Index Replacing Air cleaner element ...11-15 Battery (remote keyless entry) ...2-8 Bulbs ...11-44 Transmitters ...2-9 Rocking the vehicle ...8-11 Roof rail and crossbar ...8-13 S Safety Precautions when driving ...4 Symbol ...2 Warnings ...2 Seat height adjustment (drivers seat) ...1-4 Seatbelt ...4 Extender ...1-20 Maintenance ...1-19 Pretensioners ...1-21 Safety tips ...1-10 Warning ...

