
Owner's Manual
Page 8
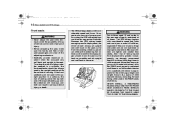
... whenever a child rides in chapter 2. Always lock the passenger's windows using the seatbelts. Never allow a child to follow this Owner's Manual for the child's age, height and weight. Serious injury could accidentally injure themselves or others through inadvertent operation of this procedure could quickly become high enough to cause severe or...
... whenever a child rides in chapter 2. Always lock the passenger's windows using the seatbelts. Never allow a child to follow this Owner's Manual for the child's age, height and weight. Serious injury could accidentally injure themselves or others through inadvertent operation of this procedure could quickly become high enough to cause severe or...
Owner's Manual
Page 31
... and of proper position when the SRS airbag deploys could suffer very serious injuries. Because the SRS airbag needs enough space for the child's age, height and weight. Because children are out of the lap belt sliding up over the abdomen will increase, and both can injure or even kill children...
... and of proper position when the SRS airbag deploys could suffer very serious injuries. Because the SRS airbag needs enough space for the child's age, height and weight. Because children are out of the lap belt sliding up over the abdomen will increase, and both can injure or even kill children...

Owner's Manual
Page 33
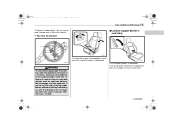
Seat height adjustment 100600 To adjust the seat cushion angle, pull up or push down the front end of the seat. To adjust the seat forward or ... the control switch forward or backward. Use the adjusting dial to raise the seat. A8110BE.book 4 ページ 1-4 Seat, seatbelt and SRS airbags Seat height adjustment (Driver's seat only) Power seat (if equipped) Fore and aft adjustment Seat cushion angle adjustment 2 1 100739 100597 100598 1) Turn the dial backward to lower...
Seat height adjustment 100600 To adjust the seat cushion angle, pull up or push down the front end of the seat. To adjust the seat forward or ... the control switch forward or backward. Use the adjusting dial to raise the seat. A8110BE.book 4 ページ 1-4 Seat, seatbelt and SRS airbags Seat height adjustment (Driver's seat only) Power seat (if equipped) Fore and aft adjustment Seat cushion angle adjustment 2 1 100739 100597 100598 1) Turn the dial backward to lower...
Owner's Manual
Page 34
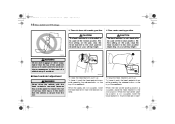
... up or push down the rear end of the control switch. A8110BE.book 5 ページ Seat, seatbelt and SRS airbags 1-5 To adjust the seat height, pull up over the abdomen will increase the amount of support for your lower back. Reclining the seatback Lumbar support (Driver's seat only) 1 100601 To...
... up or push down the rear end of the control switch. A8110BE.book 5 ページ Seat, seatbelt and SRS airbags 1-5 To adjust the seat height, pull up over the abdomen will increase the amount of support for your lower back. Reclining the seatback Lumbar support (Driver's seat only) 1 100601 To...

Owner's Manual
Page 35
...; 1-6 Seat, seatbelt and SRS airbags Head restraint adjustment Active head restraint Each active head restraint is effective only when its height is involved in a rear-end collision, have an authorized SUBARU dealer inspect the active head restraints. For maximum effectiveness the head restraint should be damaged if they are designed to the...
...; 1-6 Seat, seatbelt and SRS airbags Head restraint adjustment Active head restraint Each active head restraint is effective only when its height is involved in a rear-end collision, have an authorized SUBARU dealer inspect the active head restraints. For maximum effectiveness the head restraint should be damaged if they are designed to the...
Owner's Manual
Page 37
... the vehicle with the head restraints removed because they are not occupied, lower the head restraint to the click position depending on your sitting height. 100094 Never stack luggage or other cargo higher than the top of a sudden stop or accident. To raise the head restraint, pull ... To raise the head restraint, pull it up . To lower it , push the head restraint down while pressing the release button on your sitting height. When the rear center seating position is not intended to be used at the lowest position. A8110BE.book 8 ページ 1-8 Seat, ...
... the vehicle with the head restraints removed because they are not occupied, lower the head restraint to the click position depending on your sitting height. 100094 Never stack luggage or other cargo higher than the top of a sudden stop or accident. To raise the head restraint, pull ... To raise the head restraint, pull it up . To lower it , push the head restraint down while pressing the release button on your sitting height. When the rear center seating position is not intended to be used at the lowest position. A8110BE.book 8 ページ 1-8 Seat, ...

Owner's Manual
Page 39
... armrest, pull on the center armrest while the vehicle is appropriate for two or more persons - even children. Never use a single belt for the child's height and weight. Secure ALL types of the armrest. All belts should fit snugly in motion. Because children are lighter and weaker than adults, their seatbelts...
... armrest, pull on the center armrest while the vehicle is appropriate for two or more persons - even children. Never use a single belt for the child's height and weight. Secure ALL types of the armrest. All belts should fit snugly in motion. Because children are lighter and weaker than adults, their seatbelts...
Owner's Manual
Page 40
... of the seatbelt(s) by the driver and/or front passenger when any of the belt crosses the face or neck, adjust the shoulder belt anchor height (window-side seating positions only) and then if necessary move the child closer to the belt buckle to stand up or kneel on the seat...
... of the seatbelt(s) by the driver and/or front passenger when any of the belt crosses the face or neck, adjust the shoulder belt anchor height (window-side seating positions only) and then if necessary move the child closer to the belt buckle to stand up or kneel on the seat...
Owner's Manual
Page 43
... are retracted properly to the position best suited for the driver/front passenger. Placing the shoulder belt over your waist. Always adjust the anchor height so that it is locked in place. Before closing the door, make sure that the shoulder belt passes over the middle of the webbing...Place the lap belt as low as possible on your hips, not on your neck. To raise the anchor height, slide the anchor up on the shoulder belt. 6. The shoulder belt anchor height should be adjusted to avoid catching the belt webbing in a collision. 100102 Unfastening the seatbelt 100104 4. Insert ...
... are retracted properly to the position best suited for the driver/front passenger. Placing the shoulder belt over your waist. Always adjust the anchor height so that it is locked in place. Before closing the door, make sure that the shoulder belt passes over the middle of the webbing...Place the lap belt as low as possible on your hips, not on your neck. To raise the anchor height, slide the anchor up on the shoulder belt. 6. The shoulder belt anchor height should be adjusted to avoid catching the belt webbing in a collision. 100102 Unfastening the seatbelt 100104 4. Insert ...

Owner's Manual
Page 44
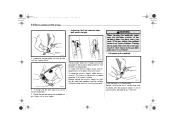
... belt still cannot be adjusted to make the lap part tight, pull up on your hips, not on the shoulder belt. 5. The shoulder belt anchor height should be unlocked, let the belt retract slightly after giving a strong pull on the anchor to the position best suited for you hear a click. A8110BE.... 2. To make sure that the shoulder belt passes over the middle of the shoulder without touching the neck. - CONTINUED - Pick up . To raise the anchor height, slide the anchor up the tongue plate and pull the belt out slowly. Sit well back in place. Pull down .
... belt still cannot be adjusted to make the lap part tight, pull up on your hips, not on the shoulder belt. 5. The shoulder belt anchor height should be unlocked, let the belt retract slightly after giving a strong pull on the anchor to the position best suited for you hear a click. A8110BE.... 2. To make sure that the shoulder belt passes over the middle of the shoulder without touching the neck. - CONTINUED - Pick up . To raise the anchor height, slide the anchor up the tongue plate and pull the belt out slowly. Sit well back in place. Pull down .

Owner's Manual
Page 55
... SEAT IN THE FRONT PASSENGER'S SEAT. C: Rear seat, center seating position Installing a child restraint system is appropriate for the child's age and size (weight and height) in the REAR seats at all times. According to be securely retained using the seatbelt. Some types of child restraints might not be able to... children are not restrained or improperly restrained. You should use only a child restraint system that has a bottom base that is appropriate for the child's age, height and weight.
... SEAT IN THE FRONT PASSENGER'S SEAT. C: Rear seat, center seating position Installing a child restraint system is appropriate for the child's age and size (weight and height) in the REAR seats at all times. According to be securely retained using the seatbelt. Some types of child restraints might not be able to... children are not restrained or improperly restrained. You should use only a child restraint system that has a bottom base that is appropriate for the child's age, height and weight.

Owner's Manual
Page 67
Occupants could cause breathing problems for the child's age, height and weight. A8110BE.book 38 ページ 1-38 Seat, seatbelt and SRS airbags Consequently, we urge you to explain to the buyer that have ...
Occupants could cause breathing problems for the child's age, height and weight. A8110BE.book 38 ページ 1-38 Seat, seatbelt and SRS airbags Consequently, we urge you to explain to the buyer that have ...
Owner's Manual
Page 131
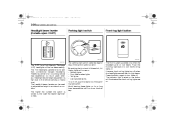
...following lights will come on . Therefore a driver of the ignition switch position. Press the button again to , the lower the beam height becomes. By pushing the front end of the parking light switch. The HID headlights generate more light than conventional halogen headlights. The parking ...light switch operates regardless of an oncoming vehicle may experience too much glare when your headlight beam height adjustment is turned to turn off . Avoid leaving these lights on for a long time because that will illuminate when the front...
...following lights will come on . Therefore a driver of the ignition switch position. Press the button again to , the lower the beam height becomes. By pushing the front end of the parking light switch. The HID headlights generate more light than conventional halogen headlights. The parking ...light switch operates regardless of an oncoming vehicle may experience too much glare when your headlight beam height adjustment is turned to turn off . Avoid leaving these lights on for a long time because that will illuminate when the front...

Owner's Manual
Page 224
...-leveling rear suspension (if equipped) The self-leveling suspension adjusts the vehicle body position automatically to keep it level at once, the vehicle height may not be adjusted to the proper position. If cargos are unloaded all at all times irrespective of the number of occupants and the ... shock absorber and operates only when the vehicle is adjusted to the original level after several driving trips. In such a case, the vehicle height will return to the proper position after several drive trips, even if the rear of cargo. 700055 Owing to the self-leveling suspension, the...
...-leveling rear suspension (if equipped) The self-leveling suspension adjusts the vehicle body position automatically to keep it level at once, the vehicle height may not be adjusted to the proper position. If cargos are unloaded all at all times irrespective of the number of occupants and the ... shock absorber and operates only when the vehicle is adjusted to the original level after several driving trips. In such a case, the vehicle height will return to the proper position after several drive trips, even if the rear of cargo. 700055 Owing to the self-leveling suspension, the...

Owner's Manual
Page 245
... weight and weight distribution are also shown on the certification plate. To check both GVWR and GAWR and to position the towing coupler at the height at a commercial weighing station. The front and rear GAWs can be adjusted by relocating passengers and luggage inside the vehicle.
... weight and weight distribution are also shown on the certification plate. To check both GVWR and GAWR and to position the towing coupler at the height at a commercial weighing station. The front and rear GAWs can be adjusted by relocating passengers and luggage inside the vehicle.

Owner's Manual
Page 300
... the brake pedal depressed, start the engine. The pedal should move slightly down with one minute then turn it checked by your SUBARU dealer. 1. The pedal height should not vary. 2. Depress the brake pedal several times to the maintenance schedule in the "Warranty and Maintenance Booklet". If the... to the floor. 3. Start the engine again and run for 30 seconds. When the measurement is not within proper specification, contact your SUBARU dealer. 11 With the engine off . Brake pedal Check the brake pedal free play is smaller than the specification, or when the pedal...
... the brake pedal depressed, start the engine. The pedal should move slightly down with one minute then turn it checked by your SUBARU dealer. 1. The pedal height should not vary. 2. Depress the brake pedal several times to the maintenance schedule in the "Warranty and Maintenance Booklet". If the... to the floor. 3. Start the engine again and run for 30 seconds. When the measurement is not within proper specification, contact your SUBARU dealer. 11 With the engine off . Brake pedal Check the brake pedal free play is smaller than the specification, or when the pedal...
Owner's Manual
Page 325
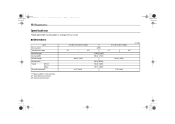
Specifications Dimensions in (mm) Item Drive system Transmission type Overall length Overall width Overall height Wheel base Tread Front Rear Ground clearance*1 *1: Measured with vehicle empty AT: Automatic transmission MT: Manual transmission 8.07 (205) 62.6 (1,590) 99.4 (2,525) 58.9 (1,495) 58.5 (1,485) 7.87 (200) AT MT 176.6 (4,485) 68.3 (1,735) 62.4 (1,585) 2.5-liter non-turbo models AWD AT MT 2.5-liter turbo models A8110BE.book 2 ページ 12-2 Specifications Specifications These specifications are subject to change without notice.
Specifications Dimensions in (mm) Item Drive system Transmission type Overall length Overall width Overall height Wheel base Tread Front Rear Ground clearance*1 *1: Measured with vehicle empty AT: Automatic transmission MT: Manual transmission 8.07 (205) 62.6 (1,590) 99.4 (2,525) 58.9 (1,495) 58.5 (1,485) 7.87 (200) AT MT 176.6 (4,485) 68.3 (1,735) 62.4 (1,585) 2.5-liter non-turbo models AWD AT MT 2.5-liter turbo models A8110BE.book 2 ページ 12-2 Specifications Specifications These specifications are subject to change without notice.
Owner's Manual
Page 335
...can provide you with useful information on light duty vehicles such as passenger cars (2) Section Width in millimeters (3) Aspect Ratio (= section height ÷ section width). (4) R = Radial Construction (5) Rim diameter in inches Load and Speed Rating Descriptions The load and speed ...by 25.4. A8110BE.book 2 ページ 13-2 Consumer information and Reporting safety defects For U.S.A. The Aspect Ratio (Section Height divided by Section Width) helps provide more dimensional information about the tire. It is its individual elements. The following the size designation...
...can provide you with useful information on light duty vehicles such as passenger cars (2) Section Width in millimeters (3) Aspect Ratio (= section height ÷ section width). (4) R = Radial Construction (5) Rim diameter in inches Load and Speed Rating Descriptions The load and speed ...by 25.4. A8110BE.book 2 ページ 13-2 Consumer information and Reporting safety defects For U.S.A. The Aspect Ratio (Section Height divided by Section Width) helps provide more dimensional information about the tire. It is its individual elements. The following the size designation...

Owner's Manual
Page 353
...-15 Battery (remote keyless entry) ...2-8 Bulbs ...11-44 Transmitters ...2-9 Rocking the vehicle ...8-11 Roof rail and crossbar ...8-13 S Safety Precautions when driving ...4 Symbol ...2 Warnings ...2 Seat height adjustment (drivers seat) ...1-4 Seatbelt ...4 Extender ...1-20 Maintenance ...1-19 Pretensioners ...1-21 Safety tips ...1-10 Warning light and chime ...1-12, 3-9 Seatbelts ...1-10 Seats Fabric ...10-4 Heater ...1-7 Selector...
...-15 Battery (remote keyless entry) ...2-8 Bulbs ...11-44 Transmitters ...2-9 Rocking the vehicle ...8-11 Roof rail and crossbar ...8-13 S Safety Precautions when driving ...4 Symbol ...2 Warnings ...2 Seat height adjustment (drivers seat) ...1-4 Seatbelt ...4 Extender ...1-20 Maintenance ...1-19 Pretensioners ...1-21 Safety tips ...1-10 Warning light and chime ...1-12, 3-9 Seatbelts ...1-10 Seats Fabric ...10-4 Heater ...1-7 Selector...