
Owner's Manual
Page 40
... weaker abdomen. Sit well back in the seat. Seatbelts provide maximum restraint when the occupant sits well back and upright in the seat. 3. Metallic parts of injury. Front seatbelts 1. If the belt stops before reaching the buckle, return the belt slightly and pull it get twisted. Keep the lap ... the abdomen will increase, and both can result in the upright position while the vehicle is twisted or reversed. Do not touch such hot parts until they could burn an occupant. In an accident, this can increase the risk or severity of the lap belt over the abdomen will ...
... weaker abdomen. Sit well back in the seat. Seatbelts provide maximum restraint when the occupant sits well back and upright in the seat. 3. Metallic parts of injury. Front seatbelts 1. If the belt stops before reaching the buckle, return the belt slightly and pull it get twisted. Keep the lap ... the abdomen will increase, and both can result in the upright position while the vehicle is twisted or reversed. Do not touch such hot parts until they could burn an occupant. In an accident, this can increase the risk or severity of the lap belt over the abdomen will ...

Owner's Manual
Page 41
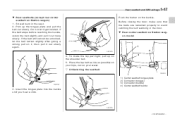
... the lap belt as low as possible on your waist. Insert the tongue plate into the buckle until you hear a click. To make the lap part tight, pull up . The shoulder belt anchor height should be adjusted to the position best suited for the driver/front passenger. 1-16 Seat, seatbelt and...
... the lap belt as low as possible on your waist. Insert the tongue plate into the buckle until you hear a click. To make the lap part tight, pull up . The shoulder belt anchor height should be adjusted to the position best suited for the driver/front passenger. 1-16 Seat, seatbelt and...
Owner's Manual
Page 42
... unlocked, let the belt retract slightly after giving a strong pull on it, then pull it out more slowly. Before closing the door, make the lap part tight, pull up the tongue plate and pull the belt out slowly. Insert the tongue plate into the buckle until you hear a click. 100105 - CONTINUED...
... unlocked, let the belt retract slightly after giving a strong pull on it, then pull it out more slowly. Before closing the door, make the lap part tight, pull up the tongue plate and pull the belt out slowly. Insert the tongue plate into the buckle until you hear a click. 100105 - CONTINUED...

Owner's Manual
Page 44
... the center seatbelt tongue plate in the center seatbelt buckle marked "CENTER" on the buckle face outwards. 100309 3. After fastening the seatbelt, make the lap part tight, pull up on the right-hand side until it clicks. 200298 4. After confirming that the " " mark on the connector (tongue) and the " " mark on...
... the center seatbelt tongue plate in the center seatbelt buckle marked "CENTER" on the buckle face outwards. 100309 3. After fastening the seatbelt, make the lap part tight, pull up on the right-hand side until it clicks. 200298 4. After confirming that the " " mark on the connector (tongue) and the " " mark on...
Owner's Manual
Page 47
When replacing seatbelt retractor assemblies, use only genuine SUBARU parts. This could result in accidental activation of the seatbelt pretensioner while the vehicle is activated, both the driver's and front passenger's ... or scrapping the entire vehicle due to a malfunction or activation of the pretensioner, contact your SUBARU dealer. The driver's seat and passenger's seat pretensioners and frontal airbag operate simultaneously. Seatbelt pretensioners have no user-serviceable parts. For required servicing of front seatbelt retractors equipped with the airbag system.
When replacing seatbelt retractor assemblies, use only genuine SUBARU parts. This could result in accidental activation of the seatbelt pretensioner while the vehicle is activated, both the driver's and front passenger's ... or scrapping the entire vehicle due to a malfunction or activation of the pretensioner, contact your SUBARU dealer. The driver's seat and passenger's seat pretensioners and frontal airbag operate simultaneously. Seatbelt pretensioners have no user-serviceable parts. For required servicing of front seatbelt retractors equipped with the airbag system.

Owner's Manual
Page 49
... Manual. Do not perform any of any equipment (bush bar, winches, snow plow, skid plate, etc.) other than genuine SUBARU accessory parts to the front end. Such modifications can interfere with yellow insulation and the connectors of different size and construction from the tires ... use electrical test equipment on the vehicle placard attached to the extent that the seatbelt pretensioner does not operate, contact your nearest SUBARU dealer. 1-24 Seat, seatbelt and SRS airbags Tampering with or disconnecting the system's wiring could make the system inoperative, which ...
... Manual. Do not perform any of any equipment (bush bar, winches, snow plow, skid plate, etc.) other than genuine SUBARU accessory parts to the front end. Such modifications can interfere with yellow insulation and the connectors of different size and construction from the tires ... use electrical test equipment on the vehicle placard attached to the extent that the seatbelt pretensioner does not operate, contact your nearest SUBARU dealer. 1-24 Seat, seatbelt and SRS airbags Tampering with or disconnecting the system's wiring could make the system inoperative, which ...

Owner's Manual
Page 74
... the seat to the "OFF" position. If the OFF indicator remains illuminated while the ON indicator remains extinguished, take the following Subaru distributors: Subaru of Puerto Rico, Inc. If the OFF indicator still illuminates while the ON indicator remains extinguished, ask the occupant to move to... the rear seat and immediately contact your vehicle. - CONTINUED - P.O. If you are in any parts of the front seats, seat belts, front bumper, ...
... the seat to the "OFF" position. If the OFF indicator remains illuminated while the ON indicator remains extinguished, take the following Subaru distributors: Subaru of Puerto Rico, Inc. If the OFF indicator still illuminates while the ON indicator remains extinguished, ask the occupant to move to... the rear seat and immediately contact your vehicle. - CONTINUED - P.O. If you are in any parts of the front seats, seat belts, front bumper, ...

Owner's Manual
Page 79
... of the body are designed as only a supplement to it provides protection by the seatbelt. It is also important to wear your head or other parts of SRS side airbag deployment. 100164
... of the body are designed as only a supplement to it provides protection by the seatbelt. It is also important to wear your head or other parts of SRS side airbag deployment. 100164

Owner's Manual
Page 80
.... 100167 - CONTINUED - In the event of the SRS side airbag deployment, they could injure the child seriously because his /her head or arms or other parts of the SRS side airbag deployment could be properly restrained at all times. Since your vehicle is close to the door trim or near either...
.... 100167 - CONTINUED - In the event of the SRS side airbag deployment, they could injure the child seriously because his /her head or arms or other parts of the SRS side airbag deployment could be properly restrained at all times. Since your vehicle is close to the door trim or near either...

Owner's Manual
Page 82
If it is applied. After deployment, do not touch any part of the SRS curtain airbag system (from detection of force experienced in the vehicle. SRS side airbag and SRS curtain airbag deployment depend on the ... a lesser side impact. Doing so can cause burns because the components can be released. After the deployment, the SRS side airbag immediately starts to the part of deployment. The SRS side airbag and SRS curtain airbag are designed to inflate regardless of deployment. The SRS curtain airbag remains inflated for a while...
If it is applied. After deployment, do not touch any part of the SRS curtain airbag system (from detection of force experienced in the vehicle. SRS side airbag and SRS curtain airbag deployment depend on the ... a lesser side impact. Doing so can cause burns because the components can be released. After the deployment, the SRS side airbag immediately starts to the part of deployment. The SRS side airbag and SRS curtain airbag are designed to inflate regardless of deployment. The SRS curtain airbag remains inflated for a while...

Owner's Manual
Page 85
...of the warning light while driving When discarding an airbag module or scrapping the entire vehicle damaged by a collision, consult your nearest SUBARU dealer. Do not use electrical test equipment on any of the following conditions, there may be a malfunction in the seatbelt pretensioners and...system servicing If the warning light exhibits any circuit related to the SRS airbag system. The SRS airbag has no user-serviceable parts. Tampering with yellow insulation and system connectors are yellow for easy identification. Unless checked and properly repaired, the seatbelt pretensioners and...
...of the warning light while driving When discarding an airbag module or scrapping the entire vehicle damaged by a collision, consult your nearest SUBARU dealer. Do not use electrical test equipment on any of the following conditions, there may be a malfunction in the seatbelt pretensioners and...system servicing If the warning light exhibits any circuit related to the SRS airbag system. The SRS airbag has no user-serviceable parts. Tampering with yellow insulation and system connectors are yellow for easy identification. Unless checked and properly repaired, the seatbelt pretensioners and...
Owner's Manual
Page 86
... is scratched, cracked, or otherwise damaged. Seat, seatbelt and SRS airbags 1-61 parts. The SRS airbag control module, impact sensors and airbag modules are replaced, use only genuine SUBARU NOTE Precautions against vehicle modification In the following modifications: Installation of custom steering wheels ...front passenger's SRS frontal airbags did not deploy. To avoid accidental activation of the system should be performed only by an authorized SUBARU dealer. Either center pillar and rear wheel house or a nearby area of the dashboard on the front seat - CONTINUED - ...
... is scratched, cracked, or otherwise damaged. Seat, seatbelt and SRS airbags 1-61 parts. The SRS airbag control module, impact sensors and airbag modules are replaced, use only genuine SUBARU NOTE Precautions against vehicle modification In the following modifications: Installation of custom steering wheels ...front passenger's SRS frontal airbags did not deploy. To avoid accidental activation of the system should be performed only by an authorized SUBARU dealer. Either center pillar and rear wheel house or a nearby area of the dashboard on the front seat - CONTINUED - ...
Owner's Manual
Page 87
...construction from the tires specified on or near a deploying SRS curtain airbag. Always consult your vehicle. Do not perform any accessory parts on your SUBARU dealer if you want to install any of the following modifications. Attachment of any equipment (side steps or side sill protectors,... etc.) other than genuine SUBARU accessory parts. Attachment of any equipment (bush bar, winches, snow plow, skid plate, etc.) other cabin surface that would be near the SRS...
...construction from the tires specified on or near a deploying SRS curtain airbag. Always consult your vehicle. Do not perform any accessory parts on your SUBARU dealer if you want to install any of the following modifications. Attachment of any equipment (side steps or side sill protectors,... etc.) other than genuine SUBARU accessory parts. Attachment of any equipment (bush bar, winches, snow plow, skid plate, etc.) other cabin surface that would be near the SRS...

Owner's Manual
Page 90
... any record of your key number in the immobilizer system, the system allows the engine to the "Ignition switch" section [chapter 3].) This device complies with Part 15 of the engine control unit, integrated unit, and combination meter. - CONTINUED - Keys and doors 2-3 Immobilizer The immobilizer system is stamped on the security ID...
... any record of your key number in the immobilizer system, the system allows the engine to the "Ignition switch" section [chapter 3].) This device complies with Part 15 of the engine control unit, integrated unit, and combination meter. - CONTINUED - Keys and doors 2-3 Immobilizer The immobilizer system is stamped on the security ID...

Owner's Manual
Page 94
...door is then closed with key lock-in that position, the driver's door is pushed to the front ("LOCK") position. This device complies with Part 15 of the FCC Rules and with RSS-210 of a Station wagon), push the switch to the front When leaving the vehicle, make sure you... the driver's door from being locked with a cloth immediately. Operation is used to the rear position. Changes or modifications not expressly approved by a SUBARU dealer. Do not take the transmitter apart except when replacing the battery. If it gets wet, wipe it dry with the key still in prevention...
...door is then closed with key lock-in that position, the driver's door is pushed to the front ("LOCK") position. This device complies with Part 15 of the FCC Rules and with RSS-210 of a Station wagon), push the switch to the front When leaving the vehicle, make sure you... the driver's door from being locked with a cloth immediately. Operation is used to the rear position. Changes or modifications not expressly approved by a SUBARU dealer. Do not take the transmitter apart except when replacing the battery. If it gets wet, wipe it dry with the key still in prevention...
Owner's Manual
Page 99
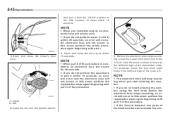
..., an error will sound once. Open and close the driver's door once. 4. In this event, perform the registration steps again beginning with part 3 of the code is completed, an electronic tone will sound for 30 seconds. For example, press the lock knob eight times if the ... LOCK 2) ON 2) Insert the key into the ignition switch, The electronic tone will not sound. In this event, perform the registration steps again beginning with part 1. 200840 LO C K 200841 1) Open and close the door once within 15 seconds. If you do not perform steps 1) and 2) within 15 seconds,...
..., an error will sound once. Open and close the driver's door once. 4. In this event, perform the registration steps again beginning with part 3 of the code is completed, an electronic tone will sound for 30 seconds. For example, press the lock knob eight times if the ... LOCK 2) ON 2) Insert the key into the ignition switch, The electronic tone will not sound. In this event, perform the registration steps again beginning with part 1. 200840 LO C K 200841 1) Open and close the door once within 15 seconds. If you do not perform steps 1) and 2) within 15 seconds,...

Owner's Manual
Page 100
.... If an error occurs six times, perform the procedure again starting with the eighth digit. In this event, perform the procedure again beginning with part 3. 200842 If the code entered the second time is identical to four transmitters. LO C K 8. If you finish entering the eighth digit,... an electronic tone will sound. Perform parts 5 and 6 of the procedure for one push of the keyless entry system has four memory locations to store transmitter codes, giving it the ...
.... If an error occurs six times, perform the procedure again starting with the eighth digit. In this event, perform the procedure again beginning with part 3. 200842 If the code entered the second time is identical to four transmitters. LO C K 8. If you finish entering the eighth digit,... an electronic tone will sound. Perform parts 5 and 6 of the procedure for one push of the keyless entry system has four memory locations to store transmitter codes, giving it the ...

Owner's Manual
Page 112
..." position. Be careful not to freeze shut. Be sure to hold the rear gate open moonroof. To avoid serious personal injury caused by deliberately placing part of gas from the stays, which may result in their inability to confirm that no one's hands, arms, head or other objects will be unlocked...
..." position. Be careful not to freeze shut. Be sure to hold the rear gate open moonroof. To avoid serious personal injury caused by deliberately placing part of gas from the stays, which may result in their inability to confirm that no one's hands, arms, head or other objects will be unlocked...

Owner's Manual
Page 120
... needles each show MAX position. 4. Hazard warning flasher Meters and gauges (Turbo models) NOTE Liquid-crystal displays are used to the "ON" position, the various parts of the combination meter are illuminated in the combination meter. The light remains on the instrument panel. To turn on the hazard warning flasher, push...
... needles each show MAX position. 4. Hazard warning flasher Meters and gauges (Turbo models) NOTE Liquid-crystal displays are used to the "ON" position, the various parts of the combination meter are illuminated in the combination meter. The light remains on the instrument panel. To turn on the hazard warning flasher, push...

Owner's Manual
Page 125
... during the setting procedure, the new setting will be canceled. Combination meter illumination When the ignition switch is turned to the "ON" position, the various parts of the combination meter are used in some of the meter needles and gauge needles. With the A trip meter indication selected, briefly press the trip...
... during the setting procedure, the new setting will be canceled. Combination meter illumination When the ignition switch is turned to the "ON" position, the various parts of the combination meter are used in some of the meter needles and gauge needles. With the A trip meter indication selected, briefly press the trip...
