
Owner's Manual
Page 13
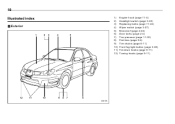
10 Illustrated index Exterior 1 2 3 4 5 1) 2) 3) 4) 5) 6) 7) 8) 9) 10) 11) 12) Engine hood (page 11-4) Headlight switch (page 3-22) Replacing bulbs (page 11-44) Wiper switch (page 3-27) Moonroof (page 2-24) Door locks (page 2-4) Tire pressure (page 11-30) Flat tires (page 9-4) Tire chains (page 8-11) Front fog light button (page 3-26) Tie-down hooks (page 9-11) Towing hooks (page 9-11) 12 11 10 9 8 7 6 000168
10 Illustrated index Exterior 1 2 3 4 5 1) 2) 3) 4) 5) 6) 7) 8) 9) 10) 11) 12) Engine hood (page 11-4) Headlight switch (page 3-22) Replacing bulbs (page 11-44) Wiper switch (page 3-27) Moonroof (page 2-24) Door locks (page 2-4) Tire pressure (page 11-30) Flat tires (page 9-4) Tire chains (page 8-11) Front fog light button (page 3-26) Tie-down hooks (page 9-11) Towing hooks (page 9-11) 12 11 10 9 8 7 6 000168

Owner's Manual
Page 127
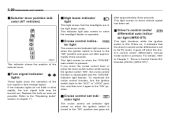
...vehicles) Cruise control indicator light (if equipped) Cruise control set indicator light (if equipped) burned-out bulb or a malfunction of the corresponding system. Consult your SUBARU dealer. Alternate flashing and steady illumination of the warning lights and sounding of the Seatbelt warning light and ... switch is a seatbelt warning light in the combination meter. For further details about canceling the warning operation, please contact your authorized SUBARU dealer for repair. If any lights fail to the “ON” position. It is possible to the vehicle speed. 3-...
...vehicles) Cruise control indicator light (if equipped) Cruise control set indicator light (if equipped) burned-out bulb or a malfunction of the corresponding system. Consult your SUBARU dealer. Alternate flashing and steady illumination of the warning lights and sounding of the Seatbelt warning light and ... switch is a seatbelt warning light in the combination meter. For further details about canceling the warning operation, please contact your authorized SUBARU dealer for repair. If any lights fail to the “ON” position. It is possible to the vehicle speed. 3-...
Owner's Manual
Page 133
... speed has been set. This indicator shows the position of the selector lever. 300622 These lights show the operation of the turn signal bulb may be burned out. This light comes on when the headlight flasher is operated. Turn signal indicator lights The cruise control indicator light...headlights are in chapter 11. For details, refer to the “ON” position and goes out after approximately three seconds. Replace the bulb as soon as possible. Driver’s control center differential auto indicator light (WRX-STI) The cruise control set indicator light comes on when ...
... speed has been set. This indicator shows the position of the selector lever. 300622 These lights show the operation of the turn signal bulb may be burned out. This light comes on when the headlight flasher is operated. Turn signal indicator lights The cruise control indicator light...headlights are in chapter 11. For details, refer to the “ON” position and goes out after approximately three seconds. Replace the bulb as soon as possible. Driver’s control center differential auto indicator light (WRX-STI) The cruise control set indicator light comes on when ...
Owner's Manual
Page 281
Tires and wheels ...11-30 Types of accessories ...Replacing bulbs ... Battery ...Fuses ...Main fuse ...Installation of tires ...Tire inspection ...Tire pressures and wear ...Wheel balance ...Wear indicators ...Tire rotation ...Tire replacement ...Wheel replacement ... Windshield wiper ... 11-33 11-34 Trunk light ...11-51 High mount stop light ...11-51 Headlights (WRX-STI) ...Headlights (Except WRX-STI) ...Front turn signal light bulbs ...Parking light ...Front fog light ...Rear combination lights ...License plate light ...Dome light, map light and cargo area light ... 11-40 11-41 11-43...
Tires and wheels ...11-30 Types of accessories ...Replacing bulbs ... Battery ...Fuses ...Main fuse ...Installation of tires ...Tire inspection ...Tire pressures and wear ...Wheel balance ...Wear indicators ...Tire rotation ...Tire replacement ...Wheel replacement ... Windshield wiper ... 11-33 11-34 Trunk light ...11-51 High mount stop light ...11-51 Headlights (WRX-STI) ...Headlights (Except WRX-STI) ...Front turn signal light bulbs ...Parking light ...Front fog light ...Rear combination lights ...License plate light ...Dome light, map light and cargo area light ... 11-40 11-41 11-43...

Owner's Manual
Page 323
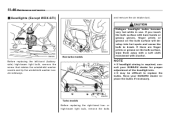
11-44 Maintenance and service Replacing bulbs 9 10 12 11 1 2 3 4 5 10 11 16 15 14 13 8 7 6 15 14 13 B00474
11-44 Maintenance and service Replacing bulbs 9 10 12 11 1 2 3 4 5 10 11 16 15 14 13 8 7 6 15 14 13 B00474

Owner's Manual
Page 324
...-STI) – – 912 7443 7443 – 7440 168 – High-intensity-discharge (HID) bulbs are used for the low beams of headlight-assembly components, contact your SUBARU dealer. – CONTINUED – For replacement of the headlight bulbs (lowbeam and high-beam), removal and installation of the headlight assemblies, and removal of the...
...-STI) – – 912 7443 7443 – 7440 168 – High-intensity-discharge (HID) bulbs are used for the low beams of headlight-assembly components, contact your SUBARU dealer. – CONTINUED – For replacement of the headlight bulbs (lowbeam and high-beam), removal and installation of the headlight assemblies, and removal of the...
Owner's Manual
Page 325
...turbo models B00525 NOTE If headlight aiming is required, consult your SUBARU dealer replace the bulbs if necessary. Before replacing the right-hand low- or high-beam light bulb, remove the bolts Turbo models B00478 If you touch the bulb surface with bare hands or greasy gloves, finger prints or grease... (Except WRX-STI) and remove the air intake duct. If there are finger prints or grease on the bulb surface will develop into hot spots and cause the bulb to replace the bulbs. It may be difficult to break. Have your SUBARU dealer for proper adjustment of the headlight aim.
...turbo models B00525 NOTE If headlight aiming is required, consult your SUBARU dealer replace the bulbs if necessary. Before replacing the right-hand low- or high-beam light bulb, remove the bolts Turbo models B00478 If you touch the bulb surface with bare hands or greasy gloves, finger prints or grease... (Except WRX-STI) and remove the air intake duct. If there are finger prints or grease on the bulb surface will develop into hot spots and cause the bulb to replace the bulbs. It may be difficult to break. Have your SUBARU dealer for proper adjustment of the headlight aim.

Owner's Manual
Page 326
...retainer spring. Set the retainer spring securely. Disconnect the electrical connector from the headlight assembly by turning it counterclockwise. Remove the bulb from the bulb. 700093 2. B00455 3. 4. 5. 6. 7. Reconnect the electrical connector. It must be performed by turning it counterclockwise. ... B00458 B00456 Replacement of the left-hand low beam light bulb requires removal of the battery and is thus dangerous. Remove the bulb cover, by a SUBARU dealer. 2. Install the bulb cover. Replace the bulb with a new one. Disconnect the electrical connector. Left-...
...retainer spring. Set the retainer spring securely. Disconnect the electrical connector from the headlight assembly by turning it counterclockwise. Remove the bulb from the bulb. 700093 2. B00455 3. 4. 5. 6. 7. Reconnect the electrical connector. It must be performed by turning it counterclockwise. ... B00458 B00456 Replacement of the left-hand low beam light bulb requires removal of the battery and is thus dangerous. Remove the bulb cover, by a SUBARU dealer. 2. Install the bulb cover. Replace the bulb with a new one. Disconnect the electrical connector. Left-...

Owner's Manual
Page 327
... into the rear combination light assembly and turn it clockwise until it locks. 6. To install the bulb to touch the bulb surface. 5. Have your SUBARU dealer replace the bulbs if necessary. Remove the clip from the rear combination light assembly by turning it with new one . 5...., turn signal light Backup light Parking light 3 B00460 Front fog light 1. Replace the bulb with a new one . 4. Reconnect the electrical connector. Have your SUBARU dealer replace the bulbs if necessary. B00185 2. Remove the bulb socket from the rear trunk trim with the clips. Pull the...
... into the rear combination light assembly and turn it clockwise until it locks. 6. To install the bulb to touch the bulb surface. 5. Have your SUBARU dealer replace the bulbs if necessary. Remove the clip from the rear combination light assembly by turning it with new one . 5...., turn signal light Backup light Parking light 3 B00460 Front fog light 1. Replace the bulb with a new one . 4. Reconnect the electrical connector. Have your SUBARU dealer replace the bulbs if necessary. B00185 2. Remove the bulb socket from the rear trunk trim with the clips. Pull the...

Owner's Manual
Page 328
Set the bulb socket into the rear combination light assembly and turn it clockwise until it from the rear combination light assembly by turning it with a new one. 6. ... lamp assembly to the rear and remove it locks. 1) Brake/tail light 2) Rear turn signal light 3) Backup light B00524 B00529 – CONTINUED – Pull the bulb out of the rear combination light assembly. 3. Using a Phillips screwdriver, remove the upper and lower clips that secure the side cover of the...
Set the bulb socket into the rear combination light assembly and turn it clockwise until it from the rear combination light assembly by turning it with a new one. 6. ... lamp assembly to the rear and remove it locks. 1) Brake/tail light 2) Rear turn signal light 3) Backup light B00524 B00529 – CONTINUED – Pull the bulb out of the rear combination light assembly. 3. Using a Phillips screwdriver, remove the upper and lower clips that secure the side cover of the...
Owner's Manual
Page 329
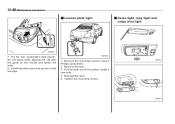
11-50 Maintenance and service License plate light Dome light, map light and cargo area light 7. Remove the mounting screws using a Phillips screwdriver. 2. Reinstall the lens. 5. Install the side cover and secure it with the guide on the vehicle and fasten the bolts. 8. Pull the bulb out of the socket. Tighten the mounting screws. B00190 700104 700106 B00530 1. Remove the lens. 3. Put the rear combination light assembly into place while aligning the clip with the clips. Install a new bulb. 4.
11-50 Maintenance and service License plate light Dome light, map light and cargo area light 7. Remove the mounting screws using a Phillips screwdriver. 2. Reinstall the lens. 5. Install the side cover and secure it with the guide on the vehicle and fasten the bolts. 8. Pull the bulb out of the socket. Tighten the mounting screws. B00190 700104 700106 B00530 1. Remove the lens. 3. Put the rear combination light assembly into place while aligning the clip with the clips. Install a new bulb. 4.
Owner's Manual
Page 330
... from the high mount stop light assembly by prying the edge of the socket. Pull the bulb out of the socket. Remove the lens by turning it . 2. Pull the bulb out of the lens with a screwdriver. 2. Remove the cover by prying the edge with a flat-head screwdriver. 2. B00523 – CONTINUED – Trunk... and pulling it counterclockwise. 3. Remove the high mount stop light Sedan Maintenance and service 11-51 1. B00191 1. Reinstall the lens. Reinstall the cover. Install a new bulb. 3. Install a new bulb. 4. Install a new bulb. 3. B00461 1.
... from the high mount stop light assembly by prying the edge of the socket. Pull the bulb out of the socket. Remove the lens by turning it . 2. Pull the bulb out of the lens with a screwdriver. 2. Remove the cover by prying the edge with a flat-head screwdriver. 2. B00523 – CONTINUED – Trunk... and pulling it counterclockwise. 3. Remove the high mount stop light Sedan Maintenance and service 11-51 1. B00191 1. Reinstall the lens. Reinstall the cover. Install a new bulb. 3. Install a new bulb. 4. Install a new bulb. 3. B00461 1.

Owner's Manual
Page 331
Install a new bulb. 3. Tighten the mounting screws. B00531 NOTE Other bulbs may be difficult to replace. Reinstall the cover. 4. Remove the mounting screws using a Phillips screwdriver and then remove the high mount stop light cover. 2. Remove the bulbs from the socket by pushing it and turning counterclockwise. Have your SUBARU dealer replace these bulbs if necessary. 11-52 Maintenance and service Wagon 1.
Install a new bulb. 3. Tighten the mounting screws. B00531 NOTE Other bulbs may be difficult to replace. Reinstall the cover. 4. Remove the mounting screws using a Phillips screwdriver and then remove the high mount stop light cover. 2. Remove the bulbs from the socket by pushing it and turning counterclockwise. Have your SUBARU dealer replace these bulbs if necessary. 11-52 Maintenance and service Wagon 1.
Owner's Manual
Page 332
Specifications Specifications ...12-2 Dimensions ...Engine ...Electrical system ...Capacities ...Tires ...Wheel alignment ...Fuse panel located behind the coin tray ...Fuse panel located in the engine compartment ...12-2 12-3 12-3 12-4 12-4 12-5 12-6 12-8 Fuses and circuits ...12-6 Bulb chart ...12-9 Vehicle identification ...12-10 12
Specifications Specifications ...12-2 Dimensions ...Engine ...Electrical system ...Capacities ...Tires ...Wheel alignment ...Fuse panel located behind the coin tray ...Fuse panel located in the engine compartment ...12-2 12-3 12-3 12-4 12-4 12-5 12-6 12-8 Fuses and circuits ...12-6 Bulb chart ...12-9 Vehicle identification ...12-10 12
Owner's Manual
Page 340
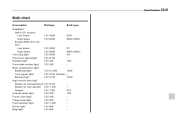
Bulb chart Description Headlight WRX-STI version Low beam High beam Except WRX-STI version Low beam High beam Front fog light Front turn signal light ... ashtray light Dome light Map light Specifications 12-9 Wattage 12V-35W 12V-60W 12V-55W 12V-60W 12V-55W 12V-21W 12V-5W 12V-5W Bulb type D2S 9005 (HB3) H7 9005 (HB3) H3 – 168 – 12V-21/5W 7443 12V-21W (Amber) – 12V-21W 7440 12V-21W 12V...
Bulb chart Description Headlight WRX-STI version Low beam High beam Except WRX-STI version Low beam High beam Front fog light Front turn signal light ... ashtray light Dome light Map light Specifications 12-9 Wattage 12V-35W 12V-60W 12V-55W 12V-60W 12V-55W 12V-21W 12V-5W 12V-5W Bulb type D2S 9005 (HB3) H7 9005 (HB3) H3 – 168 – 12V-21/5W 7443 12V-21W (Amber) – 12V-21W 7440 12V-21W 12V...
Owner's Manual
Page 357
...-27 Reserve distance ...11-27 Brake system ...7-21 Warning light ...3-18 Braking ...7-21 Breaking-in of new brake pads and linings ...11-29 Tips ...7-21 Bulb Chart ...12-9 Replacing ...11-44 C Capacities ...12-4 Cargo Area bars ...6-12 Area cover ...6-10 Area light ...6-2, 11-50 Tie-down hooks ...6-11 Catalytic converter ...8-3 Center...
...-27 Reserve distance ...11-27 Brake system ...7-21 Warning light ...3-18 Braking ...7-21 Breaking-in of new brake pads and linings ...11-29 Tips ...7-21 Bulb Chart ...12-9 Replacing ...11-44 C Capacities ...12-4 Cargo Area bars ...6-12 Area cover ...6-10 Area light ...6-2, 11-50 Tie-down hooks ...6-11 Catalytic converter ...8-3 Center...
Owner's Manual
Page 361
... lining ...11-28 Wiper blades ...11-37 Replacing Air cleaner element ...11-15 Battery (Remote keyless entry system) ...2-9 Lost transmitters (keyless entry system) ...2-10 Replacing bulbs ...11-44 Cargo area light ...11-50 Dome light ...11-50 Front fog light ...11-48 Front turn signal light ...11-48 Headlights ...11-45...
... lining ...11-28 Wiper blades ...11-37 Replacing Air cleaner element ...11-15 Battery (Remote keyless entry system) ...2-9 Lost transmitters (keyless entry system) ...2-10 Replacing bulbs ...11-44 Cargo area light ...11-50 Dome light ...11-50 Front fog light ...11-48 Front turn signal light ...11-48 Headlights ...11-45...
