

Owner's Manual
Page 6
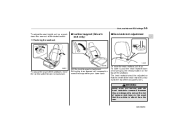
... Cigarette lighter Rear window washer Windshield defroster Windshield defroster and foot outlets Instrument panel outlets and foot outlets Foot outlets Instrument panel outlets Child restraint lower anchorages Horn Name Mark Name Seat heater Child restraint top tether anchorages Mark Lights Parking lights, tail lights, license plate light and instrument panel illumination...
... Cigarette lighter Rear window washer Windshield defroster Windshield defroster and foot outlets Instrument panel outlets and foot outlets Foot outlets Instrument panel outlets Child restraint lower anchorages Horn Name Mark Name Seat heater Child restraint top tether anchorages Mark Lights Parking lights, tail lights, license plate light and instrument panel illumination...

Owner's Manual
Page 30
...restraint adjustment ...Active head restraint ... 1-2 1-3 1-4 1-5 1-5 1-6 Installing a booster seat ...Installation of child restraint systems by use of lower and tether anchorages (LATCH) ...Top tether anchorages ... 1-30 1-31 1-34 1 *SRS airbag (Supplemental Restraint System airbag) ...Vehicle with... driver's and front passenger's SRS airbags and lap/shoulder restraints ...Subaru advanced frontal airbag system ...SRS side airbag (if equipped) ...SRS airbag system monitors ...SRS airbag system servicing ...Precautions against...
...restraint adjustment ...Active head restraint ... 1-2 1-3 1-4 1-5 1-5 1-6 Installing a booster seat ...Installation of child restraint systems by use of lower and tether anchorages (LATCH) ...Top tether anchorages ... 1-30 1-31 1-34 1 *SRS airbag (Supplemental Restraint System airbag) ...Vehicle with... driver's and front passenger's SRS airbags and lap/shoulder restraints ...Subaru advanced frontal airbag system ...SRS side airbag (if equipped) ...SRS airbag system monitors ...SRS airbag system servicing ...Precautions against...

Owner's Manual
Page 33
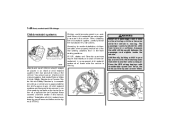
Seat height adjustment 100600 1-4 Seat, seatbelt and SRS airbags Seat height adjustment (driver's seat) Power seat (if equipped) Fore and aft adjustment Seat cushion angle adjustment 2 1 100739 100597 100598 1) Turn the dial backward to lower the seat. 2) Turn the dial forward to adjust the height of the control switch. Use the adjusting dial to raise the seat. To adjust the seat cushion angle, pull up or push down the front end of the seat. To adjust the seat forward or backward, move the control switch forward or backward.
Seat height adjustment 100600 1-4 Seat, seatbelt and SRS airbags Seat height adjustment (driver's seat) Power seat (if equipped) Fore and aft adjustment Seat cushion angle adjustment 2 1 100739 100597 100598 1) Turn the dial backward to lower the seat. 2) Turn the dial forward to adjust the height of the control switch. Use the adjusting dial to raise the seat. To adjust the seat cushion angle, pull up or push down the front end of the seat. To adjust the seat forward or backward, move the control switch forward or backward.
Owner's Manual
Page 34
... adjust the seat height, pull up . To raise the head restraint, pull it , push the head restraint down the rear end of support for your lower back. Pulling the lever forward will increase the amount of the control switch. Pull the lever forward or backward. To... lower it up or push down while pressing the release button on the top of the occupant's ears. The head restraint should be adjusted so that ...
... adjust the seat height, pull up . To raise the head restraint, pull it , push the head restraint down the rear end of support for your lower back. Pulling the lever forward will increase the amount of the control switch. Pull the lever forward or backward. To... lower it up or push down while pressing the release button on the top of the occupant's ears. The head restraint should be adjusted so that ...

Owner's Manual
Page 37
...restraint down the rear seatback After returning the rear seatback to its original position, make certain that the shoulder belts are not occupied, lower the head restraint to be used at the lowest position. The head restraint is not intended to improve rearward visibil- 1-8 Seat,...seatbelt and SRS airbags Rear windows side seating position Rear center seating position ity. When the rear center seating position is not occupied, lower the head restraint to be used at the lowest position. Never allow passengers to the click position. When the rear center seating position...
...restraint down the rear seatback After returning the rear seatback to its original position, make certain that the shoulder belts are not occupied, lower the head restraint to be used at the lowest position. The head restraint is not intended to improve rearward visibil- 1-8 Seat,...seatbelt and SRS airbags Rear windows side seating position Rear center seating position ity. When the rear center seating position is not occupied, lower the head restraint to be used at the lowest position. Never allow passengers to the click position. When the rear center seating position...

Owner's Manual
Page 38
Armrest (if equipped) 100095 100602 To lower the armrest, pull on the center armrest while the vehicle is securely locked. Lower the head restraints. 2. To avoid the possibility of the armrest. To return the seatback to sit on the top edge of serious injury, passengers must never be allowed to its original posi- Unlock the seatback by pulling the release knob and then fold the seatback down. Seat, seatbelt and SRS airbags 1-9 tion, raise the seatback until it locks into place and make sure that it is in motion. 100096 1.
Armrest (if equipped) 100095 100602 To lower the armrest, pull on the center armrest while the vehicle is securely locked. Lower the head restraints. 2. To avoid the possibility of the armrest. To return the seatback to sit on the top edge of serious injury, passengers must never be allowed to its original posi- Unlock the seatback by pulling the release knob and then fold the seatback down. Seat, seatbelt and SRS airbags 1-9 tion, raise the seatback until it locks into place and make sure that it is in motion. 100096 1.

Owner's Manual
Page 41
... ignition switch), the warning lights will alternate between flashing and steady illumination at the driver's seat, as possible on your SUBARU dealer. Fastening the seatbelt Seatbelt warning light and chime Your vehicle is twisted or reversed. Seatbelts provide maximum restraint when the... the driver's seatbelt. Alternate flashing and steady illumination of the warning lights and sounding of across the weaker abdomen. At speeds lower than approximately 9 mph (15 km/h) The warning light will alternate between flashing and steady illumination at 15-second intervals. When ...
... ignition switch), the warning lights will alternate between flashing and steady illumination at the driver's seat, as possible on your SUBARU dealer. Fastening the seatbelt Seatbelt warning light and chime Your vehicle is twisted or reversed. Seatbelts provide maximum restraint when the... the driver's seatbelt. Alternate flashing and steady illumination of the warning lights and sounding of across the weaker abdomen. At speeds lower than approximately 9 mph (15 km/h) The warning light will alternate between flashing and steady illumination at 15-second intervals. When ...

Owner's Manual
Page 43
... pull it does, adjust the seatbelt anchor to the position best suited for the driver/front passenger. If the belt still cannot be adjusted to a lower position. Before closing the door, make sure that the shoulder belt passes over the middle of the webbing does not pass over the neck may.... 100102 100105 Push the button on the buckle. Unfastening the seatbelt 100104 Rear seatbelts (except rear center seatbelt) 1. Do not let it get twisted. To lower the anchor height, push the release button and slide the anchor down on the anchor to avoid catching the belt webbing in place.
... pull it does, adjust the seatbelt anchor to the position best suited for the driver/front passenger. If the belt still cannot be adjusted to a lower position. Before closing the door, make sure that the shoulder belt passes over the middle of the webbing does not pass over the neck may.... 100102 100105 Push the button on the buckle. Unfastening the seatbelt 100104 Rear seatbelts (except rear center seatbelt) 1. Do not let it get twisted. To lower the anchor height, push the release button and slide the anchor down on the anchor to avoid catching the belt webbing in place.

Owner's Manual
Page 44
... anchor height, push the release button and slide the anchor down on the anchor to make sure that it does, adjust the seatbelt anchor to a lower position. Seat, seatbelt and SRS airbags 1-15 Adjusting the rear seat shoulder belt anchor height (window-side seating positions only) When wearing the seatbelts, make...
... anchor height, push the release button and slide the anchor down on the anchor to make sure that it does, adjust the seatbelt anchor to a lower position. Seat, seatbelt and SRS airbags 1-15 Adjusting the rear seat shoulder belt anchor height (window-side seating positions only) When wearing the seatbelts, make...
Owner's Manual
Page 53
... seats by lap belts or the lap belt portion of a lap/shoulder belt (except those covered under the section in this manual, entitled "Installation of lower and tether anchorages (LATCH)"). 100125 100126 1-24 Seat, seatbelt and SRS airbags Child restraint systems Children could be injured or even killed. 100607 Infants and...
... seats by lap belts or the lap belt portion of a lap/shoulder belt (except those covered under the section in this manual, entitled "Installation of lower and tether anchorages (LATCH)"). 100125 100126 1-24 Seat, seatbelt and SRS airbags Child restraint systems Children could be injured or even killed. 100607 Infants and...
Owner's Manual
Page 54
...the child could be secured firmly due to projection of child restraint systems. In these positions, Automatic/Emergency Locking Retractor (A/ELR) seatbelts and lower anchorages (bars) are provided in your vehicle. Never allow a child to stand up or kneeling on any seat. B: Rear seat, ... airbag. Since the SRS airbag deploys with considerable speed and force and can be securely retained using the seatbelt. Because children are SUBARU's recommendations on where to place a child restraint system in this seating position, you should use only a child restraint system that fits...
...the child could be secured firmly due to projection of child restraint systems. In these positions, Automatic/Emergency Locking Retractor (A/ELR) seatbelts and lower anchorages (bars) are provided in your vehicle. Never allow a child to stand up or kneeling on any seat. B: Rear seat, ... airbag. Since the SRS airbag deploys with considerable speed and force and can be securely retained using the seatbelt. Because children are SUBARU's recommendations on where to place a child restraint system in this seating position, you should use only a child restraint system that fits...

Owner's Manual
Page 60
... the child's arm or behind the child's back. Make sure the shoulder belt is twisted or reversed. they can increase the risk or severity of lower and tether anchorages (LATCH) 4. Do not leave an unsecured child restraint system in it. Seat, seatbelt and SRS airbags 1-31 100142 The seatbelt should fit...
... the child's arm or behind the child's back. Make sure the shoulder belt is twisted or reversed. they can increase the risk or severity of lower and tether anchorages (LATCH) 4. Do not leave an unsecured child restraint system in it. Seat, seatbelt and SRS airbags 1-31 100142 The seatbelt should fit...

Owner's Manual
Page 61
... seatback. 100614 You will find marks " " at the bottom of the seatbelts. For each window-side seating position, two lower anchorages are secured to as the LATCH system (Lower Anchors and Tethers for installing a child restraint system only on the rear seat window-side seating positions. The...be installed on the rear seat of your vehicle without use of the rear seat seatbacks. 1-32 Seat, seatbelt and SRS airbags The lower and tether anchorages are sometimes referred to the designated anchorages provided on the vehicle body. Such child restraint systems are provided. After installing...
... seatback. 100614 You will find marks " " at the bottom of the seatbelts. For each window-side seating position, two lower anchorages are secured to as the LATCH system (Lower Anchors and Tethers for installing a child restraint system only on the rear seat window-side seating positions. The...be installed on the rear seat of your vehicle without use of the rear seat seatbacks. 1-32 Seat, seatbelt and SRS airbags The lower and tether anchorages are sometimes referred to the designated anchorages provided on the vehicle body. Such child restraint systems are provided. After installing...

Owner's Manual
Page 62
...tether, read the following "Top tether anchorages". - CONTINUED - While following the instructions supplied by the child restraint system manufacturer, connect the lower hooks onto the lower anchorages located at " " marks on how to secure the child restraint system firmly by taking up the slack in the belt. 4. ...Use the " " marks to locate the two lower anchorages (bars) for the position where you want to the tether anchorage and firmly tighten the tether. When the hooks are connected, make sure ...
...tether, read the following "Top tether anchorages". - CONTINUED - While following the instructions supplied by the child restraint system manufacturer, connect the lower hooks onto the lower anchorages located at " " marks on how to secure the child restraint system firmly by taking up the slack in the belt. 4. ...Use the " " marks to locate the two lower anchorages (bars) for the position where you want to the tether anchorage and firmly tighten the tether. When the hooks are connected, make sure ...

Owner's Manual
Page 64
... Open the cover flaps to use the anchorages. To hook the top tether Always remove the head restraint when mounting a child restraint system with the lower anchorages or seatbelt; Otherwise, it from being thrown around in the passenger compartment in the cargo area. Fasten the top tether hook of the child...
... Open the cover flaps to use the anchorages. To hook the top tether Always remove the head restraint when mounting a child restraint system with the lower anchorages or seatbelt; Otherwise, it from being thrown around in the passenger compartment in the cargo area. Fasten the top tether hook of the child...

Owner's Manual
Page 68
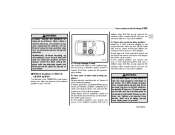
Seat, seatbelt and SRS airbags 1-39 Components Any vehicle whose vehicle identification number's last six digits are "733000" or lower but are not "729759", "729760", "729761", "729762", "729763", "729764", "729765", "729899", "729900", "729901", "729902", "729903", "729904" or "729905" For the location of the vehicle identification ...
Seat, seatbelt and SRS airbags 1-39 Components Any vehicle whose vehicle identification number's last six digits are "733000" or lower but are not "729759", "729760", "729761", "729762", "729763", "729764", "729765", "729899", "729900", "729901", "729902", "729903", "729904" or "729905" For the location of the vehicle identification ...

Owner's Manual
Page 111
... gate can unlock it by pulling on the rear gate stays or scratch the stays while loading or unloading cargo. The rear gate can be lowered easily if you can be locked and unlocked using either the keyless entry system or the power door locking switches. For the procedure, refer to... unlocked due to hit your hand being caught and injured. That could cause leakage of emergency". 200822 To open . 200194 To close the rear gate, lower it will go. NOTE If the rear gate cannot be unlocked" in chapter 9 "In case of gas from the stays, which may result in or...
... gate can unlock it by pulling on the rear gate stays or scratch the stays while loading or unloading cargo. The rear gate can be lowered easily if you can be locked and unlocked using either the keyless entry system or the power door locking switches. For the procedure, refer to... unlocked due to hit your hand being caught and injured. That could cause leakage of emergency". 200822 To open . 200194 To close the rear gate, lower it will go. NOTE If the rear gate cannot be unlocked" in chapter 9 "In case of gas from the stays, which may result in or...
Owner's Manual
Page 123
...operation that follows the 6-second warning after fastening, the seatbelt warning device operates as follows according to the vehicle speed. At speeds lower than approximately 9 mph (15 km/h) The warning light will alternate between flashing and steady illumination at 15-second intervals and the... any of injury. 1 2 1 2 100547 1) U.S.-spec. For further details about canceling the warning operation, please contact your nearest SUBARU dealer to the "ON" position Continuous illumination of the warning light Illumination of the chime will not sound. It is turned to your...
...operation that follows the 6-second warning after fastening, the seatbelt warning device operates as follows according to the vehicle speed. At speeds lower than approximately 9 mph (15 km/h) The warning light will alternate between flashing and steady illumination at 15-second intervals and the... any of injury. 1 2 1 2 100547 1) U.S.-spec. For further details about canceling the warning operation, please contact your nearest SUBARU dealer to the "ON" position Continuous illumination of the warning light Illumination of the chime will not sound. It is turned to your...

Owner's Manual
Page 134
... will come on. - Parking lights - Front side marker lights - Tail lights - License plate lights To turn them off when the headlights are switched to , the lower the beam height becomes. Therefore a driver of the ignition switch position. The parking light switch operates regardless of an oncoming vehicle may experience too much...
... will come on. - Parking lights - Front side marker lights - Tail lights - License plate lights To turn them off when the headlights are switched to , the lower the beam height becomes. Therefore a driver of the ignition switch position. The parking light switch operates regardless of an oncoming vehicle may experience too much...

Owner's Manual
Page 140
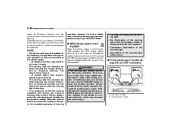
... direction will automatically calibrate from headlights of the mirror dimmer to the right of dry soft cotton cloth or an applicator. This is in the lower part of the mirror. For optimum calibration, switch off . Press and hold the left button, the automatic dimming function is on or off all nonessential...
... direction will automatically calibrate from headlights of the mirror dimmer to the right of dry soft cotton cloth or an applicator. This is in the lower part of the mirror. For optimum calibration, switch off . Press and hold the left button, the automatic dimming function is on or off all nonessential...