
Owner's Manual
Page 17
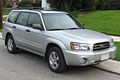
Illustrated index Exterior 1 2 3 4 5 1) 2) 3) 4) 5) 6) 7) 8) 9) 10) Engine hood (page 11-5) Headlight switch (page 3-23) Replacing bulbs (page 11-63) Wiper switch (page 3-29) Roof rails (page 8-17) Door locks (page 2-6) Tire pressure (page 11-44) Flat tires (page 9-3) Tire chains (page 8-13) Front fog light button (page 327) 11) Tie-down/Towing hooks (page 9-13) 6 11 10 9 8 7 HSF020BB 14
Illustrated index Exterior 1 2 3 4 5 1) 2) 3) 4) 5) 6) 7) 8) 9) 10) Engine hood (page 11-5) Headlight switch (page 3-23) Replacing bulbs (page 11-63) Wiper switch (page 3-29) Roof rails (page 8-17) Door locks (page 2-6) Tire pressure (page 11-44) Flat tires (page 9-3) Tire chains (page 8-13) Front fog light button (page 327) 11) Tie-down/Towing hooks (page 9-13) 6 11 10 9 8 7 HSF020BB 14

Owner's Manual
Page 153
... light (if equipped) Cruise control set indicator light (if equipped) If any lights fail to the "ON" position. Warning and indicator lights Several of the bulbs.
... light (if equipped) Cruise control set indicator light (if equipped) If any lights fail to the "ON" position. Warning and indicator lights Several of the bulbs.
Owner's Manual
Page 154
... checked. Continued vehicle operation without having the emission control system checked and repaired as possible. Consult your nearest SUBARU dealer to have your vehicle checked/repaired by your SUBARU dealer as soon as necessary could cause serious damage, - CONTINUED - 3-13 The seatbelt reminder chime will turn... If the CHECK ENGINE light comes on for about six seconds to remind the driver to your authorized SUBARU dealer for about six seconds and go out. Instruments and controls bulb or a malfunction of the warning light when the ignition switch is first turned to the "ON"...
... checked. Continued vehicle operation without having the emission control system checked and repaired as possible. Consult your nearest SUBARU dealer to have your vehicle checked/repaired by your SUBARU dealer as soon as necessary could cause serious damage, - CONTINUED - 3-13 The seatbelt reminder chime will turn... If the CHECK ENGINE light comes on for about six seconds to remind the driver to your authorized SUBARU dealer for about six seconds and go out. Instruments and controls bulb or a malfunction of the warning light when the ignition switch is first turned to the "ON"...

Owner's Manual
Page 162
... soon as possible. If this indicator light and the " " indicator light flash simultaneously during driving, have the vehicle checked by your nearest SUBARU dealer. If the indicator lights do not blink or blink rapidly, the turn signal or lane change signal. Cruise control indicator light (if ... light shows that the headlights are in chapter 11. Instruments and controls Turn signal indicator lights These lights show the operation of the turn signal bulb may be burned out. To reactivate the cruise control function, turn the ignition switch back to the "ACC" or "LOCK" position, and ...
... soon as possible. If this indicator light and the " " indicator light flash simultaneously during driving, have the vehicle checked by your nearest SUBARU dealer. If the indicator lights do not blink or blink rapidly, the turn signal or lane change signal. Cruise control indicator light (if ... light shows that the headlights are in chapter 11. Instruments and controls Turn signal indicator lights These lights show the operation of the turn signal bulb may be burned out. To reactivate the cruise control function, turn the ignition switch back to the "ACC" or "LOCK" position, and ...
Owner's Manual
Page 367
Maintenance and service Tires and wheels ...11-43 Types of accessories ...Replacing bulbs ...Windshield wiper blades ...11-52 Rear window wiper blade ...11-54 11-43 11-43 11-44 11-46 11-47 11-48 11-48 ...
Maintenance and service Tires and wheels ...11-43 Types of accessories ...Replacing bulbs ...Windshield wiper blades ...11-52 Rear window wiper blade ...11-54 11-43 11-43 11-44 11-46 11-47 11-48 11-48 ...

Owner's Manual
Page 428
Maintenance and service Installation of accessories Always consult your SUBARU dealer before installing fog lights or any other electrical equipment in your vehicle. Replacing bulbs 1 2 3 4 8 9 7 65 10 11 12 13 14 HSB069BB - CONTINUED - 11-63 Such accessories may cause the electronic system to malfunction if they are incorrectly installed or if they are not suited for the vehicle.
Maintenance and service Installation of accessories Always consult your SUBARU dealer before installing fog lights or any other electrical equipment in your vehicle. Replacing bulbs 1 2 3 4 8 9 7 65 10 11 12 13 14 HSB069BB - CONTINUED - 11-63 Such accessories may cause the electronic system to malfunction if they are incorrectly installed or if they are not suited for the vehicle.

Owner's Manual
Page 429
... will develop into hot spots and cause the bulb to break. NOTE 11) Rear turn signal Front fog light High mount stop light Cargo area light Tail/stop light 14) License plate light If headlight aiming is required, consult your SUBARU dealer for proper adjustment of the headlight aim. 11-64... HB2 (H4) 168 - - 168 1474 - 912 - 7443 1474 921 7443 168 Headlight Halogen headlight bulbs become very hot while in use. If you touch the bulb surface with bare hands or greasy gloves, ...
... will develop into hot spots and cause the bulb to break. NOTE 11) Rear turn signal Front fog light High mount stop light Cargo area light Tail/stop light 14) License plate light If headlight aiming is required, consult your SUBARU dealer for proper adjustment of the headlight aim. 11-64... HB2 (H4) 168 - - 168 1474 - 912 - 7443 1474 921 7443 168 Headlight Halogen headlight bulbs become very hot while in use. If you touch the bulb surface with bare hands or greasy gloves, ...

Owner's Manual
Page 430
Remove the retainer spring. Remove the bulb from the headlight assembly. - CONTINUED - 11-65 Maintenance and service 0 C A B A B HSB070BC HSB071BC A) Rubber cover B) Electrical connector C) "Top" mark A) Retainer spring B) Bulb 1. Disconnect the electrical connector, then remove the rubber cover. 2.
Remove the retainer spring. Remove the bulb from the headlight assembly. - CONTINUED - 11-65 Maintenance and service 0 C A B A B HSB070BC HSB071BC A) Rubber cover B) Electrical connector C) "Top" mark A) Retainer spring B) Bulb 1. Disconnect the electrical connector, then remove the rubber cover. 2.

Owner's Manual
Page 431
... removed before the parking light and front turn signal, side marker light and parking lights B C A HSB072BA 3. Have your SUBARU dealer replace the bulbs if necessary. 11-66 It may become necessary to replace the bulbs. Install the rubber cover with the top mark facing up, then reconnect the electrical connector. When the headlight...
... removed before the parking light and front turn signal, side marker light and parking lights B C A HSB072BA 3. Have your SUBARU dealer replace the bulbs if necessary. 11-66 It may become necessary to replace the bulbs. Install the rubber cover with the top mark facing up, then reconnect the electrical connector. When the headlight...

Owner's Manual
Page 435
Have your SUBARU dealer replace the bulbs if necessary. Rear combination lights 1. Remove the bulb socket from the headlight assembly by following the removal sequence in reverse. Install a new bulb. 8. Pull the bulb out of the socket. Front fog light It may be difficult to the rear and 11-70 Set the bulb socket into the headlight...
Have your SUBARU dealer replace the bulbs if necessary. Rear combination lights 1. Remove the bulb socket from the headlight assembly by following the removal sequence in reverse. Install a new bulb. 8. Pull the bulb out of the socket. Front fog light It may be difficult to the rear and 11-70 Set the bulb socket into the headlight...

Owner's Manual
Page 436
Install a new bulb. 4. Maintenance and service remove it from the rear combination light assembly by turning it locks. 5. Remove the bulb holder from the vehicle. Reinstall the rear combination light assembly. - CONTINUED - 11-71 A B C D HSB086BC HSB085BA A) B) C) D) Tail/stop light 2. Pull the bulb from the holder. Set the bulb holder into the rear combination light assembly and turn signal light Backup light Tail/stop light Rear turn it clockwise until it counterclockwise. 3.
Install a new bulb. 4. Maintenance and service remove it from the rear combination light assembly by turning it locks. 5. Remove the bulb holder from the vehicle. Reinstall the rear combination light assembly. - CONTINUED - 11-71 A B C D HSB086BC HSB085BA A) B) C) D) Tail/stop light 2. Pull the bulb from the holder. Set the bulb holder into the rear combination light assembly and turn signal light Backup light Tail/stop light Rear turn it clockwise until it counterclockwise. 3.
Owner's Manual
Page 437
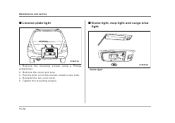
Pull the bulb out of the socket. HSB088BA Dome light 11-72 Tighten the mounting screws. Install a new bulb. 4. Maintenance and service License plate light 0 Dome light, map light and cargo area light HSB087BA 1. Remove the mounting screws using a Phillips screwdriver. 2. Remove the cover and lens. 3. Reinstall the lens and cover. 5.
Pull the bulb out of the socket. HSB088BA Dome light 11-72 Tighten the mounting screws. Install a new bulb. 4. Maintenance and service License plate light 0 Dome light, map light and cargo area light HSB087BA 1. Remove the mounting screws using a Phillips screwdriver. 2. Remove the cover and lens. 3. Reinstall the lens and cover. 5.

Owner's Manual
Page 438
Install a new bulb. 3. Pull the bulb out of the lens with a flat-head screwdriver. 2. Remove the lens by prying the edge of the socket. Maintenance and service HSB089BA HSB090BA Map light Cargo area light 1. Reinstall the lens. - CONTINUED - 11-73
Install a new bulb. 3. Pull the bulb out of the lens with a flat-head screwdriver. 2. Remove the lens by prying the edge of the socket. Maintenance and service HSB089BA HSB090BA Map light Cargo area light 1. Reinstall the lens. - CONTINUED - 11-73

Owner's Manual
Page 439
Reinstall the cover. 5. NOTE Other bulbs may be difficult to replace. Install a new bulb. 4. Remove the mounting screw covers by prying the edge with a flat-head screwdriver. 2. Remove the mounting screws using a Phillips screwdriver and then remove the high mount stop light 0 HSB091BA 1. Tighten the mounting screws then reinstall the covers. Pull the bulb from the socket. Have your SUBARU dealer replace these bulbs if necessary. 11-74 Maintenance and service High mount stop light cover. 3.
Reinstall the cover. 5. NOTE Other bulbs may be difficult to replace. Install a new bulb. 4. Remove the mounting screw covers by prying the edge with a flat-head screwdriver. 2. Remove the mounting screws using a Phillips screwdriver and then remove the high mount stop light 0 HSB091BA 1. Tighten the mounting screws then reinstall the covers. Pull the bulb from the socket. Have your SUBARU dealer replace these bulbs if necessary. 11-74 Maintenance and service High mount stop light cover. 3.
Owner's Manual
Page 440
Specifications Specifications ...Dimensions ...Engine ...Electrical system ...Capacities ...Tires ...Wheel alignment ...Fuse panel located behind the coin tray ...Fuse panel located in the engine compartment ... 12-2 12-2 12-3 12-3 12-4 12-5 12-5 Fuses and circuits ... 12-6 12-6 12-8 Bulb chart ...12-9 Vehicle identification ...12-10 12 12-1
Specifications Specifications ...Dimensions ...Engine ...Electrical system ...Capacities ...Tires ...Wheel alignment ...Fuse panel located behind the coin tray ...Fuse panel located in the engine compartment ... 12-2 12-2 12-3 12-3 12-4 12-5 12-5 Fuses and circuits ... 12-6 12-6 12-8 Bulb chart ...12-9 Vehicle identification ...12-10 12 12-1

Owner's Manual
Page 448
Specifications Fuse panel 10 11 12 13 Fuse rating 15A 15A 20A 15A Circuit Headlight (right side) Headlight (left side) Lighting switch Clock Interior light Bulb chart Description Headlight Front fog light Front turn signal Parking light Side marker light (Front) Rear combination light Tail/stop light Turn signal Wattage 12V-...60/55W 12V-55W 12V-21W 12V-5W 12V-5W Bulb type HB2 - 1474 168 168 7443 1474 7443 921 912 168 12V-21/5W 12V-21W (Amber) Tail/stop light 12V-21/5W Back-up...
Specifications Fuse panel 10 11 12 13 Fuse rating 15A 15A 20A 15A Circuit Headlight (right side) Headlight (left side) Lighting switch Clock Interior light Bulb chart Description Headlight Front fog light Front turn signal Parking light Side marker light (Front) Rear combination light Tail/stop light Turn signal Wattage 12V-...60/55W 12V-55W 12V-21W 12V-5W 12V-5W Bulb type HB2 - 1474 168 168 7443 1474 7443 921 912 168 12V-21/5W 12V-21W (Amber) Tail/stop light 12V-21/5W Back-up...
Owner's Manual
Page 469
... ...11-38 Free play ...11-38 Reserve distance ...11-39 Braking ...7-22 Braking tips ...7-22 Breaking-in of new brake pads and linings ...11-41 Bulb Chart ...12-9 Replacing ...11-63 C Capacities ...12-4 Cargo area cover (if equipped) ...6-16 Cargo area light ...6-2 Cargo tie-down hooks ...6-18 14...
... ...11-38 Free play ...11-38 Reserve distance ...11-39 Braking ...7-22 Braking tips ...7-22 Breaking-in of new brake pads and linings ...11-41 Bulb Chart ...12-9 Replacing ...11-63 C Capacities ...12-4 Cargo area cover (if equipped) ...6-16 Cargo area light ...6-2 Cargo tie-down hooks ...6-18 14...

Owner's Manual
Page 473
... Wiper and washer switch ...3-31 Wiper blades ...11-54 14-6 Remote keyless entry system ...2-9 Replacing Air cleaner element ...11-21 Battery (remote keyless entry) ...2-11 Bulbs ...11-63 Transmitters ...2-13 Rocking the vehicle ...8-14 Roof rail and crossbar ...8-17 S Seat height adjustment (driver's side) ...1-5 Seatbelt Extender ...1-29 Maintenance ...1-29 Pretensioners ...1-31...
... Wiper and washer switch ...3-31 Wiper blades ...11-54 14-6 Remote keyless entry system ...2-9 Replacing Air cleaner element ...11-21 Battery (remote keyless entry) ...2-11 Bulbs ...11-63 Transmitters ...2-13 Rocking the vehicle ...8-14 Roof rail and crossbar ...8-17 S Seat height adjustment (driver's side) ...1-5 Seatbelt Extender ...1-29 Maintenance ...1-29 Pretensioners ...1-31...


