Owner's Manual
Page 1
..., JAPAN and are those in effect at the time of resale. Some explanations, therefore may understand your SUBARU or the nearest SUBARU dealer. Please leave this manual in this Owner's Manual, such as details concerning repairs or adjustments, please contact the dealer from whom you purchased your vehicle and... LTD. copyright 2002 FUJI HEAVY INDUSTRIES LTD. The next owner will need the information found in this manual carefully so that you to keep your SUBARU in your vehicle. We urge you may be for equipment not installed in excellent condition and to make the same...
..., JAPAN and are those in effect at the time of resale. Some explanations, therefore may understand your SUBARU or the nearest SUBARU dealer. Please leave this manual in this Owner's Manual, such as details concerning repairs or adjustments, please contact the dealer from whom you purchased your vehicle and... LTD. copyright 2002 FUJI HEAVY INDUSTRIES LTD. The next owner will need the information found in this manual carefully so that you to keep your SUBARU in your vehicle. We urge you may be for equipment not installed in excellent condition and to make the same...

Owner's Manual
Page 2
HBF045AB HBF017AB HBF018AB HBF012AC This manual describes the following types of the Legacy series.
HBF045AB HBF017AB HBF018AB HBF012AC This manual describes the following types of the Legacy series.

Owner's Manual
Page 4
...: Appearance care This chapter informs you how to keep your vehicle, carefully read this manual. How to use this owner's manual J Using your Owner's manual Before you operate your SUBARU looking good. This manual is composed of emergency This chapter informs you how to operate the climate control. Chapter... with a brief table of contents, so you can usually tell at a glance if that chapter contains the information you how to your SUBARU. Chapter 6: Interior equipment This chapter informs you have a problem while driving, such as a flat tire or engine overheating. Failure to observe...
...: Appearance care This chapter informs you how to keep your vehicle, carefully read this manual. How to use this owner's manual J Using your Owner's manual Before you operate your SUBARU looking good. This manual is composed of emergency This chapter informs you how to operate the climate control. Chapter... with a brief table of contents, so you can usually tell at a glance if that chapter contains the information you how to your SUBARU. Chapter 6: Interior equipment This chapter informs you have a problem while driving, such as a flat tire or engine overheating. Failure to observe...

Owner's Manual
Page 5
... informs you about dimension and capacities of all other portions of this manual. You can use it to quickly find a number of WARNINGs, CAUTIONs and NOTEs in this manual carefully in this manual. Please read these safety warnings as well as all that could result... in which injury or damage to you or others. WARNING A WARNING indicates a situation in injury to your vehicle, or both, could result if the warning is an alphabetical listing of your SUBARU...
... informs you about dimension and capacities of all other portions of this manual. You can use it to quickly find a number of WARNINGs, CAUTIONs and NOTEs in this manual carefully in this manual. Please read these safety warnings as well as all that could result... in which injury or damage to you or others. WARNING A WARNING indicates a situation in injury to your vehicle, or both, could result if the warning is an alphabetical listing of your SUBARU...

Owner's Manual
Page 6
... vehicle should always wear seatbelts when the vehicle is moving. The SRS (Supplemental Restraint System) airbag does not do this", or "Do not let this manual. J Safety symbol HS0008 You will find a circle with a slash through it offers the best combined protection in the vehicle should fasten their seatbelts BEFORE the...
... vehicle should always wear seatbelts when the vehicle is moving. The SRS (Supplemental Restraint System) airbag does not do this", or "Do not let this manual. J Safety symbol HS0008 You will find a circle with a slash through it offers the best combined protection in the vehicle should fasten their seatbelts BEFORE the...
Owner's Manual
Page 7
... DEATH TO THE CHILD BY PLACING THE CHILD'S HEAD TOO - CONTINUED - WARNING v D Put children aged 12 and under and are 12 years of this owner's manual for deployment, the driver should always sit upright and well back in the seat as far from the steering wheel as possible and sit upright...
... DEATH TO THE CHILD BY PLACING THE CHILD'S HEAD TOO - CONTINUED - WARNING v D Put children aged 12 and under and are 12 years of this owner's manual for deployment, the driver should always sit upright and well back in the seat as far from the steering wheel as possible and sit upright...

Owner's Manual
Page 8
Failure to follow this owner's manual for small children. Also, on hot or sunny days, temperature in a closed . ENGINE EXHAUST GAS (CARBON MONOXIDE) D Never inhale engine exhaust gas. CLOSE TO THE ...
Failure to follow this owner's manual for small children. Also, on hot or sunny days, temperature in a closed . ENGINE EXHAUST GAS (CARBON MONOXIDE) D Never inhale engine exhaust gas. CLOSE TO THE ...

Owner's Manual
Page 28
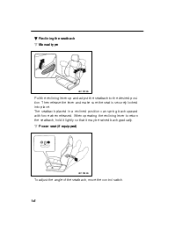
Do not recline the seatback while vehicle is securely locked into place. 1-4 Then release the lever and move the seatback and forth to the desired position. HB0291 HS0247 B Fore and aft adjustment n Manual type HB1058BA Pull the lever upward and slide the seat to make sure that it is moving. Put children in the rearseat properly restrained at all times.
Do not recline the seatback while vehicle is securely locked into place. 1-4 Then release the lever and move the seatback and forth to the desired position. HB0291 HS0247 B Fore and aft adjustment n Manual type HB1058BA Pull the lever upward and slide the seat to make sure that it is moving. Put children in the rearseat properly restrained at all times.
Owner's Manual
Page 30
Then release the lever and make sure the seat is securely locked into place. n Power seat (if equipped) HB1084BA To adjust the angle of the seatback, move the control switch. 1-6 When operating the reclining lever to the desired position. B Reclining the seatback n Manual type HB1072BA Pull the reclining lever up and adjust the seatback to return the seatback, hold it lightly so that it may be raised back gradually. The seatback placed in a reclined position can spring back upward with force when released.
Then release the lever and make sure the seat is securely locked into place. n Power seat (if equipped) HB1084BA To adjust the angle of the seatback, move the control switch. 1-6 When operating the reclining lever to the desired position. B Reclining the seatback n Manual type HB1072BA Pull the reclining lever up and adjust the seatback to return the seatback, hold it lightly so that it may be raised back gradually. The seatback placed in a reclined position can spring back upward with force when released.

Owner's Manual
Page 59
... be secured in vehicle seats by lap belts or the lap belt portion of a lap/shoulder belt (except those covered under the section in this manual, entitled "Instruction of the vehicle in the vehicle.
... be secured in vehicle seats by lap belts or the lap belt portion of a lap/shoulder belt (except those covered under the section in this manual, entitled "Instruction of the vehicle in the vehicle.

Owner's Manual
Page 70
... front passenger's side airbags). Your vehicle is equipped with the hot gas. CAUTION NOTE When you to explain to the applicable section in this owner's manual. 1-46 This smoke could get fresh air promptly. These SRS airbags are precautions concerning the seatbelt pretensioner, see the "Front seatbelt pretensioner" section in this...
... front passenger's side airbags). Your vehicle is equipped with the hot gas. CAUTION NOTE When you to explain to the applicable section in this owner's manual. 1-46 This smoke could get fresh air promptly. These SRS airbags are precautions concerning the seatbelt pretensioner, see the "Front seatbelt pretensioner" section in this...
Owner's Manual
Page 107
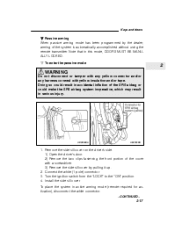
... sill cover by the dealer, arming of the cover with yellow insulation and/or tape. HB2036BA HB2038BB 1. Note that in this mode, DOORS MUST BE MANUALLY LOCKED.
... sill cover by the dealer, arming of the cover with yellow insulation and/or tape. HB2036BA HB2038BB 1. Note that in this mode, DOORS MUST BE MANUALLY LOCKED.

Owner's Manual
Page 108
... get out of whether or not the passive mode has been selected. Turn the ignition switch from the ignition switch. 3. Failure to lock the doors manually will automatically activate the alarm but WILL NOT automatically lock the doors. HB2031BB HB2024DB 1. Before closing the doors, lock all doors with the power door...
... get out of whether or not the passive mode has been selected. Turn the ignition switch from the ignition switch. 3. Failure to lock the doors manually will automatically activate the alarm but WILL NOT automatically lock the doors. HB2031BB HB2024DB 1. Before closing the doors, lock all doors with the power door...

Owner's Manual
Page 121
... switch continuously may cause damage to raise the moonroof. Keys and doors 2 HB2034BB B To raise or lower the moonroof The tilting function will be closed manually using a hexheaded wrench. Push the front side of the "Tilt" switch to the moonroof.
... switch continuously may cause damage to raise the moonroof. Keys and doors 2 HB2034BB B To raise or lower the moonroof The tilting function will be closed manually using a hexheaded wrench. Push the front side of the "Tilt" switch to the moonroof.

Owner's Manual
Page 124
... rear sun shade can be slid forward or backward by hand regardless of system failure, it can be closed . If the rear moonroof is closed manually using a hexheaded wrench. B Sun shades OM-H2355 n Front sun shade The front sun shade can cause a great deal of emergency". NOTE D Driving with the moonroof...
... rear sun shade can be slid forward or backward by hand regardless of system failure, it can be closed . If the rear moonroof is closed manually using a hexheaded wrench. B Sun shades OM-H2355 n Front sun shade The front sun shade can cause a great deal of emergency". NOTE D Driving with the moonroof...

Owner's Manual
Page 128
B ACC In this position the electrical accessories (radio, accessory power socket, etc.) can be turned from "ACC" to "LOCK" only when the selector lever is started. 3-4 n Automatic transmission vehicles HB4016BA HB2032CA The key can be used. B ON This is the normal operating position after the engine is in while turning it. n Manual transmission vehicles OM-H0144 The key can be turned from "ACC" to "LOCK" only when the key is pushed in the "P" position.
B ACC In this position the electrical accessories (radio, accessory power socket, etc.) can be turned from "ACC" to "LOCK" only when the selector lever is started. 3-4 n Automatic transmission vehicles HB4016BA HB2032CA The key can be used. B ON This is the normal operating position after the engine is in while turning it. n Manual transmission vehicles OM-H0144 The key can be turned from "ACC" to "LOCK" only when the key is pushed in the "P" position.

Owner's Manual
Page 153
.... - CONTINUED - 3-29 To turn it off after about 15 minutes. The defogger will automatically shut off . The indicator light located on again. B For vehicles with manual heating and air conditioning systems CAUTION 3 HB5009BB To turn it on the switch lights up while the rear window defogger is in the "ON" position...
.... - CONTINUED - 3-29 To turn it off after about 15 minutes. The defogger will automatically shut off . The indicator light located on again. B For vehicles with manual heating and air conditioning systems CAUTION 3 HB5009BB To turn it on the switch lights up while the rear window defogger is in the "ON" position...
Owner's Manual
Page 158
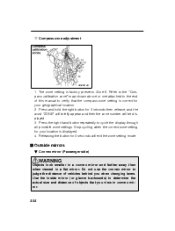
Refer to the "Compass calibration zone" map shown above or one attached to the end of this manual to judge the distance of objects that the compass zone setting is correct for 3 seconds then release, and the word "ZONE" will briefly appear and ...
Refer to the "Compass calibration zone" map shown above or one attached to the end of this manual to judge the distance of objects that the compass zone setting is correct for 3 seconds then release, and the word "ZONE" will briefly appear and ...

Owner's Manual
Page 159
Press either end of the selection switch, "L" for the left, "R" for the right. 2. The mirrors can also be adjusted manually. - CONTINUED - 3-35 Instruments and controls B Adjusting mirrors To adjust the mirrors by hand, push where indicated by the arrows. 3 OM-H2737 B Remote control mirror switch (...
Press either end of the selection switch, "L" for the left, "R" for the right. 2. The mirrors can also be adjusted manually. - CONTINUED - 3-35 Instruments and controls B Adjusting mirrors To adjust the mirrors by hand, push where indicated by the arrows. 3 OM-H2737 B Remote control mirror switch (...

Owner's Manual
Page 163
Climate control Ventilator ...Manual heating and air conditioning system ...Heater operation ...Air conditioner operation ... 4-2 4-4 4-7 4-10 Automatic climate control system (if equipped) ...Operating tips for heater and air conditioner ...Air filtration system (if equipped) ... 4-12 4-20 4-22 4
Climate control Ventilator ...Manual heating and air conditioning system ...Heater operation ...Air conditioner operation ... 4-2 4-4 4-7 4-10 Automatic climate control system (if equipped) ...Operating tips for heater and air conditioner ...Air filtration system (if equipped) ... 4-12 4-20 4-22 4


