
Owner's Manual
Page 3
This manual describes the following vehicle types. Sedan Wagon and OUTBACK SPORT
This manual describes the following vehicle types. Sedan Wagon and OUTBACK SPORT

Owner's Manual
Page 29
... seat materials ...Light control switch ...Limited slip differential (LSD) ...Loading your vehicle ...LSD (Limited slip differential) ... 9-24 9-14 H Hazard warning flasher ...3-6 Headlights ...3-16 Headrest adjustment (Wagon) ...1-10 Head restraint adjustment (Front) ...1-5 Heater operation ...4-6 High beam indicator light ...3-17 High mount stop light ...11-74 Horn ...3-32 Hose and connections ...11-16...
... seat materials ...Light control switch ...Limited slip differential (LSD) ...Loading your vehicle ...LSD (Limited slip differential) ... 9-24 9-14 H Hazard warning flasher ...3-6 Headlights ...3-16 Headrest adjustment (Wagon) ...1-10 Head restraint adjustment (Front) ...1-5 Heater operation ...4-6 High beam indicator light ...3-17 High mount stop light ...11-74 Horn ...3-32 Hose and connections ...11-16...

Owner's Manual
Page 30
... Windows ...2-22 R Rear Combination lights ...11-70 Differential gear oil ...11-31 Gate ...2-30 Seats ...1-8 Viscous limited slip differential (LSD) ...7-21 Rear seat Folding down (Wagon) ...1-11 Rear window Defogger switch ...3-25 Wiper and washer switch ...3-24 Reclining the seatback ...1-4 Recommended Automatic transmission fluid ...11-29 Brake fluid ...11-34 Clutch...
... Windows ...2-22 R Rear Combination lights ...11-70 Differential gear oil ...11-31 Gate ...2-30 Seats ...1-8 Viscous limited slip differential (LSD) ...7-21 Rear seat Folding down (Wagon) ...1-11 Rear window Defogger switch ...3-25 Wiper and washer switch ...3-24 Reclining the seatback ...1-4 Recommended Automatic transmission fluid ...11-29 Brake fluid ...11-34 Clutch...

Owner's Manual
Page 36
... (Supplemental Restraint System airbag) . 1-42 1-42 1-46 1-55 1-63 1-64 1-66 Seat heater (if equipped) ...Rear seats ...Armrest (if equipped) ...Headrest adjustment - Wagon ...Folding down the rear seat - Wagon ... 1-6 1-8 1-9 1-10 1-11 Vehicle with seatbelt ...Installation of child restraint systems by use of lower and tether anchorages ... 1-1 Seatbelts ...Seatbelt safety tips ...Emergency Locking...
... (Supplemental Restraint System airbag) . 1-42 1-42 1-46 1-55 1-63 1-64 1-66 Seat heater (if equipped) ...Rear seats ...Armrest (if equipped) ...Headrest adjustment - Wagon ...Folding down the rear seat - Wagon ... 1-6 1-8 1-9 1-10 1-11 Vehicle with seatbelt ...Installation of child restraint systems by use of lower and tether anchorages ... 1-1 Seatbelts ...Seatbelt safety tips ...Emergency Locking...

Owner's Manual
Page 45
Seat, seatbelt and SRS airbags objects can interfere with the driver's proper operation of the seatback. When the seats are not occupied, lower the headrests to improve rearward visibility. 1-10 To lower it up. J Headrest adjustment - Wagon To raise the headrest, pull it , push the head rest down while depressing the release button on the top of the car, possibly causing an accident and serious injury.
Seat, seatbelt and SRS airbags objects can interfere with the driver's proper operation of the seatback. When the seats are not occupied, lower the headrests to improve rearward visibility. 1-10 To lower it up. J Headrest adjustment - Wagon To raise the headrest, pull it , push the head rest down while depressing the release button on the top of the car, possibly causing an accident and serious injury.

Owner's Manual
Page 46
To lower it up. When the rear center seating position is occupied, place the headrest in its highest position. Seat, seatbelt and SRS airbags B Rear center seating position J Folding down the rear seat - Wagon To raise the head restraint, pull it , push the headrest down while pressing the release button on the top of the seatback. When the rear-center seating position is not occupied, lower the headrest to improve rearward visibility. - CONTINUED - 1-11
To lower it up. When the rear center seating position is occupied, place the headrest in its highest position. Seat, seatbelt and SRS airbags B Rear center seating position J Folding down the rear seat - Wagon To raise the head restraint, pull it , push the headrest down while pressing the release button on the top of the seatback. When the rear-center seating position is not occupied, lower the headrest to improve rearward visibility. - CONTINUED - 1-11

Owner's Manual
Page 54
... avoid catching the belt webbing in the seat. 2. If the belt still cannot be unlocked, let the belt retract slightly after giving a strong pull on Wagon) 1. Insert the tongue plate into the buckle until you hear a click. 4. B Rear seatbelts (except rear center seatbelt on it, then pull it out slowly again...
... avoid catching the belt webbing in the seat. 2. If the belt still cannot be unlocked, let the belt retract slightly after giving a strong pull on Wagon) 1. Insert the tongue plate into the buckle until you hear a click. 4. B Rear seatbelts (except rear center seatbelt on it, then pull it out slowly again...

Owner's Manual
Page 56
... accident. When fastening the belt after it is pulled out from the retractor, especially when inserting the connector's tongue plate into the mating buckle (on Wagon WARNING Fastening the seatbelt with the webbing twisted can increase the risk or severity of injury in the door.
... accident. When fastening the belt after it is pulled out from the retractor, especially when inserting the connector's tongue plate into the mating buckle (on Wagon WARNING Fastening the seatbelt with the webbing twisted can increase the risk or severity of injury in the door.

Owner's Manual
Page 74
Seat, seatbelt and SRS airbags J Top tether anchorages B Anchorage location 1) For left seat 2) For center seat 3) For right seat Sedan: Three anchorages are installed on the rear shelf. 1) For left seat 2) For center seat 3) For right seat Wagon: There is an anchorage for the center seating position at the rear end of the ceiling, and - CONTINUED - 1-39
Seat, seatbelt and SRS airbags J Top tether anchorages B Anchorage location 1) For left seat 2) For center seat 3) For right seat Sedan: Three anchorages are installed on the rear shelf. 1) For left seat 2) For center seat 3) For right seat Wagon: There is an anchorage for the center seating position at the rear end of the ceiling, and - CONTINUED - 1-39
Owner's Manual
Page 75
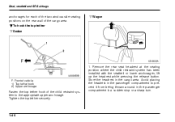
Tighten the top tether securely. 1. Store the headrest in the cargo area. B To hook the top tether n Sedan n Wagon F: Front of vehicle 1) Top tether hook 2) Upper anchorage Fasten the top tether hook of the cargo area. lift up the headrest while pressing the release ...
Tighten the top tether securely. 1. Store the headrest in the cargo area. B To hook the top tether n Sedan n Wagon F: Front of vehicle 1) Top tether hook 2) Upper anchorage Fasten the top tether hook of the cargo area. lift up the headrest while pressing the release ...

Owner's Manual
Page 102
... 2-27 Door locks ...Locking and unlocking from the outside To open and close the trunk lid from outside ...Locking and unlocking from inside ... 2-3 2-3 2-4 Rear gate (Wagon) ... 2-30 2 Power door locking switches (if equipped) ...Remote keyless entry system (if equipped) Locking the doors ...Unlocking the doors ...Illuminated entry ...Sounding a panic alarm ...Selecting...
... 2-27 Door locks ...Locking and unlocking from the outside To open and close the trunk lid from outside ...Locking and unlocking from inside ... 2-3 2-3 2-4 Rear gate (Wagon) ... 2-30 2 Power door locking switches (if equipped) ...Remote keyless entry system (if equipped) Locking the doors ...Unlocking the doors ...Illuminated entry ...Sounding a panic alarm ...Selecting...

Owner's Manual
Page 103
... vehicle. Keys and doors Keys The valet key fits only the ignition switch and driver's door lock. D Ignition switch D Doors D Trunk (sedan) or Rear gate (wagon) D Glove box 2-2 J Key number The key number is needed to the key set. The master key and submaster key fit all locks on the metal...
... vehicle. Keys and doors Keys The valet key fits only the ignition switch and driver's door lock. D Ignition switch D Doors D Trunk (sedan) or Rear gate (wagon) D Glove box 2-2 J Key number The key number is needed to the key set. The master key and submaster key fit all locks on the metal...

Owner's Manual
Page 104
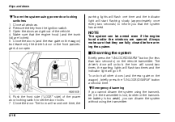
Always make sure that all closed doors and the rear gate (for wagon) are locked before leaving your vehicle. - CONTINUED - To lock the door from the outside using the power door locking switch, push the front side of ...the switch ("LOCK" side) and then close the door. In this case, all doors and the rear gate (wagon) are locked at the same time. To unlock the door, turn the key toward the front. To lock the door from the outside with the...
Always make sure that all closed doors and the rear gate (for wagon) are locked before leaving your vehicle. - CONTINUED - To lock the door from the outside using the power door locking switch, push the front side of ...the switch ("LOCK" side) and then close the door. In this case, all doors and the rear gate (wagon) are locked at the same time. To unlock the door, turn the key toward the front. To lock the door from the outside with the...

Owner's Manual
Page 105
.... The red mark on the lock lever appears when the 2-4 To unlock the door from the inside WARNING Keep all doors and the rear gate (wagon) are in an accident. It also helps prevent passengers from falling out if a door is unlocked. Pull the inside door handle to drive. door is...
.... The red mark on the lock lever appears when the 2-4 To unlock the door from the inside WARNING Keep all doors and the rear gate (wagon) are in an accident. It also helps prevent passengers from falling out if a door is unlocked. Pull the inside door handle to drive. door is...

Owner's Manual
Page 106
... the key inside the vehicle before locking the doors from the outside using power door locking switches. 1) Lock 2) Unlock All doors and the rear gate (wagon) can be locked and unlocked by the power door locking switches located at the driver's side and the front passenger's side doors. Keys and doors...
... the key inside the vehicle before locking the doors from the outside using power door locking switches. 1) Lock 2) Unlock All doors and the rear gate (wagon) can be locked and unlocked by the power door locking switches located at the driver's side and the front passenger's side doors. Keys and doors...

Owner's Manual
Page 107
.... D Do not take the transmitter apart except when replacing the battery. Range may not cause harmful interference, and (2) this distance will vary depending on the wagon) without a key D Sounding a panic alarm D Arming and disarming the security system (if your vehicle. D Locking and unlocking the doors (and rear gate on environmental conditions...
.... D Do not take the transmitter apart except when replacing the battery. Range may not cause harmful interference, and (2) this distance will vary depending on the wagon) without a key D Sounding a panic alarm D Arming and disarming the security system (if your vehicle. D Locking and unlocking the doors (and rear gate on environmental conditions...

Owner's Manual
Page 108
Press and Hold to Unlock driver's door. The horn will sound one time. To unlock all other doors (and rear gate on the wagon). The horn will sound two times. When you close the door, it will sound three times to alert you that the doors (or the rear ... doors Briefly press the "LOCK/ARM" button (for less than two seconds) to lock all of all doors (and rear gate on the Wagon). For details on the wagon), briefly press the "UNLOCK/DISARM" button a second time within 5 seconds. When locking the doors in normal circumstances, press the "LOCK/ALARM" button for...
Press and Hold to Unlock driver's door. The horn will sound one time. To unlock all other doors (and rear gate on the wagon). The horn will sound two times. When you close the door, it will sound three times to alert you that the doors (or the rear ... doors Briefly press the "LOCK/ARM" button (for less than two seconds) to lock all of all doors (and rear gate on the Wagon). For details on the wagon), briefly press the "UNLOCK/DISARM" button a second time within 5 seconds. When locking the doors in normal circumstances, press the "LOCK/ALARM" button for...

Owner's Manual
Page 109
... then simultaneously depress "LOCK/ARM" and "UNLOCK/DISARM" buttons for more than two seconds. Replace the battery as soon as possible. 2-8 Unless a button on the wagon) is pressed. J Replacing the battery When the transmitter battery begins to get weak, transmitter range will begin to decrease and the LED will sound one...
... then simultaneously depress "LOCK/ARM" and "UNLOCK/DISARM" buttons for more than two seconds. Replace the battery as soon as possible. 2-8 Unless a button on the wagon) is pressed. J Replacing the battery When the transmitter battery begins to get weak, transmitter range will begin to decrease and the LED will sound one...

Owner's Manual
Page 116
Remove the key from the ignition switch. 3. All doors (and the rear gate on the wagon). Keys and doors J Arming the system B To arm the system using remote transmitter 1. Open the doors and get out of the doors (or the rear ...gate) is not fully closed . Make sure that the doors (or the rear gate) are locked. 5. Close all doors (and the rear gate on the wagon) will lock, the horn will sound one time, the parking lights will automatically lock. - CONTINUED - 2-15 Close all windows. 2. Briefly press the "LOCK/ARM" button...
Remove the key from the ignition switch. 3. All doors (and the rear gate on the wagon). Keys and doors J Arming the system B To arm the system using remote transmitter 1. Open the doors and get out of the doors (or the rear ...gate) is not fully closed . Make sure that the doors (or the rear gate) are locked. 5. Close all doors (and the rear gate on the wagon) will lock, the horn will sound one time, the parking lights will automatically lock. - CONTINUED - 2-15 Close all windows. 2. Briefly press the "LOCK/ARM" button...
Owner's Manual
Page 117
Close all other doors (and the rear gate on the wagon), briefly press the "UNLOCK/DISARM" button a second time. B Emergency disarming If you cannot disarm the system using the transmitter. 6. The driver's door will unlock, the ... system without using the transmitter (i.e. To unlock all windows. 2. J Disarming the system Briefly press the "UNLOCK/DISARM" button (for less than two seconds) on the wagon) but leave only the driver's door or the front passenger's door open. Close the door. Keys and doors B To arm the system using power door...
Close all other doors (and the rear gate on the wagon), briefly press the "UNLOCK/DISARM" button a second time. B Emergency disarming If you cannot disarm the system using the transmitter. 6. The driver's door will unlock, the ... system without using the transmitter (i.e. To unlock all windows. 2. J Disarming the system Briefly press the "UNLOCK/DISARM" button (for less than two seconds) on the wagon) but leave only the driver's door or the front passenger's door open. Close the door. Keys and doors B To arm the system using power door...


