
Owner's Manual
Page 5
...indicators and how to use the seat and seatbelt and contains precautions for scheduled maintenance and informs you how to keep your SUBARU looking good. Chapter 6: Interior equipment This chapter informs you have a problem while driving, such as a flat tire or engine overheating. Chapter 11:...manual is composed of emergency This chapter informs you what to do if you how to operate interior equipment. Chapter 10: Appearance care This chapter informs you how to keep your SUBARU running properly. 2 Chapter 3: Instruments and controls This chapter informs you about the operation of...
...indicators and how to use the seat and seatbelt and contains precautions for scheduled maintenance and informs you how to keep your SUBARU looking good. Chapter 6: Interior equipment This chapter informs you have a problem while driving, such as a flat tire or engine overheating. Chapter 11:...manual is composed of emergency This chapter informs you what to do if you how to operate interior equipment. Chapter 10: Appearance care This chapter informs you how to keep your SUBARU running properly. 2 Chapter 3: Instruments and controls This chapter informs you about the operation of...

Owner's Manual
Page 15
Table of contents Seat, seatbelt and SRS airbags Keys and doors Instruments and controls Climate control Audio Interior equipment Starting and operating Driving tips In case of emergency Appearance care Maintenance and service Specifications Consumer information and Reporting safety defects Index 1 2 3 4 5 6 7 8 9 10 11 12 13 13 - CONTINUED -14
Table of contents Seat, seatbelt and SRS airbags Keys and doors Instruments and controls Climate control Audio Interior equipment Starting and operating Driving tips In case of emergency Appearance care Maintenance and service Specifications Consumer information and Reporting safety defects Index 1 2 3 4 5 6 7 8 9 10 11 12 13 13 - CONTINUED -14

Owner's Manual
Page 27
... ...1-31 Installation with seatbelt ...1-34 Lower and tether anchorages ...1-36 Child safety ...7 Locks ...2-21 Chime Key ...3-4 Seatbelt ...3-10 Cigarette lighter ...6-10 Cleaning Aluminum wheels ...10-3 Interior ...10-5 Ventilator grille ...4-11 Climate control system ...4-4 Clock ...3-15 Clutch fluid ...11-35 Clutch pedal ...11-38 Coat hook ...6-14 Coin tray ...6-6 Cooling system ...11...
... ...1-31 Installation with seatbelt ...1-34 Lower and tether anchorages ...1-36 Child safety ...7 Locks ...2-21 Chime Key ...3-4 Seatbelt ...3-10 Cigarette lighter ...6-10 Cleaning Aluminum wheels ...10-3 Interior ...10-5 Ventilator grille ...4-11 Climate control system ...4-4 Clock ...3-15 Clutch fluid ...11-35 Clutch pedal ...11-38 Coat hook ...6-14 Coin tray ...6-6 Cooling system ...11...

Owner's Manual
Page 42
NOTE D Use of the seat heater for a long period of time while the engine is in operation. When the vehicle's interior is a possibility that people with delicate skin may cause the seat heater to overheat. CAUTION D There is warmed enough or before you leave the vehicle, ...
NOTE D Use of the seat heater for a long period of time while the engine is in operation. When the vehicle's interior is a possibility that people with delicate skin may cause the seat heater to overheat. CAUTION D There is warmed enough or before you leave the vehicle, ...

Owner's Manual
Page 109
...inform you an audible signal when the doors lock and unlock. Replace the battery as soon as possible. 2-8 Keys and doors J Illuminated entry The interior (dome) light and ignition switch light (for turbo models) will illuminate when the "UNLOCK/ DISARM" button is inserted in order for approximately 30 ...seconds if any of the doors (or the rear gate on the remote is not opened. The interior light must be deactivated after approximately 30 seconds. To deactivate it, press the "LOCK/ARM" button or "UNLOCK/DISARM" button. Unless a button...
...inform you an audible signal when the doors lock and unlock. Replace the battery as soon as possible. 2-8 Keys and doors J Illuminated entry The interior (dome) light and ignition switch light (for turbo models) will illuminate when the "UNLOCK/ DISARM" button is inserted in order for approximately 30 ...seconds if any of the doors (or the rear gate on the remote is not opened. The interior light must be deactivated after approximately 30 seconds. To deactivate it, press the "LOCK/ARM" button or "UNLOCK/DISARM" button. Unless a button...

Owner's Manual
Page 168
.... B Air conditioner button (if equipped) 1) Push The air conditioner operates only when the engine is recirculated inside the vehicle. - CONTINUED - 4-5 B Air inlet selection lever (Recirculation): Interior air is running. Also, you cannot stop the air conditioner compressor by pressing the air conditioner button. Push it again to turn on . However the...
.... B Air conditioner button (if equipped) 1) Push The air conditioner operates only when the engine is recirculated inside the vehicle. - CONTINUED - 4-5 B Air inlet selection lever (Recirculation): Interior air is running. Also, you cannot stop the air conditioner compressor by pressing the air conditioner button. Push it again to turn on . However the...

Owner's Manual
Page 174
... the condenser is located in front of the radiator, this area should be kept clean because cooling performance is best performed by your SUBARU dealer. - CONTINUED - 4-11 Always keep the front ventilation inlet grille free of insects and leaves on the condenser. Climate control ... the air conditioner for refrigerant leaks, hose conditions, and proper operation each month during the off-season to circulate into the heated interior. This check is impaired by the air conditioner. J Checking air conditioning system before summer season Check the air conditioner unit for ...
... the condenser is located in front of the radiator, this area should be kept clean because cooling performance is best performed by your SUBARU dealer. - CONTINUED - 4-11 Always keep the front ventilation inlet grille free of insects and leaves on the condenser. Climate control ... the air conditioner for refrigerant leaks, hose conditions, and proper operation each month during the off-season to circulate into the heated interior. This check is impaired by the air conditioner. J Checking air conditioning system before summer season Check the air conditioner unit for ...

Owner's Manual
Page 212
Cup holder ... 6-7 6-7 6-7 6 In instrument panel ...In center console ... Interior equipment Interior light ...Dome light ...Cargo area light (if equipped) ... 6-2 6-2 6-2 Under-floor storage compartment (if equipped) ... 6-17 Map light (if equipped) ...Sun visors ...Center visor ...Vanity mirror (...
Cup holder ... 6-7 6-7 6-7 6 In instrument panel ...In center console ... Interior equipment Interior light ...Dome light ...Cargo area light (if equipped) ... 6-2 6-2 6-2 Under-floor storage compartment (if equipped) ... 6-17 Map light (if equipped) ...Sun visors ...Center visor ...Vanity mirror (...

Owner's Manual
Page 213
... J Cargo area light (if equipped) The dome light switch has three positions: ON: The light stays on for detailed information. The light remains on continuously. Interior equipment Interior light When leaving your vehicle, make sure the light goes out to avoid battery discharge.
... J Cargo area light (if equipped) The dome light switch has three positions: ON: The light stays on for detailed information. The light remains on continuously. Interior equipment Interior light When leaving your vehicle, make sure the light goes out to avoid battery discharge.

Owner's Manual
Page 214
To use the sun visor at a side window, swing it down the visors. To block out glare, swing down and move it off to avoid battery discharge. To turn on the spotlight, push the switch. When leaving the vehicle, make sure the light is turned off , push the switch again. Interior equipment Map light (if equipped) Sun visors To turn it sideways. - CONTINUED - 6-3
To use the sun visor at a side window, swing it down the visors. To block out glare, swing down and move it off to avoid battery discharge. To turn on the spotlight, push the switch. When leaving the vehicle, make sure the light is turned off , push the switch again. Interior equipment Map light (if equipped) Sun visors To turn it sideways. - CONTINUED - 6-3

Owner's Manual
Page 215
To use the vanity mirror, swing down the visor. Interior equipment J Center visor J Vanity mirror (if equipped) To block out glare, swing down the sun visor and open the vanity mirror cover. 6-4
To use the vanity mirror, swing down the visor. Interior equipment J Center visor J Vanity mirror (if equipped) To block out glare, swing down the sun visor and open the vanity mirror cover. 6-4

Owner's Manual
Page 216
To lock the glove compartment, insert the key and turn it , push the lid firmly upward. J Glove box 1) Lock 2) Unlock To open the glove compartment, pull the handle. To close it clockwise. - CONTINUED - 6-5 D Do not store spray cans, containers with flammable or corrosive liquids or any other dangerous items in the event of sudden stops or an accident. Interior equipment Storage compartments CAUTION D Always keep the storage compartment closed while driving to reduce the risk of injury in the storage compartment.
To lock the glove compartment, insert the key and turn it , push the lid firmly upward. J Glove box 1) Lock 2) Unlock To open the glove compartment, pull the handle. To close it clockwise. - CONTINUED - 6-5 D Do not store spray cans, containers with flammable or corrosive liquids or any other dangerous items in the event of sudden stops or an accident. Interior equipment Storage compartments CAUTION D Always keep the storage compartment closed while driving to reduce the risk of injury in the storage compartment.

Owner's Manual
Page 217
Interior equipment J Center console J Coin tray To open the coin tray, pull the upper edge of the lid. 6-6 To open the lid, push the release button.
Interior equipment J Center console J Coin tray To open the coin tray, pull the upper edge of the lid. 6-6 To open the lid, push the release button.

Owner's Manual
Page 218
To use , always keep the holder stored while driving to an accident. - CONTINUED - 6-7 D Do not pick up a cup from the cup holder or put a cup in the holder while you are driving, as this may distract you and lead to reduce the risk of injury in the event of a sudden stop or an accident. CAUTION D When not in the center console, beside the parking brake lever. Interior equipment Cup holder J In instrument panel J In center console The front passenger's cup holder is built in use the cup holder, push its front surface and pull it out completely.
To use , always keep the holder stored while driving to an accident. - CONTINUED - 6-7 D Do not pick up a cup from the cup holder or put a cup in the holder while you are driving, as this may distract you and lead to reduce the risk of injury in the event of a sudden stop or an accident. CAUTION D When not in the center console, beside the parking brake lever. Interior equipment Cup holder J In instrument panel J In center console The front passenger's cup holder is built in use the cup holder, push its front surface and pull it out completely.

Owner's Manual
Page 219
Accessory power outlet J In the luggage compartment (if equipped) Electrical power (12V DC) from the battery is on tap at the socket when the ignition switch is either in -car use an in the "ACC" or "ON" position. You can use electrical appliance by connecting it to avoid spills. Beverages, if hot, might burn you or your passengers. Spilled beverages may also damage upholstery, carpets or audio equipment. Interior equipment D Take care to the accessory power outlet. 6-8
Accessory power outlet J In the luggage compartment (if equipped) Electrical power (12V DC) from the battery is on tap at the socket when the ignition switch is either in -car use an in the "ACC" or "ON" position. You can use electrical appliance by connecting it to avoid spills. Beverages, if hot, might burn you or your passengers. Spilled beverages may also damage upholstery, carpets or audio equipment. Interior equipment D Take care to the accessory power outlet. 6-8
Owner's Manual
Page 220
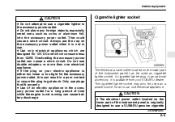
...That could cause a short circuit. Overloading the accessory power outlet can cause battery discharge. Cigarette lighter socket The electrical power outlet located on your SUBARU dealer. It is available from your electric appliance is not in the accessory power outlet for 12V DC and which are designed for a long... engine is an optional accessory. Only use plugs that fit properly. D Use only electrical appliances which consume less than one electrical appliance. Interior equipment CAUTION D Do not attempt to use a SUBARU genuine cigarette - CONTINUED - 6-9
...That could cause a short circuit. Overloading the accessory power outlet can cause battery discharge. Cigarette lighter socket The electrical power outlet located on your SUBARU dealer. It is available from your electric appliance is not in the accessory power outlet for 12V DC and which are designed for a long... engine is an optional accessory. Only use plugs that fit properly. D Use only electrical appliances which consume less than one electrical appliance. Interior equipment CAUTION D Do not attempt to use a SUBARU genuine cigarette - CONTINUED - 6-9

Owner's Manual
Page 221
... ignition switch is heated. Doing so could cause a short circuit. Doing so may cause a short-circuit and overheating, resulting in the socket. Do not use . Interior equipment lighter plug. Doing so may cause the plug to "pop out" after its lighter element is in a socket that causes a cigarette lighter plug to...
... ignition switch is heated. Doing so could cause a short circuit. Doing so may cause a short-circuit and overheating, resulting in the socket. Do not use . Interior equipment lighter plug. Doing so may cause the plug to "pop out" after its lighter element is in a socket that causes a cigarette lighter plug to...

Owner's Manual
Page 222
... for the socket, this can cause a short circuit. Overloading the socket can result in a poor contact or cause the plug - CONTINUED - 6-11 Interior equipment CAUTION Do not hold the lighter pushed in the "ACC" or "ON" position. If you use double adapters or more than 120W. When the... to get stuck. Do not use the socket as an accessory power outlet Electrical power (12V DC) from entering it will not interfere with your SUBARU dealer replace the socket with a new one electrical appliance. D Before driving your vehicle, make sure that reason, a cigarette lighter, even if it...
... for the socket, this can cause a short circuit. Overloading the socket can result in a poor contact or cause the plug - CONTINUED - 6-11 Interior equipment CAUTION Do not hold the lighter pushed in the "ACC" or "ON" position. If you use double adapters or more than 120W. When the... to get stuck. Do not use the socket as an accessory power outlet Electrical power (12V DC) from entering it will not interfere with your SUBARU dealer replace the socket with a new one electrical appliance. D Before driving your vehicle, make sure that reason, a cigarette lighter, even if it...

Owner's Manual
Page 223
To remove the ashtray for cleaning, open the ashtray, pull the lid out. Fully close the ashtray after using it out while pushing the inner plate down. 6-12 This could cause a fire. 1) Push 2) Pull To open it and pull it to help reduce residual smoke. Interior equipment Ashtray CAUTION Do not use ashtrays as waste receptacles or leave a lighted cigarette in an ashtray.
To remove the ashtray for cleaning, open the ashtray, pull the lid out. Fully close the ashtray after using it out while pushing the inner plate down. 6-12 This could cause a fire. 1) Push 2) Pull To open it and pull it to help reduce residual smoke. Interior equipment Ashtray CAUTION Do not use ashtrays as waste receptacles or leave a lighted cigarette in an ashtray.

Owner's Manual
Page 224
Make sure the driver's floor mat is placed back in grommet, by placing the grommet over the pin and pushing downward. The floor mat is secured using the built-in its retaining pin. If the floor mat slips forward and interferes with the movement of the vehicle next to the fuel filler door release. Interior equipment Floor mat (if equipped) CAUTION A retaining pin is located on its proper location and correctly secured on the driver's side of the pedals during driving, it could cause an accident. - CONTINUED - 6-13
Make sure the driver's floor mat is placed back in grommet, by placing the grommet over the pin and pushing downward. The floor mat is secured using the built-in its retaining pin. If the floor mat slips forward and interferes with the movement of the vehicle next to the fuel filler door release. Interior equipment Floor mat (if equipped) CAUTION A retaining pin is located on its proper location and correctly secured on the driver's side of the pedals during driving, it could cause an accident. - CONTINUED - 6-13
