
Owner's Manual
Page 2
... INDUSTRIES LTD. reserves the right to make the same or similar changes on choosing a SUBARU vehicle. The next owner will need the information found in this manual in this manual carefully so that you purchased your vehicle and its operation. FUJI HEAVY INDUSTRIES LTD., TOKYO... obligation to change specifications and designs at the time of printing. Some explanations, therefore may understand your SUBARU or the nearest SUBARU dealer. This Owner's Manual applies to all models and covers all the information necessary to properly maintain the emission control system for ...
... INDUSTRIES LTD. reserves the right to make the same or similar changes on choosing a SUBARU vehicle. The next owner will need the information found in this manual in this manual carefully so that you purchased your vehicle and its operation. FUJI HEAVY INDUSTRIES LTD., TOKYO... obligation to change specifications and designs at the time of printing. Some explanations, therefore may understand your SUBARU or the nearest SUBARU dealer. This Owner's Manual applies to all models and covers all the information necessary to properly maintain the emission control system for ...

Owner's Manual
Page 4
... of contents, so you can usually tell at a glance if that chapter contains the information you how to start and operate your SUBARU. This manual is composed of instrument panel indicators and how to use the seat and seatbelt and contains precautions for the SRS airbag. Each chapter ...begins with a brief table of your SUBARU in this manual. Chapter 3: Instruments and controls This chapter informs you about the operation of thirteen chapters. Chapter 5: Audio This chapter informs you how to...
... of contents, so you can usually tell at a glance if that chapter contains the information you how to start and operate your SUBARU. This manual is composed of instrument panel indicators and how to use the seat and seatbelt and contains precautions for the SRS airbag. Each chapter ...begins with a brief table of your SUBARU in this manual. Chapter 3: Instruments and controls This chapter informs you about the operation of thirteen chapters. Chapter 5: Audio This chapter informs you how to...

Owner's Manual
Page 5
... 's in which serious injury or death could result if the caution is an alphabetical listing of all other portions of your SUBARU. CAUTION A CAUTION indicates a situation in this manual. Chapter 14: Index This is ignored. Please read . You can use it to quickly find a number of WARNINGs, ...CAUTIONs and NOTEs in this manual carefully in which injury or damage to use of how to your SUBARU vehicle safely. Chapter 13: Consumer information and Reporting safety defects This chapter informs you or others. This ...
... 's in which serious injury or death could result if the caution is an alphabetical listing of all other portions of your SUBARU. CAUTION A CAUTION indicates a situation in this manual. Chapter 14: Index This is ignored. Please read . You can use it to quickly find a number of WARNINGs, ...CAUTIONs and NOTEs in this manual carefully in which injury or damage to use of how to your SUBARU vehicle safely. Chapter 13: Consumer information and Reporting safety defects This chapter informs you or others. This ...

Owner's Manual
Page 6
... fasten their seatbelts BEFORE the vehicle starts to fasten seatbelts. The SRS (Supplemental Restraint System) airbag does not do this", or "Do not let this manual. Occupants who are out of a sudden stop or accident. Safety precautions when driving SEATBELT AND SRS AIRBAG D All persons in the vehicle should always wear...
... fasten their seatbelts BEFORE the vehicle starts to fasten seatbelts. The SRS (Supplemental Restraint System) airbag does not do this", or "Do not let this manual. Occupants who are out of a sudden stop or accident. Safety precautions when driving SEATBELT AND SRS AIRBAG D All persons in the vehicle should always wear...

Owner's Manual
Page 7
... can injure or even kill children, especially if they are lighter and weaker than in the seat. Because children are 12 years of this owner's manual for a child restraint system, the child should sit in your lap or in the REAR seat and be placed in the REAR seat in chapter...
... can injure or even kill children, especially if they are lighter and weaker than in the seat. Because children are 12 years of this owner's manual for a child restraint system, the child should sit in your lap or in the REAR seat and be placed in the REAR seat in chapter...
Owner's Manual
Page 8
... exhaust gas from snow, leaves or other obstructions to the "Door locks" section in the vehicle. D Always use the ventilation fan to follow this owner's manual for a lengthy time while the engine is running. Also, on hot or sunny days, temperature in the vehicle. Failure to force fresh air into the...
... exhaust gas from snow, leaves or other obstructions to the "Door locks" section in the vehicle. D Always use the ventilation fan to follow this owner's manual for a lengthy time while the engine is running. Also, on hot or sunny days, temperature in the vehicle. Failure to force fresh air into the...
Owner's Manual
Page 22
... Cigarette lighter (if equipped) ...6-11 Cleaning aluminum wheels ...10-3 Cleaning fog light lens ...10-4 Cleaning the interior ...10-6 Clock ...6-8 Clutch fluid ...11-30 Clutch pedal (Manual transmission vehicles) ...11-38 Coat hook ...6-14 Coin tray ...6-5 Cooling system ...11-14 Corrosion protection ...8-15, 10-4 Cruise control (if equipped) ...7-28 Cup holder ...6-6 D Dashboard...
... Cigarette lighter (if equipped) ...6-11 Cleaning aluminum wheels ...10-3 Cleaning fog light lens ...10-4 Cleaning the interior ...10-6 Clock ...6-8 Clutch fluid ...11-30 Clutch pedal (Manual transmission vehicles) ...11-38 Coat hook ...6-14 Coin tray ...6-5 Cooling system ...11-14 Corrosion protection ...8-15, 10-4 Cruise control (if equipped) ...7-28 Cup holder ...6-6 D Dashboard...
Owner's Manual
Page 24
... control switch ...3-16 Loading your vehicle ...8-15 Luggage cover (if equipped) ...6-16 M Main fuse ...11-53 Maintenance precautions ...11-3 Maintenance schedule ...11-3 Maintenance tools ...9-16 Manual transmission ...7-11 Manual transmission oil ...11-21 Master, submaster and valet key ...2-2 Mirrors ...3-28 14-5
... control switch ...3-16 Loading your vehicle ...8-15 Luggage cover (if equipped) ...6-16 M Main fuse ...11-53 Maintenance precautions ...11-3 Maintenance schedule ...11-3 Maintenance tools ...9-16 Manual transmission ...7-11 Manual transmission oil ...11-21 Master, submaster and valet key ...2-2 Mirrors ...3-28 14-5
Owner's Manual
Page 26
... airbag (if equipped) ...1-42 Starting a flooded engine ...7-10 Starting the engine ...7-8 Starting the engine during cold weather below -4 °F (-20 °C) ...7-9 Starting the engine for a manual transmission vehicle ...7-8 14-7
... airbag (if equipped) ...1-42 Starting a flooded engine ...7-10 Starting the engine ...7-8 Starting the engine during cold weather below -4 °F (-20 °C) ...7-9 Starting the engine for a manual transmission vehicle ...7-8 14-7

Owner's Manual
Page 61
Seat, seatbelt and SRS airbags Put children in this owner's manual. - CONTINUED - 1-33 This smoke could get fresh air promptly. If you to explain to the buyer that it is equipped with the hot gas. Occupants ...
Seat, seatbelt and SRS airbags Put children in this owner's manual. - CONTINUED - 1-33 This smoke could get fresh air promptly. If you to explain to the buyer that it is equipped with the hot gas. Occupants ...

Owner's Manual
Page 96
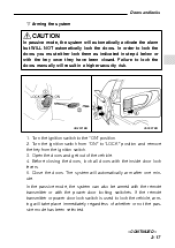
.... 4. Doing so could make the SRS airbag system inoperative, which may result in serious injury. To place the system in this mode, DOORS MUST BE MANUALLY LOCKED. HB2036BA HB2038BB 1. Remove the side sill cover on the driver's side. 1) Open the driver's door. 2) Remove the clip by pulling it up. 2. n To enter...
.... 4. Doing so could make the SRS airbag system inoperative, which may result in serious injury. To place the system in this mode, DOORS MUST BE MANUALLY LOCKED. HB2036BA HB2038BB 1. Remove the side sill cover on the driver's side. 1) Open the driver's door. 2) Remove the clip by pulling it up. 2. n To enter...
Owner's Manual
Page 97
... the key once they have been closed. Before closing the doors, lock all doors with the power door locking switches. Failure to lock the doors manually will automatically arm after one minute. Close the doors. If the remote transmitter or power door lock switch is used to lock the doors you...
... the key once they have been closed. Before closing the doors, lock all doors with the power door locking switches. Failure to lock the doors manually will automatically arm after one minute. Close the doors. If the remote transmitter or power door lock switch is used to lock the doors you...

Owner's Manual
Page 105
... such a condition has been encountered, close the moonroof up to the initial stop position of 20 in . (50 cm). D If the moonroof cannot be closed manually using a hex- CONTINUED - 2-25 Doors and locks Open/close switch HS0294 To open or close the moonroof Push the upper part of the switch to...
... such a condition has been encountered, close the moonroof up to the initial stop position of 20 in . (50 cm). D If the moonroof cannot be closed manually using a hex- CONTINUED - 2-25 Doors and locks Open/close switch HS0294 To open or close the moonroof Push the upper part of the switch to...
Owner's Manual
Page 109
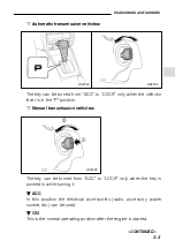
n Manual transmission vehicles: 2 1 HS0125 The key can be turned from "ACC" to "LOCK" only when the key is pushed in the "P" position. Instruments and controls n Automatic transmission vehicles: HS0123 HS0124 The key can be turned from "ACC" to "LOCK" only when the selector lever is in while turning it. B ACC In this position the electrical accessories (radio, accessory power socket, etc.) can be used. B ON This is the normal operating position after the engine is started. - CONTINUED - 3-3
n Manual transmission vehicles: 2 1 HS0125 The key can be turned from "ACC" to "LOCK" only when the key is pushed in the "P" position. Instruments and controls n Automatic transmission vehicles: HS0123 HS0124 The key can be turned from "ACC" to "LOCK" only when the selector lever is in while turning it. B ACC In this position the electrical accessories (radio, accessory power socket, etc.) can be used. B ON This is the normal operating position after the engine is started. - CONTINUED - 3-3
Owner's Manual
Page 115
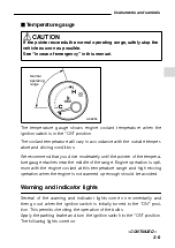
Normal operating range HS0052 The temperature gauge shows engine coolant temperature when the ignition switch is in accordance with the engine coolant at this manual. This permits checking the operation of emergency" in this temperature range and high revving operation when the engine is not warmed up enough should be ...
Normal operating range HS0052 The temperature gauge shows engine coolant temperature when the ignition switch is in accordance with the engine coolant at this manual. This permits checking the operation of emergency" in this temperature range and high revving operation when the engine is not warmed up enough should be ...

Owner's Manual
Page 137
... cycle the display through all possible zone settings. Refer to the "Compass calibration zone" map shown above or one attached to the end of this manual to determine the actual size and distance of vehicles behind you view in a flat mirror. J Outside mirrors WARNING Objects look smaller in a convex mirror (passenger...
... cycle the display through all possible zone settings. Refer to the "Compass calibration zone" map shown above or one attached to the end of this manual to determine the actual size and distance of vehicles behind you view in a flat mirror. J Outside mirrors WARNING Objects look smaller in a convex mirror (passenger...

Owner's Manual
Page 138
Return the selection switch to the neutral position to move the mirror. 3. HS0065 B Remote control mirror switch (if equipped) The remote control mirrors operate only when the ignition switch is in the direction you want to prevent unintentional operation. The mirrors can also be adjusted manually. 3-32 HS3008BB 1. Move the direction control switch in the "ON" or "ACC" position. Press either end of the selection switch, "L" for the left and "R" for the right. 2.
Return the selection switch to the neutral position to move the mirror. 3. HS0065 B Remote control mirror switch (if equipped) The remote control mirrors operate only when the ignition switch is in the direction you want to prevent unintentional operation. The mirrors can also be adjusted manually. 3-32 HS3008BB 1. Move the direction control switch in the "ON" or "ACC" position. Press either end of the selection switch, "L" for the left and "R" for the right. 2.

Owner's Manual
Page 162
...When the "SCAN" button is pressed, the frequency interval can be preset. Press the "BAND" button 3 to preset stations 1. B Tuning (TUNE) n Manual tuning (TUNE) Press the tuning button 4 marked "Y" to increase the tuning frequency and press the tuning button marked "B" to high frequencies only. Constant pressure... allows you to select that station in the direction of low frequencies to decrease it. Press the "SCAN" button or tune the radio manually until the entire band has been scanned from the station or proximity to stop at the station for automatic tuning, stations are scanned in ...
...When the "SCAN" button is pressed, the frequency interval can be preset. Press the "BAND" button 3 to preset stations 1. B Tuning (TUNE) n Manual tuning (TUNE) Press the tuning button 4 marked "Y" to increase the tuning frequency and press the tuning button marked "B" to high frequencies only. Constant pressure... allows you to select that station in the direction of low frequencies to decrease it. Press the "SCAN" button or tune the radio manually until the entire band has been scanned from the station or proximity to stop at the station for automatic tuning, stations are scanned in ...

Owner's Manual
Page 173
B Manual tuning (TUNE) Push the tuning button 3 marked "∧" to increase the tuning frequency and press the tuning button marked "∨" to the SCAN mode. B Automatic ...
B Manual tuning (TUNE) Push the tuning button 3 marked "∧" to increase the tuning frequency and press the tuning button marked "∨" to the SCAN mode. B Automatic ...
Owner's Manual
Page 174
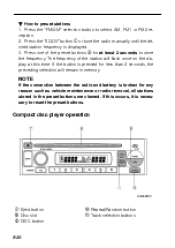
Press one of the station will remain in the preset buttons are cleared. Press the "SCAN" button 1 or tune the radio manually until the desired station frequency is broken for any reason such as vehicle maintenance or radio removal, all stations stored in memory. B How to select ...
Press one of the station will remain in the preset buttons are cleared. Press the "SCAN" button 1 or tune the radio manually until the desired station frequency is broken for any reason such as vehicle maintenance or radio removal, all stations stored in memory. B How to select ...


