
Owner's Manual
Page 4
...informs you how to use the instruments and other switches. Chapter 5: Audio This chapter informs you how to start and operate your SUBARU. Failure to observe these instructions may result in serious injury and damage to your vehicle, follow the instructions in various conditions and ... usually tell at a glance if that chapter contains the information you how to keep your SUBARU looking good. Chapter 2: Doors and Locks This chapter informs you how to operate interior equipment. Chapter 6: Interior equipment This chapter informs you how to operate the keys, locks and windows. Chapter 10:...
...informs you how to use the instruments and other switches. Chapter 5: Audio This chapter informs you how to start and operate your SUBARU. Failure to observe these instructions may result in serious injury and damage to your vehicle, follow the instructions in various conditions and ... usually tell at a glance if that chapter contains the information you how to keep your SUBARU looking good. Chapter 2: Doors and Locks This chapter informs you how to operate interior equipment. Chapter 6: Interior equipment This chapter informs you how to operate the keys, locks and windows. Chapter 10:...

Owner's Manual
Page 13
Table of contents Seat, seatbelt and SRS airbag Doors and locks Instruments and controls Climate control Audio Interior equipment Starting and operating Driving tips In case of emergency Appearance care Maintenance and service Specifications Consumer information and Reporting safety defects Index 1 2 3 4 5 6 7 8 9 10 11 12 13 14 - CONTINUED - xi
Table of contents Seat, seatbelt and SRS airbag Doors and locks Instruments and controls Climate control Audio Interior equipment Starting and operating Driving tips In case of emergency Appearance care Maintenance and service Specifications Consumer information and Reporting safety defects Index 1 2 3 4 5 6 7 8 9 10 11 12 13 14 - CONTINUED - xi

Owner's Manual
Page 15
J Interior HSF009BB 1 2 3 4 5 6 7 8 9 Q W E Head rest (page 1-9) Interior light (page 6-14) Door lock (page 2-3) Moonroof (page 2-24) Center console (page 6-3) Storage compartment (page 6-2) Selector lever/Gearshift lever (page 7-15/7-11) Front seat (page 1-2) Parking brake lever (page 7-26) Seatbelt (combination lap/shoulder belt) (page 1-10) Rear seat (page 1-8) Rear center passenger's seat seatbelt (page 1-18) - CONTINUED - xiii
J Interior HSF009BB 1 2 3 4 5 6 7 8 9 Q W E Head rest (page 1-9) Interior light (page 6-14) Door lock (page 2-3) Moonroof (page 2-24) Center console (page 6-3) Storage compartment (page 6-2) Selector lever/Gearshift lever (page 7-15/7-11) Front seat (page 1-2) Parking brake lever (page 7-26) Seatbelt (combination lap/shoulder belt) (page 1-10) Rear seat (page 1-8) Rear center passenger's seat seatbelt (page 1-18) - CONTINUED - xiii
Owner's Manual
Page 22
Index Child restraint systems ...1-25 Child safety locks ...2-19 Cigarette lighter (if equipped) ...6-11 Cleaning aluminum wheels ...10-3 Cleaning fog light lens ...10-4 Cleaning the interior ...10-6 Clock ...6-8 Clutch fluid ...11-30 Clutch pedal (Manual transmission vehicles) ...11-38 Coat hook ...6-14 Coin tray ...6-5 Cooling system ...11-14 Corrosion protection ...8-15, ...
Index Child restraint systems ...1-25 Child safety locks ...2-19 Cigarette lighter (if equipped) ...6-11 Cleaning aluminum wheels ...10-3 Cleaning fog light lens ...10-4 Cleaning the interior ...10-6 Clock ...6-8 Clutch fluid ...11-30 Clutch pedal (Manual transmission vehicles) ...11-38 Coat hook ...6-14 Coin tray ...6-5 Cooling system ...11-14 Corrosion protection ...8-15, ...
Owner's Manual
Page 24
Index Horn ... 3-28 I Ignition switch ...3-2 Illumination brightness control ...3-18 In-dash 6 CD auto changer 1 (if equipped) ...5-44 Inside mirror ...3-28 Installation of accessories ...5-2, 11-53 Interior light ...6-14 Interior light and luggage compartment light ...11-60 J Jump starting ... 9-8 K Key interlock release (AT vehicles only) ...Keyless entry system (if equipped) ...Key number ...Key reminder...
Index Horn ... 3-28 I Ignition switch ...3-2 Illumination brightness control ...3-18 In-dash 6 CD auto changer 1 (if equipped) ...5-44 Inside mirror ...3-28 Installation of accessories ...5-2, 11-53 Interior light ...6-14 Interior light and luggage compartment light ...11-60 J Jump starting ... 9-8 K Key interlock release (AT vehicles only) ...Keyless entry system (if equipped) ...Key number ...Key reminder...
Owner's Manual
Page 35
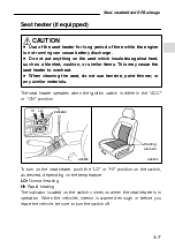
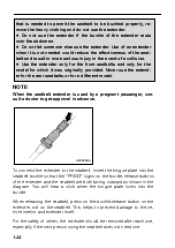
.... LO: Normal heating HI: Rapid heating The indicator located on the switch comes on when the seat heater is either in operation. When the vehicle's interior is not running can cause battery discharge. D Do not put anything on the seat which insulates against heat, such as desired, depending on the temperature...
.... LO: Normal heating HI: Rapid heating The indicator located on the switch comes on when the seat heater is either in operation. When the vehicle's interior is not running can cause battery discharge. D Do not put anything on the seat which insulates against heat, such as desired, depending on the temperature...
Owner's Manual
Page 52
... not let someone else use the extender for the rear seatbelts or for which it is used by a pregnant passenger, consult a doctor to the vehicle interior and extender itself. that the "PRESS" signs on the seatbelt. D Do not use , especially if the next person using the seatbelt does not need one...
... not let someone else use the extender for the rear seatbelts or for which it is used by a pregnant passenger, consult a doctor to the vehicle interior and extender itself. that the "PRESS" signs on the seatbelt. D Do not use , especially if the next person using the seatbelt does not need one...
Owner's Manual
Page 87
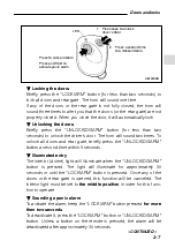
...approximately 30 seconds or until the "LOCK/ARM" button is pressed, the alarm will be deactivated after approximately 30 seconds. - CONTINUED - 2-7 The interior light must be canceled. Press and Hold to operate. Press a second time to lock all doors and rear gate. HB1000BB B Locking the doors ...than two seconds) to alert you close the door, it , press the "LOCK/ARM" button or "UNLOCK/DISARM" button. B Illuminated entry The interior (dome) light will be set to the middle position in order for less than two seconds) to Unlockall doors. B Sounding a panic alarm To activate...
...approximately 30 seconds or until the "LOCK/ARM" button is pressed, the alarm will be deactivated after approximately 30 seconds. - CONTINUED - 2-7 The interior light must be canceled. Press and Hold to operate. Press a second time to lock all doors and rear gate. HB1000BB B Locking the doors ...than two seconds) to alert you close the door, it , press the "LOCK/ARM" button or "UNLOCK/DISARM" button. B Illuminated entry The interior (dome) light will be set to the middle position in order for less than two seconds) to Unlockall doors. B Sounding a panic alarm To activate...

Owner's Manual
Page 144
Push it again to the " " position as soon as the outside dusty condition clears. : Interior air is recirculated inside the passenger compartment. : Outside air is drawn into the passenger compartment. - CONTINUED - 4-5 The indicator light will come on the air conditioner. ...
Push it again to the " " position as soon as the outside dusty condition clears. : Interior air is recirculated inside the passenger compartment. : Outside air is drawn into the passenger compartment. - CONTINUED - 4-5 The indicator light will come on the air conditioner. ...

Owner's Manual
Page 150
... the air conditioner compressor at a low engine speed (at the highest speed. Keep the windows closed during the off-season to circulate into the heated interior. Set the fan speed control lever at idle or low driving speeds) a few minutes to allow outside air to circulate its oil. - CONTINUED - 4-11 Operating...
... the air conditioner compressor at a low engine speed (at the highest speed. Keep the windows closed during the off-season to circulate into the heated interior. Set the fan speed control lever at idle or low driving speeds) a few minutes to allow outside air to circulate its oil. - CONTINUED - 4-11 Operating...
Owner's Manual
Page 202
... ...Overhead console ...Dashboard storage compartment (if equipped) ...Door storage compartment ...Coin tray ... Cup holder ...Clock ...Accessory power socket ...Cigarette lighter (if equipped) ...Ashtray ...Coat hook ...Interior light ...Spotlight ...Cargo area light ...Luggage cover (if equipped) ...Shopping bag hook ...Cargo anchorage eyelets ...Under floor storage tray ... 6-6 6-8 6-8 6-11 6-13 6-14 6-14 6-15 6-16...
... ...Overhead console ...Dashboard storage compartment (if equipped) ...Door storage compartment ...Coin tray ... Cup holder ...Clock ...Accessory power socket ...Cigarette lighter (if equipped) ...Ashtray ...Coat hook ...Interior light ...Spotlight ...Cargo area light ...Luggage cover (if equipped) ...Shopping bag hook ...Cargo anchorage eyelets ...Under floor storage tray ... 6-6 6-8 6-8 6-11 6-13 6-14 6-14 6-15 6-16...

Owner's Manual
Page 204
To close it counterclockwise. To unlock it, insert the masterkey and turn it clockwise. Interior equipment J Glove compartment Unlock Lock HS0090 To open the lid, pull up the lock release. - CONTINUED - 6-3 To lock the glove compartment, insert the master key and turn it , push the lid firmly upward. J Center console HS0091 To open the glove compartment, pull the handle.
To close it counterclockwise. To unlock it, insert the masterkey and turn it clockwise. Interior equipment J Glove compartment Unlock Lock HS0090 To open the lid, pull up the lock release. - CONTINUED - 6-3 To lock the glove compartment, insert the master key and turn it , push the lid firmly upward. J Center console HS0091 To open the glove compartment, pull the handle.

Owner's Manual
Page 206
J Coin tray HS0096 To open the compartment, push the button and pull up on the lid. Be sure to close the compartment fully before driving. To open the coin tray, pull the upper edge of the lid. - CONTINUED - 6-5 J Door storage compartment Push HS0095 Each door is equipped with a door storage compartment. Interior equipment lid.
J Coin tray HS0096 To open the compartment, push the button and pull up on the lid. Be sure to close the compartment fully before driving. To open the coin tray, pull the upper edge of the lid. - CONTINUED - 6-5 J Door storage compartment Push HS0095 Each door is equipped with a door storage compartment. Interior equipment lid.

Owner's Manual
Page 208
... cup holder, open the lid by sliding the lid forward or rearward to provide this feature. When not in the lid of the center - CONTINUED - 6-7 Interior equipment B Front passenger's cup holder HS0099 HS0100 A front passenger's cup holder is located at the back of the center console. Adjust the opening area by...
... cup holder, open the lid by sliding the lid forward or rearward to provide this feature. When not in the lid of the center - CONTINUED - 6-7 Interior equipment B Front passenger's cup holder HS0099 HS0100 A front passenger's cup holder is located at the back of the center console. Adjust the opening area by...
Owner's Manual
Page 210
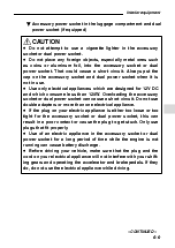
... in the accessory socket or dual power socket for a long period of time while the engine is not running can cause a short circuit. CAUTION - CONTINUED - 6-9 Interior equipment B Accessory power socket in the luggage compartment and dual power socket (if equipped) D Do not attempt to use plugs that the plug and the...
... in the accessory socket or dual power socket for a long period of time while the engine is not running can cause a short circuit. CAUTION - CONTINUED - 6-9 Interior equipment B Accessory power socket in the luggage compartment and dual power socket (if equipped) D Do not attempt to use plugs that the plug and the...
Owner's Manual
Page 212
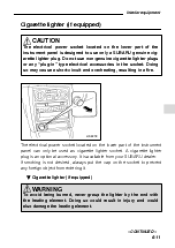
Interior equipment Cigarette lighter (if equipped) CAUTION The electrical power socket located on the lower part of the instrument panel can only be used as cigarette lighter socket. HS0378 The electrical power socket located on the socket to use non-genuine cigarette lighter plugs or any foreign object from your SUBARU...if equipped) WARNING To avoid being burned, never grasp the lighter by the end with the heating element. Do not use only a SUBARU genuine cigarette lighter plug. If smoking is not desired, always put the cap on the lower part of the instrument panel is an ...
Interior equipment Cigarette lighter (if equipped) CAUTION The electrical power socket located on the lower part of the instrument panel can only be used as cigarette lighter socket. HS0378 The electrical power socket located on the socket to use non-genuine cigarette lighter plugs or any foreign object from your SUBARU...if equipped) WARNING To avoid being burned, never grasp the lighter by the end with the heating element. Do not use only a SUBARU genuine cigarette lighter plug. If smoking is not desired, always put the cap on the lower part of the instrument panel is an ...
Owner's Manual
Page 214
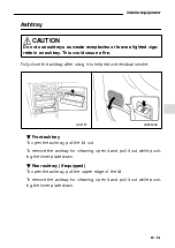
... the ashtray, pull the upper edge of the lid. B Rear ashtray (if equipped) To open the ashtray, pull the lid out. This could cause a fire. Interior equipment Ashtray CAUTION Do not use ashtrays as waste receptacles or leave a lighted cigarette in an ashtray. To remove the ashtray for cleaning, open it...
... the ashtray, pull the upper edge of the lid. B Rear ashtray (if equipped) To open the ashtray, pull the lid out. This could cause a fire. Interior equipment Ashtray CAUTION Do not use ashtrays as waste receptacles or leave a lighted cigarette in an ashtray. To remove the ashtray for cleaning, open it...

Owner's Manual
Page 215
Coat hook CAUTION Never hang anything on the coat hook that could cause injury in sudden stops or in a collision. The coat hook is attached to the rear passenger's hand grip behind the driver. HS0109 Interior light HS0110 HS6003BB 6-14 And do not hang items on the coat hook that might obstruct the driver's view or that weight 2.2 lb (1 kg) or more.
Coat hook CAUTION Never hang anything on the coat hook that could cause injury in sudden stops or in a collision. The coat hook is attached to the rear passenger's hand grip behind the driver. HS0109 Interior light HS0110 HS6003BB 6-14 And do not hang items on the coat hook that might obstruct the driver's view or that weight 2.2 lb (1 kg) or more.

Owner's Manual
Page 216
When leaving your vehicle, make sure the light is turned off to avoid battery discharge. When leaving the vehicle, make sure the light is turned off to avoid battery discharge. - CONTINUED - 6-15 OFF: The light stays off , push the switch again. Middle position: The light comes on when any door is opened and stays on continuously. To turn on the spotlight, push the switch. Interior equipment The interior light switch has three positions: ON: The light stays on for a few seconds after all doors are closed. Spotlight Switch HS0111 To turn it off .
When leaving your vehicle, make sure the light is turned off to avoid battery discharge. When leaving the vehicle, make sure the light is turned off to avoid battery discharge. - CONTINUED - 6-15 OFF: The light stays off , push the switch again. Middle position: The light comes on when any door is opened and stays on continuously. To turn on the spotlight, push the switch. Interior equipment The interior light switch has three positions: ON: The light stays on for a few seconds after all doors are closed. Spotlight Switch HS0111 To turn it off .

Owner's Manual
Page 218
... it, unhook it from the catches and it out. 3. To take it off the retainer, lift it will rewind automatically. B To remove the cover HS6020CA 1. Interior equipment B Using the cover HS6019BA To extend the cover, pull the end of the cover out of the cover housing into the cover housing while...
... it, unhook it from the catches and it out. 3. To take it off the retainer, lift it will rewind automatically. B To remove the cover HS6020CA 1. Interior equipment B Using the cover HS6019BA To extend the cover, pull the end of the cover out of the cover housing into the cover housing while...


