Owner's Manual
Page 14
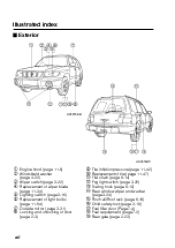
... index J Exterior HSF015EB HSF014BC 1 Engine hood (page 11-6) 2 Windshield washer 3 Wiper switch (page 3-22) 4 Replacement of wiper blade 5 Lighting switch (page 3-16) 6 Replacement of light bulbs 7 8 (page 11-34) (page 3-22) 9 Q W E R T Y U I O P (page 11-54) Outside mirror (page 3-31) Locking and unlocking of door (page 2-3) Tire inflation pressure (page 11-42) Replacement...
... index J Exterior HSF015EB HSF014BC 1 Engine hood (page 11-6) 2 Windshield washer 3 Wiper switch (page 3-22) 4 Replacement of wiper blade 5 Lighting switch (page 3-16) 6 Replacement of light bulbs 7 8 (page 11-34) (page 3-22) 9 Q W E R T Y U I O P (page 11-54) Outside mirror (page 3-31) Locking and unlocking of door (page 2-3) Tire inflation pressure (page 11-42) Replacement...
Owner's Manual
Page 21
...) ...1-12 Automatic transmission ...7-14 Automatic transmission fluid ...11-22 B Battery ...Brake booster ...Brake fluid ...Brake pedal ...Brake system ...Brake system warning light ...Braking ...Braking tips ...Bulb chart ...C Capacities ...Cargo anchorage eyelets ...Cargo area light ...Catalytic converter ...CD player (if equipped) ...Center console ...Charge warning light ...CHECK ENGINE warning light/Malfunction indicator...
...) ...1-12 Automatic transmission ...7-14 Automatic transmission fluid ...11-22 B Battery ...Brake booster ...Brake fluid ...Brake pedal ...Brake system ...Brake system warning light ...Braking ...Braking tips ...Bulb chart ...C Capacities ...Cargo anchorage eyelets ...Cargo area light ...Catalytic converter ...CD player (if equipped) ...Center console ...Charge warning light ...CHECK ENGINE warning light/Malfunction indicator...
Owner's Manual
Page 26
... Rear window wiper and washer switch (if equipped) ...3-24 Replacement of brake pad and lining ...11-39 Replacement of windshield wiper blades ...11-34 Replacing bulbs ...11-54 Reporting safety defects (USA) ...13-4 Rocking the vehicle ...8-14 Roof rail and crossbar (if equipped) ...8-18 S Seatbelt extender ...1-23 Seatbelt maintenance ...1-23 Seatbelts...
... Rear window wiper and washer switch (if equipped) ...3-24 Replacement of brake pad and lining ...11-39 Replacement of windshield wiper blades ...11-34 Replacing bulbs ...11-54 Reporting safety defects (USA) ...13-4 Rocking the vehicle ...8-14 Roof rail and crossbar (if equipped) ...8-18 S Seatbelt extender ...1-23 Seatbelt maintenance ...1-23 Seatbelts...
Owner's Manual
Page 115
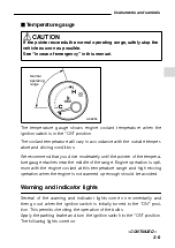
... ignition switch to the "ON" position. We recommend that you drive moderately until the pointer of the temperature gauge reaches near the middle of the bulbs. See "In case of the warning and indicator lights come on momentarily and then go out when the ignition switch is in accordance with the...
... ignition switch to the "ON" position. We recommend that you drive moderately until the pointer of the temperature gauge reaches near the middle of the bulbs. See "In case of the warning and indicator lights come on momentarily and then go out when the ignition switch is in accordance with the...
Owner's Manual
Page 116
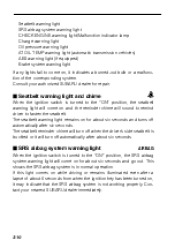
The seatbelt reminder chime will turn off automatically after about six seconds. Contact your authorized SUBARU dealer for about six seconds and turns off when the driver's side seatbelt is buckled or it... will come on for about 6 seconds from when the ignition key has been turned on, it indicates a burned-out bulb or a malfunction of about six seconds and go out. The seatbelt warning light remains on for repair. If this light comes.... J Seatbelt warning light and chime When the ignition switch is in normal operation. Consult your nearest SUBARU dealer immediately. 3-10
The seatbelt reminder chime will turn off automatically after about six seconds. Contact your authorized SUBARU dealer for about six seconds and turns off when the driver's side seatbelt is buckled or it... will come on for about 6 seconds from when the ignition key has been turned on, it indicates a burned-out bulb or a malfunction of about six seconds and go out. The seatbelt warning light remains on for repair. If this light comes.... J Seatbelt warning light and chime When the ignition switch is in normal operation. Consult your nearest SUBARU dealer immediately. 3-10
Owner's Manual
Page 121
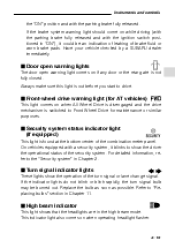
...comes on when operating headlight flasher. - CONTINUED - 3-15 For detailed information, refer to drive. Replace the bulb as soon as possible. Have your vehicle checked by a SUBARU dealer immediately. J Front-wheel drive warning light (for AT vehicles) This light comes on while driving (...start to the "Security system" in Chapter 2. J Security system status indicator light (if equipped) This light is switched to "Replacing bulbs" section in the high beam mode. J Turn signal indicator lights These lights show the driver the operational status of the combination meter...
...comes on when operating headlight flasher. - CONTINUED - 3-15 For detailed information, refer to drive. Replace the bulb as soon as possible. Have your vehicle checked by a SUBARU dealer immediately. J Front-wheel drive warning light (for AT vehicles) This light comes on while driving (...start to the "Security system" in Chapter 2. J Security system status indicator light (if equipped) This light is switched to "Replacing bulbs" section in the high beam mode. J Turn signal indicator lights These lights show the driver the operational status of the combination meter...
Owner's Manual
Page 306
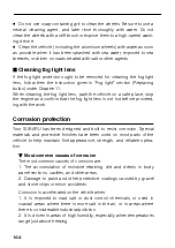
...resist corrosion. B Most common causes of corrosion The most parts of moisture retaining dirt and debris in areas of corrosion are: 1. Corrosion protection Your SUBARU has been designed and built to be removed for cleaning the fog light lens, follow then the instruction given in "Fog light" section (Replacing... bulbs) under Chapter 11. Damage to sea breezes, or driven on a safe place, stop the engine and confirm that the fog light lens is ...
...resist corrosion. B Most common causes of corrosion The most parts of moisture retaining dirt and debris in areas of corrosion are: 1. Corrosion protection Your SUBARU has been designed and built to be removed for cleaning the fog light lens, follow then the instruction given in "Fog light" section (Replacing... bulbs) under Chapter 11. Damage to sea breezes, or driven on a safe place, stop the engine and confirm that the fog light lens is ...
Owner's Manual
Page 311
Aluminum wheels (If equipped) ...Fuses ...Main fuse ...Installation of accessories ...Replacing bulbs ...Headlight ...Fog light (if equipped) ...Front turn signal, parking light and front side marker light ...Rear combination lights ...License plate light ...Interior light and luggage compartment light ...Spot light ...High mount stop light ... 11-49 11-49 11-53 11-53 11-54 11-55 11-56 11-57 11-58 11-59 11-60 11-61 11-61 11-2
Aluminum wheels (If equipped) ...Fuses ...Main fuse ...Installation of accessories ...Replacing bulbs ...Headlight ...Fog light (if equipped) ...Front turn signal, parking light and front side marker light ...Rear combination lights ...License plate light ...Interior light and luggage compartment light ...Spot light ...High mount stop light ... 11-49 11-49 11-53 11-53 11-54 11-55 11-56 11-57 11-58 11-59 11-60 11-61 11-61 11-2
Owner's Manual
Page 363
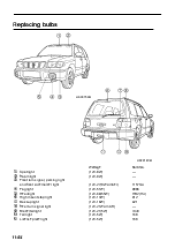
Replacing bulbs HSF015FB HSF014CB 1 2 3 4 5 6 7 8 9 Q W Spot light Room light Front turn signal, parking light and front side marker light Fog light Headlight High mount stop light Backup light Rear turn signal light Brake/tail light Tail light License plate light Wattage (12V-8W) (12V-8W) (12V-27/8W Amber) (12V-51W) (12V-60/55W) (12V-13W) (12V-18W) (12V-21W Amber) (12V-21/5W) (12V-5W) (12V-5W) Bulb No. - - 1157NA 9006 HB2 (H4) 912 921 - 7443 168 168 11-54
Replacing bulbs HSF015FB HSF014CB 1 2 3 4 5 6 7 8 9 Q W Spot light Room light Front turn signal, parking light and front side marker light Fog light Headlight High mount stop light Backup light Rear turn signal light Brake/tail light Tail light License plate light Wattage (12V-8W) (12V-8W) (12V-27/8W Amber) (12V-51W) (12V-60/55W) (12V-13W) (12V-18W) (12V-21W Amber) (12V-21/5W) (12V-5W) (12V-5W) Bulb No. - - 1157NA 9006 HB2 (H4) 912 921 - 7443 168 168 11-54
Owner's Manual
Page 364
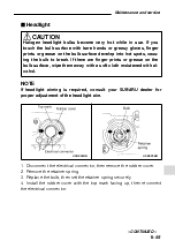
... rubber cover with alcohol. Remove the retainer spring. 3. Replace the bulb, then set the retainer spring securely. 4. NOTE If headlight aiming is required, consult your SUBARU dealer for proper adjustment of the headlight aim. Maintenance and service J Headlight CAUTION Halogen headlight bulbs become very hot while in use. Disconnect the electrical connector, then...
... rubber cover with alcohol. Remove the retainer spring. 3. Replace the bulb, then set the retainer spring securely. 4. NOTE If headlight aiming is required, consult your SUBARU dealer for proper adjustment of the headlight aim. Maintenance and service J Headlight CAUTION Halogen headlight bulbs become very hot while in use. Disconnect the electrical connector, then...
Owner's Manual
Page 365
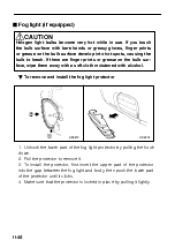
... protector by pulling it clicks. 4. B To remove and install the fog light protector 2 1 HS0213 HS0214 1. J Fog light (if equipped) CAUTION Halogen light bulbs become very hot while in place by pulling the hook down. 2. Make sure that the protector is locked in use. To install the protector, first...insert the upper part of the protector until it lightly. 11-56 If you touch the bulb surface with alcohol. Pull the protector to break. If there are finger prints or grease on the bulb surface, wipe them away with a soft cloth moistened with bare hands or greasy gloves, ...
... protector by pulling it clicks. 4. B To remove and install the fog light protector 2 1 HS0213 HS0214 1. J Fog light (if equipped) CAUTION Halogen light bulbs become very hot while in place by pulling the hook down. 2. Make sure that the protector is locked in use. To install the protector, first...insert the upper part of the protector until it lightly. 11-56 If you touch the bulb surface with alcohol. Pull the protector to break. If there are finger prints or grease on the bulb surface, wipe them away with a soft cloth moistened with bare hands or greasy gloves, ...
Owner's Manual
Page 366
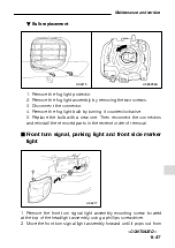
... reconnect the connectors and reinstall the removed parts in the reverse order of the headlight assembly using a phillips screwdriver. 2. Maintenance and service B Bulb replacement HS0215 HSB006BA 1. Remove the fog light bulb by removing the two screws. 3. J Front turn signal light assembly forward until it counterclockwise. 5. Remove the fog light protector. 2. Remove the...
... reconnect the connectors and reinstall the removed parts in the reverse order of the headlight assembly using a phillips screwdriver. 2. Maintenance and service B Bulb replacement HS0215 HSB006BA 1. Remove the fog light bulb by removing the two screws. 3. J Front turn signal light assembly forward until it counterclockwise. 5. Remove the fog light protector. 2. Remove the...
Owner's Manual
Page 367
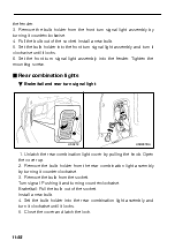
...turn it clockwise until it locks. 6. Remove the bulb from the rear combination light assembly by turning it counterclockwise. 4. Turn signal: Pushing it locks. 5. Brake/tail: Pull the bulb out of the socket. Remove the bulb holder from the front turn signal light HS0218 HSB007BA 1.... Pull the bulb out of the socket. Install a new bulb. 5. Open the cover up. 2. Install a new bulb. 4. Set the bulb holder into the front turn signal light ...
...turn it clockwise until it locks. 6. Remove the bulb from the rear combination light assembly by turning it counterclockwise. 4. Turn signal: Pushing it locks. 5. Brake/tail: Pull the bulb out of the socket. Remove the bulb holder from the front turn signal light HS0218 HSB007BA 1.... Pull the bulb out of the socket. Install a new bulb. 5. Open the cover up. 2. Install a new bulb. 4. Set the bulb holder into the front turn signal light ...
Owner's Manual
Page 368
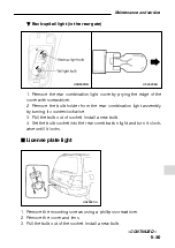
... 1. J License plate light HS2009CA 1. Remove the mounting screws using a phillips screwdriver. 2. Pull the bulb out of the socket. Remove the rear combination light cover by turning it locks. Install a new bulb. - CONTINUED - 11-59 Install a new bulb. 4. Set the bulb socket into the rear combination light and turn it clockwise untill it counterclockwise. 3. Remove...
... 1. J License plate light HS2009CA 1. Remove the mounting screws using a phillips screwdriver. 2. Pull the bulb out of the socket. Remove the rear combination light cover by turning it locks. Install a new bulb. - CONTINUED - 11-59 Install a new bulb. 4. Set the bulb socket into the rear combination light and turn it clockwise untill it counterclockwise. 3. Remove...
Owner's Manual
Page 369
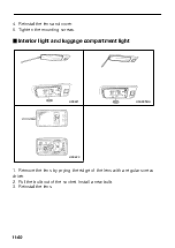
Remove the lens by prying the edge of the socket. Install a new bulb. 3. Reinstall the lens. 11-60 4. Pull the bulb out of the lens with a regular screwdriver. 2. J Interior light and luggage compartment light HS0221 HSA005BA HS0223 1. Tighten the mounting screws. Reinstall the lens and cover. 5.
Remove the lens by prying the edge of the socket. Install a new bulb. 3. Reinstall the lens. 11-60 4. Pull the bulb out of the lens with a regular screwdriver. 2. J Interior light and luggage compartment light HS0221 HSA005BA HS0223 1. Tighten the mounting screws. Reinstall the lens and cover. 5.

Owner's Manual
Page 370
J High mount stop light cover. 3. Remove the mounting screw covers by prying on the edge with a regular screwdriver. 2. Install a new bulb. 4. Remove the lens by removing a mounting screw. 3 Pull the bulb out of the socket. Remove the mounting screws using a phillips screwdriver and then remove the high mount stop light OM-H0355 1. Remove the plate by prying the edge of the socket. Install a new bulb. - CONTINUED - 11-61 Maintenance and service J Spot light HSA006BA 1. Reinstall the plate and the lens. Pull the bulb out of the lens with a screwdriver. 2.
J High mount stop light cover. 3. Remove the mounting screw covers by prying on the edge with a regular screwdriver. 2. Install a new bulb. 4. Remove the lens by removing a mounting screw. 3 Pull the bulb out of the socket. Remove the mounting screws using a phillips screwdriver and then remove the high mount stop light OM-H0355 1. Remove the plate by prying the edge of the socket. Install a new bulb. - CONTINUED - 11-61 Maintenance and service J Spot light HSA006BA 1. Reinstall the plate and the lens. Pull the bulb out of the lens with a screwdriver. 2.

Owner's Manual
Page 371
NOTE Other bulbs may be difficult to replace. Reinstall the cover. 5. Tighten the mounting screws then reinstall the covers. Have your SUBARU dealer replace these bulbs if necessary. 11-62 4.
NOTE Other bulbs may be difficult to replace. Reinstall the cover. 5. Tighten the mounting screws then reinstall the covers. Have your SUBARU dealer replace these bulbs if necessary. 11-62 4.
Owner's Manual
Page 372
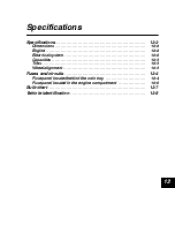
Specifications Specifications ...Dimensions ...Engine ...Electrical system ...Capacities ...Tires ...Wheel alignment ... 12-2 12-2 12-2 12-2 12-3 12-3 12-3 Fuses and circuits ...Fuse panel located behind the coin tray ...Fuse panel located in the engine compartment ... 12-4 12-4 12-6 Bulb chart ...Vehicle identification ... 12-7 12-8 12
Specifications Specifications ...Dimensions ...Engine ...Electrical system ...Capacities ...Tires ...Wheel alignment ... 12-2 12-2 12-2 12-2 12-3 12-3 12-3 Fuses and circuits ...Fuse panel located behind the coin tray ...Fuse panel located in the engine compartment ... 12-4 12-4 12-6 Bulb chart ...Vehicle identification ... 12-7 12-8 12
Owner's Manual
Page 378
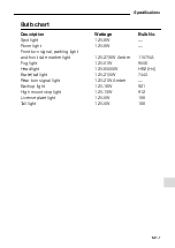
Specifications Bulb chart Description Spot light Room light Front turn signal, parking light and front side marker light Fog light Headlight Brake/tail light Rear turn signal light Backup light High mount stop light License plate light Tail light Wattage 12V-8W 12V-8W 12V-27/8W Amber 12V-51W 12V-60/55W 12V-21/5W 12V-21W Amber 12V-18W 12V-13W 12V-5W 12V-5W Bulb No. - - 1157NA 9006 HB2 (H4) 7443 - 921 912 168 168 - CONTINUED - 12-7
Specifications Bulb chart Description Spot light Room light Front turn signal, parking light and front side marker light Fog light Headlight Brake/tail light Rear turn signal light Backup light High mount stop light License plate light Tail light Wattage 12V-8W 12V-8W 12V-27/8W Amber 12V-51W 12V-60/55W 12V-21/5W 12V-21W Amber 12V-18W 12V-13W 12V-5W 12V-5W Bulb No. - - 1157NA 9006 HB2 (H4) 7443 - 921 912 168 168 - CONTINUED - 12-7


