
Owner's Manual
Page 16
J Luggage compartment HSF010BB HSF011BB 1 2 3 4 5 6 7 Jack handle (page 9-16) Jack (page 9-16) Spare tire (page 9-16) Luggage cover (page 6-16) Cargo anchorage eyelets (page 6-18) Accessory power socket (page 6-8) Luggage floor storage tray (page 6-19) xiv
J Luggage compartment HSF010BB HSF011BB 1 2 3 4 5 6 7 Jack handle (page 9-16) Jack (page 9-16) Spare tire (page 9-16) Luggage cover (page 6-16) Cargo anchorage eyelets (page 6-18) Accessory power socket (page 6-8) Luggage floor storage tray (page 6-19) xiv
Owner's Manual
Page 21
A ABS (Anti-lock Brake System) ...7-23 ABS warning light (for vehicles with ABS) ...3-13 Accessory power socket ...6-8 Air cleaner element ...11-18 Air conditioner operation ...4-10 Air filtration system (if equipped) ...4-12 Aluminum wheels (If equipped) ...11-49 Antenna system ...5-2 ...
A ABS (Anti-lock Brake System) ...7-23 ABS warning light (for vehicles with ABS) ...3-13 Accessory power socket ...6-8 Air cleaner element ...11-18 Air conditioner operation ...4-10 Air filtration system (if equipped) ...4-12 Aluminum wheels (If equipped) ...11-49 Antenna system ...5-2 ...
Owner's Manual
Page 24
Index Horn ... 3-28 I Ignition switch ...3-2 Illumination brightness control ...3-18 In-dash 6 CD auto changer 1 (if equipped) ...5-44 Inside mirror ...3-28 Installation of accessories ...5-2, 11-53 Interior light ...6-14 Interior light and luggage compartment light ...11-60 J Jump starting ... 9-8 K Key interlock release (AT vehicles only) ...Keyless entry system (if ...
Index Horn ... 3-28 I Ignition switch ...3-2 Illumination brightness control ...3-18 In-dash 6 CD auto changer 1 (if equipped) ...5-44 Inside mirror ...3-28 Installation of accessories ...5-2, 11-53 Interior light ...6-14 Interior light and luggage compartment light ...11-60 J Jump starting ... 9-8 K Key interlock release (AT vehicles only) ...Keyless entry system (if ...
Owner's Manual
Page 64
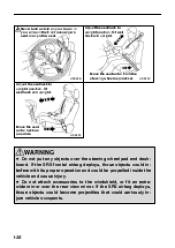
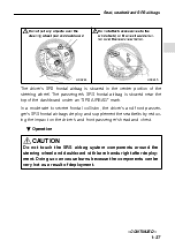
.... Sit well back and upright. Sit well back and upright. HS0229 Move the seat as far from the steering wheel as possible. D Do not attach accessories to the windshield, or fit an extrawide mirror over the steering wheel pad and dashboard. If the SRS airbag deploys, those objects could interfere with...
.... Sit well back and upright. Sit well back and upright. HS0229 Move the seat as far from the steering wheel as possible. D Do not attach accessories to the windshield, or fit an extrawide mirror over the steering wheel pad and dashboard. If the SRS airbag deploys, those objects could interfere with...
Owner's Manual
Page 65
In a moderate to the windshield, or fit an extra-wide mirror over the steering wheel pad and dashboard Do not attach accessories to severe frontal collision, the driver's and front passenger's SRS frontal airbags deploy and supplement the seatbelts by reducing the impact on the driver's and ...
In a moderate to the windshield, or fit an extra-wide mirror over the steering wheel pad and dashboard Do not attach accessories to severe frontal collision, the driver's and front passenger's SRS frontal airbags deploy and supplement the seatbelts by reducing the impact on the driver's and ...
Owner's Manual
Page 71
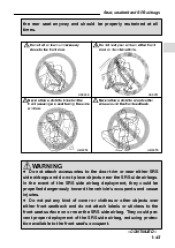
..., seatbelt and SRS airbags the rear seat anyway and should be propelled dangerously toward the vehicle's occupants and cause injuries. HB0354 HB0355 D Do not attach accessories to wrap his/her arms around the front seatback. In the event of the SRS side airbag, reducing protection available to the front seat surface...
..., seatbelt and SRS airbags the rear seat anyway and should be propelled dangerously toward the vehicle's occupants and cause injuries. HB0354 HB0355 D Do not attach accessories to wrap his/her arms around the front seatback. In the event of the SRS side airbag, reducing protection available to the front seat surface...
Owner's Manual
Page 72
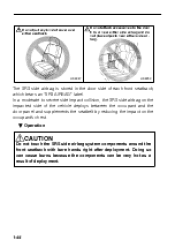
... either side airbag. In a moderate to the door trim or near either side airbag and do not place objects near either seatback. Do not attach accessories to severe side impact collision, the SRS side airbag on the occupant's chest. HS0347 HS0353 The SRS side airbag is stored in the door side...
... either side airbag. In a moderate to the door trim or near either side airbag and do not place objects near either seatback. Do not attach accessories to severe side impact collision, the SRS side airbag on the occupant's chest. HS0347 HS0353 The SRS side airbag is stored in the door side...
Owner's Manual
Page 80
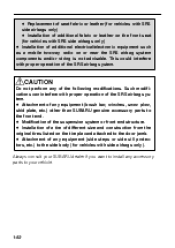
.... Always consult your vehicle. 1-52 D Attachment of any equipment (brush bar, winches, snow plow, skid plate, etc.) other than SUBARU genuine accessory parts to your SUBARU dealer if you want to install any accessory parts to the front end. D Modification of the SRS airbag system. D Replacement of seat fabric or leather (for vehicles with...
.... Always consult your vehicle. 1-52 D Attachment of any equipment (brush bar, winches, snow plow, skid plate, etc.) other than SUBARU genuine accessory parts to your SUBARU dealer if you want to install any accessory parts to the front end. D Modification of the SRS airbag system. D Replacement of seat fabric or leather (for vehicles with...
Owner's Manual
Page 109
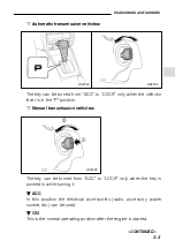
B ON This is the normal operating position after the engine is started. - CONTINUED - 3-3 n Manual transmission vehicles: 2 1 HS0125 The key can be turned from "ACC" to "LOCK" only when the key is pushed in the "P" position. B ACC In this position the electrical accessories (radio, accessory power socket, etc.) can be used. Instruments and controls n Automatic transmission vehicles: HS0123 HS0124 The key can be turned from "ACC" to "LOCK" only when the selector lever is in while turning it.
B ON This is the normal operating position after the engine is started. - CONTINUED - 3-3 n Manual transmission vehicles: 2 1 HS0125 The key can be turned from "ACC" to "LOCK" only when the key is pushed in the "P" position. B ACC In this position the electrical accessories (radio, accessory power socket, etc.) can be used. Instruments and controls n Automatic transmission vehicles: HS0123 HS0124 The key can be turned from "ACC" to "LOCK" only when the selector lever is in while turning it.
Owner's Manual
Page 136
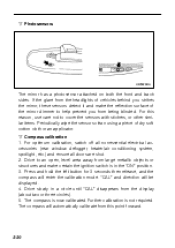
If the glare from the headlights of dry soft cotton cloth or an applicator. For optimum calibration, switch off all nonessential electrical accessories (rear window defogger, heater/air conditioning system, spotlight, etc.) and ensure all doors are shut. 2. Drive to an open, level area away from the display (...
If the glare from the headlights of dry soft cotton cloth or an applicator. For optimum calibration, switch off all nonessential electrical accessories (rear window defogger, heater/air conditioning system, spotlight, etc.) and ensure all doors are shut. 2. Drive to an open, level area away from the display (...
Owner's Manual
Page 155
Audio Antenna system ...Installation of accessories ...Audio set ...Type A audio set (if equipped) ...Type B audio set (if equipped) ...Type C audio set (if equipped) ...CD player (if equipped) ...In-dash 6 CD auto changer 1 (if equipped) ...Precautions to observe when handling a compact disc (CD) ...5-2 5-2 5-3 5-6 5-17 5-26 5-42 5-44 5-47 5
Audio Antenna system ...Installation of accessories ...Audio set ...Type A audio set (if equipped) ...Type B audio set (if equipped) ...Type C audio set (if equipped) ...CD player (if equipped) ...In-dash 6 CD auto changer 1 (if equipped) ...Precautions to observe when handling a compact disc (CD) ...5-2 5-2 5-3 5-6 5-17 5-26 5-42 5-44 5-47 5

Owner's Manual
Page 156
... control system to a stronger station. Antenna system CAUTION Do not use sharp instruments or window cleaner containing abrasives to clean the inner surface of accessories Always consult your SUBARU dealer before installing a citizen band radio or other obstructions may cause momentary static, flutter or station interference. If reception continues to be affected...
... control system to a stronger station. Antenna system CAUTION Do not use sharp instruments or window cleaner containing abrasives to clean the inner surface of accessories Always consult your SUBARU dealer before installing a citizen band radio or other obstructions may cause momentary static, flutter or station interference. If reception continues to be affected...

Owner's Manual
Page 196
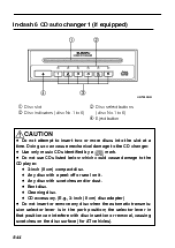
... equipped) HB5039BB 1 Disc slot 2 Disc indicator 3 Eject button D Use only music CDs identified by mark. the selector lever in the park position; D Bent disc. D CD accessory. (E.g., 3-inch (8 cm) disc adapter) D Do not insert or remove any disc when the automatic transmission selector lever is in that position can interfere with scratches...
... equipped) HB5039BB 1 Disc slot 2 Disc indicator 3 Eject button D Use only music CDs identified by mark. the selector lever in the park position; D Bent disc. D CD accessory. (E.g., 3-inch (8 cm) disc adapter) D Do not insert or remove any disc when the automatic transmission selector lever is in that position can interfere with scratches...
Owner's Manual
Page 198
D Do not use CDs listed below which could cause damage to the CD changer. D Any disc with scratches and/or dust. D Cleaning disc. D CD accessory. (E.g., 3-inch (8 cm) disc adapter) D Do not insert or remove any disc when the automatic transmission selector lever is in that position can cause mechanical damage ...
D Do not use CDs listed below which could cause damage to the CD changer. D Any disc with scratches and/or dust. D Cleaning disc. D CD accessory. (E.g., 3-inch (8 cm) disc adapter) D Do not insert or remove any disc when the automatic transmission selector lever is in that position can cause mechanical damage ...
Owner's Manual
Page 202
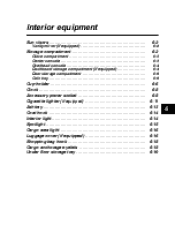
... ...Vanity mirror (if equipped) ... 6-2 6-2 Storage compartment ... 6-2 6-3 6-3 6-4 6-4 6-5 6-5 Glove compartment ...Center console ...Overhead console ...Dashboard storage compartment (if equipped) ...Door storage compartment ...Coin tray ... Cup holder ...Clock ...Accessory power socket ...Cigarette lighter (if equipped) ...Ashtray ...Coat hook ...Interior light ...Spotlight ...Cargo area light ...Luggage cover (if equipped) ...Shopping bag hook ...Cargo anchorage eyelets...
... ...Vanity mirror (if equipped) ... 6-2 6-2 Storage compartment ... 6-2 6-3 6-3 6-4 6-4 6-5 6-5 Glove compartment ...Center console ...Overhead console ...Dashboard storage compartment (if equipped) ...Door storage compartment ...Coin tray ... Cup holder ...Clock ...Accessory power socket ...Cigarette lighter (if equipped) ...Ashtray ...Coat hook ...Interior light ...Spotlight ...Cargo area light ...Luggage cover (if equipped) ...Shopping bag hook ...Cargo anchorage eyelets...
Owner's Manual
Page 209
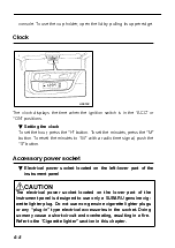
..., resulting in this chapter. 6-8 To reset the minutes to use non-genuine cigarette lighter plugs or any "plug-in" type electrical accessories in the "ACC" or "ON" positions. Accessory power socket B Electrical power socket located on the left-lower part of the instrument panel CAUTION The electrical power socket located on... to "00" with a radio time signal, push the "S" button. B Setting the clock To set the minutes, press the "M" button. console. Do not use only a SUBARU genuine cigarette lighter plug. To use the cup holder, open the lid by pulling its upper edge.
..., resulting in this chapter. 6-8 To reset the minutes to use non-genuine cigarette lighter plugs or any "plug-in" type electrical accessories in the "ACC" or "ON" positions. Accessory power socket B Electrical power socket located on the left-lower part of the instrument panel CAUTION The electrical power socket located on... to "00" with a radio time signal, push the "S" button. B Setting the clock To set the minutes, press the "M" button. console. Do not use only a SUBARU genuine cigarette lighter plug. To use the cup holder, open the lid by pulling its upper edge.
Owner's Manual
Page 210
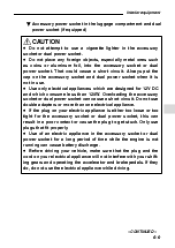
...will not interfere with your shifting gears and operating the accelerator and brake pedals. Do not use a cigarette lighter in the accessory socket or dual power socket. Interior equipment B Accessory power socket in the luggage compartment and dual power socket (if equipped) D Do not attempt to get stuck. Overloading ... battery discharge. D If the plug on your vehicle, make sure that fit properly. Only use plugs that the plug and the cord on the accessory socket and dual power socket when it is not running can cause a short circuit. If they do, do not use . That could cause a...
...will not interfere with your shifting gears and operating the accelerator and brake pedals. Do not use a cigarette lighter in the accessory socket or dual power socket. Interior equipment B Accessory power socket in the luggage compartment and dual power socket (if equipped) D Do not attempt to get stuck. Overloading ... battery discharge. D If the plug on your vehicle, make sure that fit properly. Only use plugs that the plug and the cord on the accessory socket and dual power socket when it is not running can cause a short circuit. If they do, do not use . That could cause a...
Owner's Manual
Page 212
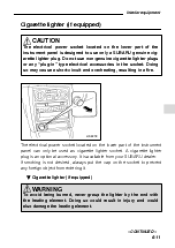
... the heating element. - CONTINUED - 6-11 If smoking is available from entering it. Do not use only a SUBARU genuine cigarette lighter plug. A cigarette lighter plug is designed to prevent any "plug-in" type electrical accessories in the socket. It is not desired, always put the cap on the lower part of the... instrument panel is an optional accessory. Doing so may cause a short-circuit and overheating, resulting in injury and could result in a fire. HS0378 The electrical power socket located on the ...
... the heating element. - CONTINUED - 6-11 If smoking is available from entering it. Do not use only a SUBARU genuine cigarette lighter plug. A cigarette lighter plug is designed to prevent any "plug-in" type electrical accessories in the socket. It is not desired, always put the cap on the lower part of the... instrument panel is an optional accessory. Doing so may cause a short-circuit and overheating, resulting in injury and could result in a fire. HS0378 The electrical power socket located on the ...
Owner's Manual
Page 230
... the "START" position again while depressing the accelerator pedal half way down. 6. Confirm that all warning and indicator lights have gone off unnecessary lights and accessories. 3. Turn the ignition switch to the floor and shift the shift lever into neutral. Turn the ignition switch to the floor while starting the engine...
... the "START" position again while depressing the accelerator pedal half way down. 6. Confirm that all warning and indicator lights have gone off unnecessary lights and accessories. 3. Turn the ignition switch to the floor and shift the shift lever into neutral. Turn the ignition switch to the floor while starting the engine...
Owner's Manual
Page 231
... the engine does not start using the normal method (without depressing the accelerator pedal. While the engine is warming up . Turn off unnecessary lights and accessories. 3. Confirm that the parking brake is applied. Shift the selector lever to the "Warning and indicator lights" section (chapter 3). 5. Refer to the "P" or "N" position (preferably...
... the engine does not start using the normal method (without depressing the accelerator pedal. While the engine is warming up . Turn off unnecessary lights and accessories. 3. Confirm that the parking brake is applied. Shift the selector lever to the "Warning and indicator lights" section (chapter 3). 5. Refer to the "P" or "N" position (preferably...