Owner's Manual
Page 14
... fluid ...11-24 B Battery ...Brake booster ...Brake fluid ...Brake pedal ...Brake system ...Brake system warning light ...Braking ...Braking tips ...Built-in child restraint (if equipped) ...Bulb chart ...C Capacities ...Cargo anchorage eyelets (if equipped) ...Catalytic converter ...CD player 1 (if equipped) ...CD player 2 (if equipped) ...14-2 11-45 11-33 11-30 11...
... fluid ...11-24 B Battery ...Brake booster ...Brake fluid ...Brake pedal ...Brake system ...Brake system warning light ...Braking ...Braking tips ...Built-in child restraint (if equipped) ...Bulb chart ...C Capacities ...Cargo anchorage eyelets (if equipped) ...Catalytic converter ...CD player 1 (if equipped) ...CD player 2 (if equipped) ...14-2 11-45 11-33 11-30 11...
Owner's Manual
Page 19
... equipped) ...Rear window defogger switch ...Rear window wiper and washer switch (if equipped) ...Replacement of brake pad and lining ...Replacement of windshield wiper blades ...Replacing bulbs ...Reporting safety defects (USA) ...Rocking the vehicle ...Roof rail and crossbar (if equipped) ... 5-60 7-8 11-55 11-27 2-26 1-10 7-20 3-29 3-28 11-36...
... equipped) ...Rear window defogger switch ...Rear window wiper and washer switch (if equipped) ...Replacement of brake pad and lining ...Replacement of windshield wiper blades ...Replacing bulbs ...Reporting safety defects (USA) ...Rocking the vehicle ...Roof rail and crossbar (if equipped) ... 5-60 7-8 11-55 11-27 2-26 1-10 7-20 3-29 3-28 11-36...
Owner's Manual
Page 139
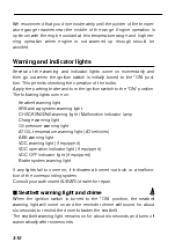
Warning and indicator lights Several of the warning and indicator lights come on , it indicates a burned-out bulb or a malfunction of the corresponding system. The following lights come on: Seatbelt warning light SRS airbag system warning light CHECK ENGINE warning light / ...driver to the "ON" position, the seatbelt warning light will sound for repair. This permits checking the operation of the range. Consult your authorized SUBARU dealer for about six seconds and turns off automatically after six seconds. 3-10 Apply the parking brake and turn the ignition switch to the "ON...
Warning and indicator lights Several of the warning and indicator lights come on , it indicates a burned-out bulb or a malfunction of the corresponding system. The following lights come on: Seatbelt warning light SRS airbag system warning light CHECK ENGINE warning light / ...driver to the "ON" position, the seatbelt warning light will sound for repair. This permits checking the operation of the range. Consult your authorized SUBARU dealer for about six seconds and turns off automatically after six seconds. 3-10 Apply the parking brake and turn the ignition switch to the "ON...
Owner's Manual
Page 147
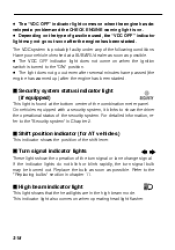
... This light shows that the headlights are in Chapter 2. For detailed information, refer to the "Security system" in the high beam mode. Replace the bulb as soon as possible. If the indicator lights do not blink or blink rapidly, the turn signal or lane change signal. D The "VDC OFF"... of the security system. D The light does not go out soon after the engine has been started . The VDC system is found at a SUBARU dealer as soon as possible. J Shift position indicator (for AT vehicles) This indicator shows the position of the following conditions. Refer to the "Replacing...
... This light shows that the headlights are in Chapter 2. For detailed information, refer to the "Security system" in the high beam mode. Replace the bulb as soon as possible. If the indicator lights do not blink or blink rapidly, the turn signal or lane change signal. D The "VDC OFF"... of the security system. D The light does not go out soon after the engine has been started . The VDC system is found at a SUBARU dealer as soon as possible. J Shift position indicator (for AT vehicles) This indicator shows the position of the following conditions. Refer to the "Replacing...

Owner's Manual
Page 374
...-40 11 Aluminum wheels (If equipped) ...Windshield washer fluid ...Replacement of windshield wiper blades ...Battery ...Fuses ...Main fuse and fusible link ...Installation of accessories ...Replacing bulbs ... 11-41 11-42 11-43 11-45 11-46 11-48 11-48 11-49
...-40 11 Aluminum wheels (If equipped) ...Windshield washer fluid ...Replacement of windshield wiper blades ...Battery ...Fuses ...Main fuse and fusible link ...Installation of accessories ...Replacing bulbs ... 11-41 11-42 11-43 11-45 11-46 11-48 11-48 11-49

Owner's Manual
Page 422
Maintenance and service Replacing bulbs HB5019EB 1 Headlight GT and OUTBACK models Low beam High beam Except GT and OUTBACK models Front turn signal Spot light Dome light Door step light Front turn signal light/ parking and front side marker light Front fog light Except OUTBACK OUTBACK Wattage Bulb No. 2 3 4 5 6 7 12V-55W 12V-60W 12V-60/55W 12V-27W 12V-8W 12V-8W 12V-3.4W 12V-27/8W 12V-55W 12V-51W H1 9005 (HB3) 9007 (HB5) 1156NA (Amber 1157NA (Amber) H3 9006 (HB4) - CONTINUED - 11-49
Maintenance and service Replacing bulbs HB5019EB 1 Headlight GT and OUTBACK models Low beam High beam Except GT and OUTBACK models Front turn signal Spot light Dome light Door step light Front turn signal light/ parking and front side marker light Front fog light Except OUTBACK OUTBACK Wattage Bulb No. 2 3 4 5 6 7 12V-55W 12V-60W 12V-60/55W 12V-27W 12V-8W 12V-8W 12V-3.4W 12V-27/8W 12V-55W 12V-51W H1 9005 (HB3) 9007 (HB5) 1156NA (Amber 1157NA (Amber) H3 9006 (HB4) - CONTINUED - 11-49

Owner's Manual
Page 423
HBF013FC HBB033BC 8 Backup light 9 Q W E R T Sedan Station wagon Luggage area light High mount stop light Sedan Station wagon Rear turn signal light Sedan Station wagon Brake/tail light Sedan Station wagon Licence plate light Sedan Station wagon Trunk room light Wattage 12V-27W 12V-27W 12V-13W 12V-18W 12V-13W 12V-21W 12V-21W 12V-27/8W 12V-27/8W 12V-5W 12V-3.8W or 5W 12V-5W Bulb No. 3156K 1156 - 921 912 - R2172 7440 3157K 1157 168 194 or 168 W5W 11-50
HBF013FC HBB033BC 8 Backup light 9 Q W E R T Sedan Station wagon Luggage area light High mount stop light Sedan Station wagon Rear turn signal light Sedan Station wagon Brake/tail light Sedan Station wagon Licence plate light Sedan Station wagon Trunk room light Wattage 12V-27W 12V-27W 12V-13W 12V-18W 12V-13W 12V-21W 12V-21W 12V-27/8W 12V-27/8W 12V-5W 12V-3.8W or 5W 12V-5W Bulb No. 3156K 1156 - 921 912 - R2172 7440 3157K 1157 168 194 or 168 W5W 11-50

Owner's Manual
Page 424
... gloves, finger prints or grease on the bulb surface, wipe them away with a soft cloth moistened with alcohol. B For GT and OUTBACK models HBB039BA HBB040BB Remove the headlight bulb cover, by turning it counterclockwise. - CONTINUED - 11-51 NOTE If headlight aiming is required, consult your SUBARU dealer for proper adjustment of the headlight aim...
... gloves, finger prints or grease on the bulb surface, wipe them away with a soft cloth moistened with alcohol. B For GT and OUTBACK models HBB039BA HBB040BB Remove the headlight bulb cover, by turning it counterclockwise. - CONTINUED - 11-51 NOTE If headlight aiming is required, consult your SUBARU dealer for proper adjustment of the headlight aim...

Owner's Manual
Page 425
... the electrical connector. Reconnect the electrical connector for the black cable. Remove the bulb from the bulb. 2. n High beam light bulbs HBB043BA HBB044BB 1. Remove the retainer spring. Install the headlight bulb cover. At this time, use care not to touch the bulb surface. 11-52 Disconnect the electrical connector for black cable. n Low beam light...
... the electrical connector. Reconnect the electrical connector for the black cable. Remove the bulb from the bulb. 2. n High beam light bulbs HBB043BA HBB044BB 1. Remove the retainer spring. Install the headlight bulb cover. At this time, use care not to touch the bulb surface. 11-52 Disconnect the electrical connector for black cable. n Low beam light...
Owner's Manual
Page 426
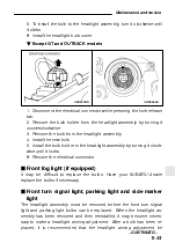
...the lock release tab. 2. Install the new bulb. 5. Remove the electrical connector. Have your SUBARU dealer replace the bulbs if necessary. Install the headlight bulb cover. Remove the bulb holder from the headlight assembly. 4. Install the bulb holder in the headlight assembly by turning it ...removed before the front turn it clockwise until it locks. 6. Maintenance and service 5. To install the bulb to make a headlight aiming adjustment. B Except GT and OUTBACK models HBB045BB HBB046BA 1. J Front fog light (if equipped) It may become necessary to the headlight ...
...the lock release tab. 2. Install the new bulb. 5. Remove the electrical connector. Have your SUBARU dealer replace the bulbs if necessary. Install the headlight bulb cover. Remove the bulb holder from the headlight assembly. 4. Install the bulb holder in the headlight assembly by turning it ...removed before the front turn it clockwise until it locks. 6. Maintenance and service 5. To install the bulb to make a headlight aiming adjustment. B Except GT and OUTBACK models HBB045BB HBB046BA 1. J Front fog light (if equipped) It may become necessary to the headlight ...

Owner's Manual
Page 427
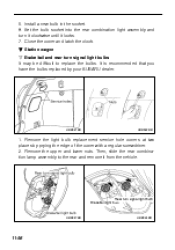
... by turning it and turning counterclockwise. Move the headlight assembly forward. Remove the bulb from the headlight assembly by pushing it counterclockwise. 4. Set the bulb socket into the vehicle body. Remove the headlight assembly mounting screws located at a SUBARU dealer. made at the top of and the front of the headlight assembly using...
... by turning it and turning counterclockwise. Move the headlight assembly forward. Remove the bulb from the headlight assembly by pushing it counterclockwise. 4. Set the bulb socket into the vehicle body. Remove the headlight assembly mounting screws located at a SUBARU dealer. made at the top of and the front of the headlight assembly using...

Owner's Manual
Page 428
... from the light assembly by pushing it and turning it counterclockwise. 4. Rear turn signal light: Remove the bulb from the socket. Open the trunk lid. 2. For covers on the trunk lid: Unlatch the cover by moving the knob upward and open the cover. ...For covers on the trunk wall: Unlatch the cover by pushing the knob and open the cover. 3. Remove the bulb from the socket by turning it counterclockwise. Open the rear combination light cover. Others: Pull the...
... from the light assembly by pushing it and turning it counterclockwise. 4. Rear turn signal light: Remove the bulb from the socket. Open the trunk lid. 2. For covers on the trunk lid: Unlatch the cover by moving the knob upward and open the cover. ...For covers on the trunk wall: Unlatch the cover by pushing the knob and open the cover. 3. Remove the bulb from the socket by turning it counterclockwise. Open the rear combination light cover. Others: Pull the...
Owner's Manual
Page 429
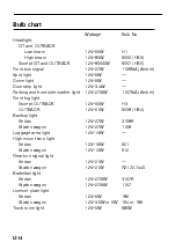
Close the cover and latch the clock. Remove the light bulb replacement service hole covers at two places by your SUBARU dealer. B Station wagon n Brake/tail and rear turn it clockwise until it from the vehicle. It is recommended that you have the bulbs replaced by prying the edge of the cover with a regular...
Close the cover and latch the clock. Remove the light bulb replacement service hole covers at two places by your SUBARU dealer. B Station wagon n Brake/tail and rear turn it clockwise until it from the vehicle. It is recommended that you have the bulbs replaced by prying the edge of the cover with a regular...

Owner's Manual
Page 430
...the nuts from the socket by turning it counterclockwise. Remove the bulb from the rear combination light assembly by pushing it and turning it locks. 8. Remove the bulb socket from the socket. Install a new bulb in the socket. 7. HBB025BA HBB048BA 5. Fit the rear ...combination light assembly into the rear combination light assembly and turn it clockwise until it counterclockwise. 6. Reinstall the light bulb replacement service hole covers. - CONTINUED - 11-57 Using a Phillips screwdriver, remove the upper and lower screws that secure the side ...
...the nuts from the socket by turning it counterclockwise. Remove the bulb from the rear combination light assembly by pushing it and turning it locks. 8. Remove the bulb socket from the socket. Install a new bulb in the socket. 7. HBB025BA HBB048BA 5. Fit the rear ...combination light assembly into the rear combination light assembly and turn it clockwise until it counterclockwise. 6. Reinstall the light bulb replacement service hole covers. - CONTINUED - 11-57 Using a Phillips screwdriver, remove the upper and lower screws that secure the side ...

Owner's Manual
Page 431
... into the rear combination light assembly and turn it clockwise until it and turning counterclockwise. n Back-up . 2. J License plate light HBF013EA HBB027BA 1. Remove the bulb socket from the socket by pushing it locks. 5. Remove the mounting screws using a phillips screwdriver. 11-58 Close the cover and latch the lock. Remove ...
... into the rear combination light assembly and turn it clockwise until it and turning counterclockwise. n Back-up . 2. J License plate light HBF013EA HBB027BA 1. Remove the bulb socket from the socket by pushing it locks. 5. Remove the mounting screws using a phillips screwdriver. 11-58 Close the cover and latch the lock. Remove ...

Owner's Manual
Page 432
Reinstall the lens and cover. Pull the bulb out of the lens with a regular screwdriver. 2. Install a new bulb. 3. Reinstall the lens. - CONTINUED - 11-59 J Dome light, spot light, luggage compartment light and door step light HSA005BA HBB029BA Bulb HB0386 HBS037AA 1. Remove the lens by prying the edge of the socket. Remove the cover and lens. Pull the bulb out of the socket. Install a new bulb. Tighten the mounting screws. Maintenance and service 2. 3. 4. 5.
Reinstall the lens and cover. Pull the bulb out of the lens with a regular screwdriver. 2. Install a new bulb. 3. Reinstall the lens. - CONTINUED - 11-59 J Dome light, spot light, luggage compartment light and door step light HSA005BA HBB029BA Bulb HB0386 HBS037AA 1. Remove the lens by prying the edge of the socket. Remove the cover and lens. Pull the bulb out of the socket. Install a new bulb. Tighten the mounting screws. Maintenance and service 2. 3. 4. 5.

Owner's Manual
Page 433
Reinstall the cover. Install a new bulb. 3. Reinstall the cover. 11-60 J Trunk light HBF014EA 1. Remove the high mount stop light B Sedan OM-H2350 1. J High mount stop light cover by pulling it out. 2. Pull the bulb out of the socket. Install a new bulb. 3. Pull the bulb out of the socket. Remove the cover by prying on the edge with a screwdriver. 2.
Reinstall the cover. Install a new bulb. 3. Reinstall the cover. 11-60 J Trunk light HBF014EA 1. Remove the high mount stop light B Sedan OM-H2350 1. J High mount stop light cover by pulling it out. 2. Pull the bulb out of the socket. Install a new bulb. 3. Pull the bulb out of the socket. Remove the cover by prying on the edge with a screwdriver. 2.

Owner's Manual
Page 434
Remove the mounting screws using a phillips screwdriver and then remove the high mount stop light cover. 3. Reinstall the cover. 5. Install a new bulb. 4. Have your SUBARU dealer replace these bulbs if necessary. - CONTINUED - 11-61 Remove the mounting screw covers by prying on the edge with a screwdriver. 2. Maintenance and service B Station wagon HBB028BA 1. Pull the bulb out of the socket. Tighten the mounting screws then reinstall the covers. NOTE Other bulbs may be difficult to replace.
Remove the mounting screws using a phillips screwdriver and then remove the high mount stop light cover. 3. Reinstall the cover. 5. Install a new bulb. 4. Have your SUBARU dealer replace these bulbs if necessary. - CONTINUED - 11-61 Remove the mounting screw covers by prying on the edge with a screwdriver. 2. Maintenance and service B Station wagon HBB028BA 1. Pull the bulb out of the socket. Tighten the mounting screws then reinstall the covers. NOTE Other bulbs may be difficult to replace.

Owner's Manual
Page 435
Specifications Specifications ...Dimensions ...Engine ...Electrical system ...Capacities ...Tires ...Wheel alignment ... 12-2 12-2 12-3 12-3 12-4 12-4 12-5 Fuses and circuits ... 12-6 Fuse panel located behind the coin tray ...12-6 Fuse panel located in the engine compartment ...12-10 Bulb chart ...12-14 Vehicle identification ...12-15 12
Specifications Specifications ...Dimensions ...Engine ...Electrical system ...Capacities ...Tires ...Wheel alignment ... 12-2 12-2 12-3 12-3 12-4 12-4 12-5 Fuses and circuits ... 12-6 Fuse panel located behind the coin tray ...12-6 Fuse panel located in the engine compartment ...12-10 Bulb chart ...12-14 Vehicle identification ...12-15 12
Owner's Manual
Page 448
Bulb chart Wattage Headlight GT and OUTBACK Low beam High beam Except GT and OUTBACK Front turn signal Spot light Dome light Door step light Parking and front side marker light Front fog light Except OUTBACK OUTBACK Backup light Sedan Station wagon Luggage area light High mount stop light Sedan Station... wagon Rear turn signal light Sedan Station wagon Brake/tail light Sedan Station wagon Licence plate light Sedan Station wagon Trunk room light Bulb No. 12V-55W 12V...
Bulb chart Wattage Headlight GT and OUTBACK Low beam High beam Except GT and OUTBACK Front turn signal Spot light Dome light Door step light Parking and front side marker light Front fog light Except OUTBACK OUTBACK Backup light Sedan Station wagon Luggage area light High mount stop light Sedan Station... wagon Rear turn signal light Sedan Station wagon Brake/tail light Sedan Station wagon Licence plate light Sedan Station wagon Trunk room light Bulb No. 12V-55W 12V...


