
Owner's Manual
Page 15
...) ...2-13 Automatic transmission ...7-19 Automatic transmission fluid ...10-20 B Battery ...Brake booster ...Brake fluid ...Brake pedal ...Brake system ...Brake system warning light ...Braking ...Braking tips ...Bulb chart ...C Capacities ...Cargo anchorage eyelets (if equipped) ...Cassette player operation ...Catalytic converter ...Center console ...Charge warning light ...CHECK ENGINE warning light/Malfunction indicator lamp ...13...
...) ...2-13 Automatic transmission ...7-19 Automatic transmission fluid ...10-20 B Battery ...Brake booster ...Brake fluid ...Brake pedal ...Brake system ...Brake system warning light ...Braking ...Braking tips ...Bulb chart ...C Capacities ...Cargo anchorage eyelets (if equipped) ...Cassette player operation ...Catalytic converter ...Center console ...Charge warning light ...CHECK ENGINE warning light/Malfunction indicator lamp ...13...
Owner's Manual
Page 20
Index Replacement of brake pad and lining ...10-37 Replacement of windshield wiper blades ...10-32 Replacing bulbs ...10-47 Reporting safety defects (USA) ...12-4 Rocking the vehicle ...7-46 Roof rack (if equipped) ...1-34 S Seatbelt maintenance ...2-19 Seatbelts ...2-11 Seatbelt safety tips ...2-11 ...
Index Replacement of brake pad and lining ...10-37 Replacement of windshield wiper blades ...10-32 Replacing bulbs ...10-47 Reporting safety defects (USA) ...12-4 Rocking the vehicle ...7-46 Roof rack (if equipped) ...1-34 S Seatbelt maintenance ...2-19 Seatbelts ...2-11 Seatbelt safety tips ...2-11 ...
Owner's Manual
Page 101
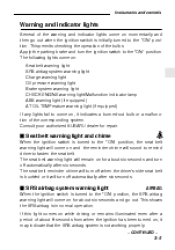
... will come on for about six seconds and go out when the ignition switch is initially turned to come on, it indicates a burned-out bulb or a malfunction of the corresponding system. J SRS airbag system warning light AIRBAG When the ignition switch is turned to fasten the seat belt....ABS warning light (if equipped) AT OIL TEMPerature warning light (if equipped) If any lights fail to the "ON" position. Consult your authorized SUBARU dealer for about 6 seconds from when the ignition has been turned on while driving or remains illuminated even after six seconds. If this light comes...
... will come on for about six seconds and go out when the ignition switch is initially turned to come on, it indicates a burned-out bulb or a malfunction of the corresponding system. J SRS airbag system warning light AIRBAG When the ignition switch is turned to fasten the seat belt....ABS warning light (if equipped) AT OIL TEMPerature warning light (if equipped) If any lights fail to the "ON" position. Consult your authorized SUBARU dealer for about 6 seconds from when the ignition has been turned on while driving or remains illuminated even after six seconds. If this light comes...

Owner's Manual
Page 106
...the light flashes after the engine starts, it may be burned out. Contact your nearest SUBARU dealer for wagon and OUTBACK SPORT) is replenished up to drive. gal.). gal. (14 liters, 3.0 Imp. Replace the bulb as soon as possible. J Low fuel warning light The low fuel warning light comes on... in chapter 10. It only operates when the ignition switch is out before you start to an internal fuel quantity of the turn signal bulb may indicate that the headlights are in the high beam mode. J High beam indicator This light shows that the automatic transmission control system ...
...the light flashes after the engine starts, it may be burned out. Contact your nearest SUBARU dealer for wagon and OUTBACK SPORT) is replenished up to drive. gal.). gal. (14 liters, 3.0 Imp. Replace the bulb as soon as possible. J Low fuel warning light The low fuel warning light comes on... in chapter 10. It only operates when the ignition switch is out before you start to an internal fuel quantity of the turn signal bulb may indicate that the headlights are in the high beam mode. J High beam indicator This light shows that the automatic transmission control system ...
Owner's Manual
Page 249
... of brake pad and lining ...Parking brake stroke ...Tires and wheels ...Aluminum wheels (if equipped) ...Fuses ...Main fuse and fusible link ...Installation of accessories ...Replacing bulbs ...Headlight ... 10-16 10-17 10-18 10-19 10-20 10-22 10-23 10-25 10-26 10-28 10-29 10-29...
... of brake pad and lining ...Parking brake stroke ...Tires and wheels ...Aluminum wheels (if equipped) ...Fuses ...Main fuse and fusible link ...Installation of accessories ...Replacing bulbs ...Headlight ... 10-16 10-17 10-18 10-19 10-20 10-22 10-23 10-25 10-26 10-28 10-29 10-29...

Owner's Manual
Page 295
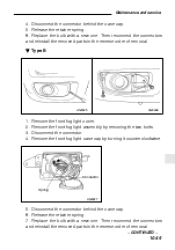
...retainer spring. 3. Replace the bulb, then set the retainer spring securely. 4. If there are finger prints or grease on the bulb surface develop into hot spots, causing the bulb to break. Maintenance and service Replacing bulbs J Headlight CAUTION Halogen headlight bulbs become very hot while in... use. If you touch the bulb surface with bare hands or greasy gloves...
...retainer spring. 3. Replace the bulb, then set the retainer spring securely. 4. If there are finger prints or grease on the bulb surface develop into hot spots, causing the bulb to break. Maintenance and service Replacing bulbs J Headlight CAUTION Halogen headlight bulbs become very hot while in... use. If you touch the bulb surface with bare hands or greasy gloves...

Owner's Manual
Page 296
J Fog light (if equipped) CAUTION Halogen light bulbs become very hot while in use. If you touch the bulb surface with bare hands or greasy gloves, finger prints or grease on the bulb surface, wipe them away with a soft cloth moistened with alcohol. Remove the front fog light assembly by turning... it counterclockwise. If there are finger prints or grease on the bulb surface develop into hot spots, causing the bulb to break. Remove the front fog light case cap by removing the three bolts. 2. Spring Connector OM-H0412 10-48...
J Fog light (if equipped) CAUTION Halogen light bulbs become very hot while in use. If you touch the bulb surface with bare hands or greasy gloves, finger prints or grease on the bulb surface, wipe them away with a soft cloth moistened with alcohol. Remove the front fog light assembly by turning... it counterclockwise. If there are finger prints or grease on the bulb surface develop into hot spots, causing the bulb to break. Remove the front fog light case cap by removing the three bolts. 2. Spring Connector OM-H0412 10-48...
Owner's Manual
Page 297
Replace the bulb with a new one . Then reconnect the connectors and reinstall the removed parts in the reverse order of removal. - CONTINUED - 10-49 Disconnect the connector behind ... case cap. 6. Connector Spring HG0327 5. Remove the front fog light cover. Remove the front fog light case cap by removing the two bolts. Replace the bulb with a new one . Release the retainer spring. 7. Disconnect the connector. B Type B HG0325 HG0326 1. 2. 3. 4. Disconnect the connector behind the case cap. 5. Then reconnect the connectors and...
Replace the bulb with a new one . Then reconnect the connectors and reinstall the removed parts in the reverse order of removal. - CONTINUED - 10-49 Disconnect the connector behind ... case cap. 6. Connector Spring HG0327 5. Remove the front fog light cover. Remove the front fog light case cap by removing the two bolts. Replace the bulb with a new one . Release the retainer spring. 7. Disconnect the connector. B Type B HG0325 HG0326 1. 2. 3. 4. Disconnect the connector behind the case cap. 5. Then reconnect the connectors and...

Owner's Manual
Page 298
J Parking light OM-H0244 1. Pull the bulb out of the headlight assembly using the phillips screwdriver. 2. Set the bulb holder into the fender. Remove the parking light assembly mounting screw located at the top of the socket. Install a new bulb. 5. Move the parking light assembly forward until it pops out from the parking light assembly by turning it counterclockwise. 4. Tighten the mounting screw. 10-50 Set the parking light assembly into the parking light assembly and turn it clockwise until it locks. 6. Remove the bulb holder from the fender. 3.
J Parking light OM-H0244 1. Pull the bulb out of the headlight assembly using the phillips screwdriver. 2. Set the bulb holder into the fender. Remove the parking light assembly mounting screw located at the top of the socket. Install a new bulb. 5. Move the parking light assembly forward until it pops out from the parking light assembly by turning it counterclockwise. 4. Tighten the mounting screw. 10-50 Set the parking light assembly into the parking light assembly and turn it clockwise until it locks. 6. Remove the bulb holder from the fender. 3.

Owner's Manual
Page 299
... signal light assembly mounting screws using the phillips screwdriver. 2. Remove the bulb from the socket by turning it in the reverse order of removal. Install the removed parts in and turning clockwise, then install a new bulb. 4. B Type B HG0194 1. Remove the lens from the front ...bumper and remove the bulb socket by pushing it counterclockwise. 3. Remove the front turn signal light assembly from the front turn...
... signal light assembly mounting screws using the phillips screwdriver. 2. Remove the bulb from the socket by turning it in the reverse order of removal. Install the removed parts in and turning clockwise, then install a new bulb. 4. B Type B HG0194 1. Remove the lens from the front ...bumper and remove the bulb socket by pushing it counterclockwise. 3. Remove the front turn signal light assembly from the front turn...

Owner's Manual
Page 300
... and tighten the mounting screws. Install a new bulb. 4. 3. Install a new bulb. 4. Remove the bulb holder from the socket by turning it forward in and turning counterclockwise. Remove the bulb from the side turn signal light assembly while moving it counterclockwise. 3. Pull the bulb out of the turn signal light assembly by pushing... it locks. 5. Reinstall the lens to the vehicle. 2. Set the bulb holder into the side turn signal light assembly and turn signal light assembly on the side of the front fender. 10-52 ...
... and tighten the mounting screws. Install a new bulb. 4. 3. Install a new bulb. 4. Remove the bulb holder from the socket by turning it forward in and turning counterclockwise. Remove the bulb from the side turn signal light assembly while moving it counterclockwise. 3. Pull the bulb out of the turn signal light assembly by pushing... it locks. 5. Reinstall the lens to the vehicle. 2. Set the bulb holder into the side turn signal light assembly and turn signal light assembly on the side of the front fender. 10-52 ...

Owner's Manual
Page 301
... light assembly and turn it clockwise until it and turning counterclockwise. Secure the rear trunk trim panel with a regular screw driver. 3. Remove the bulb from the socket by turning it counterclockwise. 6. Remove the nut securing the rear trunk trim. OM-H0447 4. Open the rear portion of the ...side trunk trim panel. 5. Remove the bulb holder from the rear trunk trim with the nut and the clips. - CONTINUED - 10-53 Remove the clip from the rear combination light assembly ...
... light assembly and turn it clockwise until it and turning counterclockwise. Secure the rear trunk trim panel with a regular screw driver. 3. Remove the bulb from the socket by turning it counterclockwise. 6. Remove the nut securing the rear trunk trim. OM-H0447 4. Open the rear portion of the ...side trunk trim panel. 5. Remove the bulb holder from the rear trunk trim with the nut and the clips. - CONTINUED - 10-53 Remove the clip from the rear combination light assembly ...

Owner's Manual
Page 302
Set the bulb holder into the rear combination light assembly and turn it clockwise until it and turning counterclockwise. Remove the bulb holder from the socket by turning it counterclockwise. 3. Close the cover and latch the lock. 10-54 B Wagon HG0195 1. Open the cover up. OM-H0449 2. Remove the bulb from the rear combination light assembly by pushing it locks. 5. Unlatch the rear combination light cover by pulling the knob. Install a new bulb. 4.
Set the bulb holder into the rear combination light assembly and turn it clockwise until it and turning counterclockwise. Remove the bulb holder from the socket by turning it counterclockwise. 3. Close the cover and latch the lock. 10-54 B Wagon HG0195 1. Open the cover up. OM-H0449 2. Remove the bulb from the rear combination light assembly by pushing it locks. 5. Unlatch the rear combination light cover by pulling the knob. Install a new bulb. 4.

Owner's Manual
Page 303
Remove the cover and lens. Tighten the mounting screws. Install a new bulb. 3. Reinstall the lens. - CONTINUED - 10-55 Pull the bulb out of the socket. J Interior light, spot light OM-H0250 OM-H0251 1. Pull the bulb out of the socket. Install a new bulb. Reinstall the lens and cover. Maintenance and service J License plate light HG0198 1. 2. 3. 4. 5. Remove the mounting screws using a phillips screwdriver. Remove the lens by prying the edge of the lens with a regular screwdriver. 2.
Remove the cover and lens. Tighten the mounting screws. Install a new bulb. 3. Reinstall the lens. - CONTINUED - 10-55 Pull the bulb out of the socket. J Interior light, spot light OM-H0250 OM-H0251 1. Pull the bulb out of the socket. Install a new bulb. Reinstall the lens and cover. Maintenance and service J License plate light HG0198 1. 2. 3. 4. 5. Remove the mounting screws using a phillips screwdriver. Remove the lens by prying the edge of the lens with a regular screwdriver. 2.
Owner's Manual
Page 304
Specifications Specifications ...Dimensions ...Maximum load limits ...Engine ...Electrical system ...Capacities ...Tires ... 11-2 11-2 11-2 11-2 11-3 11-3 11-4 Fuses and circuits ...Bulb chart ...Vehicle identification ... 11-5 11-8 11-9 11
Specifications Specifications ...Dimensions ...Maximum load limits ...Engine ...Electrical system ...Capacities ...Tires ... 11-2 11-2 11-2 11-2 11-3 11-3 11-4 Fuses and circuits ...Bulb chart ...Vehicle identification ... 11-5 11-8 11-9 11

Owner's Manual
Page 311
Bulb chart Description Headlight Front turn signal Side marker/Parking Side turn signal Rear combination light Brake/tail and Marker Turn signal Back-up High mount stop light (Sedan) High mount stop light (Wagon) License plate light Interior light Fog light Wattage 12V-60/55W 12V-27W 12V-3.8W 12V-3.8W 12V-27/8W 12V-27W 12V-27W 12V-18W 12V-13W 12V-3.8W 12V-8W 12V-55W Bulb No. HB2 (H4) 1156 194 194 1157 1156 1156 921 912 194 - H3 11-8
Bulb chart Description Headlight Front turn signal Side marker/Parking Side turn signal Rear combination light Brake/tail and Marker Turn signal Back-up High mount stop light (Sedan) High mount stop light (Wagon) License plate light Interior light Fog light Wattage 12V-60/55W 12V-27W 12V-3.8W 12V-3.8W 12V-27/8W 12V-27W 12V-27W 12V-18W 12V-13W 12V-3.8W 12V-8W 12V-55W Bulb No. HB2 (H4) 1156 194 194 1157 1156 1156 921 912 194 - H3 11-8

