Owner's Manual
Page 7
... through inadvertent operation of this procedure could quickly become high enough to cause severe or possibly fatal injuries to the "Power windows" section in the rear seat. Failure to a child operating the power window. Engine exhaust gas contains carbon monoxide, a colorless and odorless gas which is running. D Always properly maintain the engine...
... through inadvertent operation of this procedure could quickly become high enough to cause severe or possibly fatal injuries to the "Power windows" section in the rear seat. Failure to a child operating the power window. Engine exhaust gas contains carbon monoxide, a colorless and odorless gas which is running. D Always properly maintain the engine...

Owner's Manual
Page 12
A ABS (Anti-lock Brake System) ...7-23 ABS warning light (for vehicles with ABS) ...3-13 Accessory power socket ...6-8 Air cleaner element ...11-18 Air conditioner operation ...4-10 Air filtration system (if equipped) ...4-12 Aluminum wheels (If equipped) ...11-43 Antenna system ...5-2 Ashtray ...6-...
A ABS (Anti-lock Brake System) ...7-23 ABS warning light (for vehicles with ABS) ...3-13 Accessory power socket ...6-8 Air cleaner element ...11-18 Air conditioner operation ...4-10 Air filtration system (if equipped) ...4-12 Aluminum wheels (If equipped) ...11-43 Antenna system ...5-2 Ashtray ...6-...
Owner's Manual
Page 16
...) ...Overhead console ... 3-6 8-7 3-12 4-11 3-31 3-7 6-4 P Parking brake stroke ...11-40 Parking light switch ...3-19 Parking your vehicle ...7-26 Periodic inspections ...8-5 Power door locking switches ...2-5 Power steering ...7-21 Power steering fluid ...11-27 Power windows ...2-20 Precautions against vehicle modification ...1-49 Precautions to observe when handling a compact disc (CD) ...5-37 Preparing to drive ...7-7 R Rear combination...
...) ...Overhead console ... 3-6 8-7 3-12 4-11 3-31 3-7 6-4 P Parking brake stroke ...11-40 Parking light switch ...3-19 Parking your vehicle ...7-26 Periodic inspections ...8-5 Power door locking switches ...2-5 Power steering ...7-21 Power steering fluid ...11-27 Power windows ...2-20 Precautions against vehicle modification ...1-49 Precautions to observe when handling a compact disc (CD) ...5-37 Preparing to drive ...7-7 R Rear combination...

Owner's Manual
Page 71
Doors and locks Keys ...Master, submaster and valet key ...Key number ... 2-2 2-2 2-2 Door locks ...Power door locking switches ... 2-3 2-5 2 Keyless entry system (if equipped) ...Security system (if equipped) ...Child safety locks ...Power windows ...Rear gate ...Moonroof (if equipped) ... 2-6 2-12 2-19 2-20 2-23 2-24
Doors and locks Keys ...Master, submaster and valet key ...Key number ... 2-2 2-2 2-2 Door locks ...Power door locking switches ... 2-3 2-5 2 Keyless entry system (if equipped) ...Security system (if equipped) ...Child safety locks ...Power windows ...Rear gate ...Moonroof (if equipped) ... 2-6 2-12 2-19 2-20 2-23 2-24

Owner's Manual
Page 73
... from the outside Unlock Lock HS0010 To lock the door from the outside without the key 1 2 1 2 Press the lock lever. Pull the outside using the power door locking switch, push the switch forward ("LOCK" side) and then close the door. Locking without the key, press the end of the lock lever...
... from the outside Unlock Lock HS0010 To lock the door from the outside without the key 1 2 1 2 Press the lock lever. Pull the outside using the power door locking switch, push the switch forward ("LOCK" side) and then close the door. Locking without the key, press the end of the lock lever...

Owner's Manual
Page 75
NOTE Make sure that you set the door locks, the doors remain locked. To lock the doors, push the switch forward. Doors and locks J Power door locking switches HB2008CB HB2009BB All doors and the rear gate can be locked and unlocked by the power door locking switches located at the driver's side and the front passenger's side doors. To unlock the doors, push the switch rearward. When you close the doors after you do not leave the key inside the vehicle before locking the doors from the outside using power door locking switches. - CONTINUED - 2-5
NOTE Make sure that you set the door locks, the doors remain locked. To lock the doors, push the switch forward. Doors and locks J Power door locking switches HB2008CB HB2009BB All doors and the rear gate can be locked and unlocked by the power door locking switches located at the driver's side and the front passenger's side doors. To unlock the doors, push the switch rearward. When you close the doors after you do not leave the key inside the vehicle before locking the doors from the outside using power door locking switches. - CONTINUED - 2-5
Owner's Manual
Page 76
... wet, wipe it dry with a cloth immediately. Keyless entry system (if equipped) D Do not expose the transmitter to severe shocks, such as those experienced as power plants and radio/television broadcasting towers.
... wet, wipe it dry with a cloth immediately. Keyless entry system (if equipped) D Do not expose the transmitter to severe shocks, such as those experienced as power plants and radio/television broadcasting towers.

Owner's Manual
Page 84
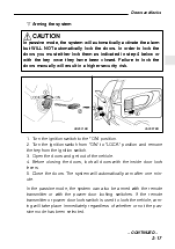
... will start flashing slowly (approximately once every two seconds) to set the door locks. 7. Close the door. n To arm the system using power door locking switches HB2024CC 1. Push the power door locking switch forward ("LOCK" side) to inform you that the system has armed. The horn will sound one time, the parking...
... will start flashing slowly (approximately once every two seconds) to set the door locks. 7. Close the door. n To arm the system using power door locking switches HB2024CC 1. Push the power door locking switch forward ("LOCK" side) to inform you that the system has armed. The horn will sound one time, the parking...
Owner's Manual
Page 87
... the doors. Turn the ignition switch to "LOCK" position and remove the key from the ignition switch. 3. If the remote transmitter or power door lock switch is used to lock the doors manually will automatically activate the alarm but WILL NOT automatically lock the doors. Failure to lock... out of whether or not the passive mode has been selected. - CONTINUED - 2-17 Before closing the doors, lock all doors with the power door locking switches. The system will take place immediately regardless of the vehicle. 4. Doors and locks n Arming the system CAUTION In passive mode...
... the doors. Turn the ignition switch to "LOCK" position and remove the key from the ignition switch. 3. If the remote transmitter or power door lock switch is used to lock the doors manually will automatically activate the alarm but WILL NOT automatically lock the doors. Failure to lock... out of whether or not the passive mode has been selected. - CONTINUED - 2-17 Before closing the doors, lock all doors with the power door locking switches. The system will take place immediately regardless of the vehicle. 4. Doors and locks n Arming the system CAUTION In passive mode...

Owner's Manual
Page 90
... when the ignition switch is in the vehicle. D Always lock the passengers' windows using the lock switch when children are riding in the "ON" position. B Power window switch cluster (driver's side) Lock switch "AUTO" switch for safety and never allow an unattended child to remain in the window. Failure to follow...
... when the ignition switch is in the vehicle. D Always lock the passengers' windows using the lock switch when children are riding in the "ON" position. B Power window switch cluster (driver's side) Lock switch "AUTO" switch for safety and never allow an unattended child to remain in the window. Failure to follow...

Owner's Manual
Page 91
... up and hold it reaches the desired position. When the lock switch is in the "LOCK" position, the passengers' windows cannot be controlled by the power window switch cluster at the driver side door. Push the switch down lightly and hold it until the window reaches the desired position. Doors and...
... up and hold it reaches the desired position. When the lock switch is in the "LOCK" position, the passengers' windows cannot be controlled by the power window switch cluster at the driver side door. Push the switch down lightly and hold it until the window reaches the desired position. Doors and...

Owner's Manual
Page 92
... the switch down and hold it until the window reaches the desired position. When the lock switch on the power window switch cluster, located on 2-22 When the lock switch on the power window switch cluster, located on the driver's side door, is in the "LOCK" position, the front passenger's window cannot...
... the switch down and hold it until the window reaches the desired position. When the lock switch on the power window switch cluster, located on 2-22 When the lock switch on the power window switch cluster, located on the driver's side door, is in the "LOCK" position, the front passenger's window cannot...

Owner's Manual
Page 93
... the cargo space. Doors and locks the driver's side door, is equipped with the rear passengers' switches. The rear gate can also be operated with power door locks, the rear gate can be lowered easily if you pull down firmly until the latch engages. WARNING Lock Unlock HS0021 To unlock the...
... the cargo space. Doors and locks the driver's side door, is equipped with the rear passengers' switches. The rear gate can also be operated with power door locks, the rear gate can be lowered easily if you pull down firmly until the latch engages. WARNING Lock Unlock HS0021 To unlock the...
Owner's Manual
Page 99
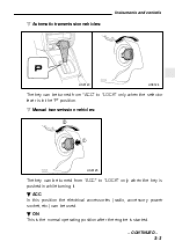
Instruments and controls n Automatic transmission vehicles: HS0123 HS0124 The key can be used. B ACC In this position the electrical accessories (radio, accessory power socket, etc.) can be turned from "ACC" to "LOCK" only when the key is pushed in the "P" position. B ON This is the normal operating position after the engine is in while turning it. n Manual transmission vehicles: 2 1 HS0125 The key can be turned from "ACC" to "LOCK" only when the selector lever is started. - CONTINUED - 3-3
Instruments and controls n Automatic transmission vehicles: HS0123 HS0124 The key can be used. B ACC In this position the electrical accessories (radio, accessory power socket, etc.) can be turned from "ACC" to "LOCK" only when the key is pushed in the "P" position. B ON This is the normal operating position after the engine is in while turning it. n Manual transmission vehicles: 2 1 HS0125 The key can be turned from "ACC" to "LOCK" only when the selector lever is started. - CONTINUED - 3-3
Owner's Manual
Page 149
... balance control (AUDIO) The volume control dial 1 normally functions as a volume control. This dial becomes a control for both power (ON/OFF) and volume control. Radio operation HS5003BB 1 Power switch/Volume, Tone, Balance, Fader control dial 2 AUDIO button 3 BAND button 4 Tuning buttons 5 Preset buttons 6 SCAN ...button B Power switch and volume/bass/treble/fader/balance control n Power switch and volume control (PWR/VOL) The dial 1 is used for Bass, Treble, Fader or Balance when you ...
... balance control (AUDIO) The volume control dial 1 normally functions as a volume control. This dial becomes a control for both power (ON/OFF) and volume control. Radio operation HS5003BB 1 Power switch/Volume, Tone, Balance, Fader control dial 2 AUDIO button 3 BAND button 4 Tuning buttons 5 Preset buttons 6 SCAN ...button B Power switch and volume/bass/treble/fader/balance control n Power switch and volume control (PWR/VOL) The dial 1 is used for Bass, Treble, Fader or Balance when you ...
Owner's Manual
Page 160
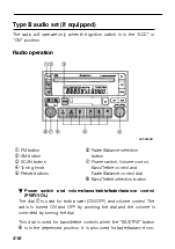
.... Radio operation HS5004BB 1 2 3 4 5 FM button AM button SCAN button Tuning knob Preset buttons 6 Fader/Balance selection button 7 Power switch, Volume control, Bass/Treble control and Fader/Balance control dial 8 Bass/Treble selection button B Power switch and volume/bass/treble/fader/balance control (PWR/VOL) The dial 7 is used for bass/treble controls...
.... Radio operation HS5004BB 1 2 3 4 5 FM button AM button SCAN button Tuning knob Preset buttons 6 Fader/Balance selection button 7 Power switch, Volume control, Bass/Treble control and Fader/Balance control dial 8 Bass/Treble selection button B Power switch and volume/bass/treble/fader/balance control (PWR/VOL) The dial 7 is used for bass/treble controls...
Owner's Manual
Page 182
Cup holder ...Clock ...Accessory power socket ...Cigarette lighter (if equipped) ...Ashtray ...Coat hook ...Interior light ...Spotlight ...Cargo area light ...Luggage cover (if equipped) ...Shopping bag hook ...Cargo anchorage eyelets ...Under ...
Cup holder ...Clock ...Accessory power socket ...Cigarette lighter (if equipped) ...Ashtray ...Coat hook ...Interior light ...Spotlight ...Cargo area light ...Luggage cover (if equipped) ...Shopping bag hook ...Cargo anchorage eyelets ...Under ...
Owner's Manual
Page 189
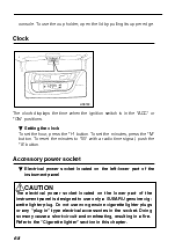
To reset the minutes to use only a SUBARU genuine cigarette lighter plug. Accessory power socket B Electrical power socket located on the left-lower part of the instrument panel CAUTION The electrical power socket located on the lower part of the instrument panel is in the socket. console. B Setting the clock To set the minutes, press...
To reset the minutes to use only a SUBARU genuine cigarette lighter plug. Accessory power socket B Electrical power socket located on the left-lower part of the instrument panel CAUTION The electrical power socket located on the lower part of the instrument panel is in the socket. console. B Setting the clock To set the minutes, press...
Owner's Manual
Page 190
... appliance while driving. D Do not place any foreign objects, especially metal ones such as coins or aluminum foil, into the accessory socket or dual power socket. D If the plug on your electrical appliance will not interfere with your electric appliance is not running can cause a short circuit. D Use... of an electric appliance in the accessory socket or dual power socket for a long period of time while the engine is either too loose or too tight for 12V DC and which are designed for ...
... appliance while driving. D Do not place any foreign objects, especially metal ones such as coins or aluminum foil, into the accessory socket or dual power socket. D If the plug on your electrical appliance will not interfere with your electric appliance is not running can cause a short circuit. D Use... of an electric appliance in the accessory socket or dual power socket for a long period of time while the engine is either too loose or too tight for 12V DC and which are designed for ...
Owner's Manual
Page 191
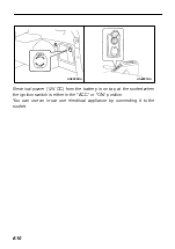
HS6000BA HS6001BA Electrical power (12V DC) from the battery is on tap at the socket when the ignition switch is either in -car use an in the "ACC" or "ON" position. You can use electrical appliance by connecting it to the socket. 6-10
HS6000BA HS6001BA Electrical power (12V DC) from the battery is on tap at the socket when the ignition switch is either in -car use an in the "ACC" or "ON" position. You can use electrical appliance by connecting it to the socket. 6-10


