
Owner's Manual
Page 15
Index Horn ... 3-28 I Ignition switch ...3-2 Illumination brightness control ...3-18 In-dash 6 CD auto changer (if equipped) ...5-34 Inside mirror ...3-28 Installation of accessories ...5-2, 11-47 Interior light ...6-14 Interior light and luggage compartment light ...11-54 J Jump starting ... 9-8 K Key interlock release (AT vehicles only) ...... link ...11-47 Maintenance precautions ...11-3 Maintenance schedule ...11-3 Maintenance tools ...9-16 Manual transmission ...7-11 Manual transmission oil ...11-21 Master, submaster and valet key ...2-2 Mirrors ...3-28 14-5
Index Horn ... 3-28 I Ignition switch ...3-2 Illumination brightness control ...3-18 In-dash 6 CD auto changer (if equipped) ...5-34 Inside mirror ...3-28 Installation of accessories ...5-2, 11-47 Interior light ...6-14 Interior light and luggage compartment light ...11-54 J Jump starting ... 9-8 K Key interlock release (AT vehicles only) ...... link ...11-47 Maintenance precautions ...11-3 Maintenance schedule ...11-3 Maintenance tools ...9-16 Manual transmission ...7-11 Manual transmission oil ...11-21 Master, submaster and valet key ...2-2 Mirrors ...3-28 14-5
Owner's Manual
Page 16
... first 1,000 miles (1,600 km) 2-24 9-15 ... 8-2 O Odometer/Trip meter ...Off road driving ...Oil pressure warning light ...Operating tips for heater and air conditioner ...Outside mirrors ...Outside temperature indicator (if equipped) ...Overhead console ... 3-6 8-7 3-12 4-11 3-31 3-7 6-4 P Parking brake stroke ...11-40 Parking light switch ...3-19 Parking your vehicle ...7-26 Periodic inspections...
... first 1,000 miles (1,600 km) 2-24 9-15 ... 8-2 O Odometer/Trip meter ...Off road driving ...Oil pressure warning light ...Operating tips for heater and air conditioner ...Outside mirrors ...Outside temperature indicator (if equipped) ...Overhead console ... 3-6 8-7 3-12 4-11 3-31 3-7 6-4 P Parking brake stroke ...11-40 Parking light switch ...3-19 Parking your vehicle ...7-26 Periodic inspections...
Owner's Manual
Page 18
... Turn signals lever ...3-18 Type A audio set (if equipped) ...5-5 Type B audio set (if equipped) ...5-16 U Under floor storage tray ...Uniform tire quality grading standards ...V Vanity mirror (if equipped) ...Vehicle capacity weight ...Vehicle identification ...Vehicle with driver's and front passenger's SRS airbags and lap/shoulder restraints ...14-8 6-19 13-2 6-2 8-16 12-8 1-28
... Turn signals lever ...3-18 Type A audio set (if equipped) ...5-5 Type B audio set (if equipped) ...5-16 U Under floor storage tray ...Uniform tire quality grading standards ...V Vanity mirror (if equipped) ...Vehicle capacity weight ...Vehicle identification ...Vehicle with driver's and front passenger's SRS airbags and lap/shoulder restraints ...14-8 6-19 13-2 6-2 8-16 12-8 1-28
Owner's Manual
Page 54
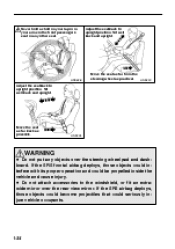
... practical. Never hold a child on your lap or in your arms in the front passenger's seat or any objects over the rear view mirror. D Do not attach accessories to upright position. If the SRS airbag deploys, those objects could interfere with its proper operation and could seriously... injure vehicle occupants. Sit well back and upright. Adjust the seatback to the windshield, or fit an extrawide mirror over the steering wheel pad and dashboard. HS0234 D Do not put any other seat. WARNING 1-34 Sit well back and upright. If the...
... practical. Never hold a child on your lap or in your arms in the front passenger's seat or any objects over the rear view mirror. D Do not attach accessories to upright position. If the SRS airbag deploys, those objects could interfere with its proper operation and could seriously... injure vehicle occupants. Sit well back and upright. Adjust the seatback to the windshield, or fit an extrawide mirror over the steering wheel pad and dashboard. HS0234 D Do not put any other seat. WARNING 1-34 Sit well back and upright. If the...
Owner's Manual
Page 55
... by reducing the impact on the driver's and front passenger's head and chest. In a moderate to the windshield, or fit an extra-wide mirror over the rear view mirror. B Operation CAUTION Do not touch the SRS airbag system components around the steering wheel and dashboard with bare hands right after deployment. The...
... by reducing the impact on the driver's and front passenger's head and chest. In a moderate to the windshield, or fit an extra-wide mirror over the rear view mirror. B Operation CAUTION Do not touch the SRS airbag system components around the steering wheel and dashboard with bare hands right after deployment. The...

Owner's Manual
Page 97
... washer switch (if equipped) ... 3-16 3-18 3-18 3-19 3-20 3-20 3-22 3-24 Windshield wiper deicer (if equipped) ...Rear window defogger switch ...Tilt steering wheel ...Horn ...Mirrors ...Inside mirror ...Outside mirrors ... 3-25 3-26 3-27 3-28 3-28 3-28 3-31 Instruments and controls Ignition switch ... 3-2 3-4 3-4 Key reminder chime ...Key interlock release (AT vehicles only) ...
... washer switch (if equipped) ... 3-16 3-18 3-18 3-19 3-20 3-20 3-22 3-24 Windshield wiper deicer (if equipped) ...Rear window defogger switch ...Tilt steering wheel ...Horn ...Mirrors ...Inside mirror ...Outside mirrors ... 3-25 3-26 3-27 3-28 3-28 3-28 3-31 Instruments and controls Ignition switch ... 3-2 3-4 3-4 Key reminder chime ...Key interlock release (AT vehicles only) ...
Owner's Manual
Page 122
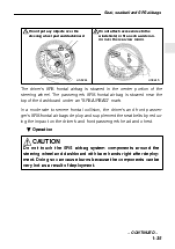
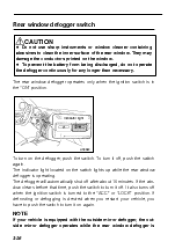
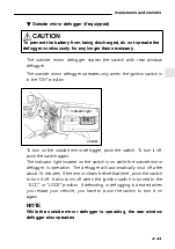
... to the "ACC" or "LOCK" position. It also turns off . NOTE If your vehicle, you restart your vehicle is equipped with the outside mirror defogger, the outside mirror defogger operates while the rear window defogger is turned to clean the inner surface of the rear window. D To prevent the battery from being...
... to the "ACC" or "LOCK" position. It also turns off . NOTE If your vehicle, you restart your vehicle is equipped with the outside mirror defogger, the outside mirror defogger operates while the rear window defogger is turned to clean the inner surface of the rear window. D To prevent the battery from being...
Owner's Manual
Page 124
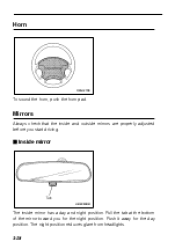
Push it away for the night position. Horn OM-H2736 To sound the horn, push the horn pad. Pull the tab at the bottom of the mirror toward you start driving. J Inside mirror HB4003BB The inside and outside mirrors are properly adjusted before you for the day position. Mirrors Always check that the inside mirror has a day and night position. The night position reduces glare from headlights. 3-28
Push it away for the night position. Horn OM-H2736 To sound the horn, push the horn pad. Pull the tab at the bottom of the mirror toward you start driving. J Inside mirror HB4003BB The inside and outside mirrors are properly adjusted before you for the day position. Mirrors Always check that the inside mirror has a day and night position. The night position reduces glare from headlights. 3-28
Owner's Manual
Page 125
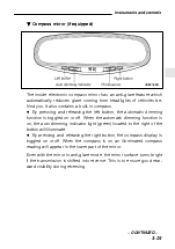
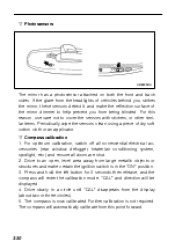
... the right button, the compass display is toggled on , an illuminated compass reading will illuminate. When the compass is shifted into reverse. Even with the mirror in compass. It also contains a built-in anti-glare mode, the mirror surface turns bright if the transmission is on or off . Instruments and controls B Compass...
... the right button, the compass display is toggled on , an illuminated compass reading will illuminate. When the compass is shifted into reverse. Even with the mirror in compass. It also contains a built-in anti-glare mode, the mirror surface turns bright if the transmission is on or off . Instruments and controls B Compass...
Owner's Manual
Page 126
...compass is in a circle until "CAL" disappears from this reason, use care not to help prevent you strikes the mirror, these sensors detect it and make the reflection surface of the mirror dimmer to cover the sensors with stickers, or other similar items. Periodically wipe the sensors clean using a piece of .... 4. Further calibration is not required. If the glare from the headlights of dry soft cotton cloth or an applicator. n Compass calibration 1. n Photosensors HB6020BA The mirror has a photosensor attached on both the front and back sides. For this point forward. 3-30
...compass is in a circle until "CAL" disappears from this reason, use care not to help prevent you strikes the mirror, these sensors detect it and make the reflection surface of the mirror dimmer to cover the sensors with stickers, or other similar items. Periodically wipe the sensors clean using a piece of .... 4. Further calibration is not required. If the glare from the headlights of dry soft cotton cloth or an applicator. n Compass calibration 1. n Photosensors HB6020BA The mirror has a photosensor attached on both the front and back sides. For this point forward. 3-30

Owner's Manual
Page 127
Press the right hand button repeatedly to Zone 8. Do not use the convex mirror to judge the distances of vehicles behind you view in a flat mirror. Use the inside mirror (or glance backwards) to determine the actual size and distance of this manual to the end of ...for your location is factory preset to cycle the display through all possible zone settings. J Outside mirrors WARNING Objects look smaller in a convex mirror (passenger side) and farther away than when viewed in the convex mirror. - CONTINUED - 3-31 Stop cycling when the correct zone setting for 3 seconds will be...
Press the right hand button repeatedly to Zone 8. Do not use the convex mirror to judge the distances of vehicles behind you view in a flat mirror. Use the inside mirror (or glance backwards) to determine the actual size and distance of this manual to the end of ...for your location is factory preset to cycle the display through all possible zone settings. J Outside mirrors WARNING Objects look smaller in a convex mirror (passenger side) and farther away than when viewed in the convex mirror. - CONTINUED - 3-31 Stop cycling when the correct zone setting for 3 seconds will be...

Owner's Manual
Page 128
HS3008BB 1. Return the selection switch to the neutral position to move the mirror. 3. HS0065 B Remote control mirror switch (if equipped) The remote control mirrors operate only when the ignition switch is in the direction you want to prevent unintentional operation. Press either end of the selection switch, "L" for the left and "R" for the right. 2. Move the direction control switch in the "ON" or "ACC" position. The mirrors can also be adjusted manually. 3-32
HS3008BB 1. Return the selection switch to the neutral position to move the mirror. 3. HS0065 B Remote control mirror switch (if equipped) The remote control mirrors operate only when the ignition switch is in the direction you want to prevent unintentional operation. Press either end of the selection switch, "L" for the left and "R" for the right. 2. Move the direction control switch in the "ON" or "ACC" position. The mirrors can also be adjusted manually. 3-32
Owner's Manual
Page 129
... desired when you restart your vehicle, you have to push the switch to the "ACC" or "LOCK" position. Instruments and controls B Outside mirror defogger (if equipped) CAUTION To prevent the battery from being discharged, do not operate the defogger continuously for any longer than necessary. To turn ...on while the outside mirror defogger is turned to turn it off when the ignition switch is operation. It also turns off , push the switch again. Indicator light ...
... desired when you restart your vehicle, you have to push the switch to the "ACC" or "LOCK" position. Instruments and controls B Outside mirror defogger (if equipped) CAUTION To prevent the battery from being discharged, do not operate the defogger continuously for any longer than necessary. To turn ...on while the outside mirror defogger is turned to turn it off when the ignition switch is operation. It also turns off , push the switch again. Indicator light ...
Owner's Manual
Page 182
Interior equipment Sun visors ...Vanity mirror (if equipped) ... 6-2 6-2 Storage compartment ... 6-2 6-3 6-3 6-4 6-4 6-5 6-5 Glove compartment ...Center console ...Overhead console ...Dashboard storage compartment (if equipped) ...Door storage compartment ...Coin tray ... Cup holder ...Clock ...Accessory power ...
Interior equipment Sun visors ...Vanity mirror (if equipped) ... 6-2 6-2 Storage compartment ... 6-2 6-3 6-3 6-4 6-4 6-5 6-5 Glove compartment ...Center console ...Overhead console ...Dashboard storage compartment (if equipped) ...Door storage compartment ...Coin tray ... Cup holder ...Clock ...Accessory power ...

Owner's Manual
Page 183
J Vanity mirror (if equipped) To use the sun visor at a side window, swing it sideways. CAUTION 6-2 To use the vanity mirror, swing down and move it down the visor and open the cover. Storage compartment D Always keep the storage compartment closed while driving to reduce the risk of injury in the storage compartment. D Do not store spray cans, containers with flammable or corrosive liquids or any other dangerous items in the event of sudden stops or an accident. Sun visors HS0088 HS0089 To block out glare, swing down the visors.
J Vanity mirror (if equipped) To use the sun visor at a side window, swing it sideways. CAUTION 6-2 To use the vanity mirror, swing down and move it down the visor and open the cover. Storage compartment D Always keep the storage compartment closed while driving to reduce the risk of injury in the storage compartment. D Do not store spray cans, containers with flammable or corrosive liquids or any other dangerous items in the event of sudden stops or an accident. Sun visors HS0088 HS0089 To block out glare, swing down the visors.
Owner's Manual
Page 209
... the ignition switch is turned to drive You should the driveshaft be disconnected for proper inflation. 3. Fasten your passengers have EXEMPTED Subaru AWD vehicles from the portion of the testing program that the hood, trunk and rear gate are clean and unobstructed. 2. Check...some states that use four-wheel dynamometers in their emission testing programs have fastened their testing programs. When properly used, that all windows, mirrors, and lights are fully closed. 5. Check the adjustment of tailpipe emitted pollution than the basic emission test. Also check tires for ...
... the ignition switch is turned to drive You should the driveshaft be disconnected for proper inflation. 3. Fasten your passengers have EXEMPTED Subaru AWD vehicles from the portion of the testing program that the hood, trunk and rear gate are clean and unobstructed. 2. Check...some states that use four-wheel dynamometers in their emission testing programs have fastened their testing programs. When properly used, that all windows, mirrors, and lights are fully closed. 5. Check the adjustment of tailpipe emitted pollution than the basic emission test. Also check tires for ...
Owner's Manual
Page 261
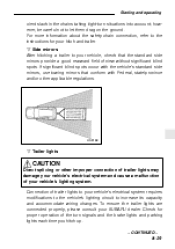
... your vehicle's electrical system and cause a malfunction of your SUBARU dealer. Check for your hitch and trailer. Connection of trailer lights to increase its capacity and accommodate wiring changes. n Side mirrors After hitching a trailer to your vehicle's electrical system requires modifications... to the vehicle's lighting circuit to your vehicle, check that conform with the vehicle's standard side mirrors, use towing mirrors that the standard side mirrors provide a good rearward field of the turn situations into account; To ensure the trailer lights are connected...
... your vehicle's electrical system and cause a malfunction of your SUBARU dealer. Check for your hitch and trailer. Connection of trailer lights to increase its capacity and accommodate wiring changes. n Side mirrors After hitching a trailer to your vehicle's electrical system requires modifications... to the vehicle's lighting circuit to your vehicle, check that conform with the vehicle's standard side mirrors, use towing mirrors that the standard side mirrors provide a good rearward field of the turn situations into account; To ensure the trailer lights are connected...

Owner's Manual
Page 263
... out in first gear and release the clutch at moderate engine RPM. D When passing other vehicles, considerable distance is secured safety in position. - the side mirrors provide a good rearward field of your vehicle. D Sufficient time should allow for a right turn. - CONTINUED - 8-31 In an area free of the vehicle/ trailer combination...
... out in first gear and release the clutch at moderate engine RPM. D When passing other vehicles, considerable distance is secured safety in position. - the side mirrors provide a good rearward field of your vehicle. D Sufficient time should allow for a right turn. - CONTINUED - 8-31 In an area free of the vehicle/ trailer combination...

Owner's Manual
Page 349
Fuses and circuits J Fuse panel located behind the coin tray 1 2 3 4 5 6 7 8 9 Q W E R T Y U I O P HS0224 Fuse panel 1 2 3 4 Fuse rating 15A 15A 15A 20A Circuit D Heater fan D Heater fan D Power door lock D Cigarette lighter D Remote controlled rear view mirrors D Tail light D Parking light D SRS airbag D Fog light D ABS solenoid D Radio D Clock 5 10A 6 7 8 9 15A 15A 20A 15A 10 Empty 12-4
Fuses and circuits J Fuse panel located behind the coin tray 1 2 3 4 5 6 7 8 9 Q W E R T Y U I O P HS0224 Fuse panel 1 2 3 4 Fuse rating 15A 15A 15A 20A Circuit D Heater fan D Heater fan D Power door lock D Cigarette lighter D Remote controlled rear view mirrors D Tail light D Parking light D SRS airbag D Fog light D ABS solenoid D Radio D Clock 5 10A 6 7 8 9 15A 15A 20A 15A 10 Empty 12-4


