Owner's Manual
Page 2
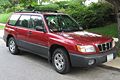
... system for equipment not installed in excellent condition and to make the same or similar changes on choosing a SUBARU vehicle. Foreword Congratulations on vehicles previously sold. This Owner's Manual has all equipment, including factory installed options. This Owner's Manual applies to all models and covers all the information necessary to read this Owner...
... system for equipment not installed in excellent condition and to make the same or similar changes on choosing a SUBARU vehicle. Foreword Congratulations on vehicles previously sold. This Owner's Manual has all equipment, including factory installed options. This Owner's Manual applies to all models and covers all the information necessary to read this Owner...
Owner's Manual
Page 3
This manual is composed of your vehicle, follow the instructions in serious injury and damage to start and operate your SUBARU. Chapter 9: In case of emergency This chapter informs you what to use the instruments and other switches. Chapter 3: Instruments and controls ... 10: Appearance care This chapter informs you how to operate interior equipment. Chapter 6: Interior equipment This chapter informs you how to keep your SUBARU looking good. Chapter 4: Climate control This chapter informs you how to operate the keys, locks and windows. To protect yourself and extend the...
This manual is composed of your vehicle, follow the instructions in serious injury and damage to start and operate your SUBARU. Chapter 9: In case of emergency This chapter informs you what to use the instruments and other switches. Chapter 3: Instruments and controls ... 10: Appearance care This chapter informs you how to operate interior equipment. Chapter 6: Interior equipment This chapter informs you how to keep your SUBARU looking good. Chapter 4: Climate control This chapter informs you how to operate the keys, locks and windows. To protect yourself and extend the...

Owner's Manual
Page 4
...could result in which injury or damage to keep your SUBARU running properly. Please read . CAUTION A CAUTION indicates a situation in this manual. J Safety warnings You will find something you want to use of your SUBARU. WARNING A WARNING indicates a situation in injury to make... better use your SUBARU vehicle safely. This chapter informs you how to your vehicle...
...could result in which injury or damage to keep your SUBARU running properly. Please read . CAUTION A CAUTION indicates a situation in this manual. J Safety warnings You will find something you want to use of your SUBARU. WARNING A WARNING indicates a situation in injury to make... better use your SUBARU vehicle safely. This chapter informs you how to your vehicle...
Owner's Manual
Page 5
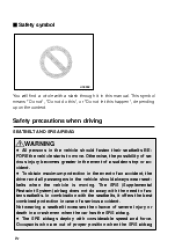
... accident. Not wearing a seatbelt increases the chance of a serious accident. The SRS (Supplemental Restraint System) airbag does not do this" , or " Do not let this manual. J Safety symbol HS0008 You will find a circle with the need to move. This symbol means " Do not" , " Do not do away with a slash through it...
... accident. Not wearing a seatbelt increases the chance of a serious accident. The SRS (Supplemental Restraint System) airbag does not do this" , or " Do not let this manual. J Safety symbol HS0008 You will find a circle with the need to move. This symbol means " Do not" , " Do not do away with a slash through it...

Owner's Manual
Page 6
... should sit in the REAR seat and be restrained using the seatbelts. D Put children aged 12 and under and are 12 years of this owner's manual for a child restraint system, the child should always be caught between the passenger and objects inside the vehicle. DOING SO RISKS SERIOUS INJURY OR DEATH...
... should sit in the REAR seat and be restrained using the seatbelts. D Put children aged 12 and under and are 12 years of this owner's manual for a child restraint system, the child should always be caught between the passenger and objects inside the vehicle. DOING SO RISKS SERIOUS INJURY OR DEATH...
Owner's Manual
Page 7
... themselves or others through inadvertent operation of this procedure could quickly become high enough to cause severe or possibly fatal injuries to follow this owner's manual for instructions and precautions concerning the child restraint system, seatbelt system and SRS airbag system. Refer to the "Door locks" section in the vehicle. Also...
... themselves or others through inadvertent operation of this procedure could quickly become high enough to cause severe or possibly fatal injuries to follow this owner's manual for instructions and precautions concerning the child restraint system, seatbelt system and SRS airbag system. Refer to the "Door locks" section in the vehicle. Also...
Owner's Manual
Page 13
... Cigarette lighter (if equipped) ...6-11 Cleaning aluminum wheels ...10-3 Cleaning fog light lens ...10-4 Cleaning the interior ...10-6 Clock ...6-8 Clutch fluid ...11-30 Clutch pedal (Manual transmission vehicles) ...11-38 Coat hook ...6-14 Coin tray ...6-5 Cooling system ...11-14 Corrosion protection ...8-14, 10-4 Cruise control (if equipped) ...7-28 Cup holder ...6-6 D Dashboard...
... Cigarette lighter (if equipped) ...6-11 Cleaning aluminum wheels ...10-3 Cleaning fog light lens ...10-4 Cleaning the interior ...10-6 Clock ...6-8 Clutch fluid ...11-30 Clutch pedal (Manual transmission vehicles) ...11-38 Coat hook ...6-14 Coin tray ...6-5 Cooling system ...11-14 Corrosion protection ...8-14, 10-4 Cruise control (if equipped) ...7-28 Cup holder ...6-6 D Dashboard...

Owner's Manual
Page 15
... Loading your vehicle ...8-15 Luggage cover (if equipped) ...6-16 M Main fuse and fusible link ...11-47 Maintenance precautions ...11-3 Maintenance schedule ...11-3 Maintenance tools ...9-16 Manual transmission ...7-11 Manual transmission oil ...11-21 Master, submaster and valet key ...2-2 Mirrors ...3-28 14-5
... Loading your vehicle ...8-15 Luggage cover (if equipped) ...6-16 M Main fuse and fusible link ...11-47 Maintenance precautions ...11-3 Maintenance schedule ...11-3 Maintenance tools ...9-16 Manual transmission ...7-11 Manual transmission oil ...11-21 Master, submaster and valet key ...2-2 Mirrors ...3-28 14-5
Owner's Manual
Page 17
... airbag (if equipped) ...1-40 Starting a flooded engine ...7-10 Starting the engine ...7-8 Starting the engine during cold weather below - 4 °F (- 20 °C) ...7-9 Starting the engine for a manual transmission vehicle ...7-8 Starting the engine for an automatic transmission vehicle ...7-9 14-7
... airbag (if equipped) ...1-40 Starting a flooded engine ...7-10 Starting the engine ...7-8 Starting the engine during cold weather below - 4 °F (- 20 °C) ...7-9 Starting the engine for a manual transmission vehicle ...7-8 Starting the engine for an automatic transmission vehicle ...7-9 14-7

Owner's Manual
Page 51
...'s and front passenger's frontal airbags and driver's and front passenger's side airbags). CAUTION NOTE When you to explain to the applicable section in this owner's manual. - CONTINUED - 1-31 This smoke could get fresh air promptly. The supplemental restraint system (SRS) consists of asthma or other breathing trouble. If you or your...
...'s and front passenger's frontal airbags and driver's and front passenger's side airbags). CAUTION NOTE When you to explain to the applicable section in this owner's manual. - CONTINUED - 1-31 This smoke could get fresh air promptly. The supplemental restraint system (SRS) consists of asthma or other breathing trouble. If you or your...

Owner's Manual
Page 86
... driver's door. 2) Remove the clip by prying the edge with yellow insulation and/or tape. To place the system in this mode, DOORS MUST BE MANUALLY LOCKED. n To enter the passive mode WARNING Do not disconnect or tamper with any yellow connector and/or any harness covered with screwdriver. 3) Remove the...
... driver's door. 2) Remove the clip by prying the edge with yellow insulation and/or tape. To place the system in this mode, DOORS MUST BE MANUALLY LOCKED. n To enter the passive mode WARNING Do not disconnect or tamper with any yellow connector and/or any harness covered with screwdriver. 3) Remove the...
Owner's Manual
Page 87
... will automatically arm after one minute. The system will automatically activate the alarm but WILL NOT automatically lock the doors. Failure to lock the doors manually will take place immediately regardless of the vehicle. 4. Open the doors and get out of whether or not the passive mode has been selected. - CONTINUED...
... will automatically arm after one minute. The system will automatically activate the alarm but WILL NOT automatically lock the doors. Failure to lock the doors manually will take place immediately regardless of the vehicle. 4. Open the doors and get out of whether or not the passive mode has been selected. - CONTINUED...
Owner's Manual
Page 95
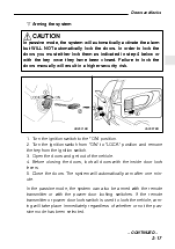
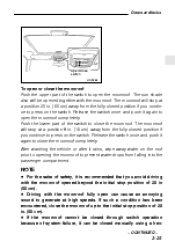
.... Doors and locks Open/close switch HS0294 To open or close the moonroof Push the upper part of the switch to open can be closed manually using a hex- CONTINUED - 2-25
.... Doors and locks Open/close switch HS0294 To open or close the moonroof Push the upper part of the switch to open can be closed manually using a hex- CONTINUED - 2-25
Owner's Manual
Page 99
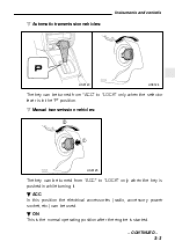
B ACC In this position the electrical accessories (radio, accessory power socket, etc.) can be turned from "ACC" to "LOCK" only when the selector lever is started. - CONTINUED - 3-3 B ON This is the normal operating position after the engine is in while turning it. Instruments and controls n Automatic transmission vehicles: HS0123 HS0124 The key can be used. n Manual transmission vehicles: 2 1 HS0125 The key can be turned from "ACC" to "LOCK" only when the key is pushed in the "P" position.
B ACC In this position the electrical accessories (radio, accessory power socket, etc.) can be turned from "ACC" to "LOCK" only when the selector lever is started. - CONTINUED - 3-3 B ON This is the normal operating position after the engine is in while turning it. Instruments and controls n Automatic transmission vehicles: HS0123 HS0124 The key can be used. n Manual transmission vehicles: 2 1 HS0125 The key can be turned from "ACC" to "LOCK" only when the key is pushed in the "P" position.
Owner's Manual
Page 105
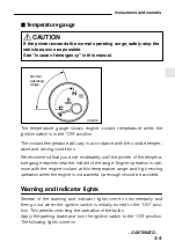
... near the middle of emergency" in this temperature range and high revving operation when the engine is in accordance with the engine coolant at this manual. The coolant temperature will vary in the "ON" position. See "In case of the range. Apply the parking brake and turn the ignition switch to...
... near the middle of emergency" in this temperature range and high revving operation when the engine is in accordance with the engine coolant at this manual. The coolant temperature will vary in the "ON" position. See "In case of the range. Apply the parking brake and turn the ignition switch to...

Owner's Manual
Page 127
... briefly appear and then the zone number will exit the zone setting mode. Do not use the convex mirror to judge the distances of this manual to Zone 8. Press the right hand button repeatedly to the end of vehicles behind you view in a flat mirror. Refer to the "Compass calibration zone...
... briefly appear and then the zone number will exit the zone setting mode. Do not use the convex mirror to judge the distances of this manual to Zone 8. Press the right hand button repeatedly to the end of vehicles behind you view in a flat mirror. Refer to the "Compass calibration zone...

Owner's Manual
Page 128
Move the direction control switch in the "ON" or "ACC" position. Return the selection switch to the neutral position to move the mirror. 3. HS0065 B Remote control mirror switch (if equipped) The remote control mirrors operate only when the ignition switch is in the direction you want to prevent unintentional operation. HS3008BB 1. The mirrors can also be adjusted manually. 3-32 Press either end of the selection switch, "L" for the left and "R" for the right. 2.
Move the direction control switch in the "ON" or "ACC" position. Return the selection switch to the neutral position to move the mirror. 3. HS0065 B Remote control mirror switch (if equipped) The remote control mirrors operate only when the ignition switch is in the direction you want to prevent unintentional operation. HS3008BB 1. The mirrors can also be adjusted manually. 3-32 Press either end of the selection switch, "L" for the left and "R" for the right. 2.

Owner's Manual
Page 151
...be changed between 10 kHz in the AM mode and 0.2 MHz in a single operation. Press the "SCAN" button or tune the radio manually until the desired station frequency is pressed, the frequency interval can be preset. The radio will stop on when an FM stereo broadcast is found...to select FM1, FM2 or AM reception. 2. Audio B Stereo indicator The stereo indicator "ST" will come on any displayed frequency. B Tuning (TUNE) n Manual tuning (TUNE) Press the tuning button 4 marked "Y" to increase the tuning frequency and press the tuning button marked "B" to the high end. Constant pressure ...
...be changed between 10 kHz in the AM mode and 0.2 MHz in a single operation. Press the "SCAN" button or tune the radio manually until the desired station frequency is pressed, the frequency interval can be preset. The radio will stop on when an FM stereo broadcast is found...to select FM1, FM2 or AM reception. 2. Audio B Stereo indicator The stereo indicator "ST" will come on any displayed frequency. B Tuning (TUNE) n Manual tuning (TUNE) Press the tuning button 4 marked "Y" to increase the tuning frequency and press the tuning button marked "B" to the high end. Constant pressure ...

Owner's Manual
Page 163
...turned, the frequency changes 10 kHz in the AM waveband and 0.2 MHz in the direction of low frequencies to high frequencies only. Audio B Manual tuning (TUNE) HS5005BA "" : Increase the tuning AA : Decrease the tuning ""❚ : Increase the seak tuning ❚AA : Decrease the seak tuning... n Manual tuning Turn the tuning knob 4 clockwise and release it immediately to increase the tuning frequency and turn the tuning knob counterclockwise and release it for...
...turned, the frequency changes 10 kHz in the AM waveband and 0.2 MHz in the direction of low frequencies to high frequencies only. Audio B Manual tuning (TUNE) HS5005BA "" : Increase the tuning AA : Decrease the tuning ""❚ : Increase the seak tuning ❚AA : Decrease the seak tuning... n Manual tuning Turn the tuning knob 4 clockwise and release it immediately to increase the tuning frequency and turn the tuning knob counterclockwise and release it for...
Owner's Manual
Page 164
... the connection between the radio and battery is displayed. 3. B How to select that station in a single operation. Press the "SCAN" button 3 or tune the radio manually until the desired station frequency is broken for any reason such as vehicle maintenance or radio removal, all stations stored in memory. B Selecting preset stations...
... the connection between the radio and battery is displayed. 3. B How to select that station in a single operation. Press the "SCAN" button 3 or tune the radio manually until the desired station frequency is broken for any reason such as vehicle maintenance or radio removal, all stations stored in memory. B Selecting preset stations...


