Owner's Manual
Page 11
... wheels (If equipped) ...10-41 AM/FM stereo radio with cassette player ...5-4 Antenna ...5-2 Ashtray ...6-22 AT OIL TEMPerature warning light (for AT vehicles) ...3-9 Automatic Locking Retractor (ALR) function (except driver's and 2-point type seatbelt) ...2-14 Automatic transmission ...7-19...-20 B Battery ...Brake booster ...Brake fluid ...Brake pedal ...Brake system ...Brake system warning light ...Braking ...Braking tips ...Bulb chart ...C Capacities ...Cargo anchorage eyelets ...Cargo area light ...Cassette player operation ...Catalytic converter ...Center console ...13-2 10-29 10-29 10-26 ...
... wheels (If equipped) ...10-41 AM/FM stereo radio with cassette player ...5-4 Antenna ...5-2 Ashtray ...6-22 AT OIL TEMPerature warning light (for AT vehicles) ...3-9 Automatic Locking Retractor (ALR) function (except driver's and 2-point type seatbelt) ...2-14 Automatic transmission ...7-19...-20 B Battery ...Brake booster ...Brake fluid ...Brake pedal ...Brake system ...Brake system warning light ...Braking ...Braking tips ...Bulb chart ...C Capacities ...Cargo anchorage eyelets ...Cargo area light ...Cassette player operation ...Catalytic converter ...Center console ...13-2 10-29 10-29 10-26 ...

Owner's Manual
Page 16
... and installation of the crossbars ...1-31 Replacement of brake pad and lining ...10-37 Replacement of windshield wiper blades ...10-32 Replacing bulbs ...10-46 Reporting safety defects (USA) ...12-4 Rocking the vehicle ...7-45 Roof rail and crossbar (if equipped) ...1-29 S ...Seatbelt maintenance ...2-20 Seatbelts ...2-12 Seatbelt safety tips ...2-12 Seatbelt warning light and chime ...2-14, 3-5 Seat heater (if equipped) ...2-7 Security system (if equipped) ...1-12 Selector lever ...7-20 Shift lock release ...7-24 Shopping...
... and installation of the crossbars ...1-31 Replacement of brake pad and lining ...10-37 Replacement of windshield wiper blades ...10-32 Replacing bulbs ...10-46 Reporting safety defects (USA) ...12-4 Rocking the vehicle ...7-45 Roof rail and crossbar (if equipped) ...1-29 S ...Seatbelt maintenance ...2-20 Seatbelts ...2-12 Seatbelt safety tips ...2-12 Seatbelt warning light and chime ...2-14, 3-5 Seat heater (if equipped) ...2-7 Security system (if equipped) ...1-12 Selector lever ...7-20 Shift lock release ...7-24 Shopping...
Owner's Manual
Page 97
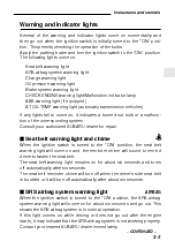
... come on for about six seconds. J SRS airbag system warning light AIRBAG When the ignition switch is buckled or it indicates a burned-out bulb or a malfunction of the corresponding system. J Seat belt warning light and chime When the ignition switch is not working properly. The... seat belt warning light remains on for repair. Contact your authorized SUBARU dealer for about six seconds and turns...
... come on for about six seconds. J SRS airbag system warning light AIRBAG When the ignition switch is buckled or it indicates a burned-out bulb or a malfunction of the corresponding system. J Seat belt warning light and chime When the ignition switch is not working properly. The... seat belt warning light remains on for repair. Contact your authorized SUBARU dealer for about six seconds and turns...

Owner's Manual
Page 102
...start to drive. Refer to Front Wheel Drive for maintenance or similar purposes. J Turn signal indicator lights These lights show the operation of the turn signal bulb may be burned out. If the indicator lights do not blink or blink rapidly, the turn signal or lane change signal. J High beam ...indicator This light shows that the headlights are in Chapter 10. Always make sure this light is not fully closed. Replace the bulb as soon as possible. This indicator light also comes on when All Wheel Drive is disengaged and the drive...
...start to drive. Refer to Front Wheel Drive for maintenance or similar purposes. J Turn signal indicator lights These lights show the operation of the turn signal bulb may be burned out. If the indicator lights do not blink or blink rapidly, the turn signal or lane change signal. J High beam ...indicator This light shows that the headlights are in Chapter 10. Always make sure this light is not fully closed. Replace the bulb as soon as possible. This indicator light also comes on when All Wheel Drive is disengaged and the drive...

Owner's Manual
Page 256
.... 9-6 B Synthetic leather upholstery The synthetic leather material used on the SUBARU may be difficult to clean off with a clean, damp cloth. Allow the soap to soak in for cleaning the fog light lens, follow then the instruction given in "Fog light" section (Replacing bulbs) under Chapter 10. D Clean the vehicle (including the aluminum wheels...
.... 9-6 B Synthetic leather upholstery The synthetic leather material used on the SUBARU may be difficult to clean off with a clean, damp cloth. Allow the soap to soak in for cleaning the fog light lens, follow then the instruction given in "Fog light" section (Replacing bulbs) under Chapter 10. D Clean the vehicle (including the aluminum wheels...

Owner's Manual
Page 302
Replacing bulbs 1 2 5 4 3 6 7 8 Q 1 2 3 4 5 6 7 8 9 Q Wattate (12V-8W) (12V-8W) 9 HS0210 Spot light Room light Front turn signal, parking light and front side marker light Fog light Headlight High mount stop light Brake/tail light Rear turn signal light Backup light License plate light Bulb No. - - 1157NA 9006 HB2 (H4) 912 1156 1157 1156 168 (12V-27/8W Amber) (12V-51W) (12V-60/55W) (12V-13W) (12V-27/8W) (12V-27W) (12V-27W) (12V-5W) 10-46
Replacing bulbs 1 2 5 4 3 6 7 8 Q 1 2 3 4 5 6 7 8 9 Q Wattate (12V-8W) (12V-8W) 9 HS0210 Spot light Room light Front turn signal, parking light and front side marker light Fog light Headlight High mount stop light Brake/tail light Rear turn signal light Backup light License plate light Bulb No. - - 1157NA 9006 HB2 (H4) 912 1156 1157 1156 168 (12V-27/8W Amber) (12V-51W) (12V-60/55W) (12V-13W) (12V-27/8W) (12V-27W) (12V-27W) (12V-5W) 10-46
Owner's Manual
Page 304
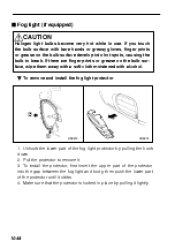
...finger prints or grease on the bulb surface develop into the gap between the fog light and body, then push the lower part of the protector until it . 3. Make sure that the protector is locked in use. J Fog light (if equipped) CAUTION Halogen light bulbs become very hot while in place ...by pulling the hook down. 2. To install the protector, first insert the upper part of the fog light protector by pulling it lightly. 10-48 Unhook the lower part of the...
...finger prints or grease on the bulb surface develop into the gap between the fog light and body, then push the lower part of the protector until it . 3. Make sure that the protector is locked in use. J Fog light (if equipped) CAUTION Halogen light bulbs become very hot while in place ...by pulling the hook down. 2. To install the protector, first insert the upper part of the fog light protector by pulling it lightly. 10-48 Unhook the lower part of the...

Owner's Manual
Page 305
... screwdriver. 2. Remove the fog light assembly by turning it pops out from - CONTINUED - 10-49 Disconnect the connector. 4. Replace the bulb with a new one. J Front turn signal light assembly mounting screw located at the top of removal. Remove the fog light bulb by removing the two screws. 3. Maintenance and service B Bulb replacement Bulb HS0215 HS0216 1. Remove the...
... screwdriver. 2. Remove the fog light assembly by turning it pops out from - CONTINUED - 10-49 Disconnect the connector. 4. Replace the bulb with a new one. J Front turn signal light assembly mounting screw located at the top of removal. Remove the fog light bulb by removing the two screws. 3. Maintenance and service B Bulb replacement Bulb HS0215 HS0216 1. Remove the...

Owner's Manual
Page 306
... it clockwise until it counterclockwise. 3. Install a new bulb. 5. the fender. 3. Install a new bulb. 4. Pull the bulb out of the socket. Unlatch the rear combination light cover by turning it locks. 6. Set the bulb holder into the fender. Open the cover up. 2. Set the bulb holder into the rear combination light assembly and turn it clockwise until it...
... it clockwise until it counterclockwise. 3. Install a new bulb. 5. the fender. 3. Install a new bulb. 4. Pull the bulb out of the socket. Unlatch the rear combination light cover by turning it locks. 6. Set the bulb holder into the fender. Open the cover up. 2. Set the bulb holder into the rear combination light assembly and turn it clockwise until it...

Owner's Manual
Page 307
Pull the bulb out of the socket. Install a new bulb. Tighten the mounting screws. - CONTINUED - 10-51 Reinstall the lens and cover. Remove the cover and lens. Maintenance and service J License plate light HS0220 1. 2. 3. 4. 5. Remove the mounting screws using a phillips screwdriver.
Pull the bulb out of the socket. Install a new bulb. Tighten the mounting screws. - CONTINUED - 10-51 Reinstall the lens and cover. Remove the cover and lens. Maintenance and service J License plate light HS0220 1. 2. 3. 4. 5. Remove the mounting screws using a phillips screwdriver.

Owner's Manual
Page 308
Pull the bulb out of the lens with a regular screwdriver. 2. Install a new bulb. 3. Remove the lens by prying the edge of the socket. Reinstall the lens. 10-52 J Interior light and luggage compartment light HS0221 HSA005BA HS0223 1.
Pull the bulb out of the lens with a regular screwdriver. 2. Install a new bulb. 3. Remove the lens by prying the edge of the socket. Reinstall the lens. 10-52 J Interior light and luggage compartment light HS0221 HSA005BA HS0223 1.

Owner's Manual
Page 309
Reinstall the plate and the lens. Pull the bulb out of the lens with a screwdriver. 2. Remove the lens by removing a mounting screw. 3 Pull the bulb out of the socket. Remove the plate by prying the edge of the socket. J High mount stop light cover. 3. Install a new bulb. - CONTINUED - 10-53 Remove the mounting screw covers by prying on the edge with a regular screwdriver. 2. Maintenance and service J Spot light HSA006BA 1. Install a new bulb. 4. Remove the mounting screws using a phillips screwdriver and then remove the high mount stop light OM-H0355 1.
Reinstall the plate and the lens. Pull the bulb out of the lens with a screwdriver. 2. Remove the lens by removing a mounting screw. 3 Pull the bulb out of the socket. Remove the plate by prying the edge of the socket. J High mount stop light cover. 3. Install a new bulb. - CONTINUED - 10-53 Remove the mounting screw covers by prying on the edge with a regular screwdriver. 2. Maintenance and service J Spot light HSA006BA 1. Install a new bulb. 4. Remove the mounting screws using a phillips screwdriver and then remove the high mount stop light OM-H0355 1.

Owner's Manual
Page 317
Specifications Bulb chart Description Spot light Room light Front turn signal, parking light and front side marker light Fog light Headlight Brake/tail light Rear turn signal light Backup light High mount stop light License plate light Wattage 12V-8W 12V-8W 12V-27/8W Amber 12V-51W 12V-60/55W 12V-27/8W 12V-27W 12V-27W 12V-13W 12V-5W Bulb No. - - 1157NA 9006 HB2 (H4) 1157 1156 1156 912 168 - CONTINUED - 11-7
Specifications Bulb chart Description Spot light Room light Front turn signal, parking light and front side marker light Fog light Headlight Brake/tail light Rear turn signal light Backup light High mount stop light License plate light Wattage 12V-8W 12V-8W 12V-27/8W Amber 12V-51W 12V-60/55W 12V-27/8W 12V-27W 12V-27W 12V-13W 12V-5W Bulb No. - - 1157NA 9006 HB2 (H4) 1157 1156 1156 912 168 - CONTINUED - 11-7


