
Owner's Manual
Page 3
...this manual. To protect yourself and extend the service life of your vehicle, follow the instructions in serious injury and damage to operate your SUBARU running properly. Chapter 4: Climate Control This chapter informs you want. Chapter 8: In case of contents, so you can usually tell at a...engine overheating. Each chapter begins with a brief table of emergency This chapter informs you what to do if you how to operate the keys, locks and windows. Chapter 1: Doors and Locks This chapter informs you about the operation of thirteen chapters. Failure to observe these ...
...this manual. To protect yourself and extend the service life of your vehicle, follow the instructions in serious injury and damage to operate your SUBARU running properly. Chapter 4: Climate Control This chapter informs you want. Chapter 8: In case of contents, so you can usually tell at a...engine overheating. Each chapter begins with a brief table of emergency This chapter informs you what to do if you how to operate the keys, locks and windows. Chapter 1: Doors and Locks This chapter informs you about the operation of thirteen chapters. Failure to observe these ...
Owner's Manual
Page 15
... 2-point type seat belt ...2-23 Seating child in the 3-point type seat belt ...2-24 Seat belt safety tips ...2-19 Safety precautions when driving ...Foreword v Chime Key reminder ...7-12 Seat belt warning ...2-12 Cigarette lighter ...6-9 Circuit breakers (See "Fuses") Cleaning Aluminum wheels ...9-5 Exterior (Washing) ...9-2 Interior ...9-6 Climate control ...Chapter 4 Air filter ...4-11 Air...
... 2-point type seat belt ...2-23 Seating child in the 3-point type seat belt ...2-24 Seat belt safety tips ...2-19 Safety precautions when driving ...Foreword v Chime Key reminder ...7-12 Seat belt warning ...2-12 Cigarette lighter ...6-9 Circuit breakers (See "Fuses") Cleaning Aluminum wheels ...9-5 Exterior (Washing) ...9-2 Interior ...9-6 Climate control ...Chapter 4 Air filter ...4-11 Air...

Owner's Manual
Page 20
... Cargo anchorage eyelets ...6-25 Coat hook ...6-12 Shopping bag hook ...6-25 Towing eyelets ...8-17 Horn ...3-25 I Ignition switch ...7-11 ACC ...7-12 Key interlock release (AT vehicle only) ...7-13 Key reminder chime ...7-13 Keys ...1-2 LOCK ...7-11 ON ...7-12 START ...7-13 Illumination brightness control ...3-18 In case of emergency ...Chapter 8 Engine overheating ...8-2 Flat tires ...8-6 Hazard...
... Cargo anchorage eyelets ...6-25 Coat hook ...6-12 Shopping bag hook ...6-25 Towing eyelets ...8-17 Horn ...3-25 I Ignition switch ...7-11 ACC ...7-12 Key interlock release (AT vehicle only) ...7-13 Key reminder chime ...7-13 Keys ...1-2 LOCK ...7-11 ON ...7-12 START ...7-13 Illumination brightness control ...3-18 In case of emergency ...Chapter 8 Engine overheating ...8-2 Flat tires ...8-6 Hazard...

Owner's Manual
Page 21
... light (Bulb replacement) ...10-59 Spotlight ...6-13 Spotlight (Bulb replacement) ...10-59 Interlock release (AT vehicle only) ...7-13 J Jack and jack handle ...Jump starting ...K Keys 8-13 8-4 ... Interlock release ...Key number ...Keyless entry system ...Reminder chime ...Security system ... 1-2 7-13 1-2 1-8 7-13 1-12 L Label (Vehicle identification) ...11-9 Lamps (See "Light controls") Leaks ...10-7 License plate...
... light (Bulb replacement) ...10-59 Spotlight ...6-13 Spotlight (Bulb replacement) ...10-59 Interlock release (AT vehicle only) ...7-13 J Jack and jack handle ...Jump starting ...K Keys 8-13 8-4 ... Interlock release ...Key number ...Keyless entry system ...Reminder chime ...Security system ... 1-2 7-13 1-2 1-8 7-13 1-12 L Label (Vehicle identification) ...11-9 Lamps (See "Light controls") Leaks ...10-7 License plate...

Owner's Manual
Page 23
... lamp (see "Warning light") Manual transmission ...7-16 Checking the oil level ...10-21 Oil leak ...10-7 Starting the engine ...7-14 Transmission oil capacity ...11-3 Master key ...1-2 Maximum load limits specifications ...11-2 Meters (Refer to "Gauges") Mirrors ...3-25 Inside mirror ...3-25 Outside mirror ...3-26 Outside mirror control ...3-27 Vanity mirror ...6-2 N New vehicle...
... lamp (see "Warning light") Manual transmission ...7-16 Checking the oil level ...10-21 Oil leak ...10-7 Starting the engine ...7-14 Transmission oil capacity ...11-3 Master key ...1-2 Maximum load limits specifications ...11-2 Meters (Refer to "Gauges") Mirrors ...3-25 Inside mirror ...3-25 Outside mirror ...3-26 Outside mirror control ...3-27 Vanity mirror ...6-2 N New vehicle...

Owner's Manual
Page 27
... steering wheel ...7-23 Stop light (Bulb replacement) ...10-57 Stopping the engine ...7-16 Storage compartment ...6-2 Center console ...6-3 Coin tray ...6-5 Dashboard storage compartment ...6-5 Glove compartment ...6-3 Submaster key ...1-2 Sunroof ...1-31 Sun visors ...6-2 T Tachometer ...Temporary spare tires ...Temperature gauge ...Three-point type seat belt (see "Seat belts - 3-point type") Tilt steering ...Time setting Combination...
... steering wheel ...7-23 Stop light (Bulb replacement) ...10-57 Stopping the engine ...7-16 Storage compartment ...6-2 Center console ...6-3 Coin tray ...6-5 Dashboard storage compartment ...6-5 Glove compartment ...6-3 Submaster key ...1-2 Sunroof ...1-31 Sun visors ...6-2 T Tachometer ...Temporary spare tires ...Temperature gauge ...Three-point type seat belt (see "Seat belts - 3-point type") Tilt steering ...Time setting Combination...

Owner's Manual
Page 28
... signal indicator light ...3-13 Turn signal switch ...3-17 Two-point type seat belt (see "Seat belt - 2-point type") U Uniformity tire quality grading standards ... 12-2 V Valet key ...Vanity mirror ...Vehicle capacity weight ...Vehicle identification ...Ventilation ... 1-2 6-2 7-43 11-9 4-2 13-18
... signal indicator light ...3-13 Turn signal switch ...3-17 Two-point type seat belt (see "Seat belt - 2-point type") U Uniformity tire quality grading standards ... 12-2 V Valet key ...Vanity mirror ...Vehicle capacity weight ...Vehicle identification ...Ventilation ... 1-2 6-2 7-43 11-9 4-2 13-18
Owner's Manual
Page 32
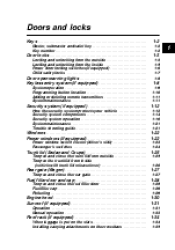
... door locking switches (if equipped) ...Child safety locks ... 1-3 1-3 1-5 1-6 1-7 1-8 Door open and close the fuel filler door ...Fuel filler cap ...Refueling ... Doors and locks Keys ...Master, submaster and valet key ...Key number ... 1-2 1-2 1-2 1 Door locks ...Locking and unlocking from the outside ...To open the trunk lid from the inside (vehicle with trunk lid release lever...
... door locking switches (if equipped) ...Child safety locks ... 1-3 1-3 1-5 1-6 1-7 1-8 Door open and close the fuel filler door ...Fuel filler cap ...Refueling ... Doors and locks Keys ...Master, submaster and valet key ...Key number ... 1-2 1-2 1-2 1 Door locks ...Locking and unlocking from the outside ...To open the trunk lid from the inside (vehicle with trunk lid release lever...
Owner's Manual
Page 33
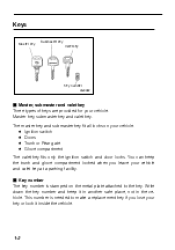
... only the ignition switch and door locks. Write down the key number and keep the trunk and glove compartment locked when you lose your vehicle. Keys Submaster key Valet key Master key Key number HG0362 J Master, submaster and valet key Three types of keys are provided for your key or lock it in another safe place, not in the...
... only the ignition switch and door locks. Write down the key number and keep the trunk and glove compartment locked when you lose your vehicle. Keys Submaster key Valet key Master key Key number HG0362 J Master, submaster and valet key Three types of keys are provided for your key or lock it in another safe place, not in the...
Owner's Manual
Page 34
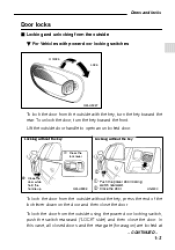
... lever down on the door and then close the door. OM-H0008 1 Push the power door locking switch rearward. To unlock the door, turn the key toward the front. To lock the door from the outside door handle to open an unlocked door. In this case, all closed doors and the... switch, push the switch rearward ("LOCK" side) and then close the door. Close the door. 1 2 HG0333 To lock the door from the outside without the key 1 Press the lock lever 2 2 Close the door while hold the handle up. Doors and locks Door locks J Locking and unlocking from the outside B For Vehicles...
... lever down on the door and then close the door. OM-H0008 1 Push the power door locking switch rearward. To unlock the door, turn the key toward the front. To lock the door from the outside door handle to open an unlocked door. In this case, all closed doors and the... switch, push the switch rearward ("LOCK" side) and then close the door. Close the door. 1 2 HG0333 To lock the door from the outside without the key 1 Press the lock lever 2 2 Close the door while hold the handle up. Doors and locks Door locks J Locking and unlocking from the outside B For Vehicles...
Owner's Manual
Page 35
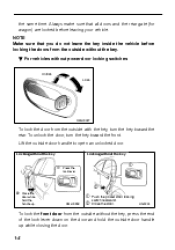
...-H0008 1 2 Push the power door locking switch rearward. Always make sure that you do not leave the key inside the vehicle before leaving your vehicle. Lift the outside with the key, turn the key toward the rear. Close the door. HG0334 To lock the front door from the outside door handle up ....down on the door and hold the handle up while closing the door. 1-4 To unlock the door, turn the key toward the front. the same time. Locking without the key Locking without power door locking switches Unlock Lock OM-H0387 To lock the door from the outside door handle to ...
...-H0008 1 2 Push the power door locking switch rearward. Always make sure that you do not leave the key inside the vehicle before leaving your vehicle. Lift the outside with the key, turn the key toward the rear. Close the door. HG0334 To lock the front door from the outside door handle up ....down on the door and hold the handle up while closing the door. 1-4 To unlock the door, turn the key toward the front. the same time. Locking without the key Locking without power door locking switches Unlock Lock OM-H0387 To lock the door from the outside door handle to ...
Owner's Manual
Page 36
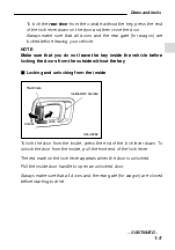
... doors and the rear gate (for wagon) are locked before locking the doors from the outside without the key. J Locking and unlocking from the inside Red mark Inside door handle Unlock Lock OM-H0009 To lock the... the front end of the lock lever. Doors and locks To lock the rear door from the outside without the key, press the end of the lock lever down . To unlock the door from the inside , press the end...open an unlocked door. Always make sure that you do not leave the key inside door handle to drive. - CONTINUED - 1-5 The red mark on the door and then close the door.
... doors and the rear gate (for wagon) are locked before locking the doors from the outside without the key. J Locking and unlocking from the inside Red mark Inside door handle Unlock Lock OM-H0009 To lock the... the front end of the lock lever. Doors and locks To lock the rear door from the outside without the key, press the end of the lock lever down . To unlock the door from the inside , press the end...open an unlocked door. Always make sure that you do not leave the key inside door handle to drive. - CONTINUED - 1-5 The red mark on the door and then close the door.
Owner's Manual
Page 37
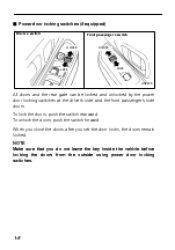
To lock the doors, push the switch rearward. J Power door locking switches (if equipped) Driver's switch Front passenger's switch Unlock Unlock Lock Lock HG0335 All doors and the rear gate can be locked and unlocked by the power door locking switches at the driver's side and the front passenger's side doors. To unlock the doors, push the switch forward. When you close the doors after you do not leave the key inside the vehicle before locking the doors from the outside using power door locking switches. 1-6 NOTE Make sure that you set the door locks, the doors remain locked.
To lock the doors, push the switch rearward. J Power door locking switches (if equipped) Driver's switch Front passenger's switch Unlock Unlock Lock Lock HG0335 All doors and the rear gate can be locked and unlocked by the power door locking switches at the driver's side and the front passenger's side doors. To unlock the doors, push the switch forward. When you close the doors after you do not leave the key inside the vehicle before locking the doors from the outside using power door locking switches. 1-6 NOTE Make sure that you set the door locks, the doors remain locked.
Owner's Manual
Page 40
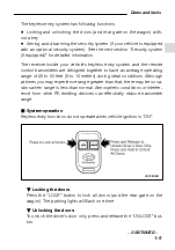
... designed together to have an average operating range of 25 to 50 feet (8 to lock all doors (and the rear gate on the wagon) without a key D Arming and disarming the security system (if your vehicle is less than that, there may be occasions when range is equipped with an optional security...
... designed together to have an average operating range of 25 to 50 feet (8 to lock all doors (and the rear gate on the wagon) without a key D Arming and disarming the security system (if your vehicle is less than that, there may be occasions when range is equipped with an optional security...

Owner's Manual
Page 49
Insert the ignition key and turn off the Panic alarm. B Personal protection alarm (Panic) HS1000BC Pressing both buttons together on the transmitter to turn to the "ON" position. 1-18 ...
Insert the ignition key and turn off the Panic alarm. B Personal protection alarm (Panic) HS1000BC Pressing both buttons together on the transmitter to turn to the "ON" position. 1-18 ...

Owner's Manual
Page 51
...any time the system is armed, or if the Passive starter interrupt feature is enabled and the passive arm time is disconnected from the ignition key to engage Valet Mode, the Passive Starter Interrupt will engage and the vehicle will not start when you forget to the vehicle's starter when.... The vehicle also will not start if power is expired. Passive starter interrupt If the Passive Starter Interrupt option has been activated by your SUBARU dealer, the starter will be automatically disabled one minute after you turn off the vehicle ignition, whether or not you leave the vehicle for ...
...any time the system is armed, or if the Passive starter interrupt feature is enabled and the passive arm time is disconnected from the ignition key to engage Valet Mode, the Passive Starter Interrupt will engage and the vehicle will not start when you forget to the vehicle's starter when.... The vehicle also will not start if power is expired. Passive starter interrupt If the Passive Starter Interrupt option has been activated by your SUBARU dealer, the starter will be automatically disabled one minute after you turn off the vehicle ignition, whether or not you leave the vehicle for ...

Owner's Manual
Page 52
... able to start your vehicle. 4. J System maintenance Your security system does not require any of the following procedure: 1. Use your keys to enter the vehicle. (Depending on your remote transmitter and it is Activated: D In the unlikely event of Keyless Entry System....experience any specific maintenance except for occasionally changing the transmitter battery. Perform the following situations...D Your remote transmitter is armed. Insert your key into the ignition and turn the ignition to start . D You attempt to start the vehicle while holding the button in. ...
... able to start your vehicle. 4. J System maintenance Your security system does not require any of the following procedure: 1. Use your keys to enter the vehicle. (Depending on your remote transmitter and it is Activated: D In the unlikely event of Keyless Entry System....experience any specific maintenance except for occasionally changing the transmitter battery. Perform the following situations...D Your remote transmitter is armed. Insert your key into the ignition and turn the ignition to start . D You attempt to start the vehicle while holding the button in. ...

Owner's Manual
Page 53
The power windows operate only when the ignition switch is in the vehicle. D Before leaving the vehicle, always remove the key from being caught in the window. Failure to follow this procedure could result in the vehicle. Windows HG0270 Turn the handle to a child operating the ...
The power windows operate only when the ignition switch is in the vehicle. D Before leaving the vehicle, always remove the key from being caught in the window. Failure to follow this procedure could result in the vehicle. Windows HG0270 Turn the handle to a child operating the ...
Owner's Manual
Page 56
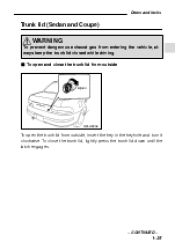
To close the trunk lid from outside Open OM-H0016 To open the trunk lid from entering the vehicle, always keep the trunk lid closed while driving. J To open and close the trunk lid, lightly press the trunk lid down until the latch engages. - CONTINUED - 1-25 Doors and locks Trunk lid (Sedan and Coupe) WARNING To prevent dangerous exhaust gas from outside, insert the key in the keyhole and turn it clockwise.
To close the trunk lid from outside Open OM-H0016 To open the trunk lid from entering the vehicle, always keep the trunk lid closed while driving. J To open and close the trunk lid, lightly press the trunk lid down until the latch engages. - CONTINUED - 1-25 Doors and locks Trunk lid (Sedan and Coupe) WARNING To prevent dangerous exhaust gas from outside, insert the key in the keyhole and turn it clockwise.

Owner's Manual
Page 57
B To cancel the trunk lid release OM-H0018 The inside of the trunk lid, mounted to the trunk lid latch) to help prevent unauthorized entry into the trunk. To cancel the trunk lid release, set the lid release cancel lever (located on the inside trunk lid release can be cancelled to the "CANCEL" position. J To open the trunk lid from inside (vehicle with trunk lid release lever) HG0003 Pull the trunk lid release lever upward. When this lock is in the "CANCEL" position, the trunk can be opened only by the master key. 1-26
B To cancel the trunk lid release OM-H0018 The inside of the trunk lid, mounted to the trunk lid latch) to help prevent unauthorized entry into the trunk. To cancel the trunk lid release, set the lid release cancel lever (located on the inside trunk lid release can be cancelled to the "CANCEL" position. J To open the trunk lid from inside (vehicle with trunk lid release lever) HG0003 Pull the trunk lid release lever upward. When this lock is in the "CANCEL" position, the trunk can be opened only by the master key. 1-26


