Owner's Manual
Page 15
Clock function (built in cassette stereo) ...5-12 Clutch fluid (Maintenance) ...10-29 Clutch pedal (Manual transmission) (Maintenance) ...10-37 Coin tray ...6-7 Combination meter ...3-4 Console (Center console) ...6-5 Coolant (Engine coolant) ...10-12 Corrosion protection ...9-4 Cruise control (if equipped) ...7-24 ...
Clock function (built in cassette stereo) ...5-12 Clutch fluid (Maintenance) ...10-29 Clutch pedal (Manual transmission) (Maintenance) ...10-37 Coin tray ...6-7 Combination meter ...3-4 Console (Center console) ...6-5 Coolant (Engine coolant) ...10-12 Corrosion protection ...9-4 Cruise control (if equipped) ...7-24 ...
Owner's Manual
Page 17
... octane rating ...Unleaded gasoline ...Gasoline for California-certified TELV ...Gasoline for cleaner air ...Fuel tank capacity (Specifications) ...Fluid (Automatic transmission fluid) ...Fluid (Brake fluid) ...Fluid (Clutch fluid) ...Fluid (Power steering fluid) ...Fuses (Replacing a fuse) ...Fuses and circuits ...Fuse panel located in the engine compartment ...Fuse panel located behind the coin tray...
... octane rating ...Unleaded gasoline ...Gasoline for California-certified TELV ...Gasoline for cleaner air ...Fuel tank capacity (Specifications) ...Fluid (Automatic transmission fluid) ...Fluid (Brake fluid) ...Fluid (Clutch fluid) ...Fluid (Power steering fluid) ...Fuses (Replacing a fuse) ...Fuses and circuits ...Fuse panel located in the engine compartment ...Fuse panel located behind the coin tray...
Owner's Manual
Page 199
... Release the key immediately after the engine has started . Apply the parking brake. 2. Turn off unnecessary lights and accessories. 3. Press the clutch pedal to the "ON" position and check the operation of the warning and indicator lights. Refer to the "P" or "N" position (preferably "P"... position). Turn the ignition switch to Warning and Indicator Lights section (Chapter 3). 7-14 The starter will only operate when the clutch pedal is moving vehicle into neutral. Turn the ignition switch to the floor and shift the shift lever into the "P" position. 1....
... Release the key immediately after the engine has started . Apply the parking brake. 2. Turn off unnecessary lights and accessories. 3. Press the clutch pedal to the "ON" position and check the operation of the warning and indicator lights. Refer to the "P" or "N" position (preferably "P"... position). Turn the ignition switch to Warning and Indicator Lights section (Chapter 3). 7-14 The starter will only operate when the clutch pedal is moving vehicle into neutral. Turn the ignition switch to the floor and shift the shift lever into the "P" position. 1....
Owner's Manual
Page 202
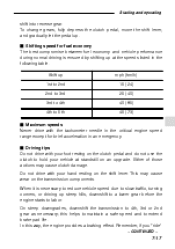
...turning corners, or driving up . In this helps to maintain a safe speed and to 4th, 3rd or 2nd gear as necessary; This may cause clutch damage. Remember, if you "ride" - CONTINUED - 7-17 Starting and operating shift into reverse gear. Do not drive with your foot resting on the... clutch pedal and do not use the clutch to labor. this way, the engine provides a braking effect. To change gears, fully depress the clutch pedal, move the shift lever, and gradually let the pedal up steep hills,...
...turning corners, or driving up . In this helps to maintain a safe speed and to 4th, 3rd or 2nd gear as necessary; This may cause clutch damage. Remember, if you "ride" - CONTINUED - 7-17 Starting and operating shift into reverse gear. Do not drive with your foot resting on the... clutch pedal and do not use the clutch to labor. this way, the engine provides a braking effect. To change gears, fully depress the clutch pedal, move the shift lever, and gradually let the pedal up steep hills,...

Owner's Manual
Page 210
... the brake pedal. The control lever can be used for increasing the cruising speed slightly. D Turn the ignition switch to accelerate the vehicle. D Depress the clutch pedal (manual transmission vehicles only). To resume the cruise control after it has been temporarily canceled and with the cruise control activated. When the accelerator...
... the brake pedal. The control lever can be used for increasing the cruising speed slightly. D Turn the ignition switch to accelerate the vehicle. D Depress the clutch pedal (manual transmission vehicles only). To resume the cruise control after it has been temporarily canceled and with the cruise control activated. When the accelerator...
Owner's Manual
Page 239
... starting out on a trip. In a tight turn, the trailer could hit your vehicle has a manual transmission, always start out in first gear and release the clutch at moderate engine RPM. In an area free of your vehicle. signal lever is operated. - the safety chains are connected properly. - all cargo in the...
... starting out on a trip. In a tight turn, the trailer could hit your vehicle has a manual transmission, always start out in first gear and release the clutch at moderate engine RPM. In an area free of your vehicle. signal lever is operated. - the safety chains are connected properly. - all cargo in the...

Owner's Manual
Page 264
Recommended fluid ...10-27 Brake fluid ...10-28 Checking the fluid level ...10-28 Recommended brake fluid ...10-29 Clutch fluid ...10-29 Recommended clutch fluid ... 10-30 10-30 Brake booster ...10-30 Checking brake booster operation Battery ...10-31 Checking the fluid level ...10-32 ...10-36 Checking the brake pedal free play ...10-36 Checking the brake pedal reserve distance ...10-36 Clutch pedal (Manual transmission) ... 10-37 Checking the clutch function ...10-37 Checking the clutch pedal free play ...10-37 Replacement of brake pad and lining ...10-38 Audiable brake pad wear indicator...
Recommended fluid ...10-27 Brake fluid ...10-28 Checking the fluid level ...10-28 Recommended brake fluid ...10-29 Clutch fluid ...10-29 Recommended clutch fluid ... 10-30 10-30 Brake booster ...10-30 Checking brake booster operation Battery ...10-31 Checking the fluid level ...10-32 ...10-36 Checking the brake pedal free play ...10-36 Checking the brake pedal reserve distance ...10-36 Clutch pedal (Manual transmission) ... 10-37 Checking the clutch function ...10-37 Checking the clutch pedal free play ...10-37 Replacement of brake pad and lining ...10-38 Audiable brake pad wear indicator...

Owner's Manual
Page 267
... and service Engine compartment overview HGA015BB 1 Manual transmission oil level gauge (MT) (page 10-20) or Differential gear oil level gauge (AT) (page 10-23) Clutch fluid reservoir (page 10-29) Automatic transmission fluid level gauge (page 10-21) Brake fluid reservoir (page 10-28) Fuel filter Windshield washer tank (page...
... and service Engine compartment overview HGA015BB 1 Manual transmission oil level gauge (MT) (page 10-20) or Differential gear oil level gauge (AT) (page 10-23) Clutch fluid reservoir (page 10-29) Automatic transmission fluid level gauge (page 10-21) Brake fluid reservoir (page 10-28) Fuel filter Windshield washer tank (page...

Owner's Manual
Page 291
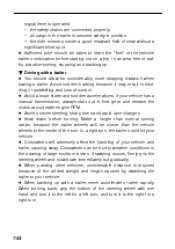
... water. D Never use different brands of the reservoir. CAUTION - CONTINUED - 10-29 Maintenance and service Check the fluid level on the outside of clutch fluid together. If clutch fluid gets in your SUBARU dealer. D If the vehicle requires frequent refilling, there may be careful not to allow any dirt into the tank. D When...
... water. D Never use different brands of the reservoir. CAUTION - CONTINUED - 10-29 Maintenance and service Check the fluid level on the outside of clutch fluid together. If clutch fluid gets in your SUBARU dealer. D If the vehicle requires frequent refilling, there may be careful not to allow any dirt into the tank. D When...
Owner's Manual
Page 292
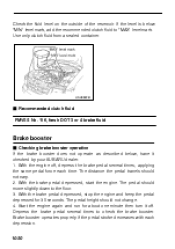
...seconds. With the brake pedal depressed, stop the engine and keep the pedal depressed for about one minute then turn it checked by your SUBARU dealer. 1. The pedal height should move slightly down to the floor. 3. Depress the brake pedal several times, applying the same pedal ... several times to "MAX" level mark. Brake booster operates properly if the pedal stroke decreases with each time. Use only clutch fluid from a sealed container. HSA002FB J Recommended clutch fluid FMVSS No. 116, fresh DOT 3 or 4 brake fluid Brake booster J Checking brake booster operation If the brake...
...seconds. With the brake pedal depressed, stop the engine and keep the pedal depressed for about one minute then turn it checked by your SUBARU dealer. 1. The pedal height should move slightly down to the floor. 3. Depress the brake pedal several times, applying the same pedal ... several times to "MAX" level mark. Brake booster operates properly if the pedal stroke decreases with each time. Use only clutch fluid from a sealed container. HSA002FB J Recommended clutch fluid FMVSS No. 116, fresh DOT 3 or 4 brake fluid Brake booster J Checking brake booster operation If the brake...
Owner's Manual
Page 299
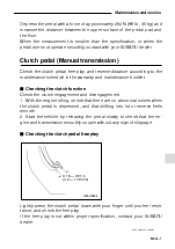
... reverse feels smooth. 2. With the engine idling, check that there are no abnormal noises when the clutch pedal is smaller than the specification, or when the pedal does not operate smoothly, contact with your finger... until you feel resistance, and check the free play is not within proper specification, contact your SUBARU dealer. When the measurement is depressed, and that the engine and transmission smoothly couple without any sign ...maintenance schedule in (4.0 - 13.0 mm) OM-H0224 Lightly press the clutch pedal down with your SUBARU dealer. - CONTINUED - 10-37
... reverse feels smooth. 2. With the engine idling, check that there are no abnormal noises when the clutch pedal is smaller than the specification, or when the pedal does not operate smoothly, contact with your finger... until you feel resistance, and check the free play is not within proper specification, contact your SUBARU dealer. When the measurement is depressed, and that the engine and transmission smoothly couple without any sign ...maintenance schedule in (4.0 - 13.0 mm) OM-H0224 Lightly press the clutch pedal down with your SUBARU dealer. - CONTINUED - 10-37


