Owner's Manual
Page 151
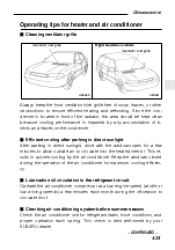
... obstructions to ensure efficient heating and defrosting. Since the condenser is best performed by the air conditioner. J Lubrication oil circulation in quicker cooling by your SUBARU dealer. - CONTINUED - 4-23 Climate control Operating tips for maximum cooling efficiency. This results in the refrigerant circuit Operate the air conditioner compressor at a low engine... grille free of insects and leaves on the condenser. J Checking air conditioning system before summer season Check the air conditioner unit for a few minutes each spring.
... obstructions to ensure efficient heating and defrosting. Since the condenser is best performed by the air conditioner. J Lubrication oil circulation in quicker cooling by your SUBARU dealer. - CONTINUED - 4-23 Climate control Operating tips for maximum cooling efficiency. This results in the refrigerant circuit Operate the air conditioner compressor at a low engine... grille free of insects and leaves on the condenser. J Checking air conditioning system before summer season Check the air conditioner unit for a few minutes each spring.
Owner's Manual
Page 206
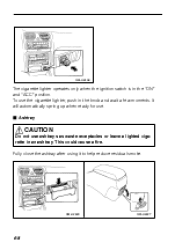
J Ashtray CAUTION Do not use the cigarette lighter, push in the knob and wait a few moments. To use ashtrays as waste receptacles or leave a lighted cigarette in the "ON" and "ACC" position. This could cause a fire. OM-H2440 OM-H2227 6-8 OM-H2439 The cigarette lighter operates only when the ignition switch is in an ashtray. It will automatically spring up when ready for use. Fully close the ashtray after using it to help reduce residual smoke.
J Ashtray CAUTION Do not use the cigarette lighter, push in the knob and wait a few moments. To use ashtrays as waste receptacles or leave a lighted cigarette in the "ON" and "ACC" position. This could cause a fire. OM-H2440 OM-H2227 6-8 OM-H2439 The cigarette lighter operates only when the ignition switch is in an ashtray. It will automatically spring up when ready for use. Fully close the ashtray after using it to help reduce residual smoke.
Owner's Manual
Page 324
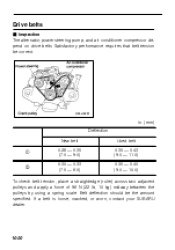
... your SUBARU dealer. 10-20 OM-H0201 in. (mm) Deflection New belt Used belt 0.35 - 0.43 (9.0 - 11.0) 0.35 - 0.40 (9.0 - 10.0) 1 2 0.28 - 0.35 (7.0 - 9.0) 0.30 - 0.33 (7.5 - 8.5) To check belt tension, place a straightedge (ruler) across two adjacent pulleys and apply a force of 98 N (22 lb, 10 kg) midway between the pulleys by using a spring scale...
... your SUBARU dealer. 10-20 OM-H0201 in. (mm) Deflection New belt Used belt 0.35 - 0.43 (9.0 - 11.0) 0.35 - 0.40 (9.0 - 10.0) 1 2 0.28 - 0.35 (7.0 - 9.0) 0.30 - 0.33 (7.5 - 8.5) To check belt tension, place a straightedge (ruler) across two adjacent pulleys and apply a force of 98 N (22 lb, 10 kg) midway between the pulleys by using a spring scale...
Owner's Manual
Page 355
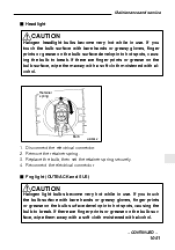
...gloves, finger prints or grease on the bulb surface develop into hot spots, causing the bulb to break. Remove the retainer spring. Replace the bulb, then set the retainer spring securely. J Fog light (OUTBACK and SUS) CAUTION Halogen light bulbs become very hot while in use . If you ... surface with bare hands or greasy gloves, finger prints or grease on the bulb surface develop into hot spots, causing the bulb to break. Retainer spring Bulb HB0342 1. 2. 3. 4. Reconnect the electrical connector. If there are finger prints or grease on the bulb surface, wipe them away with a ...
...gloves, finger prints or grease on the bulb surface develop into hot spots, causing the bulb to break. Remove the retainer spring. Replace the bulb, then set the retainer spring securely. J Fog light (OUTBACK and SUS) CAUTION Halogen light bulbs become very hot while in use . If you ... surface with bare hands or greasy gloves, finger prints or grease on the bulb surface develop into hot spots, causing the bulb to break. Retainer spring Bulb HB0342 1. 2. 3. 4. Reconnect the electrical connector. If there are finger prints or grease on the bulb surface, wipe them away with a ...

Owner's Manual
Page 357
Remove the front fog light case cap by removing the two bolts. Disconnect the connector behind the case cap. Replace the bulb with a new one. Then reconnect the connectors and reinstall the removed parts in the reverse order of removal. - CONTINUED - 10-53 Release the retainer spring. 6. Disconnect the connector. Remove the front fog light assembly by turning it counterclockwise. HB0209 5. Maintenance and service HB0056 HB0208 1. 2. 3. 4.
Remove the front fog light case cap by removing the two bolts. Disconnect the connector behind the case cap. Replace the bulb with a new one. Then reconnect the connectors and reinstall the removed parts in the reverse order of removal. - CONTINUED - 10-53 Release the retainer spring. 6. Disconnect the connector. Remove the front fog light assembly by turning it counterclockwise. HB0209 5. Maintenance and service HB0056 HB0208 1. 2. 3. 4.