
Owner's Manual
Page 13
... Brake pedal ...10-40 Brake system warning light ...3-9 Braking tips ...7-28 Checking the brake fluid ...10-32 Disk brake pad wear warning indicator ...7-30 Parking brake ...7-26 Parking tips ...7-27 Break-in (New vehicle) ......7-3 Brightness control (Illumination) ...3-18 Bulb replacement Bulb chart ...11-8 Fog lights ...10-56 Front turn signal lights ...10-58 Headlights ...10-55 Interior(Doom) light, spot lights ...10-61 License plate light ...10-61 Parking lights ...10-57 Rear combination lights ...10-59 Side turn signal lights...
... Brake pedal ...10-40 Brake system warning light ...3-9 Braking tips ...7-28 Checking the brake fluid ...10-32 Disk brake pad wear warning indicator ...7-30 Parking brake ...7-26 Parking tips ...7-27 Break-in (New vehicle) ......7-3 Brightness control (Illumination) ...3-18 Bulb replacement Bulb chart ...11-8 Fog lights ...10-56 Front turn signal lights ...10-58 Headlights ...10-55 Interior(Doom) light, spot lights ...10-61 License plate light ...10-61 Parking lights ...10-57 Rear combination lights ...10-59 Side turn signal lights...
Owner's Manual
Page 22
... Sedan and coupe (Trunk lid) ...1-11 Wagon (Rear gate) ...1-13 Light controls ...3-15 Daytime running light ...3-16 Fog light switch ...3-19 Hazard warning flasher switch ...3-14 Illumination brightness control ...3-18 Illustrated index ...3-4 Light control switch ...3-15 Parking light switch ...3-18 Replacement (See "Bulb replacement") Turn signal lights ...3-17 Loading ...7-42 Roof rack ...1-20 LOCK (Ignition switch) ...7-11...
... Sedan and coupe (Trunk lid) ...1-11 Wagon (Rear gate) ...1-13 Light controls ...3-15 Daytime running light ...3-16 Fog light switch ...3-19 Hazard warning flasher switch ...3-14 Illumination brightness control ...3-18 Illustrated index ...3-4 Light control switch ...3-15 Parking light switch ...3-18 Replacement (See "Bulb replacement") Turn signal lights ...3-17 Loading ...7-42 Roof rack ...1-20 LOCK (Ignition switch) ...7-11...
Owner's Manual
Page 23
Index Maintenance tools ...6-17 Parking brake stroke ...10-43 Seat belts ...2-20 Malfunction indicator lamp (see "Warning light") Manual transmission ...7-16 Checking the oil level ...10-24 Oil leak ...10-7 Starting the engine ...7-13 Transmission oil capacity ... driving ... 7-3 O Odometer ...Off road driving ...Oils (See "Fluids") ON (Ignition switch) ...Outside mirrors ...Outside mirror control ...Overheating the engine ...P Parking 3-5 7-34 7-12 3-26 3-27 8-2 Parking brake ...7-26 Parking brake lining ...10-43 Parking brake stroke ...10-43 Parking lights (Bulb replacement) ...10-57 13-13
Index Maintenance tools ...6-17 Parking brake stroke ...10-43 Seat belts ...2-20 Malfunction indicator lamp (see "Warning light") Manual transmission ...7-16 Checking the oil level ...10-24 Oil leak ...10-7 Starting the engine ...7-13 Transmission oil capacity ... driving ... 7-3 O Odometer ...Off road driving ...Oils (See "Fluids") ON (Ignition switch) ...Outside mirrors ...Outside mirror control ...Overheating the engine ...P Parking 3-5 7-34 7-12 3-26 3-27 8-2 Parking brake ...7-26 Parking brake lining ...10-43 Parking brake stroke ...10-43 Parking lights (Bulb replacement) ...10-57 13-13

Owner's Manual
Page 24
Parking light switch ...Parking tips ...Pedal 3-18 7-27 Brake pedal ...10-40 Clutch pedal ...10-41 Polishing (Exterior) ...9-3 Periodic inspections ...7-10 Power door locks ...1-6 Power steering Power steering ...7-23 Power steering fluid ...10-30 Fluid capacity ...11-3 Power window ...1-9 Preparing to drive ...7-9 R Radiator pressure cap ...10-14 Radio ...5-3 Rear combination lights (Bulb replacement) ...10-59...
Parking light switch ...Parking tips ...Pedal 3-18 7-27 Brake pedal ...10-40 Clutch pedal ...10-41 Polishing (Exterior) ...9-3 Periodic inspections ...7-10 Power door locks ...1-6 Power steering Power steering ...7-23 Power steering fluid ...10-30 Fluid capacity ...11-3 Power window ...1-9 Preparing to drive ...7-9 R Radiator pressure cap ...10-14 Radio ...5-3 Rear combination lights (Bulb replacement) ...10-59...
Owner's Manual
Page 92
... 3-11 3-12 3-13 3-13 3-13 3-13 3-13 Clock ...Setting the clock ... 3-14 3-14 Hazard warning flasher ...Light controls ...Light switch ...Illumination brightness control ...Parking light switch ...Fog light switch (if equipped) ... 3-14 3-15 3-15 3-18 3-18 3-19 Wiper controls ... 3-20 3-21 3-22 Windshield wipers and washer switch ...Rear window wiper and washer switch (...
... 3-11 3-12 3-13 3-13 3-13 3-13 3-13 Clock ...Setting the clock ... 3-14 3-14 Hazard warning flasher ...Light controls ...Light switch ...Illumination brightness control ...Parking light switch ...Fog light switch (if equipped) ... 3-14 3-15 3-15 3-18 3-18 3-19 Wiper controls ... 3-20 3-21 3-22 Windshield wipers and washer switch ...Rear window wiper and washer switch (...
Owner's Manual
Page 95
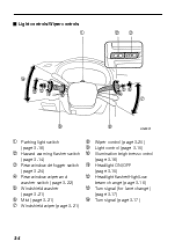
J Light controls/Wiper controls 1 2 3 T R E W Q 56 4 7 9 1 Parking light switch 2 3 4 5 6 7 (page 3-18) Hazard warning flasher switch (page 3-14) Rear window defogger switch (page 3-24) Rear window wiper and washer switch (page 3-22) Windshield washer (page 3-21) Mist (page 3-21) Windshield wiper (page 3-21) 8 HG0331 8 Wiper control (page 3-20) 9 Light control (page 3-15) Q Illumination brightness control W Headlight ON/OFF E Headlight flasher/High/Low R Turn signal (for lane change) T Turn signal (page 3-17) (page 3-17) beam change (page 3-16) (page 3-15) (page 3-18) 3-4
J Light controls/Wiper controls 1 2 3 T R E W Q 56 4 7 9 1 Parking light switch 2 3 4 5 6 7 (page 3-18) Hazard warning flasher switch (page 3-14) Rear window defogger switch (page 3-24) Rear window wiper and washer switch (page 3-22) Windshield washer (page 3-21) Mist (page 3-21) Windshield wiper (page 3-21) 8 HG0331 8 Wiper control (page 3-20) 9 Light control (page 3-15) Q Illumination brightness control W Headlight ON/OFF E Headlight flasher/High/Low R Turn signal (for lane change) T Turn signal (page 3-17) (page 3-17) beam change (page 3-16) (page 3-15) (page 3-18) 3-4
Owner's Manual
Page 99
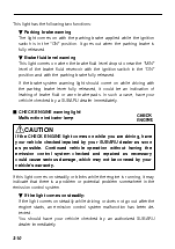
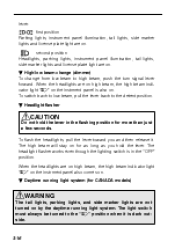
... authorized SUBARU dealer for AT vehicles) If any lights fail to the "ON" position. This shows the SRS AIRBAG is turned to the "ON" position, the SRS AIRBAG warning light will come on, it indicates a burned-out bulb or a malfunction of the corresponding system. J Seat belt warning light and chime...sound to remind driver to fasten the seat belt. J SRS AIRBAG warning light AIRBAG When the ignition switch is in normal operation. Apply the parking brake and turn off automatically after six seconds. If this light comes on for about six seconds and go out after six seconds. The...
... authorized SUBARU dealer for AT vehicles) If any lights fail to the "ON" position. This shows the SRS AIRBAG is turned to the "ON" position, the SRS AIRBAG warning light will come on, it indicates a burned-out bulb or a malfunction of the corresponding system. J Seat belt warning light and chime...sound to remind driver to fasten the seat belt. J SRS AIRBAG warning light AIRBAG When the ignition switch is in normal operation. Apply the parking brake and turn off automatically after six seconds. If this light comes on for about six seconds and go out after six seconds. The...
Owner's Manual
Page 101
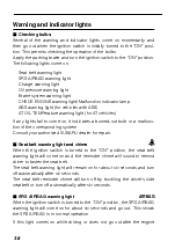
... is a problem or potential problem somewhere in the "ON" position. If the brake system warning light should have your vehicle checked by a SUBARU dealer immediately. This light has the following two functions: B Parking brake warning The light comes on with the parking brake applied while the ignition switch is in the emission control system. If this...
... is a problem or potential problem somewhere in the "ON" position. If the brake system warning light should have your vehicle checked by a SUBARU dealer immediately. This light has the following two functions: B Parking brake warning The light comes on with the parking brake applied while the ignition switch is in the emission control system. If this...
Owner's Manual
Page 106
... turn the knob on the end of the turn off the road safely and park away from accidentally leaving your lights on a roadside at night, use hazard warning flasher to park your vehicle is parked, the light switch operates only when the ignition switch is on, the turn on the hazard... warning flasher, push the hazard warning button on the instrument panel. When you park vehicle on when your vehicle under emergency conditions,...
... turn the knob on the end of the turn off the road safely and park away from accidentally leaving your lights on a roadside at night, use hazard warning flasher to park your vehicle is parked, the light switch operates only when the ignition switch is on, the turn on the hazard... warning flasher, push the hazard warning button on the instrument panel. When you park vehicle on when your vehicle under emergency conditions,...
Owner's Manual
Page 107
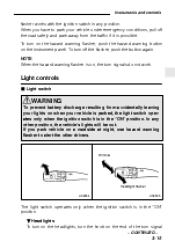
...CAUTION Do not hold the lever. The headlight flasher works even though the lighting switch is dark outside. 3-16 second position Headlights, parking lights, instrument panel illumination, tail lights, side marker lights and license plate light are not turned on . To flash the headlights, pull the lever ...turned to high beam, push the turn signal lever forward. first position Parking lights, instrument panel illumination, tail lights, side marker lights and license plate light are on high beam, the high beam indicator light "a" on the instrment panel also comes on for more than just a...
...CAUTION Do not hold the lever. The headlight flasher works even though the lighting switch is dark outside. 3-16 second position Headlights, parking lights, instrument panel illumination, tail lights, side marker lights and license plate light are not turned on . To flash the headlights, pull the lever ...turned to high beam, push the turn signal lever forward. first position Parking lights, instrument panel illumination, tail lights, side marker lights and license plate light are on high beam, the high beam indicator light "a" on the instrment panel also comes on for more than just a...
Owner's Manual
Page 108
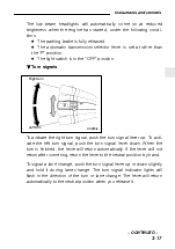
... to the neutral position when you release it during lane change. To activate the left turn signal, push the turn signal indicator lights will flash in the "OFF" position. D The light switch is finished, the lever will return automatically. B Turn signals Right turn Left turn HS0056 To activate the right turn signal... - 3-17 Instruments and controls The low beam headlights will automatically come on at reduced brightness when the engine has started, under the following conditions: D The parking brake is set at other than the "P" position. To signal a lane change .
... to the neutral position when you release it during lane change. To activate the left turn signal, push the turn signal indicator lights will flash in the "OFF" position. D The light switch is finished, the lever will return automatically. B Turn signals Right turn Left turn HS0056 To activate the right turn signal... - 3-17 Instruments and controls The low beam headlights will automatically come on at reduced brightness when the engine has started, under the following conditions: D The parking brake is set at other than the "P" position. To signal a lane change .

Owner's Manual
Page 109
To darken, turn the control dial counterclockwise. J Parking light switch HS0058 The parking light switch operates regardless of the instrument panel illumination for better visibility. J Illumination brightness control Brighten Darken HS0057 When the lighting switch is in the "p" or "a" position, you can adjust brightness of the ignition switch position. By pushing the rear end of this switch, following lights will come on. - parking lights - front and rear side marker lights - tail lights 3-18 To brighten, turn the control dial clockwise.
To darken, turn the control dial counterclockwise. J Parking light switch HS0058 The parking light switch operates regardless of the instrument panel illumination for better visibility. J Illumination brightness control Brighten Darken HS0057 When the lighting switch is in the "p" or "a" position, you can adjust brightness of the ignition switch position. By pushing the rear end of this switch, following lights will come on. - parking lights - front and rear side marker lights - tail lights 3-18 To brighten, turn the control dial clockwise.
Owner's Manual
Page 110
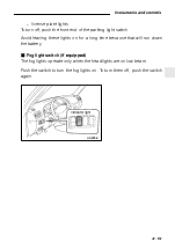
Avoid leaving these lights on low beam. Indicator light HS0059 - CONTINUED - 3-19 To turn off , push the switch again. Instruments and controls - license plate lights To turn them off , push the front end of the parking light switch. J Fog light switch (if equipped) The fog lights operate only when the headlights are on for a long time because that will run down the battery. Push the switch to turn the fog lights on.
Avoid leaving these lights on low beam. Indicator light HS0059 - CONTINUED - 3-19 To turn off , push the switch again. Instruments and controls - license plate lights To turn them off , push the front end of the parking light switch. J Fog light switch (if equipped) The fog lights operate only when the headlights are on for a long time because that will run down the battery. Push the switch to turn the fog lights on.
Owner's Manual
Page 161
... the vehicle ...Corrosion protection ... Braking tips ...Brake system ...Disc brake pad wear warning indicators ...ABS (Anti-Lock Brake System) (if equipped) ... Parking your vehicle ... 7-42 Vehicle capacity weight ...7-43 GVWR and GAWR (Gross Vehicle Weight Rating and Gross Axle Weight Rating) ...7-43 Trailer towing ... 7-...44 7-45 7-45 7-46 7-47 7-47 7-47 7-48 Warranties and maintenance ...Maximum load limits ...Trailer hitches ...Trailer lights ...Side mirrors ...Tires ...Trailer towing tips ... 7-2 Driving tips for using the brakes 7-26 7-28 7-28 7-29 7-30 7-30...
... the vehicle ...Corrosion protection ... Braking tips ...Brake system ...Disc brake pad wear warning indicators ...ABS (Anti-Lock Brake System) (if equipped) ... Parking your vehicle ... 7-42 Vehicle capacity weight ...7-43 GVWR and GAWR (Gross Vehicle Weight Rating and Gross Axle Weight Rating) ...7-43 Trailer towing ... 7-...44 7-45 7-45 7-46 7-47 7-47 7-47 7-48 Warranties and maintenance ...Maximum load limits ...Trailer hitches ...Trailer lights ...Side mirrors ...Tires ...Trailer towing tips ... 7-2 Driving tips for using the brakes 7-26 7-28 7-28 7-29 7-30 7-30...
Owner's Manual
Page 172
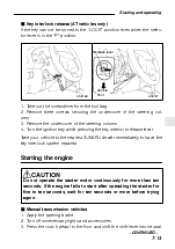
...column. 3. Remove three screws securing the undercover of the steering column. 4. Manual transmission vehicles Apply the parking brake. Press the clutch pedal to the "LOCK" position even when the selector lever is in the "P"...engine CAUTION Do not operate the starter motor continuously for ten seconds or more than ten seconds. Turn off unnecessary lights and accessories. Take out the screwdriver from the tool bag. 2. J 1. 2. 3. Starting and operating J...- 7-13 Take your vehicle to the nearest SUBARU dealer immediately to ten seconds, wait for more before trying again.
...column. 3. Remove three screws securing the undercover of the steering column. 4. Manual transmission vehicles Apply the parking brake. Press the clutch pedal to the "LOCK" position even when the selector lever is in the "P"...engine CAUTION Do not operate the starter motor continuously for ten seconds or more than ten seconds. Turn off unnecessary lights and accessories. Take out the screwdriver from the tool bag. 2. J 1. 2. 3. Starting and operating J...- 7-13 Take your vehicle to the nearest SUBARU dealer immediately to ten seconds, wait for more before trying again.
Owner's Manual
Page 173
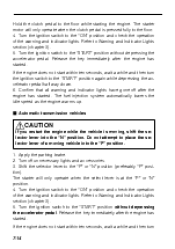
...the "P" or "N" position. 4. Turn the ignition switch to Warning and Indicator Lights section (chapter 3). 5. Apply the parking brake. 2. Refer to the "ON" position and check the operation of the warning and indicator lights. If the engine does not start within ten seconds, wait a while and then...automatically lowers the idle speed as the engine warms up. Shift the selector lever to place the selector lever of the warning and indicator lights. Do not attempt to the "P" or "N" position (preferably "P" position). The starter will only operate when the clutch pedal is moving ...
...the "P" or "N" position. 4. Turn the ignition switch to Warning and Indicator Lights section (chapter 3). 5. Apply the parking brake. 2. Refer to the "ON" position and check the operation of the warning and indicator lights. If the engine does not start within ten seconds, wait a while and then...automatically lowers the idle speed as the engine warms up. Shift the selector lever to place the selector lever of the warning and indicator lights. Do not attempt to the "P" or "N" position (preferably "P" position). The starter will only operate when the clutch pedal is moving ...
Owner's Manual
Page 174
... warms up , make sure that the selector lever is at the "P" or "N" position and that all warning and indicator lights have gone out after the engine has started. Confirm that the parking brake is difficult to the "START" position while slightly depressing the accelerator pedal. While the engine is warming up . Repeat...
... warms up , make sure that the selector lever is at the "P" or "N" position and that all warning and indicator lights have gone out after the engine has started. Confirm that the parking brake is difficult to the "START" position while slightly depressing the accelerator pedal. While the engine is warming up . Repeat...
Owner's Manual
Page 235
...57 10-58 10-58 10-59 10-60 10-60 Headlight ...Fog light (if equipped) ...Parking light ...Front turn signal light ...Side turn signal light ...Rear combination lights ...License plate light ...Interior light, spot light ... 10-2 Audible brake pad wear indicator ...10-42 Breaking-in of... new brake pads and linings ...10-42 Parking brake stroke ...10-43 Tires and wheels...
...57 10-58 10-58 10-59 10-60 10-60 Headlight ...Fog light (if equipped) ...Parking light ...Front turn signal light ...Side turn signal light ...Rear combination lights ...License plate light ...Interior light, spot light ... 10-2 Audible brake pad wear indicator ...10-42 Breaking-in of... new brake pads and linings ...10-42 Parking brake stroke ...10-43 Tires and wheels...
Owner's Manual
Page 290
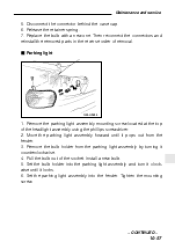
... holder into the fender. Maintenance and service 5. Move the parking light assembly forward until it counterclockwise. 4. Set the parking light assembly into the parking light assembly and turn it clockwise until it pops out from the parking light assembly by turning it locks. 6. Replace the bulb with ...of the socket. Remove the bulb holder from the fender. 3. J Parking light OM-H0244 1. Tighten the mounting screw. - CONTINUED - 10-57 Pull the bulb out of removal. Remove the parking light assembly mounting screw located at the top of the headlight assembly using the...
... holder into the fender. Maintenance and service 5. Move the parking light assembly forward until it counterclockwise. 4. Set the parking light assembly into the parking light assembly and turn it clockwise until it pops out from the parking light assembly by turning it locks. 6. Replace the bulb with ...of the socket. Remove the bulb holder from the fender. 3. J Parking light OM-H0244 1. Tighten the mounting screw. - CONTINUED - 10-57 Pull the bulb out of removal. Remove the parking light assembly mounting screw located at the top of the headlight assembly using the...

Owner's Manual
Page 300
Specifications Fuses and circuits J Fuse panel located behind the coin tray 1 2 3 4 5 6 7 8 9 Q W E R T Y U I O P HS0224 Fuse panel 1 2 3 4 Fuse rating 15A 15A Empty 20A Circuit D Heater fan D Heater fan D Front accessory power socket D Cigarette lighter D Remote controlled rear view mirrors D Tail light D Parking light D SRS AIRBAG 5 10A 6 7 8 9 15A Empty 20A 15A D ABS solenoid D Radio D Clock - CONTINUED - 11-5
Specifications Fuses and circuits J Fuse panel located behind the coin tray 1 2 3 4 5 6 7 8 9 Q W E R T Y U I O P HS0224 Fuse panel 1 2 3 4 Fuse rating 15A 15A Empty 20A Circuit D Heater fan D Heater fan D Front accessory power socket D Cigarette lighter D Remote controlled rear view mirrors D Tail light D Parking light D SRS AIRBAG 5 10A 6 7 8 9 15A Empty 20A 15A D ABS solenoid D Radio D Clock - CONTINUED - 11-5


