
Owner's Manual
Page 3
...problem while driving, such as a flat tire or engine overheating. Chapter 7: Starting and operating This chapter informs you how to keep your SUBARU. Chapter 8: In case of thirteen chapters. Failure to observe these instructions may result in this manual. Chapter 9: Appearance care This chapter informs...Maintenance and service This chapter informs you how to operate your vehicle, follow the instructions in serious injury and damage to operate the keys, locks and windows. Chapter 6: Interior equipment This chapter informs you how to keep your vehicle. How to use the seat ...
...problem while driving, such as a flat tire or engine overheating. Chapter 7: Starting and operating This chapter informs you how to keep your SUBARU. Chapter 8: In case of thirteen chapters. Failure to observe these instructions may result in this manual. Chapter 9: Appearance care This chapter informs...Maintenance and service This chapter informs you how to operate your vehicle, follow the instructions in serious injury and damage to operate the keys, locks and windows. Chapter 6: Interior equipment This chapter informs you how to keep your vehicle. How to use the seat ...
Owner's Manual
Page 15
... 2-point type seat belt ...2-23 Seating child in the 3-point type seat belt ...2-24 Seat belt safety tips ...2-19 Safety precautions when driving ...Foreword v Chime Key reminder ...7-12 Seat belt warning ...2-12 Cigarette lighter ...6-9 Circuit breakers (See "Fuses") Cleaning Aluminum wheels ...9-5 Exterior (Washing) ...9-2 Interior ...9-6 Climate control ...Chapter 4 Air filter ...4-11 Air...
... 2-point type seat belt ...2-23 Seating child in the 3-point type seat belt ...2-24 Seat belt safety tips ...2-19 Safety precautions when driving ...Foreword v Chime Key reminder ...7-12 Seat belt warning ...2-12 Cigarette lighter ...6-9 Circuit breakers (See "Fuses") Cleaning Aluminum wheels ...9-5 Exterior (Washing) ...9-2 Interior ...9-6 Climate control ...Chapter 4 Air filter ...4-11 Air...

Owner's Manual
Page 20
... (Engine) ...1-17 Hook Cargo anchorage eyelets ...6-16 Coat hook ...6-12 Shopping bag hook ...6-16 Towing eyelets ...8-17 Horn ...3-25 I Ignition switch ...ACC ...Key interlock release (AT vehicle only) ...Key reminder chime ...Keys ...LOCK ...ON ...START ... 7-10 7-12 7-13 7-12 1-2 7-11 7-12 7-12 Illumination brightness control ...3-18 In case of emergency ...Chapter 8 Engine overheating...
... (Engine) ...1-17 Hook Cargo anchorage eyelets ...6-16 Coat hook ...6-12 Shopping bag hook ...6-16 Towing eyelets ...8-17 Horn ...3-25 I Ignition switch ...ACC ...Key interlock release (AT vehicle only) ...Key reminder chime ...Keys ...LOCK ...ON ...START ... 7-10 7-12 7-13 7-12 1-2 7-11 7-12 7-12 Illumination brightness control ...3-18 In case of emergency ...Chapter 8 Engine overheating...
Owner's Manual
Page 21
Interlock release ...Key number ...Reminder chime ... 1-2 7-13 1-2 7-12 L Label (Vehicle identification) ...11-9 Lamps (See "Light controls") Leaks ...10-7 License plate light (Bulb replacement) ...10-61 Lids Center console ...6-4 ... Interior light (Bulb replacement) ...10-61 Spotlight ...6-13 Spotlight (Bulb replacement) ...10-61 Interlock release (AT vehicle only) ...7-13 J Jack and jack handle ...Jump starting ...K Keys 8-13 8-4 ...
Interlock release ...Key number ...Reminder chime ... 1-2 7-13 1-2 7-12 L Label (Vehicle identification) ...11-9 Lamps (See "Light controls") Leaks ...10-7 License plate light (Bulb replacement) ...10-61 Lids Center console ...6-4 ... Interior light (Bulb replacement) ...10-61 Spotlight ...6-13 Spotlight (Bulb replacement) ...10-61 Interlock release (AT vehicle only) ...7-13 J Jack and jack handle ...Jump starting ...K Keys 8-13 8-4 ...
Owner's Manual
Page 23
... lamp (see "Warning light") Manual transmission ...7-16 Checking the oil level ...10-24 Oil leak ...10-7 Starting the engine ...7-13 Transmission oil capacity ...11-3 Master key ...1-2 Maximum load limits specifications ...11-2 Meters (Refer to "Gauges") Mirrors ...3-25 Inside mirror ...3-25 Outside mirror ...3-26 Outside mirror control ...3-27 Vanity mirror ...6-2 N New vehicle...
... lamp (see "Warning light") Manual transmission ...7-16 Checking the oil level ...10-24 Oil leak ...10-7 Starting the engine ...7-13 Transmission oil capacity ...11-3 Master key ...1-2 Maximum load limits specifications ...11-2 Meters (Refer to "Gauges") Mirrors ...3-25 Inside mirror ...3-25 Outside mirror ...3-26 Outside mirror control ...3-27 Vanity mirror ...6-2 N New vehicle...
Owner's Manual
Page 27
... steering wheel ...7-23 Stop light (Bulb replacement) ...10-59 Stopping the engine ...7-15 Storage compartment ...6-2 Center console ...6-3 Coin tray ...6-5 Dashboard storage compartment ...6-5 Glove compartment ...6-3 Submaster key ...1-2 Sunroof ...1-18 Sun visors ...6-2 T Tachometer ...Temporary spare tires ...Temperature gauge ...Three-point type seat belt (see "Seat belts - 3-point type") Tilt steering ...Time setting Combination...
... steering wheel ...7-23 Stop light (Bulb replacement) ...10-59 Stopping the engine ...7-15 Storage compartment ...6-2 Center console ...6-3 Coin tray ...6-5 Dashboard storage compartment ...6-5 Glove compartment ...6-3 Submaster key ...1-2 Sunroof ...1-18 Sun visors ...6-2 T Tachometer ...Temporary spare tires ...Temperature gauge ...Three-point type seat belt (see "Seat belts - 3-point type") Tilt steering ...Time setting Combination...
Owner's Manual
Page 28
... signal indicator light ...3-13 Turn signal switch ...3-17 Two-point type seat belt (see "Seat belt - 2-point type") U Uniformity tire quality grading standards ... 12-2 V Valet key ...Vanity mirror ...Vehicle capacity weight ...Vehicle identification ...Ventilation ... 1-2 6-2 7-43 11-9 4-2 13-18
... signal indicator light ...3-13 Turn signal switch ...3-17 Two-point type seat belt (see "Seat belt - 2-point type") U Uniformity tire quality grading standards ... 12-2 V Valet key ...Vanity mirror ...Vehicle capacity weight ...Vehicle identification ...Ventilation ... 1-2 6-2 7-43 11-9 4-2 13-18
Owner's Manual
Page 32
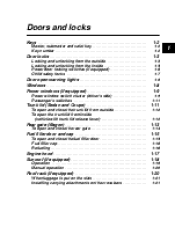
Doors and locks Keys ...Master, submaster and valet key ...Key number ... 1-2 1-2 1-2 1 Door locks ...Locking and unlocking from the outside ...Locking and unlocking from outside ...To open and close the trunk lid from the inside (vehicle ...
Doors and locks Keys ...Master, submaster and valet key ...Key number ... 1-2 1-2 1-2 1 Door locks ...Locking and unlocking from the outside ...Locking and unlocking from outside ...To open and close the trunk lid from the inside (vehicle ...
Owner's Manual
Page 33
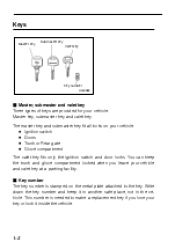
... glove compartment locked when you lose your vehicle and valet key at a parking facility. Keys Submaster key Valet key Master key Key number HG0362 J Master, submaster and valet key Three types of keys are provided for your vehicle. This number is stamped on your vehicle. Master key, submaster key and valet key. D Ignition switch D Doors D Trunk or Rear gate D Glove compartment...
... glove compartment locked when you lose your vehicle and valet key at a parking facility. Keys Submaster key Valet key Master key Key number HG0362 J Master, submaster and valet key Three types of keys are provided for your vehicle. This number is stamped on your vehicle. Master key, submaster key and valet key. D Ignition switch D Doors D Trunk or Rear gate D Glove compartment...
Owner's Manual
Page 34
... 1 Push the power door locking switch rearward. To lock the door from the outside without the key 1 Press the lock lever 2 2 Close the door while hold the handle up. In this case...door locking switch, push the switch rearward ("LOCK" side) and then close the door. Locking without the key Locking without the key, press the end of the lock lever down on the door and then close the door. To unlock... the door, turn the key toward the front. Lift the outside with power door locking switches Unlock Lock OM-H0387 To lock...
... 1 Push the power door locking switch rearward. To lock the door from the outside without the key 1 Press the lock lever 2 2 Close the door while hold the handle up. In this case...door locking switch, push the switch rearward ("LOCK" side) and then close the door. Locking without the key Locking without the key, press the end of the lock lever down on the door and then close the door. To unlock... the door, turn the key toward the front. Lift the outside with power door locking switches Unlock Lock OM-H0387 To lock...
Owner's Manual
Page 35
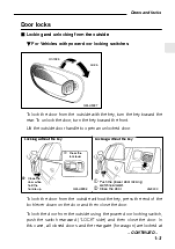
...and the rear gate (for wagon) are locked before locking the doors from the outside door handle up . To unlock the door, turn the key toward the front. OM-H0008 1 2 Push the power door locking switch rearward. Always make sure that you do not leave the... the vehicle before leaving your vehicle. Lift the outside with the key, turn the key toward the rear. B For vehicles without the key 1 Press the lock lever 1 2 2 Close the door while hold the outside without the key. Locking without the key Locking without power door locking switches Unlock Lock OM-H0387 To lock ...
...and the rear gate (for wagon) are locked before locking the doors from the outside door handle up . To unlock the door, turn the key toward the front. OM-H0008 1 2 Push the power door locking switch rearward. Always make sure that you do not leave the... the vehicle before leaving your vehicle. Lift the outside with the key, turn the key toward the rear. B For vehicles without the key 1 Press the lock lever 1 2 2 Close the door while hold the outside without the key. Locking without the key Locking without power door locking switches Unlock Lock OM-H0387 To lock ...
Owner's Manual
Page 36
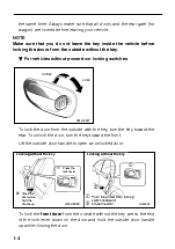
... door is unlocked. Doors and locks To lock the rear door from the outside without the key, press the end of the lock lever down . Always make sure that you do not leave the key inside Red mark Inside door handle Unlock Lock OM-H0009 To lock the door from the outside... without the key. The red mark on the door and then close the door. J Locking and unlocking from the inside the vehicle before leaving your vehicle. NOTE Make ...
... door is unlocked. Doors and locks To lock the rear door from the outside without the key, press the end of the lock lever down . Always make sure that you do not leave the key inside Red mark Inside door handle Unlock Lock OM-H0009 To lock the door from the outside... without the key. The red mark on the door and then close the door. J Locking and unlocking from the inside the vehicle before leaving your vehicle. NOTE Make ...
Owner's Manual
Page 37
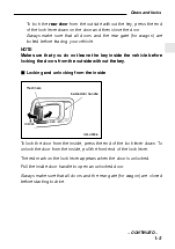
To lock the doors, push the switch rearward. When you close the doors after you do not leave the key inside the vehicle before locking the doors from the outside using power door locking switches. 1-6 To unlock the doors, push the switch forward. NOTE Make sure that you set the door locks, the doors remain locked. J Power door locking switches (if equipped) Driver's switch Front passenger's switch Unlock Unlock Lock Lock HG0335 All doors and the rear gate can be locked and unlocked by the power door locking switches at the driver's side and the front passenger's side doors.
To lock the doors, push the switch rearward. When you close the doors after you do not leave the key inside the vehicle before locking the doors from the outside using power door locking switches. 1-6 To unlock the doors, push the switch forward. NOTE Make sure that you set the door locks, the doors remain locked. J Power door locking switches (if equipped) Driver's switch Front passenger's switch Unlock Unlock Lock Lock HG0335 All doors and the rear gate can be locked and unlocked by the power door locking switches at the driver's side and the front passenger's side doors.
Owner's Manual
Page 40
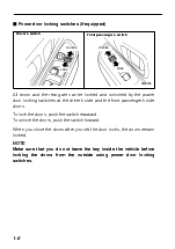
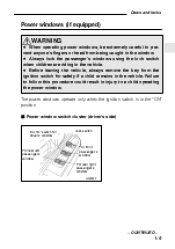
... window. D Always lock the passenger's windows using the lock switch when children are riding in the "ON" position. D Before leaving the vehicle, always remove the key from being caught in injury to prevent anyone's fingers or head from the ignition switch for driver's window For rear left passenger's window For front...
... window. D Always lock the passenger's windows using the lock switch when children are riding in the "ON" position. D Before leaving the vehicle, always remove the key from being caught in injury to prevent anyone's fingers or head from the ignition switch for driver's window For rear left passenger's window For front...
Owner's Manual
Page 43
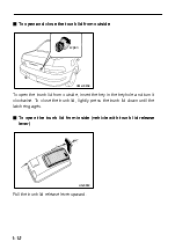
To close the trunk lid from inside (vehicle with trunk lid release lever) HG0003 Pull the trunk lid release lever upward. 1-12 J To open and close the trunk lid, lightly press the trunk lid down until the latch engages. J To open the trunk lid from outside Open OM-H0016 To open the trunk lid from outside , insert the key in the keyhole and turn it clockwise.
To close the trunk lid from inside (vehicle with trunk lid release lever) HG0003 Pull the trunk lid release lever upward. 1-12 J To open and close the trunk lid, lightly press the trunk lid down until the latch engages. J To open the trunk lid from outside Open OM-H0016 To open the trunk lid from outside , insert the key in the keyhole and turn it clockwise.

Owner's Manual
Page 44
Doors and locks B To cancel the trunk lid release OM-H0018 The inside of the trunk lid, mounted to the trunk lid latch) to help prevent unauthorized entry into the trunk. Rear gate (Wagon) WARNING To prevent dangerous exhaust gas from entering the vehicle, always keep the rear gate closed while driving. - CONTINUED - 1-13 When this lock is in the "CANCEL" position, the trunk can be opened only by the master key. To cancel the trunk lid release, set the lid release cancel lever (located on the inside trunk lid release can be cancelled to the "CANCEL" position.
Doors and locks B To cancel the trunk lid release OM-H0018 The inside of the trunk lid, mounted to the trunk lid latch) to help prevent unauthorized entry into the trunk. Rear gate (Wagon) WARNING To prevent dangerous exhaust gas from entering the vehicle, always keep the rear gate closed while driving. - CONTINUED - 1-13 When this lock is in the "CANCEL" position, the trunk can be opened only by the master key. To cancel the trunk lid release, set the lid release cancel lever (located on the inside trunk lid release can be cancelled to the "CANCEL" position.

Owner's Manual
Page 45
... open and close the rear gate, lower it clockwise. To close the rear gate Lock Unlock OM-H0019 To unlock the rear gate, insert the key in the keyhole and turn it counterclockwise. If your vehicle is equipped with power door locks, the rear gate can also be locked and unlocked... system. J To open the rear gate, first unlock the rear gate lock then pull the outside handle up. To lock the rear gate, insert the key in this chapter.
... open and close the rear gate, lower it clockwise. To close the rear gate Lock Unlock OM-H0019 To unlock the rear gate, insert the key in the keyhole and turn it counterclockwise. If your vehicle is equipped with power door locks, the rear gate can also be locked and unlocked... system. J To open the rear gate, first unlock the rear gate lock then pull the outside handle up. To lock the rear gate, insert the key in this chapter.
Owner's Manual
Page 88
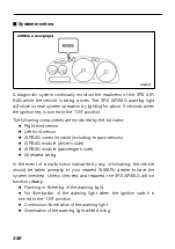
... event of the warning light when the ignition switch is being driven. D No illumination of a malfunction indicated by lighting for about 6 seconds when the ignition key is turned to the "ON" position. The following , the vehicle should be taken promptly to your nearest...
... event of the warning light when the ignition switch is being driven. D No illumination of a malfunction indicated by lighting for about 6 seconds when the ignition key is turned to the "ON" position. The following , the vehicle should be taken promptly to your nearest...
Owner's Manual
Page 145
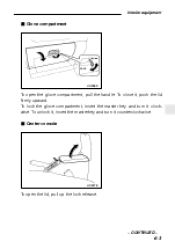
Interior equipment J Glove compartment Unlock Lock HS0090 To open the lid, pull up the lock release. - CONTINUED - 6-3 To lock the glove compartment, insert the master key and turn it counterclockwise. To close it clockwise. J Center console HS0279 To open the glove compartment, pull the handle. To unlock it, insert the masterkey and turn it , push the lid firmly upward.
Interior equipment J Glove compartment Unlock Lock HS0090 To open the lid, pull up the lock release. - CONTINUED - 6-3 To lock the glove compartment, insert the master key and turn it counterclockwise. To close it clockwise. J Center console HS0279 To open the glove compartment, pull the handle. To unlock it, insert the masterkey and turn it , push the lid firmly upward.
Owner's Manual
Page 160
... ...Maximum speeds ...Driving tips ...Shift lock release ... Starting and operating New vehicle break-in foreign countries ...Periodic inspections ...Ignition switch ...LOCK ...ACC ...ON ...START ...Key reminder chime ...Key interlock release (AT vehicles only) ... 7-6 7-7 7-8 7-9 7-9 7-10 7-10 7-10 7-11 7-12 7-12 7-12 7-12 7-13 7 Starting the engine ... 7-13 7-13 7-14 7-15 7-15 Manual transmission...
... ...Maximum speeds ...Driving tips ...Shift lock release ... Starting and operating New vehicle break-in foreign countries ...Periodic inspections ...Ignition switch ...LOCK ...ACC ...ON ...START ...Key reminder chime ...Key interlock release (AT vehicles only) ... 7-6 7-7 7-8 7-9 7-9 7-10 7-10 7-10 7-11 7-12 7-12 7-12 7-12 7-13 7 Starting the engine ... 7-13 7-13 7-14 7-15 7-15 Manual transmission...


