
Owner's Manual
Page 3
...keep your SUBARU looking good. To protect yourself and extend the service life of your vehicle, follow the instructions in serious injury and damage to operate the keys, locks and windows. This manual is composed of instrument panel indicators and how to operate interior equipment. ... as a flat tire or engine overheating. Chapter 3: Instruments and controls This chapter informs you how to use this manual. Chapter 6: Interior equipment This chapter informs you about the operation of thirteen chapters. Chapter 7: Starting and operating This chapter informs you how to use the...
...keep your SUBARU looking good. To protect yourself and extend the service life of your vehicle, follow the instructions in serious injury and damage to operate the keys, locks and windows. This manual is composed of instrument panel indicators and how to operate interior equipment. ... as a flat tire or engine overheating. Chapter 3: Instruments and controls This chapter informs you how to use this manual. Chapter 6: Interior equipment This chapter informs you about the operation of thirteen chapters. Chapter 7: Starting and operating This chapter informs you how to use the...

Owner's Manual
Page 11
Table of contents Doors and locks Seat, seatbelt and SRS AIRBAG Instruments and controls Climate control Audio Interior equipment Starting and operating In case of emergency Appearance care Maintenance and service Specifications Consumer information and Reporting safety defects Index 1 2 3 4 5 6 7 8 9 10 11 12 13 - CONTINUED - xi
Table of contents Doors and locks Seat, seatbelt and SRS AIRBAG Instruments and controls Climate control Audio Interior equipment Starting and operating In case of emergency Appearance care Maintenance and service Specifications Consumer information and Reporting safety defects Index 1 2 3 4 5 6 7 8 9 10 11 12 13 - CONTINUED - xi
Owner's Manual
Page 13
...-in (New vehicle) ...7-3 Brightness control (Illumination) ...3-18 Bulb replacement Bulb chart ...11-8 Fog lights ...10-56 Front turn signal lights ...10-58 Headlights ...10-55 Interior(Doom) light, spot lights ...10-61 License plate light ...10-61 Parking lights ...10-57 Rear combination lights ...10-59 Side turn signal lights ...10...
...-in (New vehicle) ...7-3 Brightness control (Illumination) ...3-18 Bulb replacement Bulb chart ...11-8 Fog lights ...10-56 Front turn signal lights ...10-58 Headlights ...10-55 Interior(Doom) light, spot lights ...10-61 License plate light ...10-61 Parking lights ...10-57 Rear combination lights ...10-59 Side turn signal lights ...10...
Owner's Manual
Page 15
... ...2-19 Safety precautions when driving ...Foreword v Chime Key reminder ...7-12 Seat belt warning ...2-12 Cigarette lighter ...6-9 Circuit breakers (See "Fuses") Cleaning Aluminum wheels ...9-5 Exterior (Washing) ...9-2 Interior ...9-6 Climate control ...Chapter 4 Air filter ...4-11 Air conditioner operation ...4-8 Operation tips ...4-9 Heater operation ...4-4 Heating or air conditioning ...4-3 Ventilator ...4-2 Clock function Combination meter ...3-14 Audio system...
... ...2-19 Safety precautions when driving ...Foreword v Chime Key reminder ...7-12 Seat belt warning ...2-12 Cigarette lighter ...6-9 Circuit breakers (See "Fuses") Cleaning Aluminum wheels ...9-5 Exterior (Washing) ...9-2 Interior ...9-6 Climate control ...Chapter 4 Air filter ...4-11 Air conditioner operation ...4-8 Operation tips ...4-9 Heater operation ...4-4 Heating or air conditioning ...4-3 Ventilator ...4-2 Clock function Combination meter ...3-14 Audio system...

Owner's Manual
Page 16
... differential gear oil (AT vehicles) ...10-27 Leak ...10-7 Rear differential gear oil ...10-28 Disk brake pad wear warning indicator ...7-30 Doom light (see "Interior light") 13-6
... differential gear oil (AT vehicles) ...10-27 Leak ...10-7 Rear differential gear oil ...10-28 Disk brake pad wear warning indicator ...7-30 Doom light (see "Interior light") 13-6
Owner's Manual
Page 21
... operation ...1-20 Towing ...8-14 Indicator lights (See "Warning lights") Inside mirror ...3-25 Installation of accessories ...5-12/10-53 Instrument panel overview ...3-2 Interior Cleaning ...9-6 Illustrated index ...Foreword xiii Interior light Interior light ...6-12 Interior light (Bulb replacement) ...10-61 Spotlight ...6-13 Spotlight (Bulb replacement) ...10-61 Interlock release (AT vehicle only) ...7-13 J Jack and jack...
... operation ...1-20 Towing ...8-14 Indicator lights (See "Warning lights") Inside mirror ...3-25 Installation of accessories ...5-12/10-53 Instrument panel overview ...3-2 Interior Cleaning ...9-6 Illustrated index ...Foreword xiii Interior light Interior light ...6-12 Interior light (Bulb replacement) ...10-61 Spotlight ...6-13 Spotlight (Bulb replacement) ...10-61 Interlock release (AT vehicle only) ...7-13 J Jack and jack...
Owner's Manual
Page 122
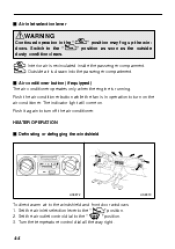
... windows. HEATER OPERATION J Defrosting or defogging the windshield HS0072 HS0073 To direct warm air to the " " position as soon as the outside dusty condition clears. : Interior air is recirculated inside the passenger comparment. : Outside air is drawn into the passenger compartment. Push the air conditioner button while the fan is running...
... windows. HEATER OPERATION J Defrosting or defogging the windshield HS0072 HS0073 To direct warm air to the " " position as soon as the outside dusty condition clears. : Interior air is recirculated inside the passenger comparment. : Outside air is drawn into the passenger compartment. Push the air conditioner button while the fan is running...
Owner's Manual
Page 128
...To improve acceleration and gas mileage, this air conditioner compressor is designed to temporarily shut off -season to circulate into the heated interior. This results in the refrigerant circuit Operate the air conditioner compressor at a low engine speed (at rapid acceleration or driving on... weather condition Under certain weather conditions (high relative humidity, low temperatures, etc.) a small amount of the air conditioner for your SUBARU dealer. Therefore, the method of insects and leaves on a steep upgrade. because cooling performance is normal and does not indicate any...
...To improve acceleration and gas mileage, this air conditioner compressor is designed to temporarily shut off -season to circulate into the heated interior. This results in the refrigerant circuit Operate the air conditioner compressor at a low engine speed (at rapid acceleration or driving on... weather condition Under certain weather conditions (high relative humidity, low temperatures, etc.) a small amount of the air conditioner for your SUBARU dealer. Therefore, the method of insects and leaves on a steep upgrade. because cooling performance is normal and does not indicate any...
Owner's Manual
Page 143
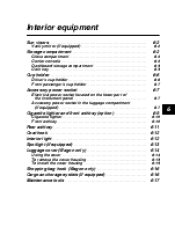
...front ashtray (option) ...Cigarette lighter ...Front ashtray ... 6-9 6-10 6-10 6 Rear ashtray ...Coat hook ...Interior light ...Spotlight (if equipped) ...Luggage cover (Wagon only) ...Using the cover ...To remove the cover ...power socket ... 6-7 6-7 6-7 Electrical power socket located on the lower part of the instrument panel ...Accessory power socket in the luggage compartment (if equipped) ... Interior equipment Sun visors ...Vanity mirror (if equipped) ... 6-2 6-2 Storage compartment ... 6-2 6-3 6-3 6-5 6-5 Glove compartment ...Center console ...Dashboard storage compartment ...Coin ...
...front ashtray (option) ...Cigarette lighter ...Front ashtray ... 6-9 6-10 6-10 6 Rear ashtray ...Coat hook ...Interior light ...Spotlight (if equipped) ...Luggage cover (Wagon only) ...Using the cover ...To remove the cover ...power socket ... 6-7 6-7 6-7 Electrical power socket located on the lower part of the instrument panel ...Accessory power socket in the luggage compartment (if equipped) ... Interior equipment Sun visors ...Vanity mirror (if equipped) ... 6-2 6-2 Storage compartment ... 6-2 6-3 6-3 6-5 6-5 Glove compartment ...Center console ...Dashboard storage compartment ...Coin ...
Owner's Manual
Page 145
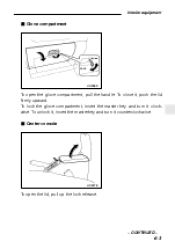
To close it counterclockwise. To unlock it, insert the masterkey and turn it clockwise. Interior equipment J Glove compartment Unlock Lock HS0090 To open the lid, pull up the lock release. - CONTINUED - 6-3 To lock the glove compartment, insert the master key and turn it , push the lid firmly upward. J Center console HS0279 To open the glove compartment, pull the handle.
To close it counterclockwise. To unlock it, insert the masterkey and turn it clockwise. Interior equipment J Glove compartment Unlock Lock HS0090 To open the lid, pull up the lock release. - CONTINUED - 6-3 To lock the glove compartment, insert the master key and turn it , push the lid firmly upward. J Center console HS0279 To open the glove compartment, pull the handle.

Owner's Manual
Page 146
... moving. B Lid tray WARNING Objects must not be placed on the lid tray could be thrown toward the vehicle's occupants and could damage the vehicle's interior trim and/or electrical equipment.
... moving. B Lid tray WARNING Objects must not be placed on the lid tray could be thrown toward the vehicle's occupants and could damage the vehicle's interior trim and/or electrical equipment.

Owner's Manual
Page 147
J Coin tray HS0096 To open the dashboard compartment, push the button and pull up on the lid. Be sure to close the compartment fully before driving. Interior equipment J Dashboard storage compartment Push HS0094 To open the coin tray, pull the upper edge of the lid. - CONTINUED - 6-5
J Coin tray HS0096 To open the dashboard compartment, push the button and pull up on the lid. Be sure to close the compartment fully before driving. Interior equipment J Dashboard storage compartment Push HS0094 To open the coin tray, pull the upper edge of the lid. - CONTINUED - 6-5

Owner's Manual
Page 149
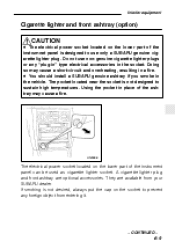
...the lower part of the instrument panel CAUTION The electrical power socket located on the lower part of the console and open the holder. Interior equipment J Front passenger's cup holder HS0305 HG0306 The front passenger's cup holder is designed to use the cup holder, open the ...) D Do not attempt to the Cigarette lighter and ashtray section in the accessory power socket. - CONTINUED - CAUTION 6-7 To use only a SUBARU genuine cigarette lighter plug. Refer to use non-genuine cigarette lighter plugs or any "plug-in" type electrical accessories in the center console.
...the lower part of the instrument panel CAUTION The electrical power socket located on the lower part of the console and open the holder. Interior equipment J Front passenger's cup holder HS0305 HG0306 The front passenger's cup holder is designed to use the cup holder, open the ...) D Do not attempt to the Cigarette lighter and ashtray section in the accessory power socket. - CONTINUED - CAUTION 6-7 To use only a SUBARU genuine cigarette lighter plug. Refer to use non-genuine cigarette lighter plugs or any "plug-in" type electrical accessories in the center console.
Owner's Manual
Page 151
... as cigarette lighter socket. Doing so may cause a fire. They are optional accessories. Do not use only a SUBARU genuine cigarette lighter plug. A cigarette lighter plug and front ashtray are available from entering it. - CONTINUED - 6-9 Interior equipment Cigarette lighter and front ashtray (option) D The electrical power socket located on the lower part of...
... as cigarette lighter socket. Doing so may cause a fire. They are optional accessories. Do not use only a SUBARU genuine cigarette lighter plug. A cigarette lighter plug and front ashtray are available from entering it. - CONTINUED - 6-9 Interior equipment Cigarette lighter and front ashtray (option) D The electrical power socket located on the lower part of...

Owner's Manual
Page 153
... lid out. The ashtray is located at the back of the center console for cleaning, open the ashtray, pull the upper edge of the lid. Interior equipment HS0107 To open it and pull it out while pushing the inner plate down . This could cause a fire. Fully close the ashtray after using...
... lid out. The ashtray is located at the back of the center console for cleaning, open the ashtray, pull the upper edge of the lid. Interior equipment HS0107 To open it and pull it out while pushing the inner plate down . This could cause a fire. Fully close the ashtray after using...

Owner's Manual
Page 154
And do not hang items on the coat hook that weigh 2.2 lb (1 kg) or more. Interior light OM-H0133 The interior light switch has three positions: 6-12 HG0307 Coat hook CAUTION Never hang anything on the coat hook that might obstruct the driver's view.
And do not hang items on the coat hook that weigh 2.2 lb (1 kg) or more. Interior light OM-H0133 The interior light switch has three positions: 6-12 HG0307 Coat hook CAUTION Never hang anything on the coat hook that might obstruct the driver's view.

Owner's Manual
Page 155
Interior equipment ON: The light stays on the spotlight, push the switch. Middle position: The light comes on only when any door is turned off , push the switch again. To turn on continuously. Spotlight (if equipped) OM-H0134 To turn it off to avoid battery discharge. When leaving your vehicle, make sure the light is opened. OFF: The light stays off to avoid battery discharge. - CONTINUED - 6-13 When leaving the vehicle, make sure the light is turned off .
Interior equipment ON: The light stays on the spotlight, push the switch. Middle position: The light comes on only when any door is turned off , push the switch again. To turn on continuously. Spotlight (if equipped) OM-H0134 To turn it off to avoid battery discharge. When leaving your vehicle, make sure the light is opened. OFF: The light stays off to avoid battery discharge. - CONTINUED - 6-13 When leaving the vehicle, make sure the light is turned off .

Owner's Manual
Page 157
Insert the projections located on the both ends of the sleeve into the recesses of the cover housing to shorten its length. 3. Pull either sleeve on the end of the retainers. - CONTINUED - 6-15 Pull either sleeve on the end of the cover housing to shorten the cover's length. 2. Take it off the retainer. 4. Rewind the cover. 2. Interior equipment J To remove the cover housing Match mark HG0099, HG0190 1. Store the cover housing in the luggage area. J To install the cover housing 1.
Insert the projections located on the both ends of the sleeve into the recesses of the cover housing to shorten its length. 3. Pull either sleeve on the end of the retainers. - CONTINUED - 6-15 Pull either sleeve on the end of the cover housing to shorten the cover's length. 2. Take it off the retainer. 4. Rewind the cover. 2. Interior equipment J To remove the cover housing Match mark HG0099, HG0190 1. Store the cover housing in the luggage area. J To install the cover housing 1.

Owner's Manual
Page 159
When using the anchorage eyelets, raise them up from under the cutouts of the luggage compartment mat. Maintenance tools OM-H0142 Your vehicle is equipped with four anchorage eyelets for vehicles equipped with a luggage net or ropes. Interior equipment Anchorage eyelets HG0192 The luggage compartment is equipped with the following maintenance tools: Screwdriver Wheel nut wrench Wheel cover remover (for securing luggage with wheel covers) - CONTINUED - 6-17 When not in use, put the eyelets down into the storing recesses.
When using the anchorage eyelets, raise them up from under the cutouts of the luggage compartment mat. Maintenance tools OM-H0142 Your vehicle is equipped with four anchorage eyelets for vehicles equipped with a luggage net or ropes. Interior equipment Anchorage eyelets HG0192 The luggage compartment is equipped with the following maintenance tools: Screwdriver Wheel nut wrench Wheel cover remover (for securing luggage with wheel covers) - CONTINUED - 6-17 When not in use, put the eyelets down into the storing recesses.

Owner's Manual
Page 228
Cleaning aluminum wheels ...Cleaning the interior ...Seat fabric ...Synthetic leather upholstery ... 9-5 9-6 9-6 9-6 9 Appearance care Exterior care ...Washing ...Waxing and polishing ... 9-2 9-2 9-3 Corrosion protection ... 9-4 9-4 9-4 Most common causes of corrosion ...To help prevent corrosion ...
Cleaning aluminum wheels ...Cleaning the interior ...Seat fabric ...Synthetic leather upholstery ... 9-5 9-6 9-6 9-6 9 Appearance care Exterior care ...Washing ...Waxing and polishing ... 9-2 9-2 9-3 Corrosion protection ... 9-4 9-4 9-4 Most common causes of corrosion ...To help prevent corrosion ...
