
Owner's Manual
Page 17
... of emergency") Emission test ...7-6 Engine Air cleaner element ...10-20 Catalytic converter ...7-8 CHECK ENGINE warning light ...3-10 Compartment overview ...10-5 Drive belts ...10-23 Engine hood ...1-17 Exhaust gas ...7-7 Oil ...10-8 Oil leak ...10-7 Oil pressure indicator light ...3-9 Overheating ...8-2 Safety precautions when driving ...Foreword vi Spark plugs ...10-22 Start the...
... of emergency") Emission test ...7-6 Engine Air cleaner element ...10-20 Catalytic converter ...7-8 CHECK ENGINE warning light ...3-10 Compartment overview ...10-5 Drive belts ...10-23 Engine hood ...1-17 Exhaust gas ...7-7 Oil ...10-8 Oil leak ...10-7 Oil pressure indicator light ...3-9 Overheating ...8-2 Safety precautions when driving ...Foreword vi Spark plugs ...10-22 Start the...

Owner's Manual
Page 20
... switch ...3-15 High beam indicator ...3-13 High/low beam change ...3-16 Head restraint adjustment (See "Seats") Heater operation ...4-4 Heating and air conditioning (see "Climate control") Hood (Engine) ...1-17 Hook Cargo anchorage eyelets ...6-16 Coat hook ...6-12 Shopping bag hook ...6-16 Towing eyelets ...8-17 Horn ...3-25 I Ignition switch ...ACC ...Key interlock release...
... switch ...3-15 High beam indicator ...3-13 High/low beam change ...3-16 Head restraint adjustment (See "Seats") Heater operation ...4-4 Heating and air conditioning (see "Climate control") Hood (Engine) ...1-17 Hook Cargo anchorage eyelets ...6-16 Coat hook ...6-12 Shopping bag hook ...6-16 Towing eyelets ...8-17 Horn ...3-25 I Ignition switch ...ACC ...Key interlock release...
Owner's Manual
Page 32
Engine hood ...Sunroof (if equipped) ...Operation ...Manual operation ... 1-17 1-18 1-18 1-20 Roof rack (if equipped) ... 1-20 1-21 1-21 When luggage is put on the slats ...Installing ...
Engine hood ...Sunroof (if equipped) ...Operation ...Manual operation ... 1-17 1-18 1-18 1-20 Roof rack (if equipped) ... 1-20 1-21 1-21 When luggage is put on the slats ...Installing ...

Owner's Manual
Page 48
...is moving the lever toward the left. Pull the hood release knob under the front of the hood prop into the slot in the hood. - CONTINUED - 1-17 Release the secondary hood release located under the instrument panel. 2. Lift up the hood, release the hood prop from its retainer and put the end of ...the engine hood by moving , blocking your view which may ...
...is moving the lever toward the left. Pull the hood release knob under the front of the hood prop into the slot in the hood. - CONTINUED - 1-17 Release the secondary hood release located under the instrument panel. 2. Lift up the hood, release the hood prop from its retainer and put the end of ...the engine hood by moving , blocking your view which may ...
Owner's Manual
Page 49
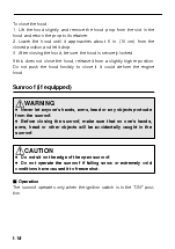
...sunroof, make sure that no one's hands, arms, head or other objects will be sure the hood is in the hood and return the prop to its retainer. 2. If this does not close the hood, release it approaches about 6 in the sunroof. J Operation The sunroof operates only when the ignition... switch is securely locked. Lift the hood slightly and remove the hood prop from a slightly higher position. Do not push the hood forcibly to freeze shut. Lower the hood until it from the slot in the "ON" position. It could deform the engine...
...sunroof, make sure that no one's hands, arms, head or other objects will be sure the hood is in the hood and return the prop to its retainer. 2. If this does not close the hood, release it approaches about 6 in the sunroof. J Operation The sunroof operates only when the ignition... switch is securely locked. Lift the hood slightly and remove the hood prop from a slightly higher position. Do not push the hood forcibly to freeze shut. Lower the hood until it from the slot in the "ON" position. It could deform the engine...
Owner's Manual
Page 93
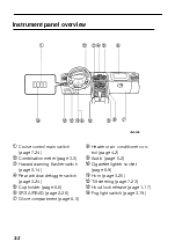
Instrument panel overview 1 2 34 5 6 T R E W6 Q 98 7 HG0329 1 Cruise control main switch 2 3 4 5 6 7 (page 7-24) Combination meter (page 3-3) Hazard warning flasher switch (page 3-14) Rear window defogger switch (page 3-24) Cup holder (page 6-6) SRS AIRBAG (page 2-28) Glove compartment (page 6-3) 8 Heater or air conditioner con9 Audio (page 5-2) Q Cigarette lighter socket W Horn (page 3-25) E Tilt steering (page 7-23) R Hood lock release (page 1-17) T Fog light switch (page 3-19) (page 6-9) trol (page 4-2) 3-2
Instrument panel overview 1 2 34 5 6 T R E W6 Q 98 7 HG0329 1 Cruise control main switch 2 3 4 5 6 7 (page 7-24) Combination meter (page 3-3) Hazard warning flasher switch (page 3-14) Rear window defogger switch (page 3-24) Cup holder (page 6-6) SRS AIRBAG (page 2-28) Glove compartment (page 6-3) 8 Heater or air conditioner con9 Audio (page 5-2) Q Cigarette lighter socket W Horn (page 3-25) E Tilt steering (page 7-23) R Hood lock release (page 1-17) T Fog light switch (page 3-19) (page 6-9) trol (page 4-2) 3-2
Owner's Manual
Page 168
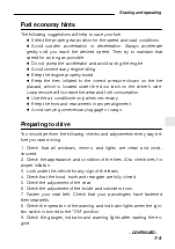
... gear position for proper inflation. 3. D Keep the tires inflated to the correct pressure shown on the tire placard, which is turned to maintain that the hood, trunk and rear gate are clean and unobstructed. 2. D Avoid carrying unnecessary luggage or cargo. Check the adjustment of the seat. 6. Check that all windows, mirrors...
... gear position for proper inflation. 3. D Keep the tires inflated to the correct pressure shown on the tire placard, which is turned to maintain that the hood, trunk and rear gate are clean and unobstructed. 2. D Avoid carrying unnecessary luggage or cargo. Check the adjustment of the seat. 6. Check that all windows, mirrors...
Owner's Manual
Page 212
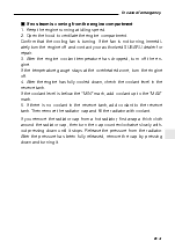
... the radiator cap, then turn the engine off the engine. Keep the engine running at the overheated zone, turn off and contact your authorized SUBARU dealer for repair. 3. Then remove the radiator cap and fill the radiator with coolant. After the pressure has been fully released, remove the ...cap by pressing down , check the coolant level in the reserve tank, add coolant to the reserve tank. Open the hood to the "MAX" mark. 5. Confirm that the cooling fan is coming from the radiator. If the temperature gauge stays at idling speed. 2. ...
... the radiator cap, then turn the engine off the engine. Keep the engine running at the overheated zone, turn off and contact your authorized SUBARU dealer for repair. 3. Then remove the radiator cap and fill the radiator with coolant. After the pressure has been fully released, remove the ...cap by pressing down , check the coolant level in the reserve tank, add coolant to the reserve tank. Open the hood to the "MAX" mark. 5. Confirm that the cooling fan is coming from the radiator. If the temperature gauge stays at idling speed. 2. ...

Owner's Manual
Page 232
... wheels. If dirt is left on roads treated with salt or other corrosive materials are used, the door hinges and locks, trunk lid lock, and hood latch should be inspected and lubricated periodically. In such a garage, corrosion can cause dampness. If your vehicle is dry. Do not park your garage dry...
... wheels. If dirt is left on roads treated with salt or other corrosive materials are used, the door hinges and locks, trunk lid lock, and hood latch should be inspected and lubricated periodically. In such a garage, corrosion can cause dampness. If your vehicle is dry. Do not park your garage dry...

Owner's Manual
Page 284
... fuses are stored in the main fuse box cover in the engine compartment) 1. B Main fuse box (in the engine compartment. 6. Contact your SUBARU dealer for repairs. Open the engine hood. 3. If it has blown, replace it with the fuse puller. The fuse puller is stored in the main fuse box cover in...
... fuses are stored in the main fuse box cover in the engine compartment) 1. B Main fuse box (in the engine compartment. 6. Contact your SUBARU dealer for repairs. Open the engine hood. 3. If it has blown, replace it with the fuse puller. The fuse puller is stored in the main fuse box cover in...

