
Owner's Manual
Page 31
... it up or down without squeezing the release buttons to severe frontal and near frontal crash if the threshold conditions for front outboard occupants. When installed on page 1-71.
... it up or down without squeezing the release buttons to severe frontal and near frontal crash if the threshold conditions for front outboard occupants. When installed on page 1-71.

Owner's Manual
Page 32
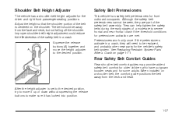
Remove the guide from its storage clip on top. 2. Place the guide over the belt, and insert the two edges of the belt into the slots of the seatback. 3. Be sure that the belt is how to install a comfort guide to the safety belt: 1. Here is not twisted and it lies flat. The elastic cord must be under the belt and the guide on the back of the guide. 1-28 There is one guide for each outside passenger position in the rear seat.
Remove the guide from its storage clip on top. 2. Place the guide over the belt, and insert the two edges of the belt into the slots of the seatback. 3. Be sure that the belt is how to install a comfort guide to the safety belt: 1. Here is not twisted and it lies flat. The elastic cord must be under the belt and the guide on the back of the guide. 1-28 There is one guide for each outside passenger position in the rear seat.

Owner's Manual
Page 45
... mind that rear-facing child restraints not be able to access certain safety belt assemblies or LATCH anchors for Use of the child restraint, you install a child restraint, be sure to secure more than one child restraint in the vehicle. Occupant prohibited B. If your vehicle does not have a rear seat that...
... mind that rear-facing child restraints not be able to access certain safety belt assemblies or LATCH anchors for Use of the child restraint, you install a child restraint, be sure to secure more than one child restraint in the vehicle. Occupant prohibited B. If your vehicle does not have a rear seat that...

Owner's Manual
Page 46
...vehicle and attachments on how to properly secure the child restraint. The child restraint manufacturer will provide you must never be installed using LATCH 1-42 Child restraint or occupant using safety belt Lower Anchors and Tethers for use the child restraint and its attachments. When... installing a child restraint with a top tether, you with that a LATCH-compatible child restraint is designed to use the vehicle's safety belts to...
...vehicle and attachments on how to properly secure the child restraint. The child restraint manufacturer will provide you must never be installed using LATCH 1-42 Child restraint or occupant using safety belt Lower Anchors and Tethers for use the child restraint and its attachments. When... installing a child restraint with a top tether, you with that a LATCH-compatible child restraint is designed to use the vehicle's safety belts to...

Owner's Manual
Page 50
...to secure the restraint, following the instructions that came with a safety belt buckled. Attaching more than one , after the child restraint has been installed. Notice: Do not let the LATCH attachments rub against the vehicle's safety belts. This could be seriously injured or killed. Pull the shoulder... or strangled if a shoulder belt is not attached to anchors, the child restraint will not be able to avoid rubbing the LATCH attachments. Install a LATCH-type child restraint properly using the anchors, or use the vehicle's safety belts to tighten. A child or others could cause the...
...to secure the restraint, following the instructions that came with a safety belt buckled. Attaching more than one , after the child restraint has been installed. Notice: Do not let the LATCH attachments rub against the vehicle's safety belts. This could be seriously injured or killed. Pull the shoulder... or strangled if a shoulder belt is not attached to anchors, the child restraint will not be able to avoid rubbing the LATCH attachments. Install a LATCH-type child restraint properly using the anchors, or use the vehicle's safety belts to tighten. A child or others could cause the...

Owner's Manual
Page 51
... top tether anchor, if equipped. If the child restraint manufacturer recommends that the top tether be attached, attach and tighten the top tether to make installation of child restraints easier. See Rear Compartment Storage Panel/ Cover on the child restraint to secure a top tether. 1. Put the child restraint on the seat...
... top tether anchor, if equipped. If the child restraint manufacturer recommends that the top tether be attached, attach and tighten the top tether to make installation of child restraints easier. See Rear Compartment Storage Panel/ Cover on the child restraint to secure a top tether. 1. Put the child restraint on the seat...

Owner's Manual
Page 53
... that the tether be sure to read Where to secure the child restraint in this vehicle. If more than one child restraint needs to be installed in the rear seat, be attached. Put the child restraint on page 1-40. 1. Secure the child in the child restraint when and as the instructions... if a national or local law requires that the top tether be anchored. Be sure to follow the instructions that came with the child restraint to install the child restraint using a safety belt and it uses a top tether, see Lower Anchors and Tethers for Children (LATCH) on page 1-42 for how and...
... that the tether be sure to read Where to secure the child restraint in this vehicle. If more than one child restraint needs to be installed in the rear seat, be attached. Put the child restraint on page 1-40. 1. Secure the child in the child restraint when and as the instructions... if a national or local law requires that the top tether be anchored. Be sure to follow the instructions that came with the child restraint to install the child restraint using a safety belt and it uses a top tether, see Lower Anchors and Tethers for Children (LATCH) on page 1-42 for how and...

Owner's Manual
Page 55
... let it . 5. To tighten the belt, push down on page 1-42 for Children (LATCH) on the child restraint as you tighten the belt. 1-51 When installing a forward-facing child restraint, it may be helpful to use of the belt to the stowed position. Push and pull the child restraint in different...
... let it . 5. To tighten the belt, push down on page 1-42 for Children (LATCH) on the child restraint as you tighten the belt. 1-51 When installing a forward-facing child restraint, it may be helpful to use of the belt to the stowed position. Push and pull the child restraint in different...

Owner's Manual
Page 57
... clicks. If your child restraint has the LATCH system, see Lower Anchors and Tethers for Children (LATCH) on page 1-42 for how and where to install the child restraint using the lap-shoulder belt to secure the child restraint in a position without a top tether anchor if a national or local law requires...
... clicks. If your child restraint has the LATCH system, see Lower Anchors and Tethers for Children (LATCH) on page 1-42 for how and where to install the child restraint using the lap-shoulder belt to secure the child restraint in a position without a top tether anchor if a national or local law requires...

Owner's Manual
Page 58
5. Pull the rest of the shoulder belt all the way out of the belt and feed the shoulder belt back into the retractor. To tighten the belt, push down on the child restraint, pull the shoulder portion of the belt to tighten the lap portion of the retractor to push down on the child restraint as you tighten the belt. 1-54 When installing a forward-facing child restraint, it may be helpful to use your knee to set the lock. 6.
5. Pull the rest of the shoulder belt all the way out of the belt and feed the shoulder belt back into the retractor. To tighten the belt, push down on the child restraint, pull the shoulder portion of the belt to tighten the lap portion of the retractor to push down on the child restraint as you tighten the belt. 1-54 When installing a forward-facing child restraint, it may be helpful to use your knee to set the lock. 6.

Owner's Manual
Page 59
Push and pull the child restraint in different directions to be sure it . If a child restraint has been installed and the on page 1-63 for the right front passenger and the passenger seated directly behind that passenger. Airbag System Your vehicle has the following ...
Push and pull the child restraint in different directions to be sure it . If a child restraint has been installed and the on page 1-63 for the right front passenger and the passenger seated directly behind that passenger. Airbag System Your vehicle has the following ...

Owner's Manual
Page 70
... position in the vehicle and check with your dealer/retailer. 1-66 If the Off Indicator is Lit for a Child Restraint If a child restraint has been installed and the on indicator is not sitting properly in the seat. Remove the child restraint from the seat such as blankets, cushions, seat covers, seat...
... position in the vehicle and check with your dealer/retailer. 1-66 If the Off Indicator is Lit for a Child Restraint If a child restraint has been installed and the on indicator is not sitting properly in the seat. Remove the child restraint from the seat such as blankets, cushions, seat covers, seat...

Owner's Manual
Page 73
... the airbag sensors, sensing and diagnostic module and airbag wiring. 1-69 Any object, such as an aftermarket seat heater or a comfort enhancing pad or device, installed under or on page 1-63. In addition, your dealer/retailer and the service manual have to get my vehicle modified. The phone numbers...
... the airbag sensors, sensing and diagnostic module and airbag wiring. 1-69 Any object, such as an aftermarket seat heater or a comfort enhancing pad or device, installed under or on page 1-63. In addition, your dealer/retailer and the service manual have to get my vehicle modified. The phone numbers...

Owner's Manual
Page 121
... rearward on page 2-46 for the rear area. Slide the panel forward. 3. The panel can be thrown around in place. The panel may also be installed either carpet or plastic side up. The panel may be used in place. Rear Seat Armrest Vehicles with a rear seat armrest, have to carry things...
... rearward on page 2-46 for the rear area. Slide the panel forward. 3. The panel can be thrown around in place. The panel may also be installed either carpet or plastic side up. The panel may be used in place. Rear Seat Armrest Vehicles with a rear seat armrest, have to carry things...
Owner's Manual
Page 133
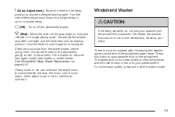
...): Move the lever all the way down for a longer delay or up for a single wiping cycle. Windshield Washer { CAUTION: In freezing weather, do become damaged, install new blades or blade inserts. 6 (Delay Adjustment): Move the lever to the delay position to prevent an overload. 8 (Mist): 3-9
...): Move the lever all the way down for a longer delay or up for a single wiping cycle. Windshield Washer { CAUTION: In freezing weather, do become damaged, install new blades or blade inserts. 6 (Delay Adjustment): Move the lever to the delay position to prevent an overload. 8 (Mist): 3-9

Owner's Manual
Page 142
... the front and at the rear of accessory or accessory bracket from working as a cellular phone. Do not hang any electrical equipment to follow the installation instructions included with the accessory power outlets and could be blown.
... the front and at the rear of accessory or accessory bracket from working as a cellular phone. Do not hang any electrical equipment to follow the installation instructions included with the accessory power outlets and could be blown.

Owner's Manual
Page 148
... is started to do . Warning lights come on briefly when the engine is a problem with one of the vehicle's functions. Follow this manual's advice. Install a new passenger compartment air filter. Reverse Steps 1 through 5. 5. Waiting to indicate they are working. When one of the filter. For the type of...
... is started to do . Warning lights come on briefly when the engine is a problem with one of the vehicle's functions. Follow this manual's advice. Install a new passenger compartment air filter. Reverse Steps 1 through 5. 5. Waiting to indicate they are working. When one of the filter. For the type of...
Owner's Manual
Page 150
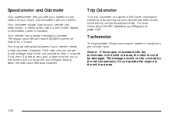
... not operate the engine in revolutions per hour (km/h). You may wonder what happens if your vehicle has been driven since the trip odometer was installed. Your vehicle has a tamper resistant odometer. The digital odometer will read 999,999 if someone tries to turn it is located in the solid red... be damaged. Notice: If the engine is operated with the tachometer in the Driver Information Center and shows how far your vehicle needs a new odometer installed.
... not operate the engine in revolutions per hour (km/h). You may wonder what happens if your vehicle has been driven since the trip odometer was installed. Your vehicle has a tamper resistant odometer. The digital odometer will read 999,999 if someone tries to turn it is located in the solid red... be damaged. Notice: If the engine is operated with the tachometer in the Driver Information Center and shows how far your vehicle needs a new odometer installed.

Owner's Manual
Page 159
...light continues to flash, when it is changed into the atmosphere. See Filling the Tank on the vehicle. The condition is fully installed. If none of water, the vehicle's electrical system might be required. Light On Steady: An emission control system malfunction has been detected on...Avoid steep uphill grades. A few driving trips should turn the light off or improperly installed. These conditions might be required. Find a safe place to fuel the vehicle with the cap properly installed should turn the light off , wait at least one or more serious damage to do...
...light continues to flash, when it is changed into the atmosphere. See Filling the Tank on the vehicle. The condition is fully installed. If none of water, the vehicle's electrical system might be required. Light On Steady: An emission control system malfunction has been detected on...Avoid steep uphill grades. A few driving trips should turn the light off or improperly installed. These conditions might be required. Find a safe place to fuel the vehicle with the cap properly installed should turn the light off , wait at least one or more serious damage to do...

Owner's Manual
Page 235
... yellow jack (A) is for auxiliary devices is for a long period of time, remove the batteries and keep them in the compartment. If the headphones are installed correctly, using the diagram on the headphones, do the following: 1. The A/V jacks allow audio or video signals to be connected from an auxiliary device such...
... yellow jack (A) is for auxiliary devices is for a long period of time, remove the batteries and keep them in the compartment. If the headphones are installed correctly, using the diagram on the headphones, do the following: 1. The A/V jacks allow audio or video signals to be connected from an auxiliary device such...

