
Owner's Manual
Page 4
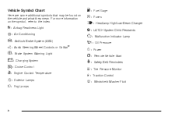
... and what they mean. Vehicle Symbol Chart Here are some additional symbols that may be found on the symbol, refer to the index. .: +: j 7: F: M: Fuel Gage Fuses Headlamp High/Low-Beam Changer i: 9: #: !: g: $: Airbag Readiness Light Air Conditioning Antilock Brake System (ABS) Audio Steering Wheel Controls or OnStar® Brake System Warning Light...
... and what they mean. Vehicle Symbol Chart Here are some additional symbols that may be found on the symbol, refer to the index. .: +: j 7: F: M: Fuel Gage Fuses Headlamp High/Low-Beam Changer i: 9: #: !: g: $: Airbag Readiness Light Air Conditioning Antilock Brake System (ABS) Audio Steering Wheel Controls or OnStar® Brake System Warning Light...
Owner's Manual
Page 94
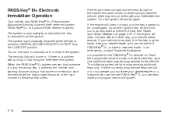
... the engine still does not start, and the key appears to start the vehicle will come on page 5-91. At this time, you must see Fuses and Circuit Breakers on if there is possible for the PASS-Key® III+ decoder to have a new key made and programmed to check the... fuse, see your dealer/retailer who can service the PASS-Key® III+ to "learn" the transponder value of electrical key codes. If the engine still ...
... the engine still does not start, and the key appears to start the vehicle will come on page 5-91. At this time, you must see Fuses and Circuit Breakers on if there is possible for the PASS-Key® III+ decoder to have a new key made and programmed to check the... fuse, see your dealer/retailer who can service the PASS-Key® III+ to "learn" the transponder value of electrical key codes. If the engine still ...

Owner's Manual
Page 131
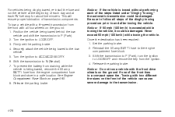
... signal a lane change . The lever on the left side of the turn or lane change . If a bulb is completed. As you signal a turn, check the fuse, see your turn signal. If the arrows do not go on at all the way up or down to -Pass. Hold it is on the... lower the lever until the lane change , if the arrows flash rapidly, a signal bulb may be burned out and other drivers will not see Fuses and Circuit Breakers on page 5-91 and for these features is released. G: O: Turn and Lane-Change Signals Headlamp High/Low-Beam Changer 53: Exterior Lamp...
... signal a lane change . The lever on the left side of the turn or lane change . If a bulb is completed. As you signal a turn, check the fuse, see your turn signal. If the arrows do not go on at all the way up or down to -Pass. Hold it is on the... lower the lever until the lane change , if the arrows flash rapidly, a signal bulb may be burned out and other drivers will not see Fuses and Circuit Breakers on page 5-91 and for these features is released. G: O: Turn and Lane-Change Signals Headlamp High/Low-Beam Changer 53: Exterior Lamp...

Owner's Manual
Page 142
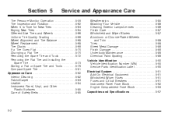
... ashtray and cigarette lighter, the ashtray can be placed into a power outlet, the battery may occur to the lighter or heating element, or a fuse could result in the ashtray. Ashtray(s) and Cigarette Lighter For vehicles with your dealer/retailer for accessory power plugs only. Do not hold a cigarette...will not allow the lighter to back away from the plug because the power outlets are put flammable items in blown vehicle or adapter fuses. Always unplug all the way and let go. If you experience a problem, see your dealer/ retailer before adding electrical equipment. The ...
... ashtray and cigarette lighter, the ashtray can be placed into a power outlet, the battery may occur to the lighter or heating element, or a fuse could result in the ashtray. Ashtray(s) and Cigarette Lighter For vehicles with your dealer/retailer for accessory power plugs only. Do not hold a cigarette...will not allow the lighter to back away from the plug because the power outlets are put flammable items in blown vehicle or adapter fuses. Always unplug all the way and let go. If you experience a problem, see your dealer/ retailer before adding electrical equipment. The ...
Owner's Manual
Page 272
...km/h) is towed without performing each RV fuel stop for about five minutes. Once the destination has been reached: 1. Reinstall the 50 amp BATT1 fuse to ACC/ACCESSORY. 6. Release the parking brake. Turn the ignition to LOCK/OFF and remove the key from the ignition. 4. See Engine Compartment...damaged. Shift the transmission to follow all four wheels on the ground if one of the front tires is being dinghy towed, re-install the fuse and run the vehicle at the beginning of each day and at each of the dinghy towing procedure prior to the transmission. 4-28 Firmly set...
...km/h) is towed without performing each RV fuel stop for about five minutes. Once the destination has been reached: 1. Reinstall the 50 amp BATT1 fuse to ACC/ACCESSORY. 6. Release the parking brake. Turn the ignition to LOCK/OFF and remove the key from the ignition. 4. See Engine Compartment...damaged. Shift the transmission to follow all four wheels on the ground if one of the front tires is being dinghy towed, re-install the fuse and run the vehicle at the beginning of each day and at each of the dinghy towing procedure prior to the transmission. 4-28 Firmly set...
Owner's Manual
Page 286
... (VIN) ...5-90 Service Parts Identification Label ...5-90 Electrical System ...5-91 Add-On Electrical Equipment ...5-91 Windshield Wiper Fuses ...5-91 Fuses and Circuit Breakers ...5-91 Instrument Panel Fuse Block ...5-92 Engine Compartment Fuse Block ...5-93 Capacities and Specifications ...5-97 Tire Pressure Monitor Operation ...5-59 Tire Inspection and Rotation ...5-62 When It...
... (VIN) ...5-90 Service Parts Identification Label ...5-90 Electrical System ...5-91 Add-On Electrical Equipment ...5-91 Windshield Wiper Fuses ...5-91 Fuses and Circuit Breakers ...5-91 Instrument Panel Fuse Block ...5-92 Engine Compartment Fuse Block ...5-93 Capacities and Specifications ...5-97 Tire Pressure Monitor Operation ...5-59 Tire Inspection and Rotation ...5-62 When It...
Owner's Manual
Page 297
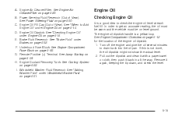
... Windshield Washer Fluid on page 5-36. A. Engine Air Cleaner/Filter. B. See "Checking Engine Oil" under Engine Oil on page 5-23. Brake Fluid Reservoir. Engine Compartment Fuse Block. See Fuses and Circuit Breakers on page 5-15. F. Remote Positive (+) Terminal. G.
... Windshield Washer Fluid on page 5-36. A. Engine Air Cleaner/Filter. B. See "Checking Engine Oil" under Engine Oil on page 5-23. Brake Fluid Reservoir. Engine Compartment Fuse Block. See Fuses and Circuit Breakers on page 5-15. F. Remote Positive (+) Terminal. G.
Owner's Manual
Page 299
...page 5-36. Turn off the engine and give the oil several minutes to check the engine oil level at each fuel fill. Underhood Fuse Block. Engine Coolant Recovery Tank. Engine Air Cleaner/Filter. C. The engine oil dipstick handle is not done, the oil dipstick might not show... the actual level. 2. A. See Engine Air Cleaner/Filter on page 5-93. B. Engine Oil Dipstick. See Engine Compartment Fuse Block on page 5-20. G. Remote Positive (+) Terminal. H. Engine Oil Checking Engine Oil It is a good idea to drain back into the oil pan....
...page 5-36. Turn off the engine and give the oil several minutes to check the engine oil level at each fuel fill. Underhood Fuse Block. Engine Coolant Recovery Tank. Engine Air Cleaner/Filter. C. The engine oil dipstick handle is not done, the oil dipstick might not show... the actual level. 2. A. See Engine Air Cleaner/Filter on page 5-93. B. Engine Oil Dipstick. See Engine Compartment Fuse Block on page 5-20. G. Remote Positive (+) Terminal. H. Engine Oil Checking Engine Oil It is a good idea to drain back into the oil pan....

Owner's Manual
Page 321
... until the tabs on the rear of the cover, click into place. 3.4L V6 Engine The remote positive (+) terminal is located under the engine compartment fuse block cover, and is marked with a plus (+) symbol on the rear of the cover, and lift. 4. To remove the... fuse block cover, push in the two locking tabs located on the cover. 5-37 Open the hoods and locate the positive (+) and negative (−) terminal locations ...
... until the tabs on the rear of the cover, click into place. 3.4L V6 Engine The remote positive (+) terminal is located under the engine compartment fuse block cover, and is marked with a plus (+) symbol on the rear of the cover, and lift. 4. To remove the... fuse block cover, push in the two locking tabs located on the cover. 5-37 Open the hoods and locate the positive (+) and negative (−) terminal locations ...

Owner's Manual
Page 325
... the good battery. 3. To disconnect the jumper cables from the other vehicle. 5. However, there are two additional systems that had the dead battery. 2. Return the fuse block cover to check the lubricant. How to Check Lubricant All-Wheel Drive If you have an all-wheel-drive vehicle, be sure to perform...
... the good battery. 3. To disconnect the jumper cables from the other vehicle. 5. However, there are two additional systems that had the dead battery. 2. Return the fuse block cover to check the lubricant. How to Check Lubricant All-Wheel Drive If you have an all-wheel-drive vehicle, be sure to perform...
Owner's Manual
Page 375
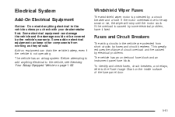
... vehicle has an airbag system. To identify and check fuses, circuit breakers, and relays, refer to the Fuse Usage Chart on electrical equipment can keep other components from short circuits by fuses and circuit breakers. Windshield Wiper Fuses The windshield wiper motor is protected by the vehicle's warranty... until the motor cools. This greatly reduces the chance of the fuse panel door. 5-91 If the overload is caused by electrical problems. The vehicle has an underhood fuse block and an instrument panel fuse block. Electrical System Add-On Electrical Equipment Notice: Do not add...
... vehicle has an airbag system. To identify and check fuses, circuit breakers, and relays, refer to the Fuse Usage Chart on electrical equipment can keep other components from short circuits by fuses and circuit breakers. Windshield Wiper Fuses The windshield wiper motor is protected by the vehicle's warranty... until the motor cools. This greatly reduces the chance of the fuse panel door. 5-91 If the overload is caused by electrical problems. The vehicle has an underhood fuse block and an instrument panel fuse block. Electrical System Add-On Electrical Equipment Notice: Do not add...
Owner's Manual
Page 376
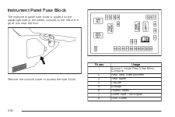
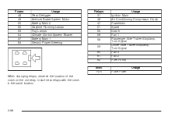
Usage Sunroof, Inside Rear View Mirror, Compass Rear Seat Entertainment Rear Wiper Liftgate Airbags Heated Seats Driver Side Turn Signal Door Locks 5-92 Fuses 1 2 3 4 5 6 7 8 Remove the console cover to the left of the center console, to access the fuse block. Instrument Panel Fuse Block The instrument panel fuse block is located on the passenger side of the glove box near the floor.
Usage Sunroof, Inside Rear View Mirror, Compass Rear Seat Entertainment Rear Wiper Liftgate Airbags Heated Seats Driver Side Turn Signal Door Locks 5-92 Fuses 1 2 3 4 5 6 7 8 Remove the console cover to the left of the center console, to access the fuse block. Instrument Panel Fuse Block The instrument panel fuse block is located on the passenger side of the glove box near the floor.
Owner's Manual
Page 377
Fuses 9 10 11 12 13 14 15 16 17 18 19 20 21 22 23 Usage Automatic Occupant Sensing Module Power Mirrors Passenger Side Turn Signal ... Lights Circuit Breakers PWR WNDW PWR SEATS EMPTY Usage Power Windows Power Seats Empty Engine Compartment Fuse Block Relays Usage RAP RLY Retained Accessory Power Relay REAR DEFOG Rear Defogger Relay RLY The engine compartment fuse block is located on location. 5-93 See Engine Compartment Overview on page 5-12 for more information...
Fuses 9 10 11 12 13 14 15 16 17 18 19 20 21 22 23 Usage Automatic Occupant Sensing Module Power Mirrors Passenger Side Turn Signal ... Lights Circuit Breakers PWR WNDW PWR SEATS EMPTY Usage Power Windows Power Seats Empty Engine Compartment Fuse Block Relays Usage RAP RLY Retained Accessory Power Relay REAR DEFOG Rear Defogger Relay RLY The engine compartment fuse block is located on location. 5-93 See Engine Compartment Overview on page 5-12 for more information...

Owner's Manual
Page 378
Notice: Spilling liquid on any electrical components on any electrical component. 5-94 Always keep the covers on the vehicle may damage it. To reinstall, fit together the tabs located on the front of the cover, and push down on the cover until the tabs at the rear have been unlocked. Then lift the cover off. To remove the fuse block cover, release the rear of the cover first, by unlocking both of the cover click into place. Do not lift the front of the cover until the tabs on the rear of the tabs in the back.
Notice: Spilling liquid on any electrical components on any electrical component. 5-94 Always keep the covers on the vehicle may damage it. To reinstall, fit together the tabs located on the front of the cover, and push down on the cover until the tabs at the rear have been unlocked. Then lift the cover off. To remove the fuse block cover, release the rear of the cover first, by unlocking both of the cover click into place. Do not lift the front of the cover until the tabs on the rear of the tabs in the back.
Owner's Manual
Page 379
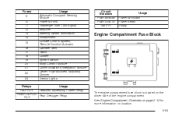
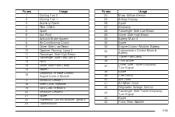
Fuses 1 2 3 4 5 6 7 8 9 10 11 12 13 14 15 16 17 18 19 20 21 22 23 Usage Cooling Fan 2 Cooling Fan 1 Auxiliary Power Rear HVAC Spare Sun ... Park Lamp Starter Electronic Throttle Control, Engine Control Module Emission Device 1 Even Coils, Injectors Odd Coils, Injectors Emission Device 2 Spare Powertrain Control Module, Ignition Transmission Fuses 24 25 26 27 28 29 30 32 33 34 35 36 37 38 39 40 41 42 43 44 45 Usage Mass Airfl...
Fuses 1 2 3 4 5 6 7 8 9 10 11 12 13 14 15 16 17 18 19 20 21 22 23 Usage Cooling Fan 2 Cooling Fan 1 Auxiliary Power Rear HVAC Spare Sun ... Park Lamp Starter Electronic Throttle Control, Engine Control Module Emission Device 1 Even Coils, Injectors Odd Coils, Injectors Emission Device 2 Spare Powertrain Control Module, Ignition Transmission Fuses 24 25 26 27 28 29 30 32 33 34 35 36 37 38 39 40 41 42 43 44 45 Usage Mass Airfl...
Owner's Manual
Page 380
Install new relays with the notch in the same location. 5-96 PLR Usage Ignition Main Air Conditioning Compressor Clutch Powertrain Spare Crank Fan 1 Passenger Side Trailer Stoplamp, Turn Signal Driver Side Trailer Stoplamp, Turn Signal Fan 3 Fan 2 Fuel Pump Usage Fuse Puller When changing relays, observe the location of the notch on the old relay. Fuses 48 49 50 52 53 54 57 63 Usage Rear Defogger Antilock Brake System Motor Battery Main 2 Daytime Running Lamps Fog Lamps Climate Control System Blower Battery Main 1 Electric Power Steering Relays 31 46 47 51 55 56 58 59 60 61 62 Misc.
Install new relays with the notch in the same location. 5-96 PLR Usage Ignition Main Air Conditioning Compressor Clutch Powertrain Spare Crank Fan 1 Passenger Side Trailer Stoplamp, Turn Signal Driver Side Trailer Stoplamp, Turn Signal Fan 3 Fan 2 Fuel Pump Usage Fuse Puller When changing relays, observe the location of the notch on the old relay. Fuses 48 49 50 52 53 54 57 63 Usage Rear Defogger Antilock Brake System Motor Battery Main 2 Daytime Running Lamps Fog Lamps Climate Control System Blower Battery Main 1 Electric Power Steering Relays 31 46 47 51 55 56 58 59 60 61 62 Misc.

Owner's Manual
Page 427
E EDR ...Electrical Equipment Add-On Equipment ...Electrical System Engine Compartment Fuse Block ...Fuses and Circuit Breakers ...Instrument Panel Fuse Block ...Windshield Wiper Fuses ...Electronic Immobilizer PASS-Key® III+ ...Electronic Immobilizer Operation PASS-Key® III+ ...Engine Air Cleaner/Filter ...Change Engine Oil Light ...Check and Service Engine ...
E EDR ...Electrical Equipment Add-On Equipment ...Electrical System Engine Compartment Fuse Block ...Fuses and Circuit Breakers ...Instrument Panel Fuse Block ...Windshield Wiper Fuses ...Electronic Immobilizer PASS-Key® III+ ...Electronic Immobilizer Operation PASS-Key® III+ ...Engine Air Cleaner/Filter ...Change Engine Oil Light ...Check and Service Engine ...
Owner's Manual
Page 428
... Filling the Tank ...5-8 Fuels in Foreign Countries ...5-7 Gage ...3-41 Gasoline Octane ...5-5 Gasoline Specifications ...5-6 Low Fuel Warning Light ...3-41 Fuses Engine Compartment Fuse Block ...5-93 Fuses and Circuit Breakers ...5-91 Instrument Panel Fuse Block ...5-92 Windshield Wiper ...5-91 Gasoline Octane ...5-5 Specifications ...5-6 Gate Ajar Light ...3-40 Glove Box ...2-42 GM Mobility Reimbursement...
... Filling the Tank ...5-8 Fuels in Foreign Countries ...5-7 Gage ...3-41 Gasoline Octane ...5-5 Gasoline Specifications ...5-6 Low Fuel Warning Light ...3-41 Fuses Engine Compartment Fuse Block ...5-93 Fuses and Circuit Breakers ...5-91 Instrument Panel Fuse Block ...5-92 Windshield Wiper ...5-91 Gasoline Octane ...5-5 Specifications ...5-6 Gate Ajar Light ...3-40 Glove Box ...2-42 GM Mobility Reimbursement...

Owner's Manual
Page 436
... Where to Put the Child Restraint ...1-40 Windows ...2-14 Power ...2-15 Windshield Washer ...3-9 Washer Fluid ...5-31 Wiper Blade Replacement ...5-47 Wiper Blades, Cleaning ...5-87 Wiper Fuses ...5-91 Wipers ...3-8 Winter Driving ...4-17 Wipers Rear Washer ...3-10 W Warning Lights, Gages, and Indicators ...3-24 Warnings DIC Warnings and Messages ...3-49 Hazard Warning Flashers ...3-6 Safety...
... Where to Put the Child Restraint ...1-40 Windows ...2-14 Power ...2-15 Windshield Washer ...3-9 Washer Fluid ...5-31 Wiper Blade Replacement ...5-47 Wiper Blades, Cleaning ...5-87 Wiper Fuses ...5-91 Wipers ...3-8 Winter Driving ...4-17 Wipers Rear Washer ...3-10 W Warning Lights, Gages, and Indicators ...3-24 Warnings DIC Warnings and Messages ...3-49 Hazard Warning Flashers ...3-6 Safety...


