Owner's Manual
Page 77
... Locks ...2-11 Door Locks ...2-11 Power Door Locks ...2-11 Delayed Locking ...2-12 Programmable Automatic Door Locks ...2-12 Rear Door Security Locks ...2-12 Lockout Protection ...2-13 Liftgate ...2-13 Windows ...2-15 Power Windows ...2-16 Sun Visors ...2-17 Theft-Deterrent Systems ...2-17 Content Theft-Deterrent ...2-18 PASS-Key® III+ ...2-18 PASS-Key®...
... Locks ...2-11 Door Locks ...2-11 Power Door Locks ...2-11 Delayed Locking ...2-12 Programmable Automatic Door Locks ...2-12 Rear Door Security Locks ...2-12 Lockout Protection ...2-13 Liftgate ...2-13 Windows ...2-15 Power Windows ...2-16 Sun Visors ...2-17 Theft-Deterrent Systems ...2-17 Content Theft-Deterrent ...2-18 PASS-Key® III+ ...2-18 PASS-Key®...

Owner's Manual
Page 82
... it off when the ignition is moved to three different modes. K (Unlock): 2-6 If K is pressed again within five seconds, all remaining doors, and the liftgate, will flash twice to work. Pressing K on page 2-18. See Content Theft-Deterrent on page 2-18. See Content Theft-Deterrent on page 2-18. If... through the DIC, the horn will come on and stay on for 20 seconds or until the ignition is used to lock the doors and liftgate. The interior lamps will chirp when Q is pressed again within five seconds of the previous press of the lock button. The turn off by...
... it off when the ignition is moved to three different modes. K (Unlock): 2-6 If K is pressed again within five seconds, all remaining doors, and the liftgate, will flash twice to work. Pressing K on page 2-18. See Content Theft-Deterrent on page 2-18. See Content Theft-Deterrent on page 2-18. If... through the DIC, the horn will come on and stay on for 20 seconds or until the ignition is used to lock the doors and liftgate. The interior lamps will chirp when Q is pressed again within five seconds of the previous press of the lock button. The turn off by...

Owner's Manual
Page 86
... ignition cycles with the remote vehicle start system enabled. • The remote start feature are shipped from approximately 195 feet (60 m) away. The vehicle's hood, liftgate or doors are on page 3-60 for additional information. There is too high. Two remote vehicle starts have the remote vehicle start feature may be...
... ignition cycles with the remote vehicle start system enabled. • The remote start feature are shipped from approximately 195 feet (60 m) away. The vehicle's hood, liftgate or doors are on page 3-60 for additional information. There is too high. Two remote vehicle starts have the remote vehicle start feature may be...
Owner's Manual
Page 88
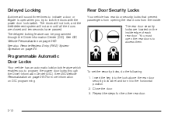
... switch. See DIC Vehicle Personalization on page 2-5. The doors will not lock, and the theft-deterrent system will sound three times to indicate a door or liftgate is open the rear doors to the horizontal position. 2. Insert the key into the lock above the rear door security lock label and turn it...
... switch. See DIC Vehicle Personalization on page 2-5. The doors will not lock, and the theft-deterrent system will sound three times to indicate a door or liftgate is open the rear doors to the horizontal position. 2. Insert the key into the lock above the rear door security lock label and turn it...
Owner's Manual
Page 89
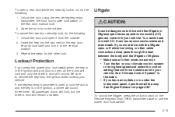
... outlets on or under the instrument panel, open them all the doors will lock and only the driver's door will remain unlocked. To unlock the liftgate, press the unlock button on the Remote Keyless Entry (RKE) transmitter twice or use the power door lock switch. 2-13 Lockout Protection If you press... key is in the ignition and any door is in the Index. • If you must pass through the seal between the body and the liftgate or liftglass: • Make sure all other lock. You cannot see or smell CO. See "Climate Control System" in the ignition, a chime will force outside...
... outlets on or under the instrument panel, open them all the doors will lock and only the driver's door will remain unlocked. To unlock the liftgate, press the unlock button on the Remote Keyless Entry (RKE) transmitter twice or use the power door lock switch. 2-13 Lockout Protection If you press... key is in the ignition and any door is in the Index. • If you must pass through the seal between the body and the liftgate or liftglass: • Make sure all other lock. You cannot see or smell CO. See "Climate Control System" in the ignition, a chime will force outside...
Owner's Manual
Page 90
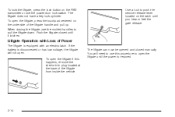
... on the latch until you hear or feel the gate release. You will need to use the power door lock switch. When closing the liftgate, use the molded handles to push the service release lever located on the RKE transmitter or use this happens, remove the interior trim plug ... touchpad centered on the underside of Power The liftgate is equipped with Loss of the liftgate handle and pull up. Use a tool to pull the liftgate down. The liftgate does not have a key lock cylinder. To open the liftgate if this procedure to open . The liftgate can now be opened and closed until the...
... on the latch until you hear or feel the gate release. You will need to use the power door lock switch. When closing the liftgate, use the molded handles to push the service release lever located on the RKE transmitter or use this happens, remove the interior trim plug ... touchpad centered on the underside of Power The liftgate is equipped with Loss of the liftgate handle and pull up. Use a tool to pull the liftgate down. The liftgate does not have a key lock cylinder. To open the liftgate if this procedure to open . The liftgate can now be opened and closed until the...
Owner's Manual
Page 94
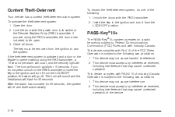
... undesired operation. Lock the door with the RKE transmitter. 2. The key must be open. 3. If the theft-deterrent system is activated and a door or the liftgate is subject to Federal Communications Commission (FCC) Rules and with Industry Canada. Unlock the doors with the power door lock switch or the Remote Keyless...
... undesired operation. Lock the door with the RKE transmitter. 2. The key must be open. 3. If the theft-deterrent system is activated and a door or the liftgate is subject to Federal Communications Commission (FCC) Rules and with Industry Canada. Unlock the doors with the power door lock switch or the Remote Keyless...

Owner's Manual
Page 123
... the table are driving. Your vehicle may have the panel in the upper position, pull it rearward to place the table leg securely onto the liftgate lock striker. The maximum load for grocery bags. 2-47 There are placed on the surface of moderate temperature. Table To set up . 2. The plastic side... also functions as a table. Always have an adjustable panel that can be used for the table is 100 lbs. Set the table leg onto the liftgate lock striker at the rear edge of the table and turn the leg outward. 3. distributed (45 kg). Always be up the table, do the following...
... the table are driving. Your vehicle may have the panel in the upper position, pull it rearward to place the table leg securely onto the liftgate lock striker. The maximum load for grocery bags. 2-47 There are placed on the surface of moderate temperature. Table To set up . 2. The plastic side... also functions as a table. Always have an adjustable panel that can be used for the table is 100 lbs. Set the table leg onto the liftgate lock striker at the rear edge of the table and turn the leg outward. 3. distributed (45 kg). Always be up the table, do the following...
Owner's Manual
Page 166
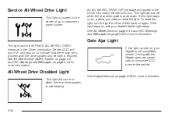
If the light stays on, see your liftgate is not completely closed. Gate Ajar Light This light and the SERVICE ALL WHEEL DRIVE message in the Driver Information Center (DIC) will turn the ... overheating. 3-42 Driving with the drive system and service is required. This light will come on to indicate that there may be a problem with the liftgate open can cause carbon monoxide (CO) to reset the light. Service All-Wheel Drive Light This light is located in the Driver Information Center (DIC...
If the light stays on, see your liftgate is not completely closed. Gate Ajar Light This light and the SERVICE ALL WHEEL DRIVE message in the Driver Information Center (DIC) will turn the ... overheating. 3-42 Driving with the drive system and service is required. This light will come on to indicate that there may be a problem with the liftgate open can cause carbon monoxide (CO) to reset the light. Service All-Wheel Drive Light This light is located in the Driver Information Center (DIC...
Owner's Manual
Page 179
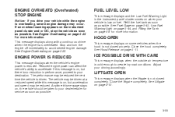
... when the hood is not closed properly. ICE POSSIBLE DRIVE WITH CARE This message displays when the outside air temperature is reduced. See Liftgate on page 5-11. See Hood Release on page 2-13. 3-55 ENGINE POWER IS REDUCED This message displays when the vehicle's engine ...power is cold enough to create icy road conditions. LIFTGATE OPEN This message displays when the liftgate is not closed completely. Close the liftgate completely. If an overheat warning appears on page 5-8 for more information. Stop and turn the ...
... when the hood is not closed properly. ICE POSSIBLE DRIVE WITH CARE This message displays when the outside air temperature is reduced. See Liftgate on page 5-11. See Hood Release on page 2-13. 3-55 ENGINE POWER IS REDUCED This message displays when the vehicle's engine ...power is cold enough to create icy road conditions. LIFTGATE OPEN This message displays when the liftgate is not closed completely. Close the liftgate completely. If an overheat warning appears on page 5-8 for more information. Stop and turn the ...

Owner's Manual
Page 188
...Then press the vehicle information button to scroll through the following settings: LOCK DELAY OFF: There will be out of the vehicle's doors and liftgate will be delayed. Then press the vehicle information button to scroll through the following settings: OFF: The exterior lamps will not turn on. ...button until five seconds after the last door is open, this feature. When locking the doors and liftgate with the power door lock switch and a door or the liftgate is closed . You can temporarily override delayed locking by pressing the power door lock switch twice or the ...
...Then press the vehicle information button to scroll through the following settings: LOCK DELAY OFF: There will be out of the vehicle's doors and liftgate will be delayed. Then press the vehicle information button to scroll through the following settings: OFF: The exterior lamps will not turn on. ...button until five seconds after the last door is open, this feature. When locking the doors and liftgate with the power door lock switch and a door or the liftgate is closed . You can temporarily override delayed locking by pressing the power door lock switch twice or the ...

Owner's Manual
Page 272
... then apply the trailer brake controller by itself. Before setting out for leaks, and make necessary repairs before starting on your trip. • Keep the liftgate closed. • If exhaust does come into your electrical connection at the same time. If the trailer has electric brakes, start , check all trailer hitch... is secure, and that the load is by hand to be sure the brakes are working . 4-36 Driving with a Trailer {CAUTION: If you have the liftgate open road, you will bring fresh, outside air into your vehicle.
... then apply the trailer brake controller by itself. Before setting out for leaks, and make necessary repairs before starting on your trip. • Keep the liftgate closed. • If exhaust does come into your electrical connection at the same time. If the trailer has electric brakes, start , check all trailer hitch... is secure, and that the load is by hand to be sure the brakes are working . 4-36 Driving with a Trailer {CAUTION: If you have the liftgate open road, you will bring fresh, outside air into your vehicle.
Owner's Manual
Page 313
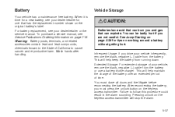
... shown on working around a battery without getting hurt. Battery Your vehicle has a maintenance free battery. You can burn you must close all doors and the liftgate before reconnecting the battery. When it is time for a new battery, see your dealer/retailer for tips on the original battery's label.
... shown on working around a battery without getting hurt. Battery Your vehicle has a maintenance free battery. You can burn you must close all doors and the liftgate before reconnecting the battery. When it is time for a new battery, see your dealer/retailer for tips on the original battery's label.

Owner's Manual
Page 325
Open the liftgate. Stoplamp/Taillamp/Sidemarker Lamp B. Backup Lamp 2. Pull the taillamp assembly towards you. 5. Pull the bulb out of these bulbs: 1. A. Remove the taillamp screw covers. 3. Remove the taillamp screws. 4. Push the new bulb into the bulb socket. 5-49 Turn the bulb socket counterclockwise to disconnect it from the taillamp assembly. 6. See Liftgate on page 2-13 for more information. Turn Signal Lamp/Taillamp C. Taillamps, Turn Signal, Stoplamps and Back-up Lamps To replace one of the bulb socket. 7.
Open the liftgate. Stoplamp/Taillamp/Sidemarker Lamp B. Backup Lamp 2. Pull the taillamp assembly towards you. 5. Pull the bulb out of these bulbs: 1. A. Remove the taillamp screw covers. 3. Remove the taillamp screws. 4. Push the new bulb into the bulb socket. 5-49 Turn the bulb socket counterclockwise to disconnect it from the taillamp assembly. 6. See Liftgate on page 2-13 for more information. Turn Signal Lamp/Taillamp C. Taillamps, Turn Signal, Stoplamps and Back-up Lamps To replace one of the bulb socket. 7.

Owner's Manual
Page 326
... 9421330 H13 For replacement bulbs not listed here, contact your dealer. 2. Insert the bulb socket into the taillamp assembly and turn it clockwise to the liftgate handle. Turn the bulb socket counterclockwise and pull the bulb straight out of these bulbs: 1. License Plate Lamp To replace one of the socket. 4. Remove... 1 through 3 to reinstall the license plate lamp. Turn and pull the license plate lamp down through 3 to reinstall the taillamp assembly. Reverse Steps 1 through the liftgate opening. 5-50 8. When reinstalling the screws, do not overtighten. 3.
... 9421330 H13 For replacement bulbs not listed here, contact your dealer. 2. Insert the bulb socket into the taillamp assembly and turn it clockwise to the liftgate handle. Turn the bulb socket counterclockwise and pull the bulb straight out of these bulbs: 1. License Plate Lamp To replace one of the socket. 4. Remove... 1 through 3 to reinstall the license plate lamp. Turn and pull the license plate lamp down through 3 to reinstall the taillamp assembly. Reverse Steps 1 through the liftgate opening. 5-50 8. When reinstalling the screws, do not overtighten. 3.

Owner's Manual
Page 376
Remove the console cover to the left of the glove box near the floor. Instrument Panel Fuse Block The instrument panel fuse block is located on the passenger side of the center console, to access the fuse block. Fuses 1 2 3 4 5 6 7 8 9 10 Usage Sunroof Rear Seat Entertainment Rear Wiper Liftgate Airbags Heated Seats Driver Side Turn Signal Door Locks Automatic Occupant Sensing Module Power Mirrors 5-100
Remove the console cover to the left of the glove box near the floor. Instrument Panel Fuse Block The instrument panel fuse block is located on the passenger side of the center console, to access the fuse block. Fuses 1 2 3 4 5 6 7 8 9 10 Usage Sunroof Rear Seat Entertainment Rear Wiper Liftgate Airbags Heated Seats Driver Side Turn Signal Door Locks Automatic Occupant Sensing Module Power Mirrors 5-100
Owner's Manual
Page 389
..., etc. Inspect all key lock cylinders, hood latch assemblies, secondary latches, pivots, spring anchor and release pawl, hood and door hinges, rear folding seats, and liftgate hinges. If you drive regularly under dusty conditions, the filter may be required when exposed to a corrosive environment. Applying silicone grease on page 1-71...
..., etc. Inspect all key lock cylinders, hood latch assemblies, secondary latches, pivots, spring anchor and release pawl, hood and door hinges, rear folding seats, and liftgate hinges. If you drive regularly under dusty conditions, the filter may be required when exposed to a corrosive environment. Applying silicone grease on page 1-71...

Owner's Manual
Page 427
Liftgate Carbon Monoxide ...Light Airbag Readiness ...All-Wheel Drive Disabled ...Antilock Brake System Warning ...Brake System Warning ...Change Engine Oil ...Charging System ...Cruise Control ...Door Ajar ......
Liftgate Carbon Monoxide ...Light Airbag Readiness ...All-Wheel Drive Disabled ...Antilock Brake System Warning ...Brake System Warning ...Change Engine Oil ...Charging System ...Cruise Control ...Door Ajar ......


