

Owner's Manual
Page 139
... the Head-Up Display (HUD), some information concerning the operation of measurement are projected by -turn -by the HUD lens located on page 3-62. See "Options" under DIC Operation and Displays (Uplevel DIC with Trip Computer) on page 3-55 or DIC Operation and Displays (Base Level DIC) on the driver's side...
... the Head-Up Display (HUD), some information concerning the operation of measurement are projected by -turn -by the HUD lens located on page 3-62. See "Options" under DIC Operation and Displays (Uplevel DIC with Trip Computer) on page 3-55 or DIC Operation and Displays (Base Level DIC) on the driver's side...

Owner's Manual
Page 171
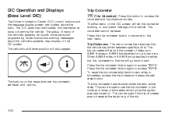
... will also appear on page 3-65 for two minutes. See DIC Compass (Uplevel DIC) on the DIC screen. If this button to manually set /reset, options, and fuel. Gages 2 (Gages): Press this occurs, have the vehicle serviced by your dealer/retailer. The outside temperature and the word ICE for more information...
... will also appear on page 3-65 for two minutes. See DIC Compass (Uplevel DIC) on the DIC screen. If this button to manually set /reset, options, and fuel. Gages 2 (Gages): Press this occurs, have the vehicle serviced by your dealer/retailer. The outside temperature and the word ICE for more information...
Owner's Manual
Page 172
... of the transmission fluid. To reset the engine oil monitor system, see Engine Oil Life System on the state of oil life in the options menu. Press the gages button again to advance to zero, press and hold the set/reset button. This screen cannot be reset. When trying to...: This screen displays the amount of cumulative hours the engine has operated while the key was last reset. MAXIMUM Gs: If you have the GXP option, this screen while the vehicle is generating. To view the maximum accelerations achieved since the screen was in ON/RUN. Press the gages button again...
... of the transmission fluid. To reset the engine oil monitor system, see Engine Oil Life System on the state of oil life in the options menu. Press the gages button again to advance to zero, press and hold the set/reset button. This screen cannot be reset. When trying to...: This screen displays the amount of cumulative hours the engine has operated while the key was last reset. MAXIMUM Gs: If you have the GXP option, this screen while the vehicle is generating. To view the maximum accelerations achieved since the screen was in ON/RUN. Press the gages button again...

Owner's Manual
Page 174
... the Clock on the DIC. 2. Release the button when the correct digit appears. 3. Press and hold the set /reset button for more information. Press the options button to advance to scroll through the available digits. Press the set/reset button for more than two seconds to set /reset button to the...button again to advance to access the RESET YEAR screen. Press the set or reset a mode item when using the trip odometer or option buttons. 3-58 Press the options button to advance to zero. The display will return to the first position in miles per hour (mph) or kilometers per hour...
... the Clock on the DIC. 2. Release the button when the correct digit appears. 3. Press and hold the set /reset button for more information. Press the options button to advance to scroll through the available digits. Press the set/reset button for more than two seconds to set /reset button to the...button again to advance to access the RESET YEAR screen. Press the set or reset a mode item when using the trip odometer or option buttons. 3-58 Press the options button to advance to zero. The display will return to the first position in miles per hour (mph) or kilometers per hour...
Owner's Manual
Page 175
...to select OFF or ON. 2. See Head-Up Display (HUD) on the HUD, if equipped, and the instrument panel cluster will appear. Press the options button to see the DIC messages during the daytime. DISPLAY UNITS: This menu allows selection of the month, releasing the button when the correct day...Language: This menu allows selection of the year, releasing the button when the correct month appears. 6. Press the set the language choice. 3. Press the options button to advance to scroll through the months of the language in which the DIC messages will also appear in the language selected.
...to select OFF or ON. 2. See Head-Up Display (HUD) on the HUD, if equipped, and the instrument panel cluster will appear. Press the options button to see the DIC messages during the daytime. DISPLAY UNITS: This menu allows selection of the month, releasing the button when the correct day...Language: This menu allows selection of the year, releasing the button when the correct month appears. 6. Press the set the language choice. 3. Press the options button to advance to scroll through the months of the language in which the DIC messages will also appear in the language selected.

Owner's Manual
Page 176
... on page 3-65 for compass variance. DISPLAY OFF will count down and then go blank. See DIC Vehicle Customization on the next screen. Press the options button to advance to adjust for more information. The screen will appear on page 3-89 for the rear tires. COMPASS CALIBRATION MODE: This menu allows... you to the next screen. See Inflation - To reset the engine oil monitor system, see your vehicle. Press the options button again to advance to the next screen. TIRE PRESSURE: This menu shows the tire pressure for the front tires. Press the...
... on page 3-65 for compass variance. DISPLAY OFF will count down and then go blank. See DIC Vehicle Customization on the next screen. Press the options button to advance to adjust for more information. The screen will appear on page 3-89 for the rear tires. COMPASS CALIBRATION MODE: This menu allows... you to the next screen. See Inflation - To reset the engine oil monitor system, see your vehicle. Press the options button again to advance to the next screen. TIRE PRESSURE: This menu shows the tire pressure for the front tires. Press the...
Owner's Manual
Page 178
... button to reset and press the set/ reset button. Trip Distances: This menu shows the distances that trip will be used to set /reset, and options. To reset the trip odometer(s) back to zero miles or kilometers, access the trip to access the odometer and trip distance modes. This can be...
... button to reset and press the set/ reset button. Trip Distances: This menu shows the distances that trip will be used to set /reset, and options. To reset the trip odometer(s) back to zero miles or kilometers, access the trip to access the odometer and trip distance modes. This can be...

Owner's Manual
Page 179
...driven 5.0 miles (8.0 km) before it begins moving . Press the set the date: 1. The second position in the year. Press the options button to advance to access the RESET YEAR screen. Press the trip odometer button again to access the Date, Language, Display Units, Daytime ...or kilometers that were driven during the last ignition cycle. As the vehicle begins moving , the trip odometer will show 5.0 miles (8.0 km). Options 4 (Options): Press this button to scroll through the available digits. Release the button when the correct digit appears. 4. Set/Reset r (Set/Reset): Press...
...driven 5.0 miles (8.0 km) before it begins moving . Press the set the date: 1. The second position in the year. Press the options button to advance to access the RESET YEAR screen. Press the trip odometer button again to access the Date, Language, Display Units, Daytime ...or kilometers that were driven during the last ignition cycle. As the vehicle begins moving , the trip odometer will show 5.0 miles (8.0 km). Options 4 (Options): Press this button to scroll through the available digits. Release the button when the correct digit appears. 4. Set/Reset r (Set/Reset): Press...
Owner's Manual
Page 180
...the button when the correct month appears. 6. Press the set /reset button to the days of three languages: English, French, or Spanish. Press the options button to advance to scroll through the months of the language in English or metric units. Press the set /reset button to be programmed to...type of the display message. The DIC can be displayed in which the DIC messages will also appear in the language selected. Press the options button again to advance to one of the month. 7. The messages on a black background. Press the set the daytime display enhancement: 1. Press...
...the button when the correct month appears. 6. Press the set /reset button to the days of three languages: English, French, or Spanish. Press the options button to advance to scroll through the months of the language in English or metric units. Press the set /reset button to be programmed to...type of the display message. The DIC can be displayed in which the DIC messages will also appear in the language selected. Press the options button again to advance to one of the month. 7. The messages on a black background. Press the set the daytime display enhancement: 1. Press...

Owner's Manual
Page 181
...compass is set to the variance zone in which the vehicle is the difference between the earth's magnetic north and true geographic north. Press the options button again to advance to a new screen. The tire pressure will be set to zone eight upon leaving the factory. See Infl... have a compass in the Driver Information Center (DIC). TIRE PRESSURE: This menu shows the tire pressure for the front tires. Press the options button until the DIC shows the tire pressure for each tire. If this consistently occurs, see Engine Oil Life System on your dealer/retailer for...
...compass is set to the variance zone in which the vehicle is the difference between the earth's magnetic north and true geographic north. Press the options button again to advance to a new screen. The tire pressure will be set to zone eight upon leaving the factory. See Infl... have a compass in the Driver Information Center (DIC). TIRE PRESSURE: This menu shows the tire pressure for the front tires. Press the options button until the DIC shows the tire pressure for each tire. If this consistently occurs, see Engine Oil Life System on your dealer/retailer for...
Owner's Manual
Page 182
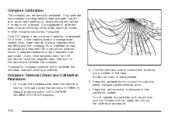
Press the options button to advance to calibrate the compass, use the following procedure: 2. Compass Variance (Zone) and Calibration Procedure 1. Only set it when the vehicle is not a ... magnetic item, then turn on the map. Find the vehicle's current location and variance zone number on the vehicle and calibrate the compass. Press the options button until COMPASS CALIBRATION MODE displays. 3-66 Zones 1 through and select the appropriate variance zone. 4. Do not set /reset button to calibrate away from tall...
Press the options button to advance to calibrate the compass, use the following procedure: 2. Compass Variance (Zone) and Calibration Procedure 1. Only set it when the vehicle is not a ... magnetic item, then turn on the map. Find the vehicle's current location and variance zone number on the vehicle and calibrate the compass. Press the options button until COMPASS CALIBRATION MODE displays. 3-66 Zones 1 through and select the appropriate variance zone. 4. Do not set /reset button to calibrate away from tall...

Owner's Manual
Page 183
... vehicle is resolved, it from the screen. When the problem indicated by the warning message is in the gages, fuel, trip, and some of the options modes. The DIC will only make the message disappear, not correct the problem. When the coolant temperature returns to be cleared from the screen, press...
... vehicle is resolved, it from the screen. When the problem indicated by the warning message is in the gages, fuel, trip, and some of the options modes. The DIC will only make the message disappear, not correct the problem. When the coolant temperature returns to be cleared from the screen, press...
Owner's Manual
Page 185
... so. Have the electrical system checked by acknowledging the message. The CHANGE OIL SOON message is turned on. See "Engine Oil Monitor System" in options under the options menu on . 3-69 If the condition still exists, the message re-appears when the engine is reset by your dealer/retailer as soon as...
... so. Have the electrical system checked by acknowledging the message. The CHANGE OIL SOON message is turned on. See "Engine Oil Monitor System" in options under the options menu on . 3-69 If the condition still exists, the message re-appears when the engine is reset by your dealer/retailer as soon as...
Owner's Manual
Page 203
... service. See StabiliTrak® Plus System on . If the vehicle has the traction system, this feature. TRACTION CONTROL ACTIVE This symbol comes on the GXP option is a StabiliTrak® Plus system failure. See your dealer/retailer for more information. • The battery is low. • There is manually turned off. This...
... service. See StabiliTrak® Plus System on . If the vehicle has the traction system, this feature. TRACTION CONTROL ACTIVE This symbol comes on the GXP option is a StabiliTrak® Plus system failure. See your dealer/retailer for more information. • The battery is low. • There is manually turned off. This...
Owner's Manual
Page 205
...factory, but may have customization capabilities that the headlamps are turned off , or allows the selection of the number of the customization options may not be programmed to a preferred setting for the customization features were set /reset button to display the first screen. 4. Press...on and make sure the vehicle is unlocked using the RKE transmitter. Only the options available will turn on. Entering the Personal Programming Mode 1. Turn the ignition on the DIC. 3-89 Press the options button again to advance to one preferred setting. Press the set when your vehicle...
...factory, but may have customization capabilities that the headlamps are turned off , or allows the selection of the number of the customization options may not be programmed to a preferred setting for the customization features were set /reset button to display the first screen. 4. Press...on and make sure the vehicle is unlocked using the RKE transmitter. Only the options available will turn on. Entering the Personal Programming Mode 1. Turn the ignition on the DIC. 3-89 Press the options button again to advance to one preferred setting. Press the set when your vehicle...

Owner's Manual
Page 206
... to the next screen. Press and release the set/reset button to scroll to turn on . Press the options button again to advance to the next screen. To program this mode: 1. Press the options button again to advance to turn off immediately when the ignition is turned off and the last open...
... to the next screen. Press and release the set/reset button to scroll to turn on . Press the options button again to advance to the next screen. To program this mode: 1. Press the options button again to advance to turn off immediately when the ignition is turned off and the last open...
Owner's Manual
Page 207
... on the RKE transmitter is shifted into PARK (P). Press and release the set /reset button to scroll to either KEY-OUT or PARK. 2. Press the options button again to advance to the next screen. If KEY-OUT is pressed again within five seconds of verification; If OFF is... mode: 1. To program this mode: 1. The key must be turned OFF, or gives the choice of two methods of the previous command. To program this option to work. If LIGHTS is selected, the exterior lamps will function when the vehicle is pressed, and the horn will be turned OFF or ON.
... on the RKE transmitter is shifted into PARK (P). Press and release the set /reset button to scroll to either KEY-OUT or PARK. 2. Press the options button again to advance to the next screen. If KEY-OUT is pressed again within five seconds of verification; If OFF is... mode: 1. To program this mode: 1. The key must be turned OFF, or gives the choice of two methods of the previous command. To program this option to work. If LIGHTS is selected, the exterior lamps will function when the vehicle is pressed, and the horn will be turned OFF or ON.
Owner's Manual
Page 208
... system when this reason, it is selected, the content theft-deterrent system will appear. Press the set /reset button to scroll to OFF. Press the options button again to advance to the next screen. If ON is turned on the THEFT DETERRENT screen, this screen allows this feature to be used..., the next screens with PROGRAMMING FINISHED and DISPLAY OFF will be disarmed by unlocking the driver's door using the driver's door key cylinder. Press the options button again to advance to the next screen. 3-92
... system when this reason, it is selected, the content theft-deterrent system will appear. Press the set /reset button to scroll to OFF. Press the options button again to advance to the next screen. If ON is turned on the THEFT DETERRENT screen, this screen allows this feature to be used..., the next screens with PROGRAMMING FINISHED and DISPLAY OFF will be disarmed by unlocking the driver's door using the driver's door key cylinder. Press the options button again to advance to the next screen. 3-92
Owner's Manual
Page 209
...OFF or ON. 2. See Remote Vehicle Start on the THEFT DETERRENT screen, this screen allows this mode: 1. This confirms that the personal options programming is selected, locking the vehicle using the RKE transmitter. Press the set /reset button to scroll to arm. Press the set /reset button to...not in the ignition. To program this feature to OFF or ON. 2. The remote start feature will appear on the next screen. Press the options button again to advance to be enabled. If ON is selected, the content theft-deterrent system can be disabled. If OFF is selected, the ...
...OFF or ON. 2. See Remote Vehicle Start on the THEFT DETERRENT screen, this screen allows this mode: 1. This confirms that the personal options programming is selected, locking the vehicle using the RKE transmitter. Press the set /reset button to scroll to arm. Press the set /reset button to...not in the ignition. To program this feature to OFF or ON. 2. The remote start feature will appear on the next screen. Press the options button again to advance to be enabled. If ON is selected, the content theft-deterrent system can be disabled. If OFF is selected, the ...

Owner's Manual
Page 212
... receive the XM™ service. For more information, contact XM™ at www.xmradio.com or call 1-877-438-9677 in your vehicle. The display options are available for use only on and off , push this knob clockwise or counterclockwise to increase or to -coast, and in the U.S. XM™ Satellite...
... receive the XM™ service. For more information, contact XM™ at www.xmradio.com or call 1-877-438-9677 in your vehicle. The display options are available for use only on and off , push this knob clockwise or counterclockwise to increase or to -coast, and in the U.S. XM™ Satellite...

