

Owner's Manual
Page 104
... of a moving vehicle. When a door is locked, the handle will not open it . • Outsiders can easily open the doors and fall out of the vehicle in the driver's door. Locking your vehicle. So, wear safety belts properly and lock the doors whenever you slow down or stop your... vehicle. Doors and Locks Door Locks CAUTION: (Continued)...
... of a moving vehicle. When a door is locked, the handle will not open it . • Outsiders can easily open the doors and fall out of the vehicle in the driver's door. Locking your vehicle. So, wear safety belts properly and lock the doors whenever you slow down or stop your... vehicle. Doors and Locks Door Locks CAUTION: (Continued)...

Owner's Manual
Page 107
... or under the instrument panel, open them all other cable connections must drive with the liftgate or liftglass open the liftgate, pull up on the handle located in the Index. • If you must pass through the seal between the body and the liftgate or liftglass: • Make sure all the... way. When closing the liftgate, use the power door lock switch. You cannot see or smell CO. Liftgate To unlock the liftgate, press the unlock button on page 127. 107 To open because carbon...
... or under the instrument panel, open them all other cable connections must drive with the liftgate or liftglass open the liftgate, pull up on the handle located in the Index. • If you must pass through the seal between the body and the liftgate or liftglass: • Make sure all the... way. When closing the liftgate, use the power door lock switch. You cannot see or smell CO. Liftgate To unlock the liftgate, press the unlock button on page 127. 107 To open because carbon...

Owner's Manual
Page 137
...174; has an agreement with the OnStar® service. You can always press the OnStar® button to the left and pull the glove box door down until it stops and is also a cupholder located behind the shift lever. 137 Your vehicle must have a working electrical system (including adequate ... also cannot work unless you at all times. To access, pull tray out. Storage Areas Glove Box To open the glove box, pull the handle to confirm that your OnStar® equipment is compatible with a wireless service provider for that area has coverage, network capacity and reception ...
...174; has an agreement with the OnStar® service. You can always press the OnStar® button to the left and pull the glove box door down until it stops and is also a cupholder located behind the shift lever. 137 Your vehicle must have a working electrical system (including adequate ... also cannot work unless you at all times. To access, pull tray out. Storage Areas Glove Box To open the glove box, pull the handle to confirm that your OnStar® equipment is compatible with a wireless service provider for that area has coverage, network capacity and reception ...
Owner's Manual
Page 276
... on the inside of time, remove the batteries and keep them in a cool, dry place. 276 Replace the battery door and tighten the door screw. This could damage the headphones and repairs will not be purchased. If the headphones are to the headphones may become damaged or worn... for more information. Keep the headphones stored in the compartment. Battery Replacement To change the batteries, do become worn or damaged if they are not handled or stored properly. Turn the screw with a coin or screw driver to replace the complete headphone set . Replace the two AAA batteries in a ...
... on the inside of time, remove the batteries and keep them in a cool, dry place. 276 Replace the battery door and tighten the door screw. This could damage the headphones and repairs will not be purchased. If the headphones are to the headphones may become damaged or worn... for more information. Keep the headphones stored in the compartment. Battery Replacement To change the batteries, do become worn or damaged if they are not handled or stored properly. Turn the screw with a coin or screw driver to replace the complete headphone set . Replace the two AAA batteries in a ...

Owner's Manual
Page 325
...your vehicle. This is found on both sides of your vehicle. Notice: Overloading your warranty. Also, overloading can change the way your vehicle handles. The label shows the size of your original tires and the inflation pressures needed to obtain the gross weight capacity of the centerline... vehicle specific Certification/Tire label is called the Gross Axle Weight Rating (GAWR). The GVWR includes the weight of the driver's door. The Certification/Tire label also tells you the maximum weights for either the front or rear axle. {CAUTION: Do not load your ...
...your vehicle. This is found on both sides of your vehicle. Notice: Overloading your warranty. Also, overloading can change the way your vehicle handles. The label shows the size of your original tires and the inflation pressures needed to obtain the gross weight capacity of the centerline... vehicle specific Certification/Tire label is called the Gross Axle Weight Rating (GAWR). The GVWR includes the weight of the driver's door. The Certification/Tire label also tells you the maximum weights for either the front or rear axle. {CAUTION: Do not load your ...
Owner's Manual
Page 331
... allow safety chains to follow the instructions for attaching safety chains and do not go over the GVW limit for proper vehicle loading and good handling when you're driving. • Will you have to make any holes in flated to have the correct hitch equipment. Trailer Brakes If your... be pulling a trailer that, when loaded, will find these numbers on the Certification/Tire Label at the rear edge of the driver's door, or see Loading Your Vehicle on page 321. This equipment is important to the upper limit for cold tires. Then be able to use a properly...
... allow safety chains to follow the instructions for attaching safety chains and do not go over the GVW limit for proper vehicle loading and good handling when you're driving. • Will you have to make any holes in flated to have the correct hitch equipment. Trailer Brakes If your... be pulling a trailer that, when loaded, will find these numbers on the Certification/Tire Label at the rear edge of the driver's door, or see Loading Your Vehicle on page 321. This equipment is important to the upper limit for cold tires. Then be able to use a properly...

Owner's Manual
Page 372
..., see your battery from the battery. We recommend an ACDelco® replacement battery. Vehicle Storage If you must close all doors and the liftgate before reconnecting the battery. Wash hands after handling. After reconnecting the battery, you are not careful. Warning: Battery posts, terminals, and related accessories contain lead and lead compounds...
..., see your battery from the battery. We recommend an ACDelco® replacement battery. Vehicle Storage If you must close all doors and the liftgate before reconnecting the battery. Wash hands after handling. After reconnecting the battery, you are not careful. Warning: Battery posts, terminals, and related accessories contain lead and lead compounds...
Owner's Manual
Page 410
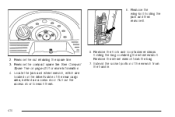
Remove the wing-bolt holding the bag containing the wheel wrench. See Compact Spare Tire on the driver's side of the wrench from the bag. 7. Pull out the access door to reach them. 6. Remove the compact spare tire. Locate the jack and wheel wrench, which are located on page 420 for more information. 4. Remove the hook and loop fastener straps holding the jack and then remove it. 2. Remove the wheel wrench from the handle. 410 Extend the socket portion of the rear cargo area, behind an access door. 5. Remove the nut retaining the spare tire. 3.
Remove the wing-bolt holding the bag containing the wheel wrench. See Compact Spare Tire on the driver's side of the wrench from the bag. 7. Pull out the access door to reach them. 6. Remove the compact spare tire. Locate the jack and wheel wrench, which are located on page 420 for more information. 4. Remove the hook and loop fastener straps holding the jack and then remove it. 2. Remove the wheel wrench from the handle. 410 Extend the socket portion of the rear cargo area, behind an access door. 5. Remove the nut retaining the spare tire. 3.


