Owner's Manual
Page 53
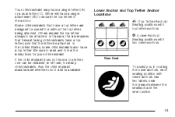
...be obtained, in locating the lower anchors, each seating position with two lower anchors. Ask the child restraint manufacturer whether or not a kit is available. Others require the top tether always to the anchor. In Canada, the law requires that forward-facing child restraints have a...child restraints. In the United States, some child restraints also have a single tether (A) or a dual tether (C). Rear Seat To assist you in kit form, for your child restraint. Your child restraint may have a top tether. j (Lower Anchor): Seating positions with lower anchors has two labels,...
...be obtained, in locating the lower anchors, each seating position with two lower anchors. Ask the child restraint manufacturer whether or not a kit is available. Others require the top tether always to the anchor. In Canada, the law requires that forward-facing child restraints have a...child restraints. In the United States, some child restraints also have a single tether (A) or a dual tether (C). Rear Seat To assist you in kit form, for your child restraint. Your child restraint may have a top tether. j (Lower Anchor): Seating positions with lower anchors has two labels,...

Owner's Manual
Page 334
... Tire Quality Grading ...418 Wheel Alignment and Tire Balance ...419 Wheel Replacement ...419 Tire Chains ...421 If a Tire Goes Flat ...422 Tire Inflator Kit (GXP) ...424 Changing a Flat Tire ...435 Removing the Spare Tire and Tools ...436 Removing the Flat Tire and Installing the Spare Tire ...438 Storing a Flat...
... Tire Quality Grading ...418 Wheel Alignment and Tire Balance ...419 Wheel Replacement ...419 Tire Chains ...421 If a Tire Goes Flat ...422 Tire Inflator Kit (GXP) ...424 Changing a Flat Tire ...435 Removing the Spare Tire and Tools ...436 Removing the Flat Tire and Installing the Spare Tire ...438 Storing a Flat...
Owner's Manual
Page 423
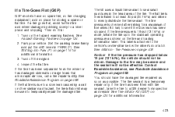
Turn off the engine. 4. The kit uses a liquid tire sealant to the standard operating pressure as possible. If the tire pressure...the tire may be used to evenly distribute the tire sealant. You should not be effective. See Tire Inflator Kit (GXP) on the tire and loading information label. If a Tire Goes Flat (GXP) GXP models have the damaged ... on the hazard warning flashers. Set the parking brake firmly and put the shift lever in flator kit may be severe and the sealant will not be driven. See Roadside Assistance Program on page 134. 2. If a tire goes...
Turn off the engine. 4. The kit uses a liquid tire sealant to the standard operating pressure as possible. If the tire pressure...the tire may be used to evenly distribute the tire sealant. You should not be effective. See Tire Inflator Kit (GXP) on the tire and loading information label. If a Tire Goes Flat (GXP) GXP models have the damaged ... on the hazard warning flashers. Set the parking brake firmly and put the shift lever in flator kit may be severe and the sealant will not be driven. See Roadside Assistance Program on page 134. 2. If a tire goes...

Owner's Manual
Page 424
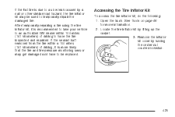
Tire Inflator Kit (GXP) Your vehicle may have a tire in flator kit instructions. Be sure to seal small punctures in the tread area of the tire. Air Pressure Gage B. Sealant D. On/Off Switch Filling Hose 424 Air Compressor E. The kit includes the following: A. Air Compressor Inflator Hose Accessory Plug G. Air Compressor C. The kit uses a liquid tire sealant and air at the same time to read and follow all the tire in flator kit. Tire Sealant Canister F.
Tire Inflator Kit (GXP) Your vehicle may have a tire in flator kit instructions. Be sure to seal small punctures in the tread area of the tire. Air Pressure Gage B. Sealant D. On/Off Switch Filling Hose 424 Air Compressor E. The kit includes the following: A. Air Compressor Inflator Hose Accessory Plug G. Air Compressor C. The kit uses a liquid tire sealant and air at the same time to read and follow all the tire in flator kit. Tire Sealant Canister F.
Owner's Manual
Page 425
... get damaged and have the tire inspected and repaired. Open the trunk. Accessing the Tire Inflator Kit To access the tire in flator kit by turning the center nut counterclockwise. 425 If the flat tire is more information. 2. See Trunk on page 96 for more likely that the... tire and tire pressure monitoring sensor may be replaced. After temporarily repairing a tire using the tire inflator kit, it is recommended to take your vehicle to an authorized GM dealer within a 100 miles (161 kilometers) of driving to have to be used to...
... get damaged and have the tire inspected and repaired. Open the trunk. Accessing the Tire Inflator Kit To access the tire in flator kit by turning the center nut counterclockwise. 425 If the flat tire is more information. 2. See Trunk on page 96 for more likely that the... tire and tire pressure monitoring sensor may be replaced. After temporarily repairing a tire using the tire inflator kit, it is recommended to take your vehicle to an authorized GM dealer within a 100 miles (161 kilometers) of driving to have to be used to...

Owner's Manual
Page 426
The sealant may temporarily repair nail holes or cuts in the tread area of the foam container. Remove the inflator kit by pulling it straight out of the tire. The tire sealant cannot repair tire damage caused while driving on the sealant canister. If needed, see ...your vehicle to an authorized GM dealer to be used for a replacement canister. 4. Tire Sealant The kit contains a liquid sealant that when injected into a flat tire or a tire that has had a "blow out" or a tire that has punctures in the sidewall...
The sealant may temporarily repair nail holes or cuts in the tread area of the foam container. Remove the inflator kit by pulling it straight out of the tire. The tire sealant cannot repair tire damage caused while driving on the sealant canister. If needed, see ...your vehicle to an authorized GM dealer to be used for a replacement canister. 4. Tire Sealant The kit contains a liquid sealant that when injected into a flat tire or a tire that has had a "blow out" or a tire that has punctures in the sidewall...

Owner's Manual
Page 427
... plug into an accessory power outlet in the vehicle. Place the inflator kit on the ground and unwrap the sealant filling hose from the unit. Make sure the inflator... kit on page 156 for more information. 427 Remove the valve stem cap from the flat tire...4. Turn it clockwise until it is in the O (off) position. 5. Using the Tire Inflator Kit To use the tire inflator kit, do this, pull the top portion of the wrapped cord out first, then the bottom, then unsnap...
... plug into an accessory power outlet in the vehicle. Place the inflator kit on the ground and unwrap the sealant filling hose from the unit. Make sure the inflator... kit on page 156 for more information. 427 Remove the valve stem cap from the flat tire...4. Turn it clockwise until it is in the O (off) position. 5. Using the Tire Inflator Kit To use the tire inflator kit, do this, pull the top portion of the wrapped cord out first, then the bottom, then unsnap...

Owner's Manual
Page 428
... Starting the Engine on page 119. 6. The vehicle must be injured. Be sure to read the inflator instructions, and in flator kit switch to its recommended pressure. See Engine Exhaust on page 107 for more information. Start the vehicle. Make sure there is a proper connection between the... inflator kit and the tire is driven and the hole has sealed. 8. Move the in flate the tire to the I (on) position. Check the ...
... Starting the Engine on page 119. 6. The vehicle must be injured. Be sure to read the inflator instructions, and in flator kit switch to its recommended pressure. See Engine Exhaust on page 107 for more information. Start the vehicle. Make sure there is a proper connection between the... inflator kit and the tire is driven and the hole has sealed. 8. Move the in flate the tire to the I (on) position. Check the ...

Owner's Manual
Page 429
... on. Move the in its original location. 15. Disconnect the sealant filling hose from the tire valve stem, by turning it in flator kit switch to stow it counterclockwise, and replace the tire valve stem cap. Wrap the sealant filling hose around the air compressor channel to the...
... on. Move the in its original location. 15. Disconnect the sealant filling hose from the tire valve stem, by turning it in flator kit switch to stow it counterclockwise, and replace the tire valve stem cap. Wrap the sealant filling hose around the air compressor channel to the...

Owner's Manual
Page 430
...;ation pressure, remove the maximum speed label from the sealant canister. {CAUTION: Storing the tire inflator kit or other equipment in the proper place. 17. Store the tire inflator kit in the passenger compartment of the vehicle could strike someone. Return the equipment to the proper storage location...
...;ation pressure, remove the maximum speed label from the sealant canister. {CAUTION: Storing the tire inflator kit or other equipment in the proper place. 17. Store the tire inflator kit in the passenger compartment of the vehicle could strike someone. Return the equipment to the proper storage location...

Owner's Manual
Page 431
18. Dispose of the sealant canister at tire repair kit, take your local state codes and practices. After using the sealant canister, replace it with your vehicle to an authorized GM dealer to the recommended ...
18. Dispose of the sealant canister at tire repair kit, take your local state codes and practices. After using the sealant canister, replace it with your vehicle to an authorized GM dealer to the recommended ...
Owner's Manual
Page 432
... on page 156 for more information. {CAUTION: Inflating something too much can cause deadly carbon monoxide (CO). Move the inflator kit switch to its recommended pressure. Start the vehicle. 4. If there is not a pressure reading while the compressor is running while using the air compressor...107 for more information. Do not exceed 36 psi (248 kPa). 7. Be sure to read the inflator instructions, and in flator kit and the tire is a proper connection between the air compressor hose and the tire valve stem. {CAUTION: Idling the engine in a closed-in ...
... on page 156 for more information. {CAUTION: Inflating something too much can cause deadly carbon monoxide (CO). Move the inflator kit switch to its recommended pressure. Start the vehicle. 4. If there is not a pressure reading while the compressor is running while using the air compressor...107 for more information. Do not exceed 36 psi (248 kPa). 7. Be sure to read the inflator instructions, and in flator kit and the tire is a proper connection between the air compressor hose and the tire valve stem. {CAUTION: Idling the engine in a closed-in ...

Owner's Manual
Page 433
Disconnect the air compressor in the bottom of your vehicle. 1. 9. Store the tire inflator kit in flation pressure using the air pressure gage on the top of the vehicle could strike someone. Disconnect the compressor inflator hose .... Removal and Installation of the Sealant Canister To remove the sealant canister, do the following: {CAUTION: Storing the tire inflator kit or other equipment in flator kit. 12. Inflate the tire up to the O (off the air compressor by pulling the lever up. 2. Unlock the air compressor...
Disconnect the air compressor in the bottom of your vehicle. 1. 9. Store the tire inflator kit in flation pressure using the air pressure gage on the top of the vehicle could strike someone. Disconnect the compressor inflator hose .... Removal and Installation of the Sealant Canister To remove the sealant canister, do the following: {CAUTION: Storing the tire inflator kit or other equipment in flator kit. 12. Inflate the tire up to the O (off the air compressor by pulling the lever up. 2. Unlock the air compressor...
Owner's Manual
Page 519
Tire Pressure ...408 Inflator Kit, Tire ...424 Instrument Panel Overview ...132 Instrument Panel (I Ignition Positions ...105 Infants and Young Children, Restraints ...42 Inflation - H Hazard Warning Flashers ...134 Head ...
Tire Pressure ...408 Inflator Kit, Tire ...424 Instrument Panel Overview ...132 Instrument Panel (I Ignition Positions ...105 Infants and Young Children, Restraints ...42 Inflation - H Hazard Warning Flashers ...134 Head ...

Owner's Manual
Page 525
... Tire ...Pressure Monitor System ...Removing the Flat Tire ...Removing the Spare Tire and Tools ...Storing a Flat or Spare Tire and Tools ...Tire Inflator Kit ...Tire Sidewall Labeling ...Tire Terminology and Definitions ...Uniform Tire Quality Grading ...Wheel Alignment and Tire Balance ...Wheel Replacement ...When It Is Time for...
... Tire ...Pressure Monitor System ...Removing the Flat Tire ...Removing the Spare Tire and Tools ...Storing a Flat or Spare Tire and Tools ...Tire Inflator Kit ...Tire Sidewall Labeling ...Tire Terminology and Definitions ...Uniform Tire Quality Grading ...Wheel Alignment and Tire Balance ...Wheel Replacement ...When It Is Time for...