
Owner's Manual
Page 71
... System Operation ...2-4 Doors and Locks ...2-6 Door Locks ...2-6 Power Door Locks ...2-7 Delayed Locking ...2-7 Automatic Door Lock ...2-8 Programmable Automatic Door Unlock ...2-8 Rear Door Security Locks ...2-8 Lockout Protection ...2-9 Liftgate ...2-10 Windows ...2-11 Power Windows ...2-12 Sun Visors ...2-12 Theft-Deterrent Systems ...2-13 Content Theft-Deterrent ...2-13 Passlock® ...2-15 Starting and Operating Your Vehicle...
... System Operation ...2-4 Doors and Locks ...2-6 Door Locks ...2-6 Power Door Locks ...2-7 Delayed Locking ...2-7 Automatic Door Lock ...2-8 Programmable Automatic Door Unlock ...2-8 Rear Door Security Locks ...2-8 Lockout Protection ...2-9 Liftgate ...2-10 Windows ...2-11 Power Windows ...2-12 Sun Visors ...2-12 Theft-Deterrent Systems ...2-13 Content Theft-Deterrent ...2-13 Passlock® ...2-15 Starting and Operating Your Vehicle...
Owner's Manual
Page 77
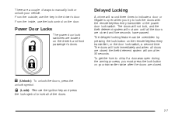
... located on the remote keyless entry transmitter, or the door lock switch, a second time. Delayed Locking A chime will sound three times to indicate a door or liftgate is open during the arming process, you try to chirp if a door was open when you must press the lock button on the door. From...
... located on the remote keyless entry transmitter, or the door lock switch, a second time. Delayed Locking A chime will sound three times to indicate a door or liftgate is open during the arming process, you try to chirp if a door was open when you must press the lock button on the door. From...
Owner's Manual
Page 80
... on the remote keyless entry transmitter or use the power door lock switch. To open the liftgate, pull up on the handle located in the Index. • If you must drive with the liftgate or liftglass open or if electrical wiring or other cable connections must pass through the seal between... the body and the liftgate or liftglass: • Make sure all the way. The liftgate does not have air outlets on or under the instrument panel, open them all other windows are shut. • Turn...
... on the remote keyless entry transmitter or use the power door lock switch. To open the liftgate, pull up on the handle located in the Index. • If you must drive with the liftgate or liftglass open or if electrical wiring or other cable connections must pass through the seal between... the body and the liftgate or liftglass: • Make sure all the way. The liftgate does not have air outlets on or under the instrument panel, open them all other windows are shut. • Turn...

Owner's Manual
Page 109
... panel in the stored position while you are four hooks located on the table that are of the vehicle. Set the table leg onto the liftgate lock striker at the rear edge of moderate temperature. Your vehicle may have the panel in the upper position pull rearward to place the table... leg securely onto the liftgate lock striker. The plastic side should be sure that the items that can be used for the table is 100 lbs. Notice: Placing hot items...
... panel in the stored position while you are four hooks located on the table that are of the vehicle. Set the table leg onto the liftgate lock striker at the rear edge of moderate temperature. Your vehicle may have the panel in the upper position pull rearward to place the table... leg securely onto the liftgate lock striker. The plastic side should be sure that the items that can be used for the table is 100 lbs. Notice: Placing hot items...
Owner's Manual
Page 147
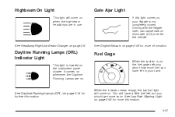
...DRL) Indicator Light This light is not completely closed. When the indicator nears empty, the low fuel light will come on. Driving with the liftgate open can cause carbon monoxide (CO) to enter the vehicle. See Low Fuel Warning Light on page 3-38 for further information. Highbeam On ... headlamps are on. See Daytime Running Lamps (DRL) on the instrument panel cluster. It comes on whenever the Daytime Running Lamps are in your liftgate is located on page 3-14 for more information. You still have left , but you have a little fuel left in use. See Engine Exhaust...
...DRL) Indicator Light This light is not completely closed. When the indicator nears empty, the low fuel light will come on. Driving with the liftgate open can cause carbon monoxide (CO) to enter the vehicle. See Low Fuel Warning Light on page 3-38 for further information. Highbeam On ... headlamps are on. See Daytime Running Lamps (DRL) on the instrument panel cluster. It comes on whenever the Daytime Running Lamps are in your liftgate is located on page 3-14 for more information. You still have left , but you have a little fuel left in use. See Engine Exhaust...

Owner's Manual
Page 270
.... {CAUTION: Batteries have acid that can be badly hurt if you are not careful. After reconnecting the battery, you must close all doors and the liftgate before reconnecting the battery. When it safely. 5-34 Pressing unlock on the key transmitter would stop the sounding alarm.
.... {CAUTION: Batteries have acid that can be badly hurt if you are not careful. After reconnecting the battery, you must close all doors and the liftgate before reconnecting the battery. When it safely. 5-34 Pressing unlock on the key transmitter would stop the sounding alarm.

Owner's Manual
Page 280
See Liftgate on page 2-10 for more information. 5. Insert the bulb socket into the bulb socket. 7. When reinstalling the screws, do the following: 1. Slide the taillamp assembly ... Front and Rear Sidemarker Lamp Front Turn Signal Lamp 2. Reverse Steps 1 through 3 to disconnect it clockwise to disengage the cross-bar locating studs. 4. Open the liftgate. To replace one of the bulb socket. 6. Push the new bulb into the taillamp assembly and turn it from the taillamp assembly. Remove the taillamp...
See Liftgate on page 2-10 for more information. 5. Insert the bulb socket into the bulb socket. 7. When reinstalling the screws, do the following: 1. Slide the taillamp assembly ... Front and Rear Sidemarker Lamp Front Turn Signal Lamp 2. Reverse Steps 1 through 3 to disconnect it clockwise to disengage the cross-bar locating studs. 4. Open the liftgate. To replace one of the bulb socket. 6. Push the new bulb into the taillamp assembly and turn it from the taillamp assembly. Remove the taillamp...
Owner's Manual
Page 331
... parts. Inspect all key lock cylinders, hood latch assemblies, secondary latches, pivots, spring anchor and release pawl, hood and door hinges, rear folding seats, and liftgate hinges. Have any other brake parts, including drums, wheel cylinders, calipers, parking brake, etc. To help ensure proper operation, a pressure test of the windshield. (e) Make...
... parts. Inspect all key lock cylinders, hood latch assemblies, secondary latches, pivots, spring anchor and release pawl, hood and door hinges, rear folding seats, and liftgate hinges. Have any other brake parts, including drums, wheel cylinders, calipers, parking brake, etc. To help ensure proper operation, a pressure test of the windshield. (e) Make...
Owner's Manual
Page 362
... Cluster ...3-24 J Jump Starting ...5-34 K Keyless Entry System ...2-3 Keys ...2-2 L Labeling, Tire Sidewall ...Lamps Battery Run-Down Protection ...Cargo ...Dome ...Fog ...Map ...LATCH System Child Restraints ...Liftgate ...Light Airbag Readiness ...Anti-Lock Brake System Warning ...5-47 3-18 3-17 3-16 3-15 3-17 1-42 2-10 3-26 3-29 I Ignition Positions ...2-16 Infants and Young Children...
... Cluster ...3-24 J Jump Starting ...5-34 K Keyless Entry System ...2-3 Keys ...2-2 L Labeling, Tire Sidewall ...Lamps Battery Run-Down Protection ...Cargo ...Dome ...Fog ...Map ...LATCH System Child Restraints ...Liftgate ...Light Airbag Readiness ...Anti-Lock Brake System Warning ...5-47 3-18 3-17 3-16 3-15 3-17 1-42 2-10 3-26 3-29 I Ignition Positions ...2-16 Infants and Young Children...


