Owner's Manual
Page 1
2006 Pontiac Torrent Owner Manual Seats and Restraint Systems ...1-1 Front Seats ...1-2 Rear Seats ...1-10 Safety Belts ...1-12 Child Restraints ...1-30 Airbag System ...1-53 Restraint System Check ...1-62 Features and Controls ...2-1 Keys ...2-2 Doors and Locks ...2-6 Windows ...2-11 Theft-...Deterrent Systems ...2-13 Starting and Operating Your Vehicle ...2-15 Mirrors ...2-27 OnStar® System ...2-32 Storage Areas ...2-34 Sunroof ...2-40 Instrument Panel ...3-1 Instrument Panel Overview ...3-4 Climate Controls ...
2006 Pontiac Torrent Owner Manual Seats and Restraint Systems ...1-1 Front Seats ...1-2 Rear Seats ...1-10 Safety Belts ...1-12 Child Restraints ...1-30 Airbag System ...1-53 Restraint System Check ...1-62 Features and Controls ...2-1 Keys ...2-2 Doors and Locks ...2-6 Windows ...2-11 Theft-...Deterrent Systems ...2-13 Starting and Operating Your Vehicle ...2-15 Mirrors ...2-27 OnStar® System ...2-32 Storage Areas ...2-34 Sunroof ...2-40 Instrument Panel ...3-1 Instrument Panel Overview ...3-4 Climate Controls ...

Owner's Manual
Page 66
... also occur from leaving the vehicle. {CAUTION: When an airbag in flate an airbag, windshields are broken by opening a window or a door. Some components of the windshield or being able to do so. These components include the steering wheel hub for the driver's frontal airbag and the... instrument panel for people with roof-mounted side impact airbags, the ceiling of asthma or other breathing trouble. If you may not even realize the airbag...
... also occur from leaving the vehicle. {CAUTION: When an airbag in flate an airbag, windshields are broken by opening a window or a door. Some components of the windshield or being able to do so. These components include the steering wheel hub for the driver's frontal airbag and the... instrument panel for people with roof-mounted side impact airbags, the ceiling of asthma or other breathing trouble. If you may not even realize the airbag...
Owner's Manual
Page 71
... Storage Area ...2-35 Luggage Carrier ...2-35 Rear Compartment Storage Panel/Cover ...2-37 Table ...2-39 Convenience Net ...2-40 Sunroof ...2-40 2-1 Keys ...2-2 Remote Keyless Entry System ...2-3 Remote Keyless Entry System Operation ...2-4 Doors and Locks ...2-6 Door Locks ...2-6 Power Door Locks ...2-7 Delayed Locking ...2-7 Automatic Door Lock ...2-8 Programmable Automatic Door Unlock ...2-8 Rear Door Security Locks ...2-8 Lockout Protection ...2-9 Liftgate ...2-10 Windows ...2-11 Power...
... Storage Area ...2-35 Luggage Carrier ...2-35 Rear Compartment Storage Panel/Cover ...2-37 Table ...2-39 Convenience Net ...2-40 Sunroof ...2-40 2-1 Keys ...2-2 Remote Keyless Entry System ...2-3 Remote Keyless Entry System Operation ...2-4 Doors and Locks ...2-6 Door Locks ...2-6 Power Door Locks ...2-7 Delayed Locking ...2-7 Automatic Door Lock ...2-8 Programmable Automatic Door Unlock ...2-8 Rear Door Security Locks ...2-8 Lockout Protection ...2-9 Liftgate ...2-10 Windows ...2-11 Power...
Owner's Manual
Page 80
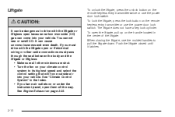
...shut. • Turn the fan on your climate control system to drive with the liftgate open the liftgate, pull up on or under the instrument panel, open because carbon monoxide (CO) gas can cause unconsciousness and even death. If you have a key lock cylinder. See "Climate Control System" in... to its highest speed and select the control setting that will force outside air into your vehicle. When closing the liftgate, use the power door lock switch. Liftgate To unlock the liftgate, press the unlock button on page 2-25. 2-10 The liftgate does not have air outlets on...
...shut. • Turn the fan on your climate control system to drive with the liftgate open the liftgate, pull up on or under the instrument panel, open because carbon monoxide (CO) gas can cause unconsciousness and even death. If you have a key lock cylinder. See "Climate Control System" in... to its highest speed and select the control setting that will force outside air into your vehicle. When closing the liftgate, use the power door lock switch. Liftgate To unlock the liftgate, press the unlock button on page 2-25. 2-10 The liftgate does not have air outlets on...

Owner's Manual
Page 106
... the load is evenly distributed on the siderails and lock the other crossrail above the opening of the rear door to reduce wind noise. Do not stand on the plastic lower body panel when loading cargo on the luggage carrier that weighs more information on vehicle capacity and loading, see Loading Your...
... the load is evenly distributed on the siderails and lock the other crossrail above the opening of the rear door to reduce wind noise. Do not stand on the plastic lower body panel when loading cargo on the luggage carrier that weighs more information on vehicle capacity and loading, see Loading Your...
Owner's Manual
Page 124
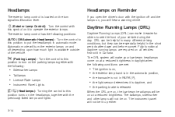
...): Turn the control to this symbol on all vehicles first sold in the short periods after dawn and before sunset. The instrument panel will hear a warning chime. Fully functional daytime running lamps are required on it to put the headlamps in automatic mode. O(Exterior Lamp Control...lamps. Daytime Running Lamps (DRL) Daytime Running Lamps (DRL) can be especially helpful in Canada. Headlamps on Reminder If you open the driver's door with the previously listed lamps and lights. 53(Headlamps): When the DRL are met: ; (Parking Lamps): Turn the control to this position ...
...): Turn the control to this symbol on all vehicles first sold in the short periods after dawn and before sunset. The instrument panel will hear a warning chime. Fully functional daytime running lamps are required on it to put the headlamps in automatic mode. O(Exterior Lamp Control...lamps. Daytime Running Lamps (DRL) Daytime Running Lamps (DRL) can be especially helpful in Canada. Headlamps on Reminder If you open the driver's door with the previously listed lamps and lights. 53(Headlamps): When the DRL are met: ; (Parking Lamps): Turn the control to this position ...
Owner's Manual
Page 126
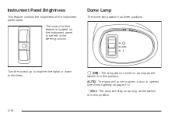
Turn the control up to brighten the lights or down to dim them. 9(Off): The lamp will not come on page 3-17. AUTO: The lamp will stay on as long as the switch is in this position. 3-16 Instrument Panel Brightness This feature controls the brightness of the steering column. R(On): The lamp will come on the instrument panel to the left of the instrument panel lights. Dome Lamp The dome lamp switch has three positions. The control for this position. See Entry Lighting on when a door is in this feature is located on as long as the switch is opened.
Turn the control up to brighten the lights or down to dim them. 9(Off): The lamp will not come on page 3-17. AUTO: The lamp will stay on as long as the switch is in this position. 3-16 Instrument Panel Brightness This feature controls the brightness of the steering column. R(On): The lamp will come on the instrument panel to the left of the instrument panel lights. Dome Lamp The dome lamp switch has three positions. The control for this position. See Entry Lighting on when a door is in this feature is located on as long as the switch is opened.

Owner's Manual
Page 135
... reading when the new odometer was last reset. If the new one can be set at zero and a label must be put on the instrument panel and shows how far your vehicle has been driven since the trip odometer was installed. To reset the trip odometer to zero, press and hold... the trip/reset button on the odometer indicating that the speedometer reading is located on the driver's door to the odometer/trip mode. You may wonder what happens if your vehicle needs a new odometer installed. Your odometer shows how far your vehicle has...
... reading when the new odometer was last reset. If the new one can be set at zero and a label must be put on the instrument panel and shows how far your vehicle has been driven since the trip odometer was installed. To reset the trip odometer to zero, press and hold... the trip/reset button on the odometer indicating that the speedometer reading is located on the driver's door to the odometer/trip mode. You may wonder what happens if your vehicle needs a new odometer installed. Your odometer shows how far your vehicle has...

Owner's Manual
Page 300
See Rear Compartment Storage Panel/Cover on page 2-37 and Table on page 5-73 for more information. 4. Remove the bolt retaining the spare tire. 3. Pull out the access door to access the load floor. Lift the load floor up and pull it out of the rear cargo area, behind an access... door. See Compact Spare Tire on page 2-39 for more information. Removing the Spare Tire and Tools The spare tire is located under the load fl...
See Rear Compartment Storage Panel/Cover on page 2-37 and Table on page 5-73 for more information. 4. Remove the bolt retaining the spare tire. 3. Pull out the access door to access the load floor. Lift the load floor up and pull it out of the rear cargo area, behind an access... door. See Compact Spare Tire on page 2-39 for more information. Removing the Spare Tire and Tools The spare tire is located under the load fl...
Owner's Manual
Page 319
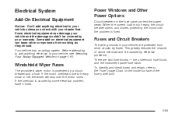
This greatly reduces the chance of the fuse panel door. Your vehicle has an airbag system. Fuses and Circuit Breakers The wiring circuits in the fuse panel protect the power seats. Before attempting to add anything electrical to your vehicle unless you check with your dealer first. To identify and check .... Some electrical equipment can keep other components from short circuits by electrical problems. There are two fuse blocks - the underhood fuse block, and the instrument panel fuse block.
This greatly reduces the chance of the fuse panel door. Your vehicle has an airbag system. Fuses and Circuit Breakers The wiring circuits in the fuse panel protect the power seats. Before attempting to add anything electrical to your vehicle unless you check with your dealer first. To identify and check .... Some electrical equipment can keep other components from short circuits by electrical problems. There are two fuse blocks - the underhood fuse block, and the instrument panel fuse block.
Owner's Manual
Page 320
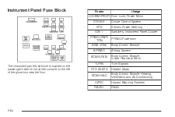
... Body Control Module, Heating, Ventilation and Air Conditioning Hazard Warning Flashers Radio 5-84 Instrument Panel Fuse Block Fuses Usage LOCK/MIRROR Door Lock, Power Mirror CRUISE EPS IGN 1 PRNDL/PWR TRN BCM (IGN) AIRBAG BCM/ISRVM The instrument panel fuse block is located on the passenger's side of the center console, to the...
... Body Control Module, Heating, Ventilation and Air Conditioning Hazard Warning Flashers Radio 5-84 Instrument Panel Fuse Block Fuses Usage LOCK/MIRROR Door Lock, Power Mirror CRUISE EPS IGN 1 PRNDL/PWR TRN BCM (IGN) AIRBAG BCM/ISRVM The instrument panel fuse block is located on the passenger's side of the center console, to the...
Owner's Manual
Page 321
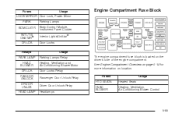
... on page 5-12 for more information on the driver's side of the engine compartment. Fuses Usage Engine Compartment Fuse Block LOCK/MIRROR Door Lock, Power Mirror PARK BCM/CLSTR INT LTS/ ONSTAR® DR LCK Relays PARK LAMP HVAC BLOWER DR LCK PASS DR UNLOCK DRV... DR UNLCK HEAD LAMP Parking Lamps Body Control Module, Instrument Panel Cluster Interior Lights/OnStar® Door Locks Usage Parking Lamps Relay Heating, Ventilation and Air Conditioning Blower Motor Door Locks Relay Passenger Door Unlock Relay Driver Door Unlock Relay Headlamps Fuses HTD SEATS HVAC BLOWER Heated Seats Heating, ...
... on page 5-12 for more information on the driver's side of the engine compartment. Fuses Usage Engine Compartment Fuse Block LOCK/MIRROR Door Lock, Power Mirror PARK BCM/CLSTR INT LTS/ ONSTAR® DR LCK Relays PARK LAMP HVAC BLOWER DR LCK PASS DR UNLOCK DRV... DR UNLCK HEAD LAMP Parking Lamps Body Control Module, Instrument Panel Cluster Interior Lights/OnStar® Door Locks Usage Parking Lamps Relay Heating, Ventilation and Air Conditioning Blower Motor Door Locks Relay Passenger Door Unlock Relay Driver Door Unlock Relay Headlamps Fuses HTD SEATS HVAC BLOWER Heated Seats Heating, ...
Owner's Manual
Page 360
... Driving ...4-2 Delayed Locking ...2-7 Doing Your Own Service Work ...5-4 Dome Lamp ...3-16 Door Automatic Door Lock ...2-8 Delayed Locking ...2-7 Locks ...2-6 Power Door Locks ...2-7 Programmable Automatic Door Unlock ...2-8 Rear Door Security Locks ...2-8 Driver Position, Safety Belt ...1-18 Seat Height Adjuster ...1-3 Six-Way... Winter ...4-26 E Electrical System Add-On Equipment ...Engine Compartment Fuse Block ...Fuses and Circuit Breakers ...Instrument Panel Fuse Block ...Power Windows and Other Power Options ...Windshield Wiper Fuses ...Engine Air Cleaner/Filter ...Battery ...Change...
... Driving ...4-2 Delayed Locking ...2-7 Doing Your Own Service Work ...5-4 Dome Lamp ...3-16 Door Automatic Door Lock ...2-8 Delayed Locking ...2-7 Locks ...2-6 Power Door Locks ...2-7 Programmable Automatic Door Unlock ...2-8 Rear Door Security Locks ...2-8 Driver Position, Safety Belt ...1-18 Seat Height Adjuster ...1-3 Six-Way... Winter ...4-26 E Electrical System Add-On Equipment ...Engine Compartment Fuse Block ...Fuses and Circuit Breakers ...Instrument Panel Fuse Block ...Power Windows and Other Power Options ...Windshield Wiper Fuses ...Engine Air Cleaner/Filter ...Battery ...Change...
Owner's Manual
Page 365
... Radio with CD ...3-40, 3-50 Radio with Six-Disc CD ...3-65 Setting the Time ...3-40 Theft-Deterrent ...3-79 Understanding Reception ...3-80 Rear Compartment Storage Panel/Cover ...2-37 Rear Door Security Locks ...2-8 Rear Safety Belt Comfort Guides ...1-27 Rear Seat Passengers, Safety Belts ...1-25 Rear Windshield Washer/Wiper ...3-10 Rearview Mirror, Automatic Dimming...
... Radio with CD ...3-40, 3-50 Radio with Six-Disc CD ...3-65 Setting the Time ...3-40 Theft-Deterrent ...3-79 Understanding Reception ...3-80 Rear Compartment Storage Panel/Cover ...2-37 Rear Door Security Locks ...2-8 Rear Safety Belt Comfort Guides ...1-27 Rear Seat Passengers, Safety Belts ...1-25 Rear Windshield Washer/Wiper ...3-10 Rearview Mirror, Automatic Dimming...


