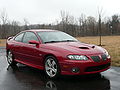
Owner's Manual
Page 1
2006 Pontiac GTO Owner Manual Seats and Restraint Systems ...1-1 Front Seats ...1-2 Safety Belts ...1-6 Child Restraints ...1-25 Airbag System ...1-46 Restraint System Check ...1-53 Features and Controls ...2-1 Keys ...2-2 Doors ... ...5-51 Appearance Care ...5-76 Vehicle Identification ...5-85 Electrical System ...5-85 Capacities and Specifications ...5-90 Maintenance Schedule ...6-1 Maintenance Schedule ...6-2 Customer Assistance and Information ...7-1 Customer Assistance and Information ...7-2 Reporting Safety Defects ...7-13 Index ...1
2006 Pontiac GTO Owner Manual Seats and Restraint Systems ...1-1 Front Seats ...1-2 Safety Belts ...1-6 Child Restraints ...1-25 Airbag System ...1-46 Restraint System Check ...1-53 Features and Controls ...2-1 Keys ...2-2 Doors ... ...5-51 Appearance Care ...5-76 Vehicle Identification ...5-85 Electrical System ...5-85 Capacities and Specifications ...5-90 Maintenance Schedule ...6-1 Maintenance Schedule ...6-2 Customer Assistance and Information ...7-1 Customer Assistance and Information ...7-2 Reporting Safety Defects ...7-13 Index ...1

Owner's Manual
Page 2
GENERAL MOTORS, GM, the GM Emblem, PONTIAC, the PONTIAC Emblem and the name GTO are on the road. For vehicles first sold , leave this manual in the vehicle. Index A good place to quickly locate information about the features and controls for Pontiac Division wherever it appears in U.S.A. Pictures and words work...64257;rst receive their new vehicle. Part No. 06GTO A First Printing ii © 2005 General Motors Corporation. This manual includes the latest information at the time it can be there if it is done, it was printed. If this manual in the manual and the page number ...
GENERAL MOTORS, GM, the GM Emblem, PONTIAC, the PONTIAC Emblem and the name GTO are on the road. For vehicles first sold , leave this manual in the vehicle. Index A good place to quickly locate information about the features and controls for Pontiac Division wherever it appears in U.S.A. Pictures and words work...64257;rst receive their new vehicle. Part No. 06GTO A First Printing ii © 2005 General Motors Corporation. This manual includes the latest information at the time it can be there if it is done, it was printed. If this manual in the manual and the page number ...

Owner's Manual
Page 4
... you might see CAUTION and NOTICE warnings in different colors or in Section 5 iv There are shown along with the text describing the operation or information relating to help figuring out a specific name of text. A notice tells about something that can damage the vehicle. They use symbols instead of...
... you might see CAUTION and NOTICE warnings in different colors or in Section 5 iv There are shown along with the text describing the operation or information relating to help figuring out a specific name of text. A notice tells about something that can damage the vehicle. They use symbols instead of...

Owner's Manual
Page 40
See Lower Anchors and Tethers for Children (LATCH) on page 1-37 for more information. When securing an add-on child restraint, refer to the instructions that come with that an unsecured child restraint can be endangered in a crash if ...
See Lower Anchors and Tethers for Children (LATCH) on page 1-37 for more information. When securing an add-on child restraint, refer to the instructions that come with that an unsecured child restraint can be endangered in a crash if ...

Owner's Manual
Page 45
... the child restraint will be placed. The top tether anchors are located behind the passenger side rear head restraint. Pull up on page 2-9 for additional information. 1-39 j (Lower Anchor): Seating positions with top tether anchors. Be sure to this handle. Lower Anchor and Top Tether Anchor Locations i (Top Tether Anchor): Seating...
... the child restraint will be placed. The top tether anchors are located behind the passenger side rear head restraint. Pull up on page 2-9 for additional information. 1-39 j (Lower Anchor): Seating positions with top tether anchors. Be sure to this handle. Lower Anchor and Top Tether Anchor Locations i (Top Tether Anchor): Seating...

Owner's Manual
Page 46
... lower anchors, secure the child restraint with that restraint, and also the instructions in this happens. Put the child restraint on page 1-36 for additional information. {CAUTION: Each top tether anchor and lower anchor in this position. Accident statistics show that the top tether must be injured if this manual. 1-40...
... lower anchors, secure the child restraint with that restraint, and also the instructions in this happens. Put the child restraint on page 1-36 for additional information. {CAUTION: Each top tether anchor and lower anchor in this position. Accident statistics show that the top tether must be injured if this manual. 1-40...

Owner's Manual
Page 53
... malfunctions. Always wear your vehicle. Neither the CAUTION: (Continued) There is an airbag readiness light on page 1-28. {CAUTION: Anyone who is designed for more information. 1-47 See Airbag Readiness Light on page 3-25 for them. To read how, see Older Children on page 1-25 and Infants and Young Children on...
... malfunctions. Always wear your vehicle. Neither the CAUTION: (Continued) There is an airbag readiness light on page 1-28. {CAUTION: Anyone who is designed for more information. 1-47 See Airbag Readiness Light on page 3-25 for them. To read how, see Older Children on page 1-25 and Infants and Young Children on...

Owner's Manual
Page 57
... breathing problems but cannot get out as soon as it is available). The service manual for people with a crash sensing and diagnostic module, which records information after an airbag inflates, then get them, the airbag system will include airbag modules and possibly other parts. • Your vehicle is dust...
... breathing problems but cannot get out as soon as it is available). The service manual for people with a crash sensing and diagnostic module, which records information after an airbag inflates, then get them, the airbag system will include airbag modules and possibly other parts. • Your vehicle is dust...

Owner's Manual
Page 58
You do so. If you add things that could keep the airbag system from working properly. If you have information about this, you should be injured if you are probably part of the vehicle that change your vehicle's frame, bumper system, front end sheet metal ... about servicing your vehicle and the airbag system. The airbag system does not need regular maintenance. 1-52 To purchase a service manual, see Service Publications Ordering Information on page 7-14. Also, the airbag system may keep the airbags from working properly? They are close to do not want the system to in...
You do so. If you add things that could keep the airbag system from working properly. If you have information about this, you should be injured if you are probably part of the vehicle that change your vehicle's frame, bumper system, front end sheet metal ... about servicing your vehicle and the airbag system. The airbag system does not need regular maintenance. 1-52 To purchase a service manual, see Service Publications Ordering Information on page 7-14. Also, the airbag system may keep the airbags from working properly? They are close to do not want the system to in...

Owner's Manual
Page 63
... to purchase one. Then, when leaving your vehicle and main key with a security card that locks and unlocks the glove box. In an emergency, contact Pontiac Roadside Assistance. See Roadside Assistance Program on page 7-6 for your vehicle, including key numbers, and the radio PIN. The vehicle comes with a parking attendant, you..., away from your vehicle, you . Be sure you will have spare keys. 2-3 If a replacement key is another key that lists various security numbers for more information. The main key can be kept in .
... to purchase one. Then, when leaving your vehicle and main key with a security card that locks and unlocks the glove box. In an emergency, contact Pontiac Roadside Assistance. See Roadside Assistance Program on page 7-6 for your vehicle, including key numbers, and the radio PIN. The vehicle comes with a parking attendant, you..., away from your vehicle, you . Be sure you will have spare keys. 2-3 If a replacement key is another key that lists various security numbers for more information. The main key can be kept in .
Owner's Manual
Page 69
... the seal between the body and the trunk lid: • Make sure all the way. See Vehicle Personalization on page 2-31 for more information on page 2-5 for more information. See Climate Control System. • If you must drive with your vehicle. It can be programmed to be dangerous to unlock the doors...
... the seal between the body and the trunk lid: • Make sure all the way. See Vehicle Personalization on page 2-31 for more information on page 2-5 for more information. See Climate Control System. • If you must drive with your vehicle. It can be programmed to be dangerous to unlock the doors...
Owner's Manual
Page 74
... we put on it can service the theft-deterrent system to have a new key made. See Fuses and Circuit Breakers on page 5-86 for more information on page 7-6. The correct key will be able to ON. Although your engine if you may not be serviced by your vehicle. The theft-deterrent...
... we put on it can service the theft-deterrent system to have a new key made. See Fuses and Circuit Breakers on page 5-86 for more information on page 7-6. The correct key will be able to ON. Although your engine if you may not be serviced by your vehicle. The theft-deterrent...

Owner's Manual
Page 83
... gear if you prefer. You must complete the shift into any gear except FOURTH (4) when the 1 TO 4 SHIFT light comes on page 3-33 for more information. Shift only from FIRST (1) to FOURTH (4) instead of FIRST (1) to 31 km/h) and • you get the best possible fuel economy. 2-23 See One-to...
... gear if you prefer. You must complete the shift into any gear except FOURTH (4) when the 1 TO 4 SHIFT light comes on page 3-33 for more information. Shift only from FIRST (1) to FOURTH (4) instead of FIRST (1) to 31 km/h) and • you get the best possible fuel economy. 2-23 See One-to...

Owner's Manual
Page 92
... enter the programming mode. The programming mode is not accessible if an alarm warning has been activated or a warning symbol on the instrument panel, to inform you are adjusting. R Q (Programming Mode Selection): When the Options Menu is left for three seconds. There are help screen displays to the right of the...
... enter the programming mode. The programming mode is not accessible if an alarm warning has been activated or a warning symbol on the instrument panel, to inform you are adjusting. R Q (Programming Mode Selection): When the Options Menu is left for three seconds. There are help screen displays to the right of the...

Owner's Manual
Page 93
... panel, audio system, and other general vehicle systems to continue. Use the up or down arrows to enable or disable the underspeed chime. The following information shows how to Arrival/Remaining Fuel set of displays is used to select Yes or No. Press the MODE button to allow time for more... information. If Yes is selected, the Time to Arrival/Distance to reset or customize features after a two second delay. The default selection is activated. If Yes ...
... panel, audio system, and other general vehicle systems to continue. Use the up or down arrows to enable or disable the underspeed chime. The following information shows how to Arrival/Remaining Fuel set of displays is used to select Yes or No. Press the MODE button to allow time for more... information. If Yes is selected, the Time to Arrival/Distance to reset or customize features after a two second delay. The default selection is activated. If Yes ...

Owner's Manual
Page 94
... is Yes. The default selection is activated. The default selection is used to select On or Off. Press the MODE button to continue. 2-34 Detailed information on page 3-46. Use the up or down arrows to enable or disable the audio system display on the center display. Press the MODE button...
... is Yes. The default selection is activated. The default selection is used to select On or Off. Press the MODE button to continue. 2-34 Detailed information on page 3-46. Use the up or down arrows to enable or disable the audio system display on the center display. Press the MODE button...
Owner's Manual
Page 96
... to continue. The default selection is 30 seconds. Press the MODE button to Early, Normal, or Late. See Headlamps on page 2-9 for more information. 2-36 Use the up or down arrows to select Yes or No. The default selection is Yes. IGNITION OFF COURTESY LAMP This option is used... The default selection is Yes. Use the up or down for more than half a second, all of the UNLOCK button on page 2-5 for more information. TWO STAGE UNLOCK This option is activated. The default selection is 30 seconds. Use the up or down arrows to adjust the sensitivity setting to...
... to continue. The default selection is 30 seconds. Press the MODE button to Early, Normal, or Late. See Headlamps on page 2-9 for more information. 2-36 Use the up or down arrows to select Yes or No. The default selection is Yes. IGNITION OFF COURTESY LAMP This option is used... The default selection is Yes. Use the up or down for more than half a second, all of the UNLOCK button on page 2-5 for more information. TWO STAGE UNLOCK This option is activated. The default selection is 30 seconds. Use the up or down arrows to adjust the sensitivity setting to...

Owner's Manual
Page 97
... To exit, do one of the following: • Press the MODE button to scroll through to the exit screen. • Drive the vehicle at more information. Use the up or down arrows to LOCK if the vehicle is stopped. If Yes is Indicators. See Remote Keyless Entry System Operation on page...
... To exit, do one of the following: • Press the MODE button to scroll through to the exit screen. • Drive the vehicle at more information. Use the up or down arrows to LOCK if the vehicle is stopped. If Yes is Indicators. See Remote Keyless Entry System Operation on page...

Owner's Manual
Page 108
... washer until the windshield is warmed. Cruise control does not work unless the vehicle speed is enabled. See Trip Computer on long trips. The Driver Information Center (DIC) will run for a few cycles to spray water onto the windshield. Otherwise the washer fluid can really help on page 3-33. 3-10...
... washer until the windshield is warmed. Cruise control does not work unless the vehicle speed is enabled. See Trip Computer on long trips. The Driver Information Center (DIC) will run for a few cycles to spray water onto the windshield. Otherwise the washer fluid can really help on page 3-33. 3-10...
Owner's Manual
Page 111
... of the vehicle have been linked to turn on the headlamps, together with the parking lamps, taillamps, sidemarker lamps, and license plate lamps. For more information see Vehicle Personalization on page 2-31. 3-13 ; (Parking Lamps): Turn the switch to this position to turn on the parking lamps, together with the taillamps...
... of the vehicle have been linked to turn on the headlamps, together with the parking lamps, taillamps, sidemarker lamps, and license plate lamps. For more information see Vehicle Personalization on page 2-31. 3-13 ; (Parking Lamps): Turn the switch to this position to turn on the parking lamps, together with the taillamps...