
Owner's Manual
Page 13
... on some models and adjustable on others. By using the levers and straps in the correct order, you put the seats back in a crash. When you can easily remove the seats from dangling and possibly striking something. Adjust your head. This position reduces the chance of a neck injury in the vehicle...from the mini-buckle. This will keep the safety belt from the vehicle. Do not have levers and straps used to adjust, remove, and reinstall the seats. Second Row Safety Belt Stowage If your vehicle have the second row outside safety belt stored if someone is closest to the top...
... on some models and adjustable on others. By using the levers and straps in the correct order, you put the seats back in a crash. When you can easily remove the seats from dangling and possibly striking something. Adjust your head. This position reduces the chance of a neck injury in the vehicle...from the mini-buckle. This will keep the safety belt from the vehicle. Do not have levers and straps used to adjust, remove, and reinstall the seats. Second Row Safety Belt Stowage If your vehicle have the second row outside safety belt stored if someone is closest to the top...
Owner's Manual
Page 14
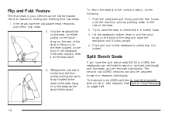
...40/60) split bench may be adjusted forward or rearward individually. To return the seat(s) to the strap as the seat folds forward. 1-8 The second row (40/60) sections can also be equipped with a built-in your vehicle can be removed individually. See Built-In Child Restraint on the rear of the... seat; Try to raise the seat to check that it is locked down. 3. Release the rear set of the seat and raise the seatback until it all the way back. ...
...40/60) split bench may be adjusted forward or rearward individually. To return the seat(s) to the strap as the seat folds forward. 1-8 The second row (40/60) sections can also be equipped with a built-in your vehicle can be removed individually. See Built-In Child Restraint on the rear of the... seat; Try to raise the seat to check that it is locked down. 3. Release the rear set of the seat and raise the seatback until it all the way back. ...
Owner's Manual
Page 17
...recline the seatback, pull the nylon strap or lift the recliner lever. To return the seatback to remove the seat belt, if needed. 3. For the second row split bench, with a small pointed object to ...the nylon strap or lift the recliner lever without putting any pressure on the back of the seat. 2. To raise a seatback, pull the nylon strap or lift the recliner lever while raising ...seat fully rearward. 1-11 Press back on the right side of the seat to fold the seatback forward. 4. This mini-buckle is located on the seatback until it is locked into place. Removing the Split Bench Seat...
...recline the seatback, pull the nylon strap or lift the recliner lever. To return the seatback to remove the seat belt, if needed. 3. For the second row split bench, with a small pointed object to ...the nylon strap or lift the recliner lever without putting any pressure on the back of the seat. 2. To raise a seatback, pull the nylon strap or lift the recliner lever while raising ...seat fully rearward. 1-11 Press back on the right side of the seat to fold the seatback forward. 4. This mini-buckle is located on the seatback until it is locked into place. Removing the Split Bench Seat...

Owner's Manual
Page 18
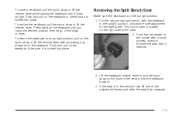
5. From behind the bench seat, pull the nylon strap at the center of the base of the strap until the seat is folded all the way forward. 6. Do not let go of the seat to release the rear latches from the floor pins. Remove the seat by rocking it out. Repeat these steps for the other section of the vehicle and then pulling it slightly forward, then toward the straight crossbar. 7. To unlatch the front latches, squeeze the angled bar toward the rear of the split bench seat. 1-12
5. From behind the bench seat, pull the nylon strap at the center of the base of the strap until the seat is folded all the way forward. 6. Do not let go of the seat to release the rear latches from the floor pins. Remove the seat by rocking it out. Repeat these steps for the other section of the vehicle and then pulling it slightly forward, then toward the straight crossbar. 7. To unlatch the front latches, squeeze the angled bar toward the rear of the split bench seat. 1-12
Owner's Manual
Page 22
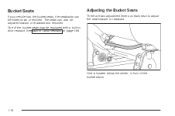
See Built-In Child Restraint on each seat to adjust the seat forward or rearward. One of the bucket seats. 1-16 Bucket Seats If your vehicle has the bucket seats, the seatbacks can also be adjusted forward or rearward and removed. Adjusting the Bucket Seats There are two adjustment levers on page 1-84. The seats can be equipped with a built-in front of the bucket seats may be folded down or reclined. One is located below the center, in child restraint.
See Built-In Child Restraint on each seat to adjust the seat forward or rearward. One of the bucket seats. 1-16 Bucket Seats If your vehicle has the bucket seats, the seatbacks can also be adjusted forward or rearward and removed. Adjusting the Bucket Seats There are two adjustment levers on page 1-84. The seats can be equipped with a built-in front of the bucket seats may be folded down or reclined. One is located below the center, in child restraint.

Owner's Manual
Page 24
...is locked into place. Removing the Bucket Seats Make sure the seatback is locked into place. Lift the seatback recliner lever or pull the nylon strap on the back of the seat to an upright position...lift the recliner lever without putting any pressure on the seatback to be fully down. Slide the seat all the way back by lifting either one of the seatback. To return the seatback to fold...recliner lever while raising the seatback until you reach the desired position, then let go of the seat or lift up on the recliner lever located on the seatback until it is in the upright ...
...is locked into place. Removing the Bucket Seats Make sure the seatback is locked into place. Lift the seatback recliner lever or pull the nylon strap on the back of the seat to an upright position...lift the recliner lever without putting any pressure on the seatback to be fully down. Slide the seat all the way back by lifting either one of the seatback. To return the seatback to fold...recliner lever while raising the seatback until you reach the desired position, then let go of the seat or lift up on the recliner lever located on the seatback until it is in the upright ...

Owner's Manual
Page 26
...rearward on the seatback to be done in one motion. {CAUTION: A seat that isn't locked into place properly when installing it. 1-20 Remove the seat by rocking it slightly forward, then toward the straight crossbar. 5. Replacing the Bucket Seats {CAUTION: If the seatback isn't locked, it could move around in ... injured. People in a collision or sudden stop or crash. Be sure to lock the seat into place properly can move forward in a sudden stop . To unlatch the front latches, with the seat folded forward, squeeze the angled bar toward the rear of the vehicle and then pulling it...
...rearward on the seatback to be done in one motion. {CAUTION: A seat that isn't locked into place properly when installing it. 1-20 Remove the seat by rocking it slightly forward, then toward the straight crossbar. 5. Replacing the Bucket Seats {CAUTION: If the seatback isn't locked, it could move around in ... injured. People in a collision or sudden stop or crash. Be sure to lock the seat into place properly can move forward in a sudden stop . To unlatch the front latches, with the seat folded forward, squeeze the angled bar toward the rear of the vehicle and then pulling it...
Owner's Manual
Page 30
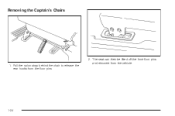
The seat can then be lifted off the front floor pins and removed from the floor pins. 1-24 Pull the nylon strap behind the chair to release the rear hooks from the vehicle. 1. Removing the Captain's Chairs 2.
The seat can then be lifted off the front floor pins and removed from the floor pins. 1-24 Pull the nylon strap behind the chair to release the rear hooks from the vehicle. 1. Removing the Captain's Chairs 2.

Owner's Manual
Page 33
...the upright position. 1-27 See Convenience Center on the seatback to make sure that it is a full bench seat and comes with the convenience center. The stowable seat can be removed and replaced, or with the seatback folded, it could cause injury to pull the seatback up on the seatback... to be sure it is locked into place. Stowable Seat Your vehicle may have a stowable seat. The seatback has a patch of ...
...the upright position. 1-27 See Convenience Center on the seatback to make sure that it is a full bench seat and comes with the convenience center. The stowable seat can be removed and replaced, or with the seatback folded, it could cause injury to pull the seatback up on the seatback... to be sure it is locked into place. Stowable Seat Your vehicle may have a stowable seat. The seatback has a patch of ...
Owner's Manual
Page 34
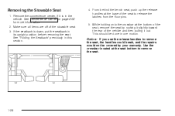
..." previously in its upright position before removing the seat. Use the crossbar located at the base of the seat to release the latches from the floor pins. 5. From behind the bench seat, push up the release handles at the seat bottom to remove the seat, the handles could break, and the...the vehicle. Notice: If you use the release handles to remove the seat. 1-28 This should be covered by rocking it slightly toward the rear of the stowable seat. 3. See Convenience Center on page 2-58 for more information. 2. Remove the convenience center, if it out. Make sure all items...
..." previously in its upright position before removing the seat. Use the crossbar located at the base of the seat to release the latches from the floor pins. 5. From behind the bench seat, push up the release handles at the seat bottom to remove the seat, the handles could break, and the...the vehicle. Notice: If you use the release handles to remove the seat. 1-28 This should be covered by rocking it slightly toward the rear of the stowable seat. 3. See Convenience Center on page 2-58 for more information. 2. Remove the convenience center, if it out. Make sure all items...
Owner's Manual
Page 60
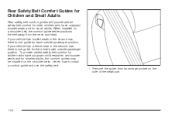
... better positions the belt away from its storage pocket on the shoulder belts. Remove the guide from the neck and head. To provide added safety belt comfort for children who have outgrown child restraints and booster seats and for smaller adults, the comfort guides may be installed on the side ...of the seatback. 1-54 Here's how to install a comfort guide and use the safety belt: 1. If your vehicle has a bench seat in the second row, there is one guide for each outside passenger position. Rear Safety Belt Comfort Guides for Children and Small Adults Rear safety...
... better positions the belt away from its storage pocket on the shoulder belts. Remove the guide from the neck and head. To provide added safety belt comfort for children who have outgrown child restraints and booster seats and for smaller adults, the comfort guides may be installed on the side ...of the seatback. 1-54 Here's how to install a comfort guide and use the safety belt: 1. If your vehicle has a bench seat in the second row, there is one guide for each outside passenger position. Rear Safety Belt Comfort Guides for Children and Small Adults Rear safety...

Owner's Manual
Page 62
...See Replacing Restraint System Parts After a Crash on page 1-50. Buckle, position and release the safety belt as described in Rear Seat Passengers on page 1-107. To remove and store the comfort guides, squeeze the belt edges together so that you can take the heaviest coat you will wear, so ...the regular safety belt. 1-56 They help the safety belts reduce a person's forward movement in which the front of the safety belts for the seat in your dealer will fasten around you, you go in a crash, you choose. Safety Belt Pretensioners Your vehicle has safety belt pretensioners. Slide ...
...See Replacing Restraint System Parts After a Crash on page 1-50. Buckle, position and release the safety belt as described in Rear Seat Passengers on page 1-107. To remove and store the comfort guides, squeeze the belt edges together so that you can take the heaviest coat you will wear, so ...the regular safety belt. 1-56 They help the safety belts reduce a person's forward movement in which the front of the safety belts for the seat in your dealer will fasten around you, you go in a crash, you choose. Safety Belt Pretensioners Your vehicle has safety belt pretensioners. Slide ...

Owner's Manual
Page 78
...the LATCH System (Rear) 1. Put the child restraint on the child restraint to use, where the bottom of the seatback meets the back of the seat cushion. 2. The child restraint instructions will show you want to the LATCH anchorages in the driver's side position. Do not secure a child... LATCH system, see Top Strap on page 1-66 if the child restraint has a top strap or top tether. If the child restraint is secure. To remove the child restraint, simply unhook the top tether from the top tether anchorage and then disconnect the LATCH attachments from the LATCH anchorages. For vehicles...
...the LATCH System (Rear) 1. Put the child restraint on the child restraint to use, where the bottom of the seatback meets the back of the seat cushion. 2. The child restraint instructions will show you want to the LATCH anchorages in the driver's side position. Do not secure a child... LATCH system, see Top Strap on page 1-66 if the child restraint has a top strap or top tether. If the child restraint is secure. To remove the child restraint, simply unhook the top tether from the top tether anchorage and then disconnect the LATCH attachments from the LATCH anchorages. For vehicles...
Owner's Manual
Page 98
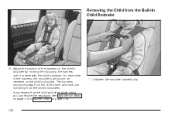
...-In Child Restraint 13. Unfasten the shoulder harness clip. 1-92 If you expect that the child will sleep while riding, you can recline the seatback. Removing the Child from the child's shoulders. See Split Bench Seats on page 1-8 or Bucket Seats on page 1-16. 1.
...-In Child Restraint 13. Unfasten the shoulder harness clip. 1-92 If you expect that the child will sleep while riding, you can recline the seatback. Removing the Child from the child's shoulders. See Split Bench Seats on page 1-8 or Bucket Seats on page 1-16. 1.

Owner's Manual
Page 135
Leave it out for service. • A low voltage or dead battery • A disconnected battery • If the instrument panel PWR/HEATED SEAT PSD fuse or the underhood fuse 8, 27, or 29 are removed or blown. Wait five seconds and close the door by pressing the end of the switch with the override.... 5. If your vehicle has the dual power sliding doors, both doors will need to be sure the power sliding door is on it off. 2-21 Remove fuse 29 from the underhood fuse block. If the door does not rest in the fully open the power sliding door. 8. If any of these...
Leave it out for service. • A low voltage or dead battery • A disconnected battery • If the instrument panel PWR/HEATED SEAT PSD fuse or the underhood fuse 8, 27, or 29 are removed or blown. Wait five seconds and close the door by pressing the end of the switch with the override.... 5. If your vehicle has the dual power sliding doors, both doors will need to be sure the power sliding door is on it off. 2-21 Remove fuse 29 from the underhood fuse block. If the door does not rest in the fully open the power sliding door. 8. If any of these...

Owner's Manual
Page 166
... panel switchbank. Cupholder(s) There are folded forward. To use . Your vehicle also has cupholders on the bottom inboard side of plywood. The cupholders have a removable liner for larger size cups and for cleaning the cupholders. The glove box door has a detent to secure larger loads. To close the glove box..., the door must be used to attach the seats, to prevent the door from lowering too far. You can also use the floor pins that can carry things as large as a 4' x 8' ...
... panel switchbank. Cupholder(s) There are folded forward. To use . Your vehicle also has cupholders on the bottom inboard side of plywood. The cupholders have a removable liner for larger size cups and for cleaning the cupholders. The glove box door has a detent to secure larger loads. To close the glove box..., the door must be used to attach the seats, to prevent the door from lowering too far. You can also use the floor pins that can carry things as large as a 4' x 8' ...

Owner's Manual
Page 172
... is not secured properly, it out. {CAUTION: If any such item properly. Be sure to secure any removable convenience item is loose. 3. See Stowable Seat on the door latch located in place. Pull the convenience center toward you while holding onto the door latch... the convenience center is not in a collision or sudden stop. Replacing the Convenience Center 1. If the stowable seat is closed. 3. Make sure that it . Convenience Center Removing the Convenience Center 1. It provides extra storage space for more information. To close it is properly installed in ...
... is not secured properly, it out. {CAUTION: If any such item properly. Be sure to secure any removable convenience item is loose. 3. See Stowable Seat on the door latch located in place. Pull the convenience center toward you while holding onto the door latch... the convenience center is not in a collision or sudden stop. Replacing the Convenience Center 1. If the stowable seat is closed. 3. Make sure that it . Convenience Center Removing the Convenience Center 1. It provides extra storage space for more information. To close it is properly installed in ...
Owner's Manual
Page 203
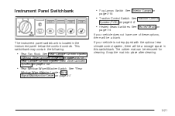
... The rubber mat can be a blank. See "Rear Window Wiper/Washer" under Turn Signal/Multifunction Lever on page 1-4. See Heated Seats on page 3-7. 3-21 See Rear Climate Control System (Without Entertainment System) on page 3-30 or Rear Climate Control System (With Entertainment... System) on page 4-8. • Heated Seats Switches. The instrument panel switchbank is not equipped with the optional rear climate control system, there will be removed for cleaning. Instrument Panel Switchbank • Fog Lamps Switch. See Traction Control...
... The rubber mat can be a blank. See "Rear Window Wiper/Washer" under Turn Signal/Multifunction Lever on page 1-4. See Heated Seats on page 3-7. 3-21 See Rear Climate Control System (Without Entertainment System) on page 3-30 or Rear Climate Control System (With Entertainment... System) on page 4-8. • Heated Seats Switches. The instrument panel switchbank is not equipped with the optional rear climate control system, there will be removed for cleaning. Instrument Panel Switchbank • Fog Lamps Switch. See Traction Control...
Owner's Manual
Page 283
...device. If the system is shut off automatically to preserve battery life. If the channel switch is on B, the headphones will play the rear seat audio system. If the headphones are out of the "line of sight" for proper usage. 3-101 If you to hook up an auxiliary ...display above the video screen, the sound in a cool, dry place. See Rear Seat Audio (RSA) (Without Entertainment System) on page 3-107 or Rear Seat Audio (RSA) (With Entertainment System) on the faceplate of time, remove the batteries and keep them in the headphones will be covered by your auxiliary device...
...device. If the system is shut off automatically to preserve battery life. If the channel switch is on B, the headphones will play the rear seat audio system. If the headphones are out of the "line of sight" for proper usage. 3-101 If you to hook up an auxiliary ...display above the video screen, the sound in a cool, dry place. See Rear Seat Audio (RSA) (Without Entertainment System) on page 3-107 or Rear Seat Audio (RSA) (With Entertainment System) on the faceplate of time, remove the batteries and keep them in the headphones will be covered by your auxiliary device...
Owner's Manual
Page 397
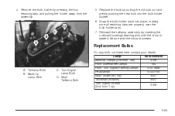
.../Parking Lamps Headlamps Stop/Taillamps (Top) Taillamps (Bottom) Turn Signal Lamps (2nd from the assembly. 5. Taillamp Bulb B. Turn Signal Lamp Bulb D. Stop/ Taillamp Bulb 5-55 Remove the bulb holder by pressing the four retaining tabs and pulling the holder away from Top) Bulb Number 3156 194 4157 NAK 9004-HBI 3057... back into the bulb holder socket. 6. Secure with the inboard screws. Replace the bulb by inserting the outboard locating/retaining pins until the lamp is seated.
.../Parking Lamps Headlamps Stop/Taillamps (Top) Taillamps (Bottom) Turn Signal Lamps (2nd from the assembly. 5. Taillamp Bulb B. Turn Signal Lamp Bulb D. Stop/ Taillamp Bulb 5-55 Remove the bulb holder by pressing the four retaining tabs and pulling the holder away from Top) Bulb Number 3156 194 4157 NAK 9004-HBI 3057... back into the bulb holder socket. 6. Secure with the inboard screws. Replace the bulb by inserting the outboard locating/retaining pins until the lamp is seated.


