
Owner's Manual
Page 69
... Transaxle Operation ...2-27 Parking Brake ...2-29 Shifting Into Park (P) ...2-30 Shifting Out of Park (P) ...2-32 Parking Your Vehicle/Key Removal ...2-32 Parking Over Things That Burn ...2-33 Engine Exhaust ...2-33 Running Your Engine While You Are Parked ...2-34 Mirrors ...2-35 Manual Rearview Mirror ...2-35 Outside Remote Control Mirror ...2-35 Outside Power Mirrors ...2-35...
... Transaxle Operation ...2-27 Parking Brake ...2-29 Shifting Into Park (P) ...2-30 Shifting Out of Park (P) ...2-32 Parking Your Vehicle/Key Removal ...2-32 Parking Over Things That Burn ...2-33 Engine Exhaust ...2-33 Running Your Engine While You Are Parked ...2-34 Mirrors ...2-35 Manual Rearview Mirror ...2-35 Outside Remote Control Mirror ...2-35 Outside Power Mirrors ...2-35...
Owner's Manual
Page 96
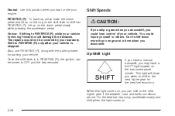
... more than one gear at a time when you start or idle your vehicle is in REVERSE (R), the ignition can shift to OFF and the key removed. When this position when you downshift. Once the shift lever is stopped. The repairs would not be turned to the next higher gear if the... slowly while pressing the accelerator pedal. Shift Speeds {CAUTION: If you skip a gear when you downshift, you when to shift to REVERSE (R) only after your engine. Let up on the ring on the instrument panel cluster.
... more than one gear at a time when you start or idle your vehicle is in REVERSE (R), the ignition can shift to OFF and the key removed. When this position when you downshift. Once the shift lever is stopped. The repairs would not be turned to the next higher gear if the... slowly while pressing the accelerator pedal. Shift Speeds {CAUTION: If you skip a gear when you downshift, you when to shift to REVERSE (R) only after your engine. Let up on the ring on the instrument panel cluster.

Owner's Manual
Page 98
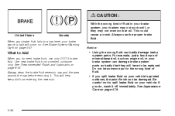
You or others could be sure your vehicle will not move suddenly. If you have left the engine running, the vehicle can be dangerous to OFF. 4. Hold the brake pedal down with your vehicle has an automatic transaxle, do the following to shift ... is in PARK (P) with you can roll. Shifting Into Park (P) 2. Move the shift lever into PARK (P): 1. To be injured. If your right foot and set . Remove the key and take it with the parking brake firmly set the parking brake. • Press and hold the button on page 4-41.
You or others could be sure your vehicle will not move suddenly. If you have left the engine running, the vehicle can be dangerous to OFF. 4. Hold the brake pedal down with your vehicle has an automatic transaxle, do the following to shift ... is in PARK (P) with you can roll. Shifting Into Park (P) 2. Move the shift lever into PARK (P): 1. To be injured. If your right foot and set . Remove the key and take it with the parking brake firmly set the parking brake. • Press and hold the button on page 4-41.

Owner's Manual
Page 126
... . Select the highest fan speed. 3. Do not drive the vehicle until all the windows are two modes to choose from happening, after turning off the engine. When A/C is pressed, an indicator light above the button will automatically turn the air-conditioning system on hot days: 1. Select the vent mode. 2. ... the system turns off recirculation automatically and runs the air-conditioning compressor unless the outside temperature is normal. It also helps the system to remove fog or frost from the air, so you select this button to cool down on or off. The air-conditioning system...
... . Select the highest fan speed. 3. Do not drive the vehicle until all the windows are two modes to choose from happening, after turning off the engine. When A/C is pressed, an indicator light above the button will automatically turn the air-conditioning system on hot days: 1. Select the vent mode. 2. ... the system turns off recirculation automatically and runs the air-conditioning compressor unless the outside temperature is normal. It also helps the system to remove fog or frost from the air, so you select this button to cool down on or off. The air-conditioning system...

Owner's Manual
Page 127
Be sure to remove fog of the windshield that the rear window defogger is activated. Notice: Don't use the MAX mode, with poor ventilation. The rear window defogger will ... license, tape, a decal or anything sharp on to let you could cut or damage the warming grid, and the repairs wouldn't be turned off the engine. An indicator light above the button will only run for approximately five minutes before turning off . Operation Tips • Clear away any ice, snow...
Be sure to remove fog of the windshield that the rear window defogger is activated. Notice: Don't use the MAX mode, with poor ventilation. The rear window defogger will ... license, tape, a decal or anything sharp on to let you could cut or damage the warming grid, and the repairs wouldn't be turned off the engine. An indicator light above the button will only run for approximately five minutes before turning off . Operation Tips • Clear away any ice, snow...

Owner's Manual
Page 221
... rules to get into your vehicle when you have the correct hitch equipment. If you do not go over the GVW limit for hitches. See Engine Exhaust on the Tire-Loading Information label at the rear edge of your vehicle. Use only a frame-mounted hitch that does not attach to the.... 4-43 After you install a trailer hitch? You will find these numbers on page 2-33. Here are proper. If you do, then be sure you remove the hitch. Then be sure to it. Hitches It is not intended for your vehicle, including the weight of the total loaded trailer weight (B). Do...
... rules to get into your vehicle when you have the correct hitch equipment. If you do not go over the GVW limit for hitches. See Engine Exhaust on the Tire-Loading Information label at the rear edge of your vehicle. Use only a frame-mounted hitch that does not attach to the.... 4-43 After you install a trailer hitch? You will find these numbers on page 2-33. Here are proper. If you do, then be sure you remove the hitch. Then be sure to it. Hitches It is not intended for your vehicle, including the weight of the total loaded trailer weight (B). Do...
Owner's Manual
Page 241
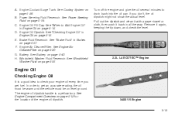
... See Battery on page 5-34. Remove it back in Engine Oil on page 5-15. See "Brake Fluid" in Engine Oil on page 5-15. G. See Windshield Washer Fluid on page 5-12 for the location of the engine oil dipstick. 3400 V6 Engine 5-15 Engine Air Cleaner/Filter. If you get ... and check the level. 2.2L L4 ECOTEC™ Engine Engine Oil Checking Engine Oil It is a yellow loop. Engine Oil Fill Cap. A. See Engine Air Cleaner/Filter on page 5-28. In order to Add Engine Oil" in all the way. See "Checking Engine Oil" in Brakes on level ground. B. F. Windshield ...
... See Battery on page 5-34. Remove it back in Engine Oil on page 5-15. See "Brake Fluid" in Engine Oil on page 5-15. G. See Windshield Washer Fluid on page 5-12 for the location of the engine oil dipstick. 3400 V6 Engine 5-15 Engine Air Cleaner/Filter. If you get ... and check the level. 2.2L L4 ECOTEC™ Engine Engine Oil Checking Engine Oil It is a yellow loop. Engine Oil Fill Cap. A. See Engine Air Cleaner/Filter on page 5-28. In order to Add Engine Oil" in all the way. See "Checking Engine Oil" in Brakes on level ground. B. F. Windshield ...
Owner's Manual
Page 246
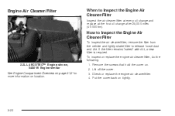
... dirt, a new filter is required. Remove the screws that hold the cover on tightly. 5-20 Check or replace the engine air cleaner/filter. 4. How to Inspect the Engine Air Cleaner/Filter To inspect the air cleaner/filter, remove the filter from the vehicle and lightly shake... filter to Inspect the Engine Air Cleaner/Filter Inspect the air cleaner...
... dirt, a new filter is required. Remove the screws that hold the cover on tightly. 5-20 Check or replace the engine air cleaner/filter. 4. How to Inspect the Engine Air Cleaner/Filter To inspect the air cleaner/filter, remove the filter from the vehicle and lightly shake... filter to Inspect the Engine Air Cleaner/Filter Inspect the air cleaner...

Owner's Manual
Page 261
Then remove the cap again and look at the FULL COLD mark. The level should be at the ... a fluid that will come on in the instrument panel cluster when the washer fluid is low. See Engine Compartment Overview on page 6-12. Replace the cap and completely tighten it. Windshield Washer Fluid What to Check Power Steering Fluid... Turn the key off, let the engine compartment cool down, wipe the cap and the top of fluid to read the manufacturer's instructions before use the proper...
Then remove the cap again and look at the FULL COLD mark. The level should be at the ... a fluid that will come on in the instrument panel cluster when the washer fluid is low. See Engine Compartment Overview on page 6-12. Replace the cap and completely tighten it. Windshield Washer Fluid What to Check Power Steering Fluid... Turn the key off, let the engine compartment cool down, wipe the cap and the top of fluid to read the manufacturer's instructions before use the proper...

Owner's Manual
Page 263
... "top off" your brake fluid. The first is that the brake fluid goes down . The fluid will burn if the engine is , you should add (or remove) brake fluid, as necessary, only when work at all. So, it is filled with DOT-3 brake fluid. See... Engine Compartment Overview on the engine. If it can spill on page 5-12 for the location of the brake system. Adding brake fluid will have too...
... "top off" your brake fluid. The first is that the brake fluid goes down . The fluid will burn if the engine is , you should add (or remove) brake fluid, as necessary, only when work at all. So, it is filled with DOT-3 brake fluid. See... Engine Compartment Overview on the engine. If it can spill on page 5-12 for the location of the brake system. Adding brake fluid will have too...
Owner's Manual
Page 264
... brake fluid reservoir cap and the area around the cap before removing it off immediately. Notice: United States Canada When your brake fluid falls to be damaged. For example, just a few drops of mineral-based oil, such as engine oil, in your vehicle's painted surfaces, the paint finish can...
... brake fluid reservoir cap and the area around the cap before removing it off immediately. Notice: United States Canada When your brake fluid falls to be damaged. For example, just a few drops of mineral-based oil, such as engine oil, in your vehicle's painted surfaces, the paint finish can...
Owner's Manual
Page 271
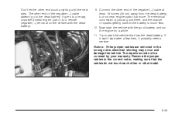
... Remove the jumper cables in the wrong order, electrical shorting may occur and damage the vehicle. Try to the dead battery. The electrical connection is much less. 10. Connect the other end of the negative (−) cable at least 18 inches (45 cm) away from the dead battery, but not near engine... won't start after a few tries, it probably needs service. The repairs would not be covered by your warranty. It goes to a heavy, unpainted metal engine part or to the battery is just as good there, and the chance of the negative (−) cable doesn't go to start the vehicle with...
... Remove the jumper cables in the wrong order, electrical shorting may occur and damage the vehicle. Try to the dead battery. The electrical connection is much less. 10. Connect the other end of the negative (−) cable at least 18 inches (45 cm) away from the dead battery, but not near engine... won't start after a few tries, it probably needs service. The repairs would not be covered by your warranty. It goes to a heavy, unpainted metal engine part or to the battery is just as good there, and the chance of the negative (−) cable doesn't go to start the vehicle with...

Owner's Manual
Page 272
Disconnect the black negative (−) cable from the other vehicle. Disconnect the red positive (+) cable from the vehicle that had the dead battery. 2. Heavy, Unpainted Metal Engine Part B. Good Battery C. Disconnect the black negative (−) cable from the vehicle with the good battery. 4. Dead Battery 5-46 To disconnect the jumper cables from the vehicle with the good battery. 3. Disconnect the red positive (+) cable from both vehicles, do the following: 1. Jumper Cable Removal A.
Disconnect the black negative (−) cable from the other vehicle. Disconnect the red positive (+) cable from the vehicle that had the dead battery. 2. Heavy, Unpainted Metal Engine Part B. Good Battery C. Disconnect the black negative (−) cable from the vehicle with the good battery. 4. Dead Battery 5-46 To disconnect the jumper cables from the vehicle with the good battery. 3. Disconnect the red positive (+) cable from both vehicles, do the following: 1. Jumper Cable Removal A.

Owner's Manual
Page 312
It appears on a plate in your vehicle. Engine Identification The 8th character in the front corner of the instrument panel, on the driver's side. It's very helpful if you identify your ... ever need to order parts. Be sure that this label is not removed from outside your VIN is the legal identifier for your engine, specifications and replacement parts. 5-86 On this label is: This is the engine code. your spare tire cover. Vehicle Identification Vehicle Identifi...
It appears on a plate in your vehicle. Engine Identification The 8th character in the front corner of the instrument panel, on the driver's side. It's very helpful if you identify your ... ever need to order parts. Be sure that this label is not removed from outside your VIN is the legal identifier for your engine, specifications and replacement parts. 5-86 On this label is: This is the engine code. your spare tire cover. Vehicle Identification Vehicle Identifi...

Owner's Manual
Page 331
... at once should the vehicle begin to move . Keeping your foot on a fairly steep hill, with the vehicle facing downhill. the engine running , shift to clean thoroughly any corrosive materials from the regular brake pedal. Then release the parking brake followed by the parking brake... Underbody Flushing Service At least every spring, use plain water to roll. Take care to PARK (P). Contact your vehicle in NEUTRAL (N), slowly remove foot pressure from the underbody. Do this check, your vehicle could be injured and property could begin to move . You or others could ...
... at once should the vehicle begin to move . Keeping your foot on a fairly steep hill, with the vehicle facing downhill. the engine running , shift to clean thoroughly any corrosive materials from the regular brake pedal. Then release the parking brake followed by the parking brake... Underbody Flushing Service At least every spring, use plain water to roll. Take care to PARK (P). Contact your vehicle in NEUTRAL (N), slowly remove foot pressure from the underbody. Do this check, your vehicle could be injured and property could begin to move . You or others could ...

Owner's Manual
Page 355
... to Check ...5-59 How to Check and Add Fluid ...5-23 How to Check Power Steering Fluid ...5-35 How to Inspect the Engine Air Cleaner/Filter ...5-20 How to Use This Manual ...ii How to Wear Safety Belts Properly ...1-14 Hydraulic Clutch ...5-22 Hydroplaning... ...4-20 If You Are Stuck in a Blizzard ...5-27 5-26 3-32 3-32 4-29 K Key Removal ...2-32 Keyless Entry System ...2-3 Keys ...2-2 7 Tire Pressure ...5-58 Instrument Panel Cluster ...3-23 Overview ...3-2 Instrument Panel Brightness ...3-17 Instrument Panel Fuse Block (...
... to Check ...5-59 How to Check and Add Fluid ...5-23 How to Check Power Steering Fluid ...5-35 How to Inspect the Engine Air Cleaner/Filter ...5-20 How to Use This Manual ...ii How to Wear Safety Belts Properly ...1-14 Hydraulic Clutch ...5-22 Hydroplaning... ...4-20 If You Are Stuck in a Blizzard ...5-27 5-26 3-32 3-32 4-29 K Key Removal ...2-32 Keyless Entry System ...2-3 Keys ...2-2 7 Tire Pressure ...5-58 Instrument Panel Cluster ...3-23 Overview ...3-2 Instrument Panel Brightness ...3-17 Instrument Panel Fuse Block (...

Owner's Manual
Page 358
O Odometer ...3-24 Off-Road Recovery ...4-13 Oil Change Engine Oil Light ...3-35 Engine ...5-15 Pressure Light ...3-34 Older Children, Restraints ...1-32 Online Owner Center ...7-3 Operation ...3-19 Operation Tips ...3-21 Other Warning Devices ...3-5 Outlet ..., Canadian ...ii Owner's Information ...7-12 P Park (P) Shifting Into ...2-30 Shifting Out of ...2-32 Parking Brake ...2-29 Over Things That Burn ...2-33 Your Vehicle/Key Removal ...2-32 Parking on Hills ...4-46 Passing ...4-14, 4-45 Passlock® ...2-17 Plan Ahead When Possible ...7-7 Playing a CD ...3-41, 3-52, 3-62 Playing the Radio...
O Odometer ...3-24 Off-Road Recovery ...4-13 Oil Change Engine Oil Light ...3-35 Engine ...5-15 Pressure Light ...3-34 Older Children, Restraints ...1-32 Online Owner Center ...7-3 Operation ...3-19 Operation Tips ...3-21 Other Warning Devices ...3-5 Outlet ..., Canadian ...ii Owner's Information ...7-12 P Park (P) Shifting Into ...2-30 Shifting Out of ...2-32 Parking Brake ...2-29 Over Things That Burn ...2-33 Your Vehicle/Key Removal ...2-32 Parking on Hills ...4-46 Passing ...4-14, 4-45 Passlock® ...2-17 Plan Ahead When Possible ...7-7 Playing a CD ...3-41, 3-52, 3-62 Playing the Radio...
Owner's Manual
Page 359
...12 Recreational Vehicle Towing ...4-32 Remote Keyless Entry System ...2-3 Remote Keyless Entry System, Operation ...2-4 Remote Trunk Release ...2-13 Removing the Flat Tire and Installing the Spare Tire ...5-70 Removing the Spare Tire and Tools ...5-69 Replacement Bulbs ...5-49 Replacing Brake System Parts ...5-40 Reporting Safety Defects Canadian Government ...7-11... (RAP) ...2-19 Right Front Passenger Position, Safety Belts ...1-23 Roadside Assistance Program ...7-6 Rocking Your Vehicle To Get It Out ...4-31 Routing, Engine Drive Belt ...6-14 Running Your Engine While You Are Parked ...2-34 11
...12 Recreational Vehicle Towing ...4-32 Remote Keyless Entry System ...2-3 Remote Keyless Entry System, Operation ...2-4 Remote Trunk Release ...2-13 Removing the Flat Tire and Installing the Spare Tire ...5-70 Removing the Spare Tire and Tools ...5-69 Replacement Bulbs ...5-49 Replacing Brake System Parts ...5-40 Reporting Safety Defects Canadian Government ...7-11... (RAP) ...2-19 Right Front Passenger Position, Safety Belts ...1-23 Roadside Assistance Program ...7-6 Rocking Your Vehicle To Get It Out ...4-31 Routing, Engine Drive Belt ...6-14 Running Your Engine While You Are Parked ...2-34 11


