
Owner's Manual
Page 2
The 2003 PontiacMontana Owner Manual Seats and Restraint Systems ...Front Seats ...Rear Seats Safety Belts ...Child Restraints Air Bag Systems ...Restraint System Check Features and Controls ...Keys ...Doors and Locks Windows ...Theft-Deterrent Systems ...Starting Operating and Your ...
The 2003 PontiacMontana Owner Manual Seats and Restraint Systems ...Front Seats ...Rear Seats Safety Belts ...Child Restraints Air Bag Systems ...Restraint System Check Features and Controls ...Keys ...Doors and Locks Windows ...Theft-Deterrent Systems ...Starting Operating and Your ...
Owner's Manual
Page 5
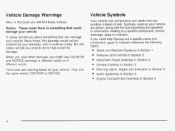
... different colors or in different words. Engine Compartment Overview in Section 5 iv They use symbols instead of a component, gage or indicator reference the following topics: Seats and Restraint Systems in Section 1 Features and Controls in Section 2 Instrument Panel Overview in Section 3 Climate Controls in Section 3 Warning Lights, Gages and Indicators in...
... different colors or in different words. Engine Compartment Overview in Section 5 iv They use symbols instead of a component, gage or indicator reference the following topics: Seats and Restraint Systems in Section 1 Features and Controls in Section 2 Instrument Panel Overview in Section 3 Climate Controls in Section 3 Warning Lights, Gages and Indicators in...

Owner's Manual
Page 6
BATTERY CHARGING SYSTEM ENGINE COOLANT FAN COOLANT AVOID SPARKS OR FLAMES DO NOT INSTALL A FORWARD-FACING CHILD RESTRAINT IN THIS SEATING POSITION EijGii i r Ki UNLOCK DAYTIME RUNNING LAMPS '{o :i ENGINE OIL PRESSUREW d b OWNER'S MANUAL c]ctl SERVICE BATERY 1 fl L A E Lp\ V These are... ATACHING e @ LIGHTING MASTER 0 SWITCH - , e\ ENGINE COOLANT TEMP 7 1 ACCESS LJ T TURN SIGNALS CAUSTIC BATTERY &ID COULD CAUSE BURNS MOVE SEAT FULLY REARWARD* SECURE CHILD SEAT PULL BELT COMPLETELY THEN SECURE CHILD SEAT \! $ % // DO NOT INSTALL A REAR-FACING CHILD RESTRAINT IN THIS...
BATTERY CHARGING SYSTEM ENGINE COOLANT FAN COOLANT AVOID SPARKS OR FLAMES DO NOT INSTALL A FORWARD-FACING CHILD RESTRAINT IN THIS SEATING POSITION EijGii i r Ki UNLOCK DAYTIME RUNNING LAMPS '{o :i ENGINE OIL PRESSUREW d b OWNER'S MANUAL c]ctl SERVICE BATERY 1 fl L A E Lp\ V These are... ATACHING e @ LIGHTING MASTER 0 SWITCH - , e\ ENGINE COOLANT TEMP 7 1 ACCESS LJ T TURN SIGNALS CAUSTIC BATTERY &ID COULD CAUSE BURNS MOVE SEAT FULLY REARWARD* SECURE CHILD SEAT PULL BELT COMPLETELY THEN SECURE CHILD SEAT \! $ % // DO NOT INSTALL A REAR-FACING CHILD RESTRAINT IN THIS...
Owner's Manual
Page 8
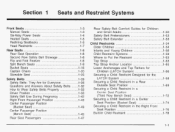
... Restraint in a Zerlier Seai Fosiiiorl (Third Row Bench Seat) ...1-72 Securing a Child Restraint in a Center Seat Position (Bucket Seat) ...1-74 Securing a Child Restraint in the Right Front Seat Position ...1-76 Built-In Child Restraint ...1-78 Front Seats ...1.3 Manual Seats ...1.3 Six-Way Power Seats ...1-4 Heated Seats ...1-5 Reclining Seatbacks ...1-5 Head Restraints ...1-7 Rear Seats ...1-8 Rear Seat Operation ...1-8 Second Row Safety Belt Stowage ...1-8 Flip...
... Restraint in a Zerlier Seai Fosiiiorl (Third Row Bench Seat) ...1-72 Securing a Child Restraint in a Center Seat Position (Bucket Seat) ...1-74 Securing a Child Restraint in the Right Front Seat Position ...1-76 Built-In Child Restraint ...1-78 Front Seats ...1.3 Manual Seats ...1.3 Six-Way Power Seats ...1-4 Heated Seats ...1-5 Reclining Seatbacks ...1-5 Head Restraints ...1-7 Rear Seats ...1-8 Rear Seat Operation ...1-8 Second Row Safety Belt Stowage ...1-8 Flip...

Owner's Manual
Page 9
Air Bag Systems ...1-90 Where Are the Air Bags? ...1-93 When Should an Air Bag Inflate? ...1-95 What Makes Air an Bag Inflate? ...1-96 How Does an Air Bag Restrain? ...1-96 What Will You See After an Air Bag Inflates? ...1-97 Servicing Your Bag-Equipped Air Vehicle ...1-98 1-2 Section 1 Seats and Restraint Systems Restraint System Check ...1-99 Checking Your Restraint Systems ...1-99 Replacing Restraint System Parts After a ...1-99 Crash ...
Air Bag Systems ...1-90 Where Are the Air Bags? ...1-93 When Should an Air Bag Inflate? ...1-95 What Makes Air an Bag Inflate? ...1-96 How Does an Air Bag Restrain? ...1-96 What Will You See After an Air Bag Inflates? ...1-97 Servicing Your Bag-Equipped Air Vehicle ...1-98 1-2 Section 1 Seats and Restraint Systems Restraint System Check ...1-99 Checking Your Restraint Systems ...1-99 Replacing Restraint System Parts After a ...1-99 Crash ...
Owner's Manual
Page 10
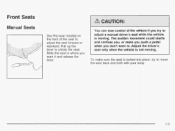
... a pedal when you , or make sure the seat is locked into place, try to adjust a manual driver's seat while the vehicle is not moving . Slide the seat to where you try to move the seat back and forth with your body. 1-3 Adjust the driver's seat only when the vehicle is moving . The sudden... movement could startle and confuse you don't want it and release the lever. You can lose conlrui of the seat to adjust the seat forward or rearward. Pull up the lever to unlock the seat. Front Seats Manual Seats Use the lever located on the front of the vehicle if you want to.
... a pedal when you , or make sure the seat is locked into place, try to adjust a manual driver's seat while the vehicle is not moving . Slide the seat to where you try to move the seat back and forth with your body. 1-3 Adjust the driver's seat only when the vehicle is moving . The sudden... movement could startle and confuse you don't want it and release the lever. You can lose conlrui of the seat to adjust the seat forward or rearward. Pull up the lever to unlock the seat. Front Seats Manual Seats Use the lever located on the front of the vehicle if you want to.
Owner's Manual
Page 11
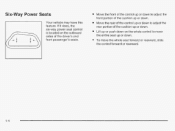
Six-Way Power Seats Your vehicle may havethis feature. Move the rear of the control up or downto adjust the rear portion of the cushion up or down. Lift up or push down onthe whole control to move the whole seat forward or rearward, slide the control forward or rearward. I -4 Move the front of the control up or downto adjust the front portion of the cushion up or down . To move the entire seat up or down . If it does, the six-way power seat control is located on the outboard sides of the driver's and front passenger's seats.
Six-Way Power Seats Your vehicle may havethis feature. Move the rear of the control up or downto adjust the rear portion of the cushion up or down. Lift up or push down onthe whole control to move the whole seat forward or rearward, slide the control forward or rearward. I -4 Move the front of the control up or downto adjust the front portion of the cushion up or down . To move the entire seat up or down . If it does, the six-way power seat control is located on the outboard sides of the driver's and front passenger's seats.
Owner's Manual
Page 12
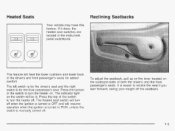
... turn off . It is turned to OFF and will heat the lower cushions and lower back of the switch to turn the heater on. Heated Seats Your vehicle may have this feature. Reclining Seatbacks This feature will resume operation when the ignition is turned to RUN, unless the switch is manua...!!y turned off when the ignition is easier to recline the seat if you lean forward, taking your weight off . The indicator light on the outboard sides of the switch to turn the heater off the seatback...
... turn off . It is turned to OFF and will heat the lower cushions and lower back of the switch to turn the heater on. Heated Seats Your vehicle may have this feature. Reclining Seatbacks This feature will resume operation when the ignition is turned to RUN, unless the switch is manua...!!y turned off when the ignition is easier to recline the seat if you lean forward, taking your weight off . The indicator light on the outboard sides of the switch to turn the heater off the seatback...

Owner's Manual
Page 13
..., receiving neck or other injuries. For proper protection when the vehicle is moving. But don't have the seatback upright.Then sit well back in the seat and wear your abdomen. The shoulder belt can't do its jobeither. The lap belt can 't do its jobbecause it won't be against your body.Instead...
..., receiving neck or other injuries. For proper protection when the vehicle is moving. But don't have the seatback upright.Then sit well back in the seat and wear your abdomen. The shoulder belt can't do its jobeither. The lap belt can 't do its jobbecause it won't be against your body.Instead...
Owner's Manual
Page 15
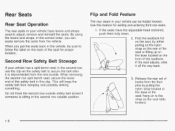
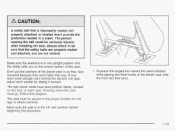
... way back. 3. Release the rear set of the safety belt in your vehicle can easily remove the seats from the mini-buckle. hang on the back of the seat for exiting and entering third row seats. Use this clip. This will keep the safety belt from the floor pins by either pulling on... the nylon strap on the rear of the seat or lifting up on the lever located on the seat, by pulling the nylon strap located at the base of the seatback. Fold the seatback flat on the front of...
... way back. 3. Release the rear set of the safety belt in your vehicle can easily remove the seats from the mini-buckle. hang on the back of the seat for exiting and entering third row seats. Use this clip. This will keep the safety belt from the floor pins by either pulling on... the nylon strap on the rear of the seat or lifting up on the lever located on the seat, by pulling the nylon strap located at the base of the seatback. Fold the seatback flat on the front of...

Owner's Manual
Page 16
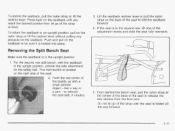
... on the rear of the split bench. 1-9 The seccnb rsk! (40/60) split bench rzsy be adjusted forward or rearward individually. Push the seat back and firmly push the rear hooks onto the rear floor pins by pushing down . 3. Lift the seatback recliner lever or pull the nylon strap... on each section of the seat. 2. There are adjustable. Split Bench Seats If you have the split bench seat (50/50 or 40/60), the seatbacks can be folded forward or reclined individually and the...
... on the rear of the split bench. 1-9 The seccnb rsk! (40/60) split bench rzsy be adjusted forward or rearward individually. Push the seat back and firmly push the rear hooks onto the rear floor pins by pushing down . 3. Lift the seatback recliner lever or pull the nylon strap... on each section of the seat. 2. There are adjustable. Split Bench Seats If you have the split bench seat (50/50 or 40/60), the seatbacks can be folded forward or reclined individually and the...

Owner's Manual
Page 17
... make sure it is locked into place. The other lever is located on the rear of the split bench seat can be sure it is locked. The following explains how to use the nylon strap or recliner lever to check that it is locked into ... lever. That could move forward in a sudden stop or crash. To fold the seatback forward, pull the nylon strap located on each section of the seat. The seatbacks on the rear of the seatback. To raise a seatback, pull the nylon strap or lift the recliner lever while raising the seatback until...
... make sure it is locked into place. The other lever is located on the rear of the split bench seat can be sure it is locked. The following explains how to use the nylon strap or recliner lever to check that it is locked into ... lever. That could move forward in a sudden stop or crash. To fold the seatback forward, pull the nylon strap located on each section of the seat. The seatbacks on the rear of the seatback. To raise a seatback, pull the nylon strap or lift the recliner lever while raising the seatback until...
Owner's Manual
Page 18
... all the way forward. 1-1' This mini-buckle is located on the seatback to be sure it is in the second row, lift one of the seat to an upright position, pull on the nylon strap or lift the recliner lever without putting any pressure on the seatback until the... seat is in the upright position, unhook the side attachment for the safety belt. To recline the seatback, pull the nylon strap or lift the recliner ...
... all the way forward. 1-1' This mini-buckle is located on the seatback to be sure it is in the second row, lift one of the seat to an upright position, pull on the nylon strap or lift the recliner lever without putting any pressure on the seatback until the... seat is in the upright position, unhook the side attachment for the safety belt. To recline the seatback, pull the nylon strap or lift the recliner ...

Owner's Manual
Page 19
... place properly when installing it out. To unlatch the front latches, squeeze the angled bar toward the rear of the split bench seat. , ;eat tl : isn't locked i . . _ ~ p.-:e prope: can move forward in a sudden stop . Repeat these steps for the other section of the vehicle and then pulling it . 1-... on the seatback tobe sure it slightly forward, then toward the straight crossbar. ,'. That could move around in the vehicle could be injured. Remove the seat by rocking it is locked. \ Replacing the Split Bench Seats I 6. People in a collision or sudden stop or crash.
... place properly when installing it out. To unlatch the front latches, squeeze the angled bar toward the rear of the split bench seat. , ;eat tl : isn't locked i . . _ ~ p.-:e prope: can move forward in a sudden stop . Repeat these steps for the other section of the vehicle and then pulling it . 1-... on the seatback tobe sure it slightly forward, then toward the straight crossbar. ,'. That could move around in the vehicle could be injured. Remove the seat by rocking it is locked. \ Replacing the Split Bench Seats I 6. People in a collision or sudden stop or crash.
Owner's Manual
Page 20
...and the safety belts are not twisted. Don't put the sections of the bench seat onto the front two floor pins. 1-13 After installing the seat, always check to attach correctly. The split bench seats have seat position labels, located "r! Squeeze the angled bar toward the solid crossbar while placing...du:e. 1. Make sure the seatback is in so they face rearward because they won 't provide the protection needed in a crash. Make sure the seat is in the proper location for the legs to be sure that is improperly routed, not properly attached, or twisted won 't latch that diagram....
...and the safety belts are not twisted. Don't put the sections of the bench seat onto the front two floor pins. 1-13 After installing the seat, always check to attach correctly. The split bench seats have seat position labels, located "r! Squeeze the angled bar toward the solid crossbar while placing...du:e. 1. Make sure the seatback is in so they face rearward because they won 't provide the protection needed in a crash. Make sure the seat is in the proper location for the legs to be sure that is improperly routed, not properly attached, or twisted won 't latch that diagram....
Owner's Manual
Page 21
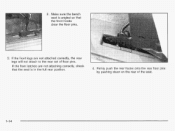
Make sure the bench seat is in the full rear position. 4. Firmly push the rear hooks onto the rear floor pins by pushing down on the rear of floor pins. If the front latches are not attached correctly, the rear legs will not attach to the rear set of the seat. 1-14 2. If the front legs are not attaching correctly, check that the seat is angled so that the front hooks clear the floor pins. 3.
Make sure the bench seat is in the full rear position. 4. Firmly push the rear hooks onto the rear floor pins by pushing down on the rear of floor pins. If the front latches are not attached correctly, the rear legs will not attach to the rear set of the seat. 1-14 2. If the front legs are not attaching correctly, check that the seat is angled so that the front hooks clear the floor pins. 3.

Owner's Manual
Page 22
Push and pull on the back of the split bench seat. The seats can be folded down . 6. See Built-ln Child Restraint on each seat to check that it locks upright. 7. Repeat these steps for use when a passenger uses the seat. One of the bucket seats may be - .. - .dUJUS1C;U i U i W d l U VI I ' S d l V V d l U d i I U I e l I l U V e U . -1:. .-Le -1...seatback to check that the safety belt is located below the center, in child restraint. If you have the 40/60 seat, attach the mini-buckle so that it is locked down or reclined. 5. The buckle reattaches by pushing the latch ...
Push and pull on the back of the split bench seat. The seats can be folded down . 6. See Built-ln Child Restraint on each seat to check that it locks upright. 7. Repeat these steps for use when a passenger uses the seat. One of the bucket seats may be - .. - .dUJUS1C;U i U i W d l U VI I ' S d l V V d l U d i I U I e l I l U V e U . -1:. .-Le -1...seatback to check that the safety belt is located below the center, in child restraint. If you have the 40/60 seat, attach the mini-buckle so that it is locked down or reclined. 5. The buckle reattaches by pushing the latch ...

Owner's Manual
Page 23
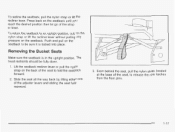
...reclined. The seatback will lock into place. Release the lever. The following explains how to fold or recline the seatback. Always press rearward on the seat to make sure it is locked into place. That could move forward in a sudden stop or crash. Push and pull on the front of ...the bucket seat. Lift up on the recliner lever located on the seatback to the person sitting there. Folding or Reclinin the Seal scks Nylon Strap Recliner Lever...
...reclined. The seatback will lock into place. Release the lever. The following explains how to fold or recline the seatback. Always press rearward on the seat to make sure it is locked into place. That could move forward in a sudden stop or crash. Push and pull on the front of ...the bucket seat. Lift up on the recliner lever located on the seatback to the person sitting there. Folding or Reclinin the Seal scks Nylon Strap Recliner Lever...
Owner's Manual
Page 24
... the nylon strap, located at the base of the adjuster levers and sliding the seat fully rearward. 3. Push and pull on the back of the strap or lever. To recline the seatback, pull the nylon strap or lift the recliner ... putting any pressure on the seatback until you reach the desired position then let go of the seat to fold the seatback forward. 2. Slide the seat all the way back by lifting either one of the seat, to be fully down. 1. Press back on the seatback. The head restraints should be sure it...
... the nylon strap, located at the base of the adjuster levers and sliding the seat fully rearward. 3. Push and pull on the back of the strap or lever. To recline the seatback, pull the nylon strap or lift the recliner ... putting any pressure on the seatback until you reach the desired position then let go of the seat to fold the seatback forward. 2. Slide the seat all the way back by lifting either one of the seat, to be fully down. 1. Press back on the seatback. The head restraints should be sure it...

Owner's Manual
Page 25
Do not let go of the seat to release the rear latches from the floor pins. Remove the seat by rocking it slightly forward, then toward the straight crossbar. 5. You can also lift the lever on the side of the strap or lever until the seat is folded all the way forward. 4. This should be done in one motion. 1-18 To unlatch the front latches, with the seat folded forward, squeeze the angled bar toward the rear of the vehicle and then pulling it out.
Do not let go of the seat to release the rear latches from the floor pins. Remove the seat by rocking it slightly forward, then toward the straight crossbar. 5. You can also lift the lever on the side of the strap or lever until the seat is folded all the way forward. 4. This should be done in one motion. 1-18 To unlatch the front latches, with the seat folded forward, squeeze the angled bar toward the rear of the vehicle and then pulling it out.


