
Owner's Manual
Page 6
These are some examples of vehicle symbols you may find on your vehicle: CAUTION POSSIBLE INJURY p\ PROTECT EYES BY SHIELDING W 6 LATCH BOTH LAP AND SHOULDER BELTSTO OCCUPANT PROTECT DO NOT TWIST SAFETY BELT WHEN ATACHING e @ LIGHTING MASTER 0 SWITCH - , e\ ENGINE COOLANT TEMP 7 1 ACCESS LJ T TURN SIGNALS CAUSTIC ...
These are some examples of vehicle symbols you may find on your vehicle: CAUTION POSSIBLE INJURY p\ PROTECT EYES BY SHIELDING W 6 LATCH BOTH LAP AND SHOULDER BELTSTO OCCUPANT PROTECT DO NOT TWIST SAFETY BELT WHEN ATACHING e @ LIGHTING MASTER 0 SWITCH - , e\ ENGINE COOLANT TEMP 7 1 ACCESS LJ T TURN SIGNALS CAUSTIC ...
Owner's Manual
Page 8
... Where to Put the Restraint ...1.63 Top Strap ...1.63 Top Strap Anchor Location ...1-65 Lower Anchorages and Top Tethers for Children (LATCH System) ...1-66 Securing a Child Restraint Designed for the LATCH System ...1-68 Securing a Child Restraint in a Rear Outside Seat Position ...1-69 Securing a Child Restraint in a Zerlier Seai Fosiiiorl (Third Row Bench...
... Where to Put the Restraint ...1.63 Top Strap ...1.63 Top Strap Anchor Location ...1-65 Lower Anchorages and Top Tethers for Children (LATCH System) ...1-66 Securing a Child Restraint Designed for the LATCH System ...1-68 Securing a Child Restraint in a Rear Outside Seat Position ...1-69 Securing a Child Restraint in a Zerlier Seai Fosiiiorl (Third Row Bench...
Owner's Manual
Page 18
... place. 4. io remove the seat belt, if needed. 5. This mini-buckle is located on the seatback. Press back on the seatback to release the rear latches from the floor pins.
... place. 4. io remove the seat belt, if needed. 5. This mini-buckle is located on the seatback. Press back on the seatback to release the rear latches from the floor pins.

Owner's Manual
Page 19
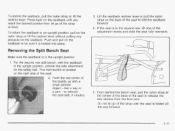
... place properly when installing it out. Repeat these steps for the other section of the vehicle and then pulling it . 1-12 To unlatch the front latches, squeeze the angled bar toward the rear of the split bench seat. , ;eat tl : isn't locked i . . _ ~ p.-:e prope: can move forward in a sudden stop . People in...
... place properly when installing it out. Repeat these steps for the other section of the vehicle and then pulling it . 1-12 To unlatch the front latches, squeeze the angled bar toward the rear of the split bench seat. , ;eat tl : isn't locked i . . _ ~ p.-:e prope: can move forward in a sudden stop . People in...
Owner's Manual
Page 20
... behind the second row seat, adjust each section by sliding it forward. Make sure the seatback is improperly routed, not properly attached, or twisted won 't latch that way. The person wearing the belt could be placed in so they face rearward because they won 't provide the protection needed in a crash. Squeeze...
... behind the second row seat, adjust each section by sliding it forward. Make sure the seatback is improperly routed, not properly attached, or twisted won 't latch that way. The person wearing the belt could be placed in so they face rearward because they won 't provide the protection needed in a crash. Squeeze...
Owner's Manual
Page 21
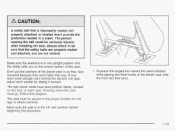
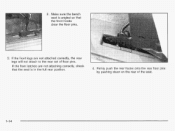
If the front latches are not attached correctly, the rear legs will not attach to the rear set of the seat. 1-14 Make sure the bench seat is in the full rear position. 4. Firmly push the rear hooks onto the rear floor pins by pushing down on the rear of floor pins. If the front legs are not attaching correctly, check that the seat is angled so that the front hooks clear the floor pins. 3. 2.
If the front latches are not attached correctly, the rear legs will not attach to the rear set of the seat. 1-14 Make sure the bench seat is in the full rear position. 4. Firmly push the rear hooks onto the rear floor pins by pushing down on the rear of floor pins. If the front legs are not attaching correctly, check that the seat is angled so that the front hooks clear the floor pins. 3. 2.

Owner's Manual
Page 22
... pull the nylon strap on the seatback to check that it is located below the center, in child restraint. The buckle reattaches by pushing the latch into the buckle until it locks upright. 7. If you have the 40/60 seat, attach the mini-buckle so that it is ready for the...
... pull the nylon strap on the seatback to check that it is located below the center, in child restraint. The buckle reattaches by pushing the latch into the buckle until it locks upright. 7. If you have the 40/60 seat, attach the mini-buckle so that it is ready for the...
Owner's Manual
Page 24
Lift the seatback recliner lever or pull the nylon strap on the seatback to release the rear latches from the floor pins. 1-17 Slide the seat all the way back by lifting either one of the strap or lever. Push and pull on ...
Lift the seatback recliner lever or pull the nylon strap on the seatback to release the rear latches from the floor pins. 1-17 Slide the seat all the way back by lifting either one of the strap or lever. Push and pull on ...

Owner's Manual
Page 25
This should be done in one motion. 1-18 Remove the seat by rocking it slightly forward, then toward the straight crossbar. 5. You can also lift the lever on the side of the strap or lever until the seat is folded all the way forward. 4. Do not let go of the seat to release the rear latches from the floor pins. To unlatch the front latches, with the seat folded forward, squeeze the angled bar toward the rear of the vehicle and then pulling it out.
This should be done in one motion. 1-18 Remove the seat by rocking it slightly forward, then toward the straight crossbar. 5. You can also lift the lever on the side of the strap or lever until the seat is folded all the way forward. 4. Do not let go of the seat to release the rear latches from the floor pins. To unlatch the front latches, with the seat folded forward, squeeze the angled bar toward the rear of the vehicle and then pulling it out.
Owner's Manual
Page 26
... the legs to the person sitting there. If the seatback isn't locked, it could be sureit is improperly routed, not properly attached, or twisted won 't latch that way. If you want more storage room behind the seat, adjust the seat by sliding it .
... the legs to the person sitting there. If the seatback isn't locked, it could be sureit is improperly routed, not properly attached, or twisted won 't latch that way. If you want more storage room behind the seat, adjust the seat by sliding it .
Owner's Manual
Page 27
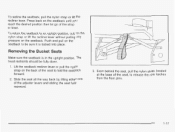
Make sure the bucket seat is angled so that the seat is in the full rear position. 4. If the front latches are not attaching correctly, check that the front hooks clear the floor pins. 3. Push and pull on the back of floor pins. Firmly push the ...
Make sure the bucket seat is angled so that the seat is in the full rear position. 4. If the front latches are not attaching correctly, check that the front hooks clear the floor pins. 3. Push and pull on the back of floor pins. Firmly push the ...
Owner's Manual
Page 30
... labels, located on the correct side of the seat, showing where the seat must be sureit is improperly routed, not properly attached, or twisted won 't latch that way. Don't put the seats in so they face rearward because they won 't provide the protection needed in the full rear position before beginning...
... labels, located on the correct side of the seat, showing where the seat must be sureit is improperly routed, not properly attached, or twisted won 't latch that way. Don't put the seats in so they face rearward because they won 't provide the protection needed in the full rear position before beginning...

Owner's Manual
Page 31
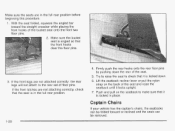
Push and pull on the seat to lock the rear latches onto the rear set of floor pins. 3. Hook the front latches over the front floor pins. 2. 1. Push the rear of the seat down to be sure it is properly attached. 1-24
Push and pull on the seat to lock the rear latches onto the rear set of floor pins. 3. Hook the front latches over the front floor pins. 2. 1. Push the rear of the seat down to be sure it is properly attached. 1-24
Owner's Manual
Page 33
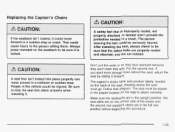
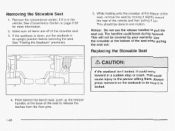
... center, if it is in its upright position before removing the seat. Removing the Stowable Seat 1. See Convenience Center on the seatback to release the latches from the floor pins. 1-26 This should be covered by rocking it slightly toward the rear of the seat to sure it is be locked...
... center, if it is in its upright position before removing the seat. Removing the Stowable Seat 1. See Convenience Center on the seatback to release the latches from the floor pins. 1-26 This should be covered by rocking it slightly toward the rear of the seat to sure it is be locked...
Owner's Manual
Page 34
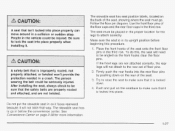
... its upright position before tite con-venierice center* See Convenience Center on gage 2-58 for the legs to attach correctly. A seat that it will not latch that the safetv belts are properly routed and attached, and are not attached correctly, the rear legs will need to be placed in a collision or...
... its upright position before tite con-venierice center* See Convenience Center on gage 2-58 for the legs to attach correctly. A seat that it will not latch that the safetv belts are properly routed and attached, and are not attached correctly, the rear legs will need to be placed in a collision or...

Owner's Manual
Page 41
... to make the lap part tight, pull down on the buckle end of the belt as you pull up the latch plate and pull the belt across you ever had to unlock it is positioned so you would be able to unbuckle the safety belt quickly ...if you . I 3. Don't let it clicks. 4. Then pull the belt across you more slowly. 5. Push the latch plate into the buckle until it get twisted. If this happens, let the belt go back slightly to . To make sure it . Make sure the...
... to make the lap part tight, pull down on the buckle end of the belt as you pull up the latch plate and pull the belt across you ever had to unlock it is positioned so you would be able to unbuckle the safety belt quickly ...if you . I 3. Don't let it clicks. 4. Then pull the belt across you more slowly. 5. Push the latch plate into the buckle until it get twisted. If this happens, let the belt go back slightly to . To make sure it . Make sure the...
Owner's Manual
Page 51
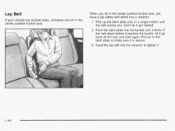
Don't let it go back all the way and start again. Push the latch plate into the retractor to make sure it is secure. 3. Feed the lap belt into the buckle until it . 1-44 Pick up on the latch plate to tighten it clicks. Lap Belt If your vehicle has bucket seats, someone can sit in the center position bucket seat, you . When you sit in the center position bucket seat. If the belt stops before it reaches the buckle, let it get twisted. 2. Pull up the latch plate and, in a single motion, pull the belt across you have a lap safety belt which has a retractor. 1.
Don't let it go back all the way and start again. Push the latch plate into the retractor to make sure it is secure. 3. Feed the lap belt into the buckle until it . 1-44 Pick up on the latch plate to tighten it clicks. Lap Belt If your vehicle has bucket seats, someone can sit in the center position bucket seat, you . When you sit in the center position bucket seat. If the belt stops before it reaches the buckle, let it get twisted. 2. Pull up the latch plate and, in a single motion, pull the belt across you have a lap safety belt which has a retractor. 1.

Owner's Manual
Page 53
... buckle is snug. Make sure the release button on page 1-53. When you sit in the center position. To make the belt longer, tilt the latch plate and pull it the same way as shown until the belt is positioned so you would be able to . Lap Belt If your vehicle...
... buckle is snug. Make sure the release button on page 1-53. When you sit in the center position. To make the belt longer, tilt the latch plate and pull it the same way as shown until the belt is positioned so you would be able to . Lap Belt If your vehicle...
Owner's Manual
Page 54
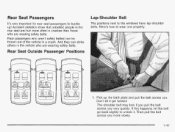
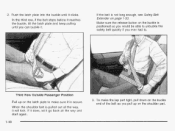
... are wearing safety belts. L - Pick up ! Rear Seat Passengers It's very important for rearseat passengers to wear one properly. Here's how to buckle up the latch plate and pull the belt across you more often in crashes than those who aren't safety belted can strike others in the rear seat are...
... are wearing safety belts. L - Pick up ! Rear Seat Passengers It's very important for rearseat passengers to wear one properly. Here's how to buckle up the latch plate and pull the belt across you more often in crashes than those who aren't safety belted can strike others in the rear seat are...
Owner's Manual
Page 55
... the belt as you pull up on the shoulder part. In the third row, if the belt stops before it reaches the buckle, tilt the latch plate and keep pulling until it will lock. To make sure it is positioned so you would be able to . Make sure the release button... enough, see Safety Belt Extender on the buckle is secure. If the belt is pulled out all the way and start again. 1-48 3. Push the latch plate into the buckle until you ever had to unbuckle the safety belt quickly if you can buckle it go back all the way, it...
... the belt as you pull up on the shoulder part. In the third row, if the belt stops before it reaches the buckle, tilt the latch plate and keep pulling until it will lock. To make sure it is positioned so you would be able to . Make sure the release button... enough, see Safety Belt Extender on the buckle is secure. If the belt is pulled out all the way and start again. 1-48 3. Push the latch plate into the buckle until you ever had to unbuckle the safety belt quickly if you can buckle it go back all the way, it...


