
Owner's Manual
Page 84
... as the ignition key that operates the system. 2-17 If the engine still does not start, and the key appears to have keys Ill made . In an Ill emergency, contact Pontiac Roadside Assistance. Up to use this time, you insert or remove the key from the ignition. Anyone using the wrong key, it...
... as the ignition key that operates the system. 2-17 If the engine still does not start, and the key appears to have keys Ill made . In an Ill emergency, contact Pontiac Roadside Assistance. Up to use this time, you insert or remove the key from the ignition. Anyone using the wrong key, it...
Owner's Manual
Page 85
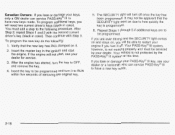
... damage your keys, only a GM dealer can service PASS-Key@ Ill to have new keys made . 2-18 If the engine will turn it . 2. If you are to RUN within five seconds of removing the original key. 5. Repeat Steps 1 through 5 if additional keys are ever driving and the SECURITY light comes on and... off . Your vehicle is not working properly and must add a step to the following : 1. Verify that the SECURITY light went on due to OFF, and remove the key. 4. Insert the master key in the ignition and start , see your Ill dealer or a locksmith who can service PASS-Key@Ill to have...
... damage your keys, only a GM dealer can service PASS-Key@ Ill to have new keys made . 2-18 If the engine will turn it . 2. If you are to RUN within five seconds of removing the original key. 5. Repeat Steps 1 through 5 if additional keys are ever driving and the SECURITY light comes on and... off . Your vehicle is not working properly and must add a step to the following : 1. Verify that the SECURITY light went on due to OFF, and remove the key. 4. Insert the master key in the ignition and start , see your Ill dealer or a locksmith who can service PASS-Key@Ill to have...
Owner's Manual
Page 87
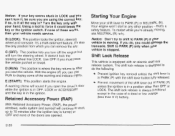
... position other position - If none of a dead or low voltage (less than OFF or LOCK. It's also the onlyposition from which you can remove the key. that's a safety feature. It doesn't lock the steering wheel like LOCK. Turn the key only with your vehicle needs service. Starting Your... must have the vehicle pushed or towed. if so, is stopped. B (LOCK): This position locks the ignition, steering wheel and transaxle. Your engine won't start the vehicle. Nofice: Don't try to shift to PARK (P) if your shift lever to do , you do the following: Prevent ignition key...
... position other position - If none of a dead or low voltage (less than OFF or LOCK. It's also the onlyposition from which you can remove the key. that's a safety feature. It doesn't lock the steering wheel like LOCK. Turn the key only with your vehicle needs service. Starting Your... must have the vehicle pushed or towed. if so, is stopped. B (LOCK): This position locks the ignition, steering wheel and transaxle. Your engine won't start the vehicle. Nofice: Don't try to shift to PARK (P) if your shift lever to do , you do the following: Prevent ignition key...
Owner's Manual
Page 88
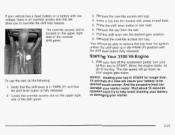
Remove the override access slot cap. 4. insert a key into the desired gear position. 8. Pull the shift lever into the access slot, press in and hold . 6. Starting Your 3100 V6 Engine 1. To use the slot, do the following: 1. Verify that the shift lever is in START for longerthan 15 seconds at a ... your key in PARK (P) and that will allow you to be able to remove the key from the slot. 7. If your vehicle has a dead battery or a battery with the shift lever button fully released. When the engine starts, let go down as your starter motor. Wait about 15 seconds between ...
Remove the override access slot cap. 4. insert a key into the desired gear position. 8. Pull the shift lever into the access slot, press in and hold . 6. Starting Your 3100 V6 Engine 1. To use the slot, do the following: 1. Verify that the shift lever is in START for longerthan 15 seconds at a ... your key in PARK (P) and that will allow you to be able to remove the key from the slot. 7. If your vehicle has a dead battery or a battery with the shift lever button fully released. When the engine starts, let go down as your starter motor. Wait about 15 seconds between ...
Owner's Manual
Page 95
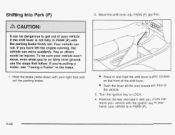
... the parking brake firmly set the parking brake. Push the lever all the way toward the front of the shift lever. you have left the engine running, the vehicle can leave your vehicle won't move suddenly. Move the shift lever into PARK (P) like this: It can roll. Press in the Index... you 're pulling a If trailer, see "Towing a Trailer" in and hold the shift lever button, located on fairly level ground, use the steps that follow. Remove the key and take it with your vehicle is not fully inPARK (P) with the ignition key in your hand, your right foot and set . Hold...
... the parking brake firmly set the parking brake. Push the lever all the way toward the front of the shift lever. you have left the engine running, the vehicle can leave your vehicle won't move suddenly. Move the shift lever into PARK (P) like this: It can roll. Press in the Index... you 're pulling a If trailer, see "Towing a Trailer" in and hold the shift lever button, located on fairly level ground, use the steps that follow. Remove the key and take it with your vehicle is not fully inPARK (P) with the ignition key in your hand, your right foot and set . Hold...

Owner's Manual
Page 119
... reason while the content theft-deterrent system is damaged, lost or if it can be disarmed for any door is open and the key is removed form the ignition. 0 The content theft-deterrent system will not arm. While this section under Content Theft-Deterrent System on page 2-51. Disarm the... remotely unlock your vehicle if it has been programmed to run and while in this mode provides increased security, it fails to operate for the engine to Mode 2. With the arming and disarming feature, you can no longer disarm the system. Mode 2: Remote Keyless Entry Transmitter Arm/Disarm Only ...
... reason while the content theft-deterrent system is damaged, lost or if it can be disarmed for any door is open and the key is removed form the ignition. 0 The content theft-deterrent system will not arm. While this section under Content Theft-Deterrent System on page 2-51. Disarm the... remotely unlock your vehicle if it has been programmed to run and while in this mode provides increased security, it fails to operate for the engine to Mode 2. With the arming and disarming feature, you can no longer disarm the system. Mode 2: Remote Keyless Entry Transmitter Arm/Disarm Only ...

Owner's Manual
Page 142
... amount of time may cause the air inside air escape; It also helps the system to operate more quickly. Select A/C. Use the defrost mode to remove fog or frost from the windshield more efficiently. For 1. 2. 3. 4. Use the floor/defog mode to clear the windows of the air to the windshield and... Defrosting There are two modes to clear fog from the air, so you select this mode, the system turns on or off the engine. The air-conditioning system removes moisture from your vehicle to cool down on to let you know that A/C is active. On hot days, open the windows to let...
... amount of time may cause the air inside air escape; It also helps the system to operate more quickly. Select A/C. Use the defrost mode to remove fog or frost from the windshield more efficiently. For 1. 2. 3. 4. Use the floor/defog mode to clear the windows of the air to the windshield and... Defrosting There are two modes to clear fog from the air, so you select this mode, the system turns on or off the engine. The air-conditioning system removes moisture from your vehicle to cool down on to let you know that A/C is active. On hot days, open the windows to let...

Owner's Manual
Page 143
... adjusted to the highest setting during the daytime in order to the defogger grid. The instrument brightness control may have to be turned off the engine. e Keep the path under the front seats clear of objects to clear as much snow from the rear window as possible. Outlet Adjustment REAR:... affect the performance of the rear window. When this button to turn off . Rear Window Defogger The rear window defogger uses a warming grid to remove fog or frost from the air inlets at the base of the windshield that the rear window defogger is pressed. Be sure to help circulate...
... adjusted to the highest setting during the daytime in order to the defogger grid. The instrument brightness control may have to be turned off the engine. e Keep the path under the front seats clear of objects to clear as much snow from the rear window as possible. Outlet Adjustment REAR:... affect the performance of the rear window. When this button to turn off . Rear Window Defogger The rear window defogger uses a warming grid to remove fog or frost from the air inlets at the base of the windshield that the rear window defogger is pressed. Be sure to help circulate...
Owner's Manual
Page 244
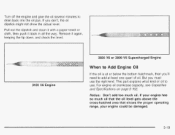
...the cross-hatched area that shows the proper operating range, your engine could be damaged. 3100 V6 Engine 5-19 Turn off the engine and give the oil several minutes to use the right kind....keeping the tip down, and check the level. 3800 V6 or 3800 V6 Supercharged Engine When to Add Engine Oil If the oil is at or below the bottom hatchmark, then you'll ...need to add at least one quart of oil to drain back into the oil pan. If you must use . But you don't, the oil dipstick might not show the actual level. Remove...
...the cross-hatched area that shows the proper operating range, your engine could be damaged. 3100 V6 Engine 5-19 Turn off the engine and give the oil several minutes to use the right kind....keeping the tip down, and check the level. 3800 V6 or 3800 V6 Supercharged Engine When to Add Engine Oil If the oil is at or below the bottom hatchmark, then you'll ...need to add at least one quart of oil to drain back into the oil pan. If you must use . But you don't, the oil dipstick might not show the actual level. Remove...

Owner's Manual
Page 250
... may be burned. Replace the oil plug with the O-ring in the engine compartment on a level surface. Loosen the two clips on location. How to three hours after running. Remove the oil fill plug. 3. Allow the engine to cool two to Check and Add Oil Park the vehicle on the driver...'s side of the housing. 2. Do not remove the plug until the engine cools. I If you remove the supercharger oil fill plug while the engine is located in place. Clean the area around the oil fill plug before removing it just reaches the bottom of the threads of the oil ...
... may be burned. Replace the oil plug with the O-ring in the engine compartment on a level surface. Loosen the two clips on location. How to three hours after running. Remove the oil fill plug. 3. Allow the engine to cool two to Check and Add Oil Park the vehicle on the driver...'s side of the housing. 2. Do not remove the plug until the engine cools. I If you remove the supercharger oil fill plug while the engine is located in place. Clean the area around the oil fill plug before removing it just reaches the bottom of the threads of the oil ...
Owner's Manual
Page 266
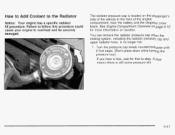
You can remove the radiator pressure cap when the cooling system, including the radiator pressure cap and upper radiator hose, is still some pressure left. 5-4 1 If you hear a ...'t press down while turning the pressure cap). The radiator pressure cap is located on page 5-12 for that to the Radiator dotice: Your engine has specific a radiator ill procedure. A hiss means there is no longer hot. 1. See Engine Compartment Overview on the passenger's side of the vehicle in the front of the...
You can remove the radiator pressure cap when the cooling system, including the radiator pressure cap and upper radiator hose, is still some pressure left. 5-4 1 If you hear a ...'t press down while turning the pressure cap). The radiator pressure cap is located on page 5-12 for that to the Radiator dotice: Your engine has specific a radiator ill procedure. A hiss means there is no longer hot. 1. See Engine Compartment Overview on the passenger's side of the vehicle in the front of the...

Owner's Manual
Page 267
If you have the 3800 V6 engine, remove the 3800 Series II V6 engine cover shield to access the bleed valve. 2. Clean the area around the engine oil fill tube and cap before removing. 3. If you have the supercharged engine, remove the nut in the center of the cover shield. You can be burned if you turn it...
If you have the 3800 V6 engine, remove the 3800 Series II V6 engine cover shield to access the bleed valve. 2. Clean the area around the engine oil fill tube and cap before removing. 3. If you have the supercharged engine, remove the nut in the center of the cover shield. You can be burned if you turn it...
Owner's Manual
Page 268
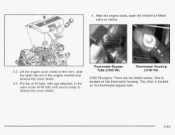
After the engine cools, open the coolant air bleed valve or valves. 3.3. Lift the engine cover shield at the front, slide the catch tab out of the engine bracket and remove the cover shield. 3.4. One is located on the thermostat housing. Put the oil fill tube, with cap attached, in the valve cover oil fill hole until you're ready to replace the cover shield. The other is located on the thermostat bypass tube. 5-43 Thermostat Bypass Tube (3100 V6) Thermostat Housing (3100 V6) 3100 V6 engine: There are two bleed valves. 4.
After the engine cools, open the coolant air bleed valve or valves. 3.3. Lift the engine cover shield at the front, slide the catch tab out of the engine bracket and remove the cover shield. 3.4. One is located on the thermostat housing. Put the oil fill tube, with cap attached, in the valve cover oil fill hole until you're ready to replace the cover shield. The other is located on the thermostat bypass tube. 5-43 Thermostat Bypass Tube (3100 V6) Thermostat Housing (3100 V6) 3100 V6 engine: There are two bleed valves. 4.

Owner's Manual
Page 269
Remove the oil fill tube, with the proper DEX-COOL@ coolant mixture, up to the base of the filler neck. See Engine Coolant on the engine. 7.3. If you have the supercharged engine, install the nut in the valve cover. Install oil fill tube and cap by twisting clockwise. 7.4. If ...information about the proper coolant mixture. Rinse or wipe any spilled coolant from the valve cover. 7.2. Thermostat Housing (3800V6) 7. 3800 V6 engine: There is located on the thermostat housing. 5. It is one bleed valve. Otherwise, close the valve. Fill the radiator with cap attached,...
Remove the oil fill tube, with the proper DEX-COOL@ coolant mixture, up to the base of the filler neck. See Engine Coolant on the engine. 7.3. If you have the supercharged engine, install the nut in the valve cover. Install oil fill tube and cap by twisting clockwise. 7.4. If ...information about the proper coolant mixture. Rinse or wipe any spilled coolant from the valve cover. 7.2. Thermostat Housing (3800V6) 7. 3800 V6 engine: There is located on the thermostat housing. 5. It is one bleed valve. Otherwise, close the valve. Fill the radiator with cap attached,...

Owner's Manual
Page 272
A fluid loss in the system or you hear an unusual noise. Then remove the cap againand look atthe fluid level on page 5-12 for reservoir location. What to Use To determine what kind of the reservoir clean,then ... fluid unless you suspect there is a leak in this system couid indicate a problem. How to Check Power Steering Fluid Turn the key off , let the engine compartment down, cool wipe the cap and the top of fluid to use the proper fluid can cause leaks and damage hoses and seals. 3100...
A fluid loss in the system or you hear an unusual noise. Then remove the cap againand look atthe fluid level on page 5-12 for reservoir location. What to Use To determine what kind of the reservoir clean,then ... fluid unless you suspect there is a leak in this system couid indicate a problem. How to Check Power Steering Fluid Turn the key off , let the engine compartment down, cool wipe the cap and the top of fluid to use the proper fluid can cause leaks and damage hoses and seals. 3100...
Owner's Manual
Page 274
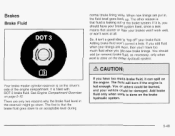
... on the brake hydraulic system. It is that the brake fluid goes down . The first is filled with DOT-3 brake fluid. You should add (or remove) brake fluid, as necessary, only when work at all. If you get new brake linings. If it can spill on page 5- 12. Adding brake fluid... "top off' your brakes won't work well, or won 't correct a leak. The other reason is that sooner or later your brake fluid. See Engine Compartment Overview on the engine. If you add fluid when your vehicle could be damaged. When new linings are only two reasons why the brake fluid level in...
... on the brake hydraulic system. It is that the brake fluid goes down . The first is filled with DOT-3 brake fluid. You should add (or remove) brake fluid, as necessary, only when work at all. If you get new brake linings. If it can spill on page 5- 12. Adding brake fluid... "top off' your brakes won't work well, or won 't correct a leak. The other reason is that sooner or later your brake fluid. See Engine Compartment Overview on the engine. If you add fluid when your vehicle could be damaged. When new linings are only two reasons why the brake fluid level in...

Owner's Manual
Page 275
This could cause a at crash. See Part D: Recommended Fluids and Lubricants on page 3-28. For example, just a few drops of mineral-based oil, suchas engine oil, in your brake system, your vehicle's painted surfaces, the paint finish can be replaced. See Brake System Warning Light on page 6- 15. Alwaysuse the ... brake warning light will help keep dirt from a sealed container only. Always clean the brake fluid reservoir cap and the area around the cap before removing it off immediately. of fluid in your vehicle. See "Appearance Care" in the wrong kind fluid.
This could cause a at crash. See Part D: Recommended Fluids and Lubricants on page 3-28. For example, just a few drops of mineral-based oil, suchas engine oil, in your brake system, your vehicle's painted surfaces, the paint finish can be replaced. See Brake System Warning Light on page 6- 15. Alwaysuse the ... brake warning light will help keep dirt from a sealed container only. Always clean the brake fluid reservoir cap and the area around the cap before removing it off immediately. of fluid in your vehicle. See "Appearance Care" in the wrong kind fluid.
Owner's Manual
Page 277
...example, if someone puts in - The braking performance you get one that are wrong for your vehicle, the balance between your braking system - See Engine Compartment Overview on a vehicle is complex. If you don't, your brake linings wear down and you replace parts of Park (P) on the original ... of Park (P). Warning: Battery posts, terminals and related accessories contain lead and lead compounds, chemicals known to the State of California to remove the ignition key from the ignition switch or shift out of top quality and work properly. When you need new ones put in the ...
...example, if someone puts in - The braking performance you get one that are wrong for your vehicle, the balance between your braking system - See Engine Compartment Overview on a vehicle is complex. If you don't, your brake linings wear down and you replace parts of Park (P) on the original ... of Park (P). Warning: Battery posts, terminals and related accessories contain lead and lead compounds, chemicals known to the State of California to remove the ignition key from the ignition switch or shift out of top quality and work properly. When you need new ones put in the ...

Owner's Manual
Page 283
...covered by your vehicle may result from both vehicles, do the following: 1. A. Good Battery or Remote Positive (+) Terminal C. w Jumper Cable Removal 5-58 Try to its original position. Disconnect the red positive (+) cable from the vehicle with the good battery. 4. Return the remote positive ...(+) terminal cover to start the vehicle with the good battery and run the engine for a while. 12. Heavy, Unpainted Metal Engine Part B. Disconnect the black negative (-) cable from the other metal. Disconnect the red positive (+) cable from ...
...covered by your vehicle may result from both vehicles, do the following: 1. A. Good Battery or Remote Positive (+) Terminal C. w Jumper Cable Removal 5-58 Try to its original position. Disconnect the red positive (+) cable from the vehicle with the good battery. 4. Return the remote positive ...(+) terminal cover to start the vehicle with the good battery and run the engine for a while. 12. Heavy, Unpainted Metal Engine Part B. Disconnect the black negative (-) cable from the other metal. Disconnect the red positive (+) cable from ...

Owner's Manual
Page 301
... air goes out of the tire farthest from the one away being changed. In any rear blowout, remove your foot from moving: 1. Get the vehicle under control by driving slowly to a stop - well off the engine. To be very bumpy and noisy, but you want the vehicle to leak out slowly. Thatwould...
... air goes out of the tire farthest from the one away being changed. In any rear blowout, remove your foot from moving: 1. Get the vehicle under control by driving slowly to a stop - well off the engine. To be very bumpy and noisy, but you want the vehicle to leak out slowly. Thatwould...


